background image

AX2G4A Quick Start Guide

www.atcom.cn

Email: [email protected]

7

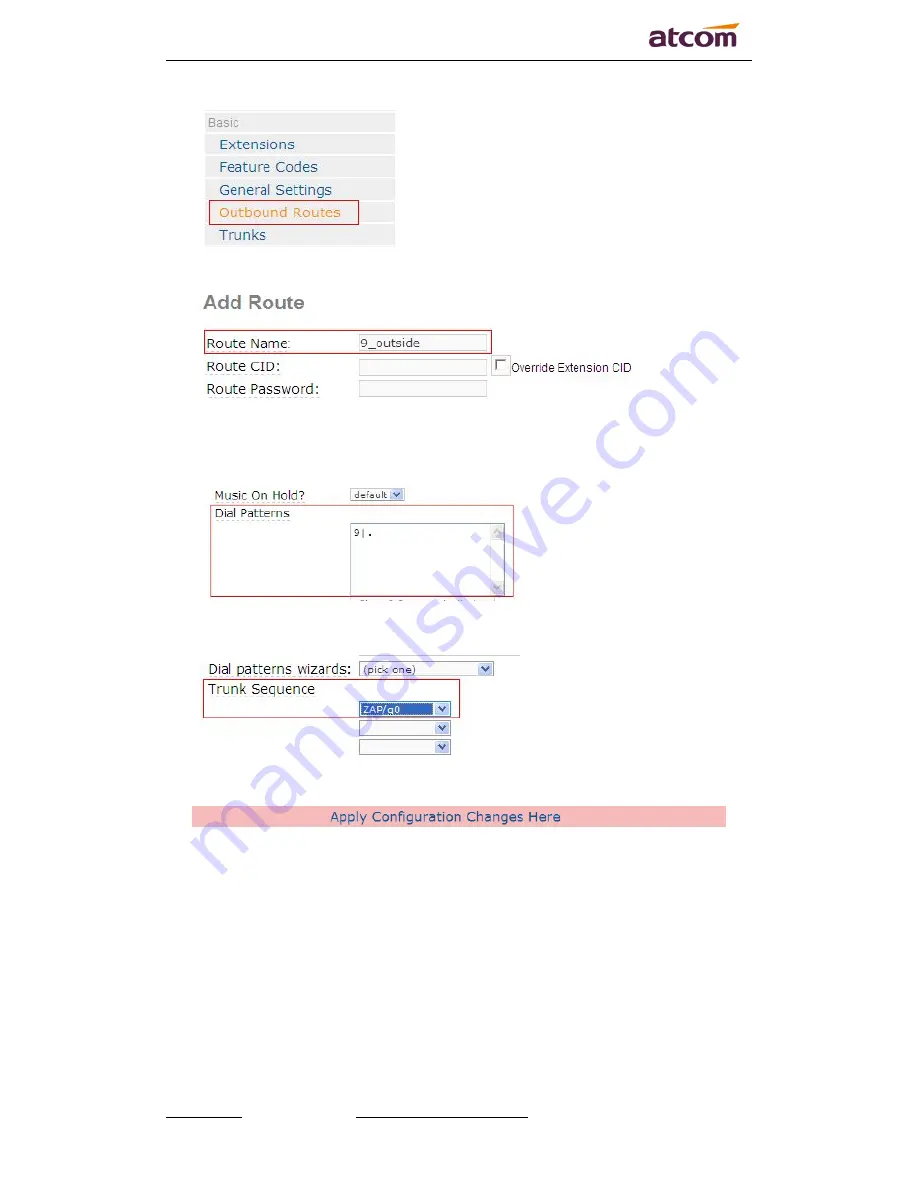
b) Input out_route9 in the textbox of Description as the following screen:

c) In the Dial Patterns , please input 9|. , it will help you get calls before you called number.

Please refer to the following illustration:

d) Choose the Trunk Sequence: ZAP/g0 ,Then click submit. Please refer to the following

illustration:

e) Click the “Apply Configuration Changes Here” bar in the top of the screen.

Содержание AX-2G4A

Страница 1: ...AX2G4A Quick Start Guide with Elastix2 4 0 Version 2 0 2013 06 03...

Страница 2: ...AX2G4A Quick Start Guide www atcom cn Email support atcomemail com Release note Version Changed note Editor Date 1 0 First Release 2 0 Release the Quick start Guide Daniel 2013 06 03...

Страница 3: ...stix2 4 0 1 1 Download the driver 1 2 Install the driver 1 3 Compatibility with the driver 1 2 HOW TO CONFIGURE YOUR PBX 2 2 1 Log into the Elastix webpage 2 2 2 Detect the hardware 2 2 3 Configurate...

Страница 4: ...the competitive IP phone and other terminals for IP PBX softswitch IMS NGN providers and carriers supplying the competitive total VoIP solution for SMB market We keep improving the customer s experien...

Страница 5: ...he script Normally the script will install the driver automatically root localhost src tar zxvf ax2g4a_elastix2 4 0 tar gz root localhost src cd ax2g4a_elastix2 4 0 root localhost elastix_ax2g4a_drive...

Страница 6: ...x2 0 3 configure webpage So the following instruction will be an example to Elastix OS 2 1 Log into the Elastix webpage Please open the browser and input the server IP address And then clink on the su...

Страница 7: ...stly users will get the following illustration 2 3 Configurate your PBX 1 Configure the PBX Click the PBX button to jump into the pbx configuration page 2 Add an SIP Extension Click the Add an extensi...

Страница 8: ...AX2G4A Quick Start Guide www atcom cn Email support atcomemail com 4 Then Click the Apply Configuration Changes Here bar in the top of the screen...

Страница 9: ...Trunk a Choose the Add Zap Trunk DAHDI compatibility button b Set the Trunk Description enter the name what you have set Then choose the Dial Rules Identifier g0 click on submit in the following illus...

Страница 10: ...m9 in the textbox of Description as the following screen c Click the Extensions textbox choose an extension number from the drop down selection box Then click submit Please refer to the following illu...

Страница 11: ...he following screen c In the Dial Patterns please input 9 it will help you get calls before you called number Please refer to the following illustration d Choose the Trunk Sequence ZAP g0 Then click s...

Отзывы: