Page2_UVEP636
_ATT141210877-2_HSI_CSI_GATEWAY_s1
Page3_UVEP636
_ATT141210877-2_HSI_CSI_GATEWAY_s1
E
D
A
C
B
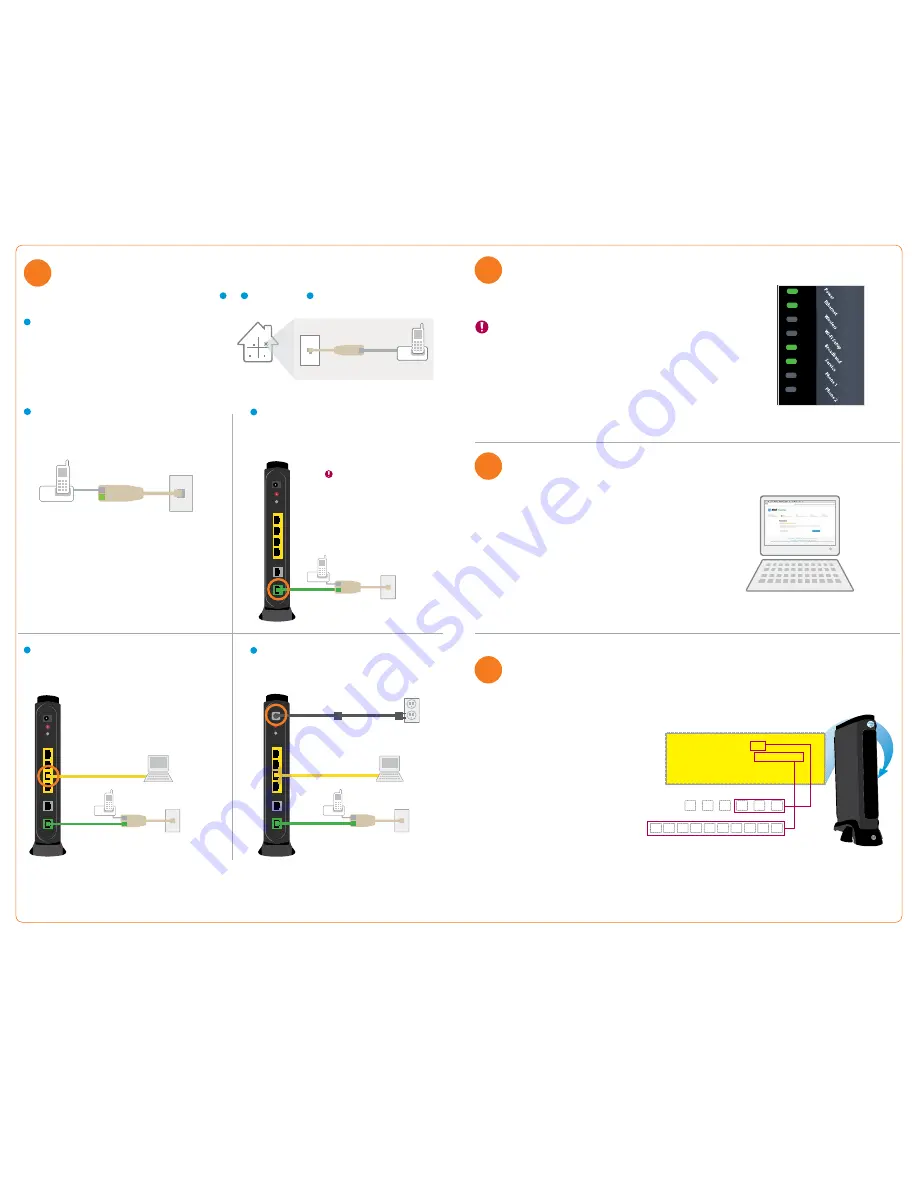
Customers without traditional dial tone phone service can skip Steps
A
and
B
, and start with Step
C
.
If you have traditional dial tone phone service, install single-
port filters in wall jacks that have devices such as phones, fax
machines, satellite receivers, or modems.
Connect the green data cable from the Wi-Fi Gateway’s green DSL
Broadband port to the dual-port filter’s DSL port (or directly to the
wall if you do not have traditional phone service).
Connect the yellow Ethernet cable from the
Wi-Fi Gateway’s Local Ethernet port to your
computer’s Ethernet port
.
The dual-port filter is used when you want to connect a phone
or other piece of equipment, such as a fax machine, to the same
wall jack as your Wi-Fi Gateway.
Remove the sticker covering the Power port. Combine the two-part
power cord, and then connect one end to the Wi-Fi Gateway’s Power
port and the other end to an electrical outlet
.
3600HGV
Service
Broadband
Phone 2
Phone 1
Wireless
Local Ethernet
SN:
For Advanced Configuration: http://192.168.1.254
System Password:
Mac Address:
Wireless Network Key:
Wall jac
k
Single-port filter
Phone device
Installing phone filters
A dual-port filter is only
necessary if you have traditional
phone service and want to share
the wall jack with a phone device;
otherwise, plug the data cable
directly into the wall jack.
Wall jack
Electrical
outlet
Power adapter
Questions?
Visit
att.com/uversesupport
New customer? Visit
att.com/uversewelcome
Green Data cable
Computer Ethernet
port
Wall jack
Dual-port filter
Phone, cordless base station,
or other phone device
(e.g., fax)
Yellow Ethernet cable
You must complete the following registration process to use your
High Speed Internet service.
•
Open your Internet browser (e.g., Internet Explorer, Safari, etc.).
•
The online registration process will start automatically (if it doesn’t, enter
att.net/uverse
into your address bar)
•
Enter your Account Number (if requested) and passcode.
1. Your Account Number is available on your order confirmation email or letter
2. Your Passcode is the four-digit number that you selected when you placed your order
•
Follow the online instructions to complete your registration and activate your Internet service
Upon successful registration your Internet service will be activated and you will see the
following:
Congratulations! Thank you for completing this process!
Stay connected on the go!
AT&T Wi-Fi Basic is included with your AT&T U-verse High
Speed Internet service, so you can access the Internet at
thousands of AT&T
Wi-Fi Hot Spots
across the country.
Visit
attwifi.com
to learn more.
Write down your Wi-Fi Network Name (SSID) and Wi-Fi Password (Wireless Network Key) to configure a Wi-Fi
device. This information is on the side of your Wi-Fi Gateway. The Network Name consists of “ATT” plus the last
three digits of the Wi-Fi Gateway’s serial number. Be sure to record this information in the form below.
Now configure your Wi-Fi network:
•
Go to your computer’s “Wireless Network Settings” and
refresh the network list.
•
Select your Wi-Fi Network Name (SSID) from the list. You
may need to scroll through the list to find your Wi-Fi
Network Name.
•
Enter the 10-digit Wi-Fi Password in the Password field to
connect to your network.
Congratulations! You should now be wirelessly connected to the Internet.
SSID: ATTXXX
Wireless Network Key: XXXXXXXXXX
For help: att.com/support
Wi-Fi Network Name (SSID)
10-digit Wi-Fi Password
A
T
T
3600HGV
Service
Broadband
Phone 2
Phone 1
Wireless
Local Ethernet
SN:
For Advanced Configuration: http://192.168.1.254
System Password:
Mac Address:
Wireless Network Key:
http://www.att.net/uverse
Your Wi-Fi Gateway is now powering up. During this time, the Broadband light will turn red.
Wait up to fifteen minutes for the indicator lights for Broadband and Service to turn
solid green and the Local Ethernet indicator light to start blinking green.
During this time (up to 15 minutes), do not unplug the power cord
or the green data cable, as this can permanently damage the Wi-Fi
Gateway AND significantly delay your Service Activation.
If the Broadband and Service lights do not turn solid green or continue to blink after
15 minutes, see the “Having trouble?” section on the back of this guide.
Wi-Fi Gateway indicator lights
Power up
Approximate time: 15 minutes
2
Set up
Approximate time: 10 minutes
1
Go Wi-fi
(optional) Approximate time: 10 minutes
4
registration
Approximate time: 5 minutes
3


