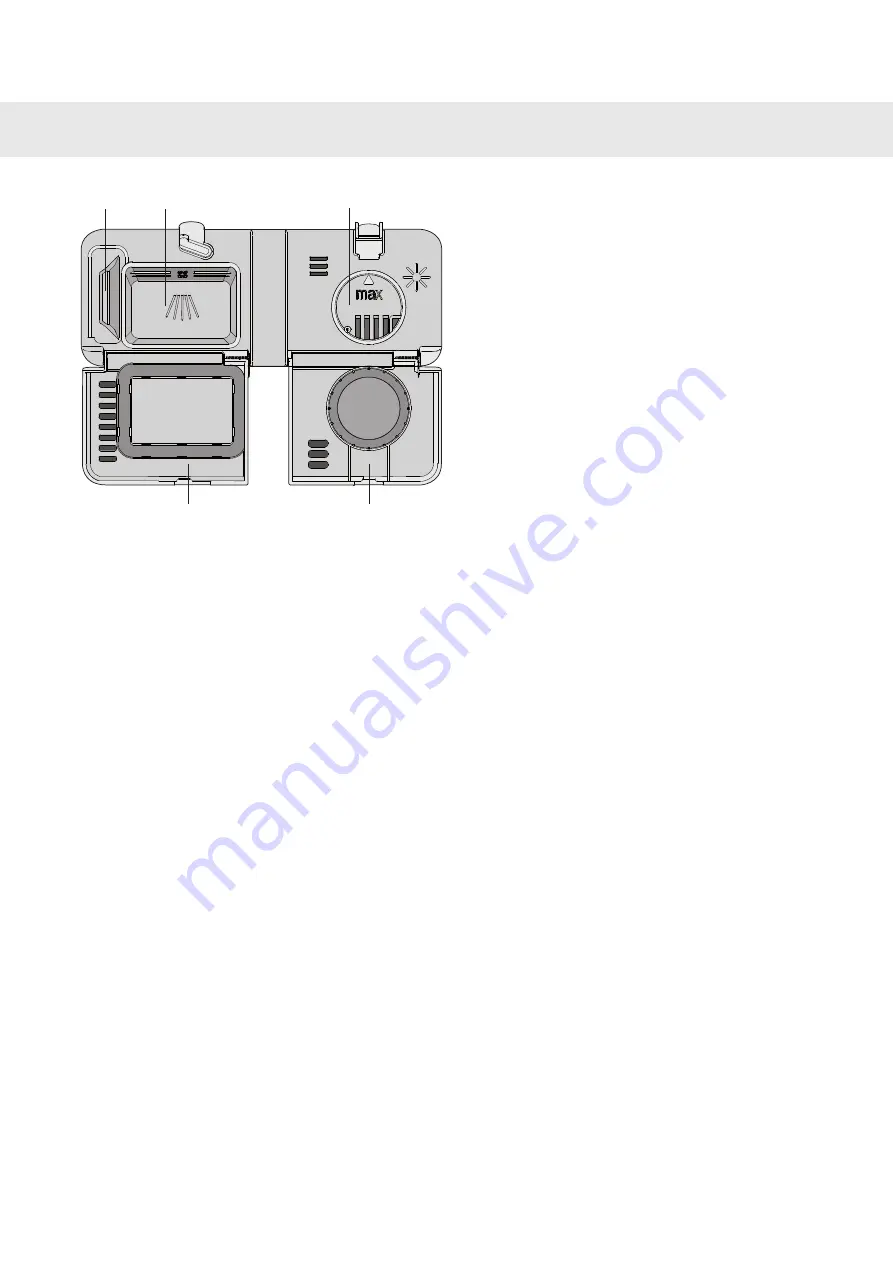
1. Prewash detergent compartment2. Main wash detergent compartment3. Rinse aid compartment4. Detergent compartment lid5. Rinse aid compartment lid
1
2
4
5
3
11
Dispenser
Страница 1: ...hine The machine has many features To make the most of its functions we recommend that you read the operating instructions before using the machine The operating instructions include information on ho...
Страница 2: ...Fragile dishes 14 Dishwashing 14 Load the baskets correctly 15 Add detergent 15 Select the programme 18 Select options 19 After dishwashing 20 Settings 23 Time remaining 24 Status light 25 Care and cl...
Страница 3: ...you value Checking water hardness Contact the local waterworks to check the water hardness in your area This is important when adjusting the water softener see the section Settings Before you begin wa...
Страница 4: ...dishwasher due to the risk of explosion Nor may dishes that contain ash wax or lubricants be washed in the dishwasher Installation See the section Installation Winter storage Transport Store the dishw...
Страница 5: ...door is open WARNING Children must be supervised dishwasher detergent is corrosive Store detergent and rinse aid out of the reach of children If anyone swallows dishwasher detergent they should immed...
Страница 6: ...sket 1 Serial number plate 8 Middle basket 2 Salt compartment 9 Filters 3 Lower basket 10 Cutlery basket 4 Rinse aid compartment 11 Detergent compartment 5 Panel 12 Upper basket 6 Specifications may d...
Страница 7: ...ls basket for ladles whisks food turners serving cutlery and similar items 3 Spray pipes 4 Handle The wire basket can be replaced with another utensils basket The two baskets in the middle basket can...
Страница 8: ...pport 2 Forward mount for plate support used for plates with a diameter greater than 25 cm 3 Handle Knife basket 2 1 1 Basket 2 Knife support Cutlery basket a c b Specifications may differ depending o...
Страница 9: ...of cutlery basket lid in upper basket The cutlery basket lid can be removed and used for example as an extra cutlery basket in the upper basket see below a b c Specifications may differ depending on...
Страница 10: ...OTE The touch buttons only react to use when the door is open Wait a moment before pressing the touch buttons after opening the door Two minutes after the last button press the panel backlight enters...
Страница 11: ...1 Prewash detergent compartment 2 Main wash detergent compartment 3 Rinse aid compartment 4 Detergent compartment lid 5 Rinse aid compartment lid 1 2 4 5 3 11 Dispenser...
Страница 12: ...g Select a programme with Short dry To save energy use Short dry The drying result will be better if once the programme is finished you leave the door slightly open Do not rinse under running water Si...
Страница 13: ...d in a dishwasher at high temperatures can gradually develop a grey film that cannot be removed Wash fragile glasses at a low temperature and with a small amount of detergent Silver Silver and stainle...
Страница 14: ...es and bowls The middle basket s utensils basket has space for ladles whisks serving cutlery and similar items Do not place bowls or cups in the utensils basket The two baskets in the middle basket ca...
Страница 15: ...hwasher from operating effectively Dishwasher tablets Halve the tablet if it is difficult to close the dispenser lid There is a risk that the detergent will not be released properly if the lid is tigh...
Страница 16: ...if you want to be especially cautious See also the section Fragile dishes Eco wash Use when you want to save energy For normally dirty dishes Upper half You can use this programme if you only have cu...
Страница 17: ...l wash 13 0 8 1 30 1 2 1 40 65 2 60 1 Daily wash 9 0 1 0 20 0 2 0 20 2 30 0 Quick wash 9 0 1 0 15 0 2 0 15 2 30 0 Super quick wash 14 0 2 1 25 0 9 1 40 50 2 40 1 Delicate wash 12 0 6 2 20 1 0 2 40 55...
Страница 18: ...ayed start When you select Delayed start the dishwasher will start 1 24 hours after you press the Start Stop button 1 Press the button once to activate Delayed start Press the button several times or...
Страница 19: ...e is interrupted if the power is cut or the door is open for more than 2 minutes 8After dishwashing Once the programme has finished End appears on the display A buzzer also sounds at the end of the pr...
Страница 20: ...g values You can now adjust the following settings Description Settings Options Button press You can activate the child lock button lock option to prevent children from starting the dishwasher Press t...
Страница 21: ...utomat ically adapts to provide the best possible dishwashing and drying results every time If you deactivate this option the dishwasher will return to ordinary function for all programmes If this set...
Страница 22: ...check the water hardness in your area Water hardness is spe cified using the following scales The German water hardness scale dH and the French water hardness scale fH 0 low water hardness dH 0 5 6 8...
Страница 23: ...the amount of dishes the ambient temperature and other factors While the programme is running the time counts down and the remaining programme time is shown on the display The remaining time is shown...
Страница 24: ...ansparent plastic strip Status light Blue Load more The programme has started but you can still load more dishes Red Do not load You should not load more dishes risk of poorer dishwashing result Flash...
Страница 25: ...ber to replace it Fine filter Debris that collects on the fine filter is automatically rinsed away during each wash However the fine filter and its pipe section should be cleaned a couple of times a y...
Страница 26: ...is heard the overflow protection has been activated Shut off the water Remove the plug from the wall socket Call the service division NOTE Do not forget to reinstall the fitted piece Lower spray arm...
Страница 27: ...the like Door When cleaning the edge around the door use only a slightly damp cloth with a little cleaner if necessary WARNING Do not use a spray bottle or the like around the door lock This is to ens...
Страница 28: ...the compartment 4 Close the lid firmly NOTE After topping up it may take a while before the symbol goes out Select dosage The rinse aid dispenser can be adjusted between 0 off and 6 Increase the rins...
Страница 29: ...nt top up hole First pour in about 1 l of water 3 Then add salt a maximum of 1 5 kg until the compartment is full 4 Wipe up any excess salt so that the lid can be screwed on firmly 5 Run the Normal wa...
Страница 30: ...ter Troubleshooting Water outlet fault Check that the water tap is on Water inlet fault Turn off the water tap and call the service divi sion Inlet valve leakage Turn off the machine with the main pow...
Страница 31: ...ion Salt Salt compartment empty Wash crystal at a low temperature and with a conservative amount of detergent Contact the detergent manufacturer Too high temperature and or too much detergent can caus...
Страница 32: ...sen the drainage hose where it con nects to the sink unit s water trap Check that no debris has fastened Is the cone shaped part of the pipe cut to an inner diameter of at least 14 mm Blocked drainage...
Страница 33: ...re not blocking the baskets from sliding properly into place Wait a moment then try again You have pressed the touch buttons too soon after opening the door The touch buttons do not react when pressed...
Страница 34: ...3 Test method for noise measurement Dosages during testing In accordance with EN 50242 Detergent 7 5 gram Prewash 25 gram Main wash In accordance with EN 50242 Rinse aid 5 Rinse aid dosage Loading the...
Страница 35: ...Soupspoons 4 Forks 5 Knives 6 Serving cutlery fork 7 Serving cutlery gravy ladle 8 Serving cutlery spoons 6 7 3 4 8 2 2 5 5 1 1 1 1 1 1 1 1 1 1 1 1 5 5 5 1 2 2 2 2 2 2 2 2 2 2 5 5 5 5 5 5 5 5 2 35 In...
Страница 36: ...ance with standard EN 50242 2 Based on 280 standard cleaning cycles with a cold water connection and consumption in accordance with energy saving mode The actual energy consumption depends on how the...
Страница 37: ...ion during installation Use protective gloves Always have someone assist you Place a watertight protective tray on the floor under the dishwasher to prevent damage from any water leaks Before screwing...
Страница 38: ...e hose has no kinks Connection to water supply Use only the supply hose provided with the dishwasher Do not re use old hoses or other spare supply hoses The supply pipe must be fitted with a stopcock...
Страница 39: ...bleshooting before contacting the service division Make a note of the information on the serial number plate on the right inside the dishwasher Note the type number 1 and the serial number 2 SERIAL NO...
Страница 40: ...er 2Add detergent The detergent compartment has one smaller compartment for the prewash and one for the main wash 3Check that the spray arms can rotate freely 4Press the main power switch until the di...