Atag OX6211E Скачать руководство пользователя страница 59

ATAG 

59

Oven shelves and telescopic runners

Before proceeding ensure the oven is
cool and disconnected from the electric-
ity supply.

The shelf supports can be removed for easy cleaning.

Proceed as follows:

1. remove the front screw while keeping the shelf

support in position with the other hand (see
picture).

2. Disengage the rear hook and take off the shelf

support. Do the same thing on the other side of
the oven (see picture).

Cleaning

Clean the set of shelf supports with telescopic rails
on the outside only with commercially available
detergents.

 Rinse well and dry with a soft cloth.

The telescopic rails must not be cleaned
in the dishwasher.

When cleaning the shelf supports, take care
not to remove the lubricating grease behind
the telescopic runners. This is meant to ensure
their good operation.

3. Once the cleaning is carried out, refit the shelf

supports following the procedure in reverse.

Please, ensure the retaining nuts are secure when
refitting the shelf support.

)

If necessary, it is possible to reverse the
oven door. This operation should be carried
out by 

authorized personnel ONLY

.

Please find the separate instruction.
Customers are recommended not to carry
out this operation themselves. Complaints
as a result of changing the appliance are

excluded from the guarantee

.

ATAG supplies a range of cleaning agents
under the name of ATAG Shine.
You may order these on 

www.hps.nl

. This

site also contains several tips on cleaning
and operating the appliance.

Содержание OX6211E

Страница 1: ...Bedienungsanleitung Elektro Backofen instructions for use electric oven OX6211E OX6292E C 50 75 100 125 150 175 200 225 250 SELECT 120 105 90 75 0 15 30 45 60...

Страница 2: ...ackofenfunktionen Einstellknopf Betriebsanzeige Rost Kuchenblech Auffangblech Ofenzubeh r Ger tebeschreibung Backofeninnenraum 1 bis 4 Einschubebenen Einschubebenen Nr 2 und 4 sind ausgestattet mit Te...

Страница 3: ...Gartabellen 21 Reinigung und Pflege 23 Wenn etwas falsch l uft 30 Technische Daten 31 Anweisungen f r den Installateur 32 Einbau Anweisungen 34 Service und Ersatzteile 35 Sicherheitsanweisung Schritt...

Страница 4: ...ifikatio nen an der Stromversorgung haben durch einen Fachmann zu erfolgen Bedienen Dieser Backofen ist zur Zubereitung von Speisen gedacht gebrauchen Sie ihn niemals zu Anderem Bitte achten Sie beim...

Страница 5: ...t den vorzeitigen Verschlei des Oberfl chenmaterials Schalten Sie vor der Reinigung des Backofens entweder den Strom ab oder ziehen Sie den Netzstecker Stellen Sie sicher dass der Backofen auf die Pos...

Страница 6: ...icherheits und Um weltschutzvorschriften Machen Sie ein Altger t vor der Ent sorgung durch Abtrennen des Netz kabels unbrauchbar Entfernen Sie jegliche T rverschl sse um zu verhin dern dass sich klein...

Страница 7: ...erwertung elektrischer und elektronischer Ger te abgegeben werden Durch Ihren Beitrag zum korrekten Entsorgen dieses Produkts sch tzen Sie die Umwelt und die Ge sundheit Ihrer Mitmenschen Umwelt und G...

Страница 8: ...l Drehspie Der Drehspie kann zum Grillen von Grillfleisch oder Kebabs und kleinere Fleischst cke verwendet werden Gro fl chengrill Das gesamte Grillele ment schaltet sich ein Empfohlen f r gro e Men g...

Страница 9: ...Diese Funktion erm glicht das automatische Abschalten des Ofens nach Ablauf der voreingestellten Garzeit Nach Ablauf der Garzeit ert nt ein akustisches Signal Die Garzeit kann auf max 120 Minuten ein...

Страница 10: ...r die Bedienungsblende die Einstellkn pfe und den Griff der Ofent r k hlt Der Ventilator schaltet sich automatisch ein wenn der Ofen einige Minuten in Betrieb ist Die warme Luft wird durch die ffnung...

Страница 11: ...ssern Sie sich vor Benutzung des Backofens dass der Drehknopf der automatischen Ofenabschaltung in manueller Position eingeschaltet ist 1 Drehen Sie den Backofenregler auf Multi Hei luft 2 Drehen Sie...

Страница 12: ...Erhitzen von Speisen entsteht wie bei einem Wasserkessel Dampf Wenn der Dampf mit dem Backofen T rglas in Ber hrung kommt kondensiert er und es entstehen Wassertr pfchen Um Kondensation zu verringern...

Страница 13: ...sgem einzuschieben Die Einschubebenen 2 und 4 sind mit Teleskopauszugsschienen ausgestattet Dies vereinfacht das Einsetzen bzw Herausziehen von Ofenrosten 1 Ziehen Sie die rechten und linken Teleko pa...

Страница 14: ...i wird und das Geschirr besch digen kann In dieser Einstellung wird die W rme vom oberen und unteren Heizelement erzeugt Damit k nnen Sie Speisen auf einer einzigen Ebene garen Dies eignet sich besond...

Страница 15: ...inseln Sie mageres Fleisch und Fisch mit etwas l oder geschmolzener Butter ein damit das Grillgut beim Garen nicht austrocknet Mitgegrillte Beilagen wie z B Tomaten oder Pilze k nnen beim Grillen von...

Страница 16: ...r Sie Steaks grillen bzw Brot toasten Stellen Sie die Temperatur und die Ein schubebene des Grillblechs rosts w hrend des Garens entsprechend ein Grill Drehspie Verwenden Sie den Drehspie wie folgt 1...

Страница 17: ...r Funktion eine H chsttemperatur von 200 C Benutzung der Multi Hei luft Die Speisen werden mit Hei luft gegart die mit einem Gebl se auf der Ofenr ckwand gleich m ig im Backofen Innenraum verteilt wir...

Страница 18: ...en empfindlicher Lebensmittel die durch Erw r men Schaden nehmen k nnten zum Beispiel Kuchen mit Cremef llung Eistorten Geb ck Brot und Backwaren aus Hefeteig Praktische Tipps Die optimalste W rmevert...

Страница 19: ...Fl s sigkeit unn tig verl ngert werden Werden zwei Backbleche mit Geb ck gleichzeitig in den Backofen eingeschoben muss zwischen den Blechen eine Einschiebeleiste freigelassen werden Werden zwei Backb...

Страница 20: ...ben Die Teller k nnen bis zum Servieren im Backofen bei Mindesttemperatur warmgehalten werden Achtung Den Backofen nicht mit Alufolie ausle gen und kein Kochgeschirr keine Fett pfanne oder Backblech a...

Страница 21: ...0 25 35 Backform Cannelloni 2 200 2 200 25 35 Backform FLEISCH Rind 2 190 2 175 50 70 Rost Schwein 2 180 2 175 100 130 Rost Kalb 2 190 2 175 90 120 Rost Roastbeef rosa rot 2 210 2 200 50 60 Rost rosa...

Страница 22: ...2 250 20 30 Vorheizen 5 00 Fischfilet 4 400 3 250 12 14 10 12 Belegte Toastbrote 4 6 3 250 5 7 Wei brotscheiben 4 6 3 250 2 4 2 3 Ebene GERICHT Menge Ebene Temp C Garzeit in Minuten gr unten oben Sei...

Страница 23: ...n Durchf hrung nur bei abgek hltem Backofen Die emaillierten Teile mit Seifenlauge reinigen Keine Scheuermittel verwenden Edelstahlteile und Glasscheiben mit einem weichen Tuch trockenreiben Bei hartn...

Страница 24: ...r auf keinen Fall Haushaltsreinigungsmittel und Bleichlauge impr gnierte Reinigungsschw mme die f r Kocht pfe mit Antihaftbeschichtung ungeeig net sind Metallschw mmchen Chemische Ofenreiniger oder Sp...

Страница 25: ...jeweils andere Seite bertragen werden Bauen Sie die beiden inneren T rscheiben aus bevor Sie mit der Reinigung beginnen Bitte die folgende Anweisung beachten Abb 1 Halten Sie mit beiden H nden das Loc...

Страница 26: ...ar sein wenn man mit den Fingern ber die sichtbare Fl che streicht Die Innenscheibe B mit seitlichem Dekor muss mit der dekorierten Oberfl che zum Backraum gerichtet werden Die leichte Rauheit der Ser...

Страница 27: ...ntiekarte oder im Internet unter www hps nl Bei Bedarf kann die Backofent r umgekehrt eingebaut werden Dieser Vorgang darf NUR von autorisiertem Fachpersonal durchgef hrt werden Die Anleitung ist dem...

Страница 28: ...ung Reinigung Reinigen Sie die Ofenrostauflagen mit Teleskop auszugsschienen von au en nur mit einem han dels blichen Reinigungsmittel Gut nachwischen und mit einem weichen Toch trocken wischen DieTel...

Страница 29: ...eit von 300 C Anschlussart E14 Ersatzlampen k nnen Sie bei Ihrem Fachh ndler beziehen Auswechseln einer schadhaften Backofen Gl hlampe 1 Vergewissern Sie sich dass der Herd abgek hlt ist 2 Dr cken Sie...

Страница 30: ...Sie mit dem Ofenfunktionsschalter eine Garfunktion ein W hlen Sie eine Funktion mit dem Ofenfunktionsschalter oder berpr fen Sie die Lampe und wechseln Sie sie gegebenenfalls aus siehe Abschnitt Auswe...

Страница 31: ...ill 2450 W Infrabraten 2475 W Multi Hei luftf 2000 W Backofen Lampe 25 W Backofen Ventilator 25 W K hlgebl se 25 W Drehspie motor 4 W Gesamtanschlusswert 2525 W Betriebsspannung 50 Hz 230 V Einbaunisc...

Страница 32: ...tsprechenden Erdanschluss ausgestat tet sein Die Steckdose oder der mehrpolige Ausschalter m ssen auch nach erfolgter Installation des Ger tes einfach zu erreichen sein Das Ger t wird mit einem Standa...

Страница 33: ...RR F H05 VV F H05 V2V2 F T90 H05 BB F Das Anschlusskabel muss jedenfalls so ausgelegt sein dass es an keiner Stelle 50 C ber der Raum temperatur erreicht Nach erfolgtem Anschluss sind die Heizelemente...

Страница 34: ...urch den Einbau sichergestellt sein Das Ger t kann mit seiner R ckseite bzw mit ei ner Seitenwand an h here K chenm bel Ger te bzw W nde gestellt werden An die andere Seiten wand d rfen jedoch nur and...

Страница 35: ...Angaben Art der St rung Ger temodell Mod Produktnummer Prod Nr und Seriennummer Ser Nr die aus dem Typenschild ersichtlich sind Das Schild ist auf dem vorderen Au enrand der Backr hre an gebracht Vom...

Страница 36: ...knob Oven function control knob Mains on indicator Shelf Cake tray Dripping pan Oven accessories Description of the appliance Oven interior 1 to 4 Shelf levels shelf levels nr 2 and 4 are fitted with...

Страница 37: ...g tables 53 Cleaning and Maintenance 55 If something is wrong 61 Technical data 62 Instructions for the Installer 63 Instructions for building in 65 Service and spare parts 66 Safety instructions Step...

Страница 38: ...ectrician Operation This oven is designed for cooking foodstuffs never use it for other pur poses When opening the oven door dur ingorattheendofcookingbecare ful of the stream of hot air which comes o...

Страница 39: ...jet cleaner Do not use abrasive cleaners or sharp metal scrapers These can scratch the glass in the oven door which may re sult in the shattering of the glass People safety This appliance is intended...

Страница 40: ...o repair the appli ance yourself in the event of malfunc tions or damage Repairs carried out by untrained persons may cause damage or injury The symbol on the product or its packaging indicates that t...

Страница 41: ...n be used for either spit roasting meat or for kebabs and smaller pieces of meat Max grill The full grill element will be on Recommended for large quantities Fanned grill This function offers an alter...

Страница 42: ...rature is being maintained Endofcookingprogrammer This device allows you to make the oven switch off automatically once the preset time is over An acousitic signal will be heard when the cooking is co...

Страница 43: ...ive component please contact Customer Service The cooling fan The oven is provided with a cooling fan meant to keep the front panel the knobs and the oven door handle cool The fan switches on automati...

Страница 44: ...the oven make sure the end of cooking programmer control knob is in position 1 Switch the oven function control knob to turbo fan cooking 2 Set the thermostat control knob to 250 C 3 Open a window fo...

Страница 45: ...which has been inserted in the shelf runners When food is heated steam is created like in a kettle When the steam comes into contact with the glass in the oven door it condenses and creates water dro...

Страница 46: ...oven has four shelf levels The shelf positions are counted from the bottom of the oven as shown in the diagram It is important that these shelves are correctly positioned as shown in the picture Shelf...

Страница 47: ...ob on the desired temperature The heat comes from the top of the oven only to allow you to finish your dishes e g lasagne shepherds pie cauliflower cheese etc Bottom heat 1 Turn the oven function cont...

Страница 48: ...ature 3 Adjust the grid and grill pan runner position to allow for different thicknesses of food and follow the instructions for grilling The grill element is controlled by the thermostat During cooki...

Страница 49: ...control knob on and the thermostat control knob to the desired temperature The forks and the spit of the turnspit are pointed and sharp When using manipulate them with caution to avoid any injury It i...

Страница 50: ...ishes at the same time and up to three tins of biscuits and mini pizzas to be eaten immediately or subsequently deep frozen Naturally the oven can also be used for cooking on just one shelf In this ca...

Страница 51: ...it becomes very hot and damage will occur On baking Cakes and pastries usually require a medium temperature 150 C 200 C and therefore it is necessary to preheat the oven for about 10 minutes Do not op...

Страница 52: ...the oven shelf insert the roasting pan in the shelf level below to catch the juices Leave the joint to stand for at least 15 min utes so that the meat juices do not run out To reduce the build up of...

Страница 53: ...n mould Lasagne 2 200 2 200 25 35 In mould Cannelloni 2 200 2 200 25 35 In mould MEAT Beef 2 190 2 175 50 70 On grid Pork 2 180 2 175 100 130 On grid Veal 2 190 2 175 90 120 On grid English roast beef...

Страница 54: ...400 3 250 12 15 12 14 Hamburger 6 600 2 250 20 30 Preheat 5 00 Fish fillets 4 400 3 250 12 14 10 12 Sandwiches 4 6 3 250 5 7 Toast 4 6 3 250 2 4 2 3 Level TYPE OF DISH Quantity Level Temp C Cooking t...

Страница 55: ...Only perform when the oven has cooled down Clean the enamelled parts with soapy water Do not use abrasive cleaners Dry the stainless steel parts and glass with a soft cloth If there are stubborn stai...

Страница 56: ...panels avoid the use of the following Household detergent and bleaches Impregnated pads unsuitable for non stick saucepans Steel wool pads Chemical oven pads or aerosols Rust removers Bath Sink stain...

Страница 57: ...f right left must also be transferred to the other side We recommend you remove both inner door panes before cleaning Please follow the instructions below Fig 1 With both hands hold the perforated pla...

Страница 58: ...es has to face the oven door in a way that when touching the surface on sight the light roughness of the silk screen printing is not perceptible After reinserting the inner panes Fig 4 insert the perf...

Страница 59: ...hwasher When cleaning the shelf supports take care not to remove the lubricating grease behind thetelescopicrunners Thisismeanttoensure their good operation 3 Once the cleaning is carried out refit th...

Страница 60: ...230 V 50 Hz Resistant to temperatures of 300 C Connection type E14 These bulbs are available from your local Service Force Centre To replace the faulty bulb 1 Ensure the oven is isolated from the elec...

Страница 61: ...or Select a function with the oven function control knob Select a function with the oven function control knob or Check the light bulb and replace it if necessary see paragraph Replacing the oven ligh...

Страница 62: ...1650 W Max grill 2450 W Fanned grill 2475 W Turbo Fan cooking 2000 W Oven light 25 W Oven fan 25 W Cooling fan 25 W Turnspit motor 4 W Total rating 2525 W Operating voltage 50 Hz 230 V Dimensions of t...

Страница 63: ...in force The socket or the multi pole off switch must be easy to access after the appliance has been installed The appliance is supplied with a connection cable incorporating a standard plug suitable...

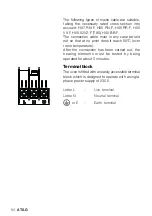
Страница 64: ...e be laid out so that at no point does it reach 50 C over room temperature After the connection has been carried out the heating elements must be tested by being operated for about 3 minutes Terminal...

Страница 65: ...ding in of the appliance The appliance can be placed with its back or a side wall against higher kitchen units appliances or walls However only other appliances or units of the same height as the appl...

Страница 66: ...Centre specifying the type of malfunctioning the appliance model Mod the product number Prod No and the serial number Ser No marked on the identification plate This plate is placed on the front extern...

Страница 67: ...gba 88022338 05 08 R A Adressen und Telefonnummern der Kundendienstorganisation finden Sie auf der Garantiekarte You will find the addresses and phone numbers of the service organisation on the guara...

Отзывы: