background image

GB 9

600

500

70

550

min.690- 
max.1040

275

300

doorsnede
koker

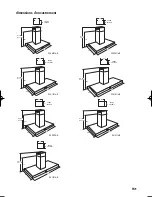
appliance dimensions

WS6011QR

900

500

70

550

min.690 - 
max.1040

275

300

doorsnede
koker

WS9011QR

1200

500

70

550

min.690 - 
max.1040

275

300

doorsnede
koker

WS1211QR

1200

500

70

550

min.690 - 
max.1140

275

300

doorsnede
koker

WS1511QR

900

600

70

550

min.690- 
max.1140

302

302

doorsnede
koker

ES9011QR

1200

600

70

550

min.690- 
max.1140

302

302

doorsnede
koker

ES1211QR

1500

600

70

550

min.690- 
max.1140

302

302

doorsnede
koker

ES1511QR

cross-cut

chimney

cross-cut

chimney

cross-cut

chimney

cross-cut

chimney

cross-cut

chimney

cross-cut

chimney

cross-cut

chimney

88020554_HL_Centrallogic_GB.qxp  21-12-2006  09:28  Pagina GB 9

Содержание ES1211QR

Страница 1: ...fzuigkap instructions for use installation guide extractor hood mode d emploi instructions d installation hotte aspirante Bedienungsanleitung Installationsanweisung Dunstabzugshaube ES9011QR ES1211QR ES1511QR WS6011QR WS9011QR WS1211QR WS1511QR ...

Страница 2: ...BE NL IE FR CH CH AT LU LU GB BE DE BE nederlands blz NL 1 NL 13 english page GB 1 GB 13 français page FR 1 FR 13 Deutsch Seite DE 1 DE 13 ...

Страница 3: ...et recirculatie De vettige en vochtige kooklucht wordt gereinigd door de metalen vetfilters de geurtjes worden door het uitwasbare koolstoffilter geëlimineerd Een deel van de lucht wordt naar buiten afgevoerd via het mechanische ventilatiekanaal het resterende deel wordt als schone lucht in de keuken teruggeblazen Door dit systeem wordt de afzuigcapaciteit indien nodig verhoogd naar ruim 500 m3 pe...

Страница 4: ...el mee doen inhoud algemeen 1 2 inleiding 1 voor uw veiligheid 2 bediening 3 verlichting 3 ventilator 3 storingen 4 hoe blijft het toestel mooi 5 6 algemeen 5 buitenzijde 5 metalen vetfilters 5 koolstoffilter 6 vetfilters verwijderen plaatsen 6 koolstoffilter verwijderen 6 installatie 7 8 opmerkingen vooraf 7 elektrische aansluiting 7 afvoer 8 instellen Volume regelklep 8 toestelmaten 9 montage 10...

Страница 5: ...regelmatig zoals aangegeven in hoe blijft het toestel mooi Hiermee voorkomt u dat er een brandgevaarlijke situatie ontstaat en zorgt u ervoor dat de afzuigkap optimaal blijft functioneren Mocht er onverhoopt een reparatie aan het toestel nodig zijn maak dan het toestel spanningsloos voordat met de reparatie wordt gestart Bij voorkeur door de stekker uit het stopcontact te halen of door de schakela...

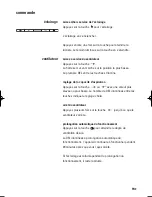
Страница 6: ...citeit regelen Druk op toets of voor een hogere of lagere waarde Het aantal brandende ledjes tussen de toetsen geeft de ingestelde stand aan ventilator uitschakelen Druk herhaaldelijk op toets totdat de ventilator uitschakelt automatisch nadraaien Kies de gewenste ventilatorstand en druk op toets De led indicatie knippert om aan te geven dat de nadraaistand gekozen is Na 20 minuten schakelt de afz...

Страница 7: ...andt niet Afzuigkap maakt lawaai Geen of onvoldoende afzuiging storingen Wanneer het toestel niet goed werkt betekent dit niet altijd dat het defect is Probeer het euvel eerst zelf volgens onderstaande tabel te verhelpen Wanneer onderstaande adviezen niet helpen kunt u de website www hps nl raadplegen Mocht u ook daar geen oplossing kunnen vinden bel dan de servicedienst Wanneer het aansluitsnoer ...

Страница 8: ...site www hps nl Hier vindt u ook diverse schoonmaak en gebruikerstips Gebruik nooit schurende schoonmaakmiddelen schuursponsjes pannensponsjes of polijstende schoonmaakmiddelen zoals vloeibare schuurmiddelen Gebruik nooit agressieve reinigingsmiddelen Deze kunnen verkleuringen veroorzaken op roestvaststaal De metalen vetfilters moeten minimaal 1 x per maand gereinigd te worden U kunt de vetfilters...

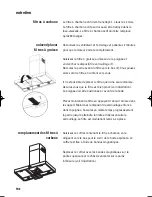
Страница 9: ...ar op één manier geplaatst worden Let op de juiste positie van het filter zie illustratie De handgreep moet aan de voorkant van de kap zitten Plaats het filter terug door eerst de achterkant in de kap te drukken Houd de vergrendeling in de handgreep ingedrukt en kantel gelijktijdig de voorzijde naar boven totdat deze niet verder gaat en laat dan de vergrendeling los Het filter zit nu weer op zijn ...

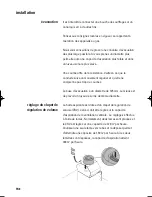
Страница 10: ...e werking is het belangrijk dat de afzuigkap voldoende verse lucht krijgt toegevoerd Daarom is in de ruimte waarin de afzuigkap gebruikt wordt een goede luchttoevoer noodzakelijk Na montage van de afzuigkap moet de stekker bereikbaar zijn of moet de afzuigkap door middel van een separate schakelaar spanningsloos te maken te zijn Wanneer het aansluitsnoer beschadigd is moet het vervangen worden doo...

Страница 11: ...ten heeft Trek de flexibele buis zover mogelijk uit De afvoerstomp heeft een diameter van 125 mm Het beste is de afvoerpijp ook met deze diameter uit te voeren De afzuigkap is voorzien van een Volume regelklep VRK Deze moet ingesteld worden op de afzuigcapaciteit van de centrale ventilatie Het instellen gebeurt met behulp van lamellen Standaard zijn beide lamellen geplaatst en is de VRK afgesteld ...

Страница 12: ...r WS9011QR 1200 500 70 550 min 690 max 1040 275 300 doorsnede koker WS1211QR 1200 500 70 550 min 690 max 1140 275 300 doorsnede koker WS1511QR 900 600 70 550 min 690 max 1140 302 302 doorsnede koker ES9011QR 1200 600 70 550 min 690 max 1140 302 302 doorsnede koker ES1211QR 1500 600 70 550 min 690 max 1140 302 302 doorsnede koker ES1511QR ...

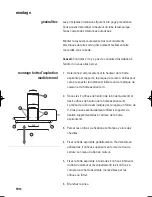
Страница 13: ...igingsgaten voor de muurbeugel 2 en de 4 bevestigingsgaten voor de afzuigkap 3 af De V markering geeft het midden van de beugel aan Eventueel kunt u gebruik maken van 2 extra bevestigingsgaten in de achterzijde van de afzuigkap 4 3 Boor de bevestigingsgaten en duw pluggen in de geboorde gaten 4 Bevestig de afzuigkap volledig horizontaal door middel van de bovenste 2 sleutelgaten van de motorbehuiz...

Страница 14: ...an de 2 schroeven 6 1 Bepaal de plaats van de plafondbeugel ten opzicht van de kookplaat en teken de teken de bevestigingsgaten 1 af 2 Boor de bevestigingsgaten en bevestig de plafondbeugel met de bijgeleverde schroeven en pluggen 3 Bevestig de zijstukken aan de afzuigkap met 2 schroeven in de bovenplaat van het motorhuis 2 en 2 schroeven in de onderkant van het zijstuk 3 via de onderkant van de a...

Страница 15: ...5 6 Maak de stekkerverbinding 7 Sluit het afvoerkanaal aan 8 Laat het onderste deel van de telescooppijp zakken op de afzuigkap 5 4 6 technische gegevens typenummer zie gegevensplaatje in de kap energiesoort 230 V 50 Hz aansluitwaarde zie gegevensplaatje afmetingen h x b x d zie toestelmaten Dit toestel voldoet aan de geldende CE markering ...

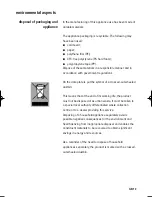
Страница 16: ...den gevoegd maar naar een speciaal centrum voor gescheiden afvalinzameling van de gemeente moet worden gebracht of naar een verkooppunt dat deze service verschaft Het apart verwerken van een huishoudelijk apparaat zoals deze afzuigkap voorkomt mogelijk negatieve gevolgen voor het milieu en de gezondheid die door een ongeschikte verwerking ontstaat en zorgt ervoor dat de materialen waaruit het appa...

Страница 17: ...s mechanical ventilation with recirculation Kitchen air is cleaned of oil and moisture by the metal grease filters the washable carbon filter eliminates smells Part of the air is transported outside via the mechanical ventilation duct the remaining part is blown back into the kitchen as clean air If needed one can increase the extraction capacity of this system to 500 m3 per hour This is more than...

Страница 18: ... introduction 1 for your safety 2 instructions for use 3 lighting 3 fan 3 faults 4 how to keep the appliance looking good 5 6 general 5 exterior 5 grease filters 5 carbon filter 6 removing placing grease filters 6 removing carbon filter 6 installation instructions 7 8 some preliminary remarks 7 electrical connection 7 discharge 8 setting the voulme control valve 8 appliance dimensions 9 assembly 1...

Страница 19: ...you have finished cooking Clean the appliance regularly as shown in maintenance This prevents fire hazards and ensures that the extractor hood continues to work optimally In the unlikely event that the unit has to be repaired disconnect the unit from the power supply before performing the repair Preferably by taking the plug out of the socket or by turning off the mains switch You must also discon...

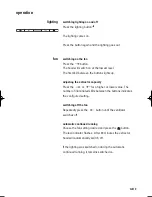
Страница 20: ...apacity Press the or for a higher or lower value The number of illuminated LEDs between the buttons indicates the configured setting switching off the fan Repeatedly press the button until the ventilator switches off automatic continued running Choose the fan setting desired and press the button The led indicator flashes After 20 minutes the extractor hood will automatically switch off If the ligh...

Страница 21: ... defective Connection lead defective fault Lighting does not work Extractor hood makes a lot of noise No extraction faults If the appliance does not work properly this does not always mean that it is defective First try to correct the fault by consulting the table below If you cannot find an answer here phone the Service Department If the connection cable becomes damaged it should be replaced by t...

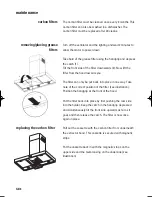
Страница 22: ...d a range of cleaning agents called Atag Shine Never use abrasive cleaning agents green scouring pads other scourers or polishing cleaning products such as liquid scourers Never use caustic cleaning agents These can cause stainless steel to discolour Clean the grease filters at least once a month You can clean the grease filters in the dishwasher To prevent possible fouling of the grease filters w...

Страница 23: ...e way Take note of the correct position of the filter see illustration Position the handgrip at the front of the hood Put the filter back into place by first pushing the rear side into the holder Keep the catch in the handgrip depressed and simultaneously tilt the front side upwards as far as it goes and then release the catch The filter is now once again in place Pull out the cassette with the ca...

Страница 24: ...unctioning it is important that the extractor hood is supplied with sufficient fresh air For this a good air supply is necessary in the room in which the extractor hood is used The extractor hood s plug should be accessible after fitting or the extractor hood should be isolated by a separate switch If the connection cable is damaged it should be replaced by the service department of the manufactur...

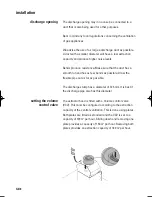
Страница 25: ...s as few bends as possible Draw the flexible pipe out as far as possible The discharge stump has a diameter of 125 mm It is best if the discharge pipe also has this diameter The extractor hood is fitted with a Volume control valve VCV This must be configured according to the extraction capacity of the central ventilation This is done using plates Both plates are fitted as standard and the VCV is s...

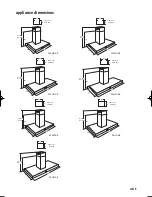
Страница 26: ...de koker WS1211QR 1200 500 70 550 min 690 max 1140 275 300 doorsnede koker WS1511QR 900 600 70 550 min 690 max 1140 302 302 doorsnede koker ES9011QR 1200 600 70 550 min 690 max 1140 302 302 doorsnede koker ES1211QR 1500 600 70 550 min 690 max 1140 302 302 doorsnede koker ES1511QR cross cut chimney cross cut chimney cross cut chimney cross cut chimney cross cut chimney cross cut chimney cross cut c...

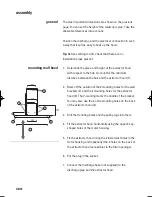
Страница 27: ...f the position of the 2 mounting holes for the wall brackets 2 and the 4 mounting holes for the extractor hood 3 The V marking marks the middle of the bracket You may also use the 2 extra mounting holes on the back of the extractor hood 4 3 Drill the mounting holes and the push plugs into them 4 Fit the extractor hood horizontally using the upper 2 key shaped holes of the motor housing 5 Fix the e...

Страница 28: ...etermine the position of the wall bracket with respect to the hob and mark off the mounting holes 1 2 Drill the mounting holes and secure the ceiling bracket with the screws and plugs supplied 3 Secure the sidepieces of the extractor hood with 2 screws to the top plate of the motor housing 2 and secure the underside of the extractor hood to the underside of the sidepiece 3 with another 2 screws 6 ...

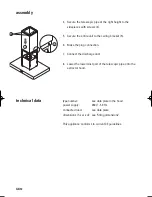
Страница 29: ...et 5 6 Make the plug connection 7 Connect the discharge duct 8 Lower the lowermost part of the telescopic pipe onto the extractor hood 5 4 6 technical data type number see data plate in the hood power supply 230 V 50 Hz connected load see data plate dimensions h x w x d see fitting dimensions This appliance conforms to current CE guidelines ...

Страница 30: ...means that at the end of its working life the product must not be disposed of as urban waste It must be taken to a special local authority differentiated waste collection centre or to a dealer providing this service Disposing of a household appliance separately avoids possible negative consequences for the environment and health deriving from inappropriate disposal and enables the constituent mate...

Страница 31: ...de cuisine alliant graisse et humidité sont nettoyées par les filtres à graisse en métal les mauvaises odeurs sont éliminées par le filtre à charbon actif lavable Une partie de l air est évacuée vers l extérieur par un conduit de ventilation mécanique l air restant retourne lui dans la cuisine une fois nettoyé Ce système permet si nécessaire d augmenter la capacité aspirante et de la faire passer ...

Страница 32: ...duction 1 sécurité avant tout 2 commande 3 éclairage 3 ventilateur 3 anomalies de fonctionnement 4 entretien 5 6 généralités 5 extérieur 5 filtres à graisse 5 filtres à carbon 6 enlever placer filtres à graisse 6 elimination filtres à carbon 6 directives d installation 7 8 remarques préliminaires 7 branchement électrique 7 évacuation 8 réglage du clapet de régulation de volume 8 dimensions d encas...

Страница 33: ...oyer l appareil régulièrement comme indiqué dans entretien Vous évitez ainsi tout risque d incendie et permettez un fonctionnement optimal de la hotte aspirante Si malencontreusement une réparation au niveau du dispositif s avère nécessaire libérez alors l appareil avant de procéder aux travaux de réparation Toujours débrancher la fiche de prise de courant ou mettre le disjoncteur en position d in...

Страница 34: ...iration Appuyez sur la touche ou avec une valeur plus élevée ou plus basse Le nombre de DEL illuminées entre les touches indique le réglage choisi arrêt du ventilateur Appuyez plusieurs fois sur la touche jusqu à ce que le ventilateur s arrête prolongation automatique du fonctionnement Appuyez sur la touche pour atteindre le degré de ventilation désiré La DEL illuminées a prolongation automatique ...

Страница 35: ...ès vente du fabricant ou par des personnes détenant les mêmes qualifications pour éviter toute situation dangereuse Attention Mettez l appareil hors tension avant de commencer les réparations De préférence débranchez l appareil ou mettez l interrupteur de fonctionnement sur zéro 1 2 solution Remplacer l ampoule Enfoncez légèrement la petite lucarne au niveau de la partie avant 1 elle s ouvrira alo...

Страница 36: ...er vertes autres éponges pour casseroles ou d autres produits d entretien destinés au polissage comme les produits d entretien liquides N utilisez jamais de produits d entretien agressifs Ceux ci peuvent provoquer des décolorations sur l acier inoxydable Nettoyez la filtres à graisse métallique au moins 1x par mois Vous pouvez nettoyer les filtres dans le lave vaisselle Comme les restes alimentair...

Страница 37: ...Assurez vous que le filtre est bien placé voir illustration La poignée doit être positionée à l avant de la hotte Placez maintenant le filtre en appuyant d abord l arrière dans le support Maintenez le dispositif de verrouillage enfoncé dans la poignée basculez en même temps progressivement la partie jusqu à atteindre la limite et libérez ensuite le verrouillage Le filtre est maintenant remis à sa ...

Страница 38: ...aut qu une quantité d air frais suffisante soit amenée vers la hotte aspirante Une bonne alimentation en air est donc indispensable dans la pièce où la hotte est utilisée Après montage de la hotte la prise doit être accessible ou il doit être possible de débrancher la hotte par le truchement d un interrupteur bipolaire En cas de détérioration du cordon alimentaire celui ci doit être remplacé par l...

Страница 39: ... régulier et qu elle ne comprenne pas trop de courbes La buse d évacuation a un diamètre de 125 mm Le mieux est de prévoir un tuyau de sortie de même diamètre La hotte aspirante est dotée d un clapet de régulation de volume CRV Celui ci doit être réglé sur la capacité d aspiration de la ventilation centrale Le réglage s effectue à l aide de lames Normalement deux lames sont placées et le CRV est r...

Страница 40: ... 275 300 doorsnede koker WS1211QR 1200 500 70 550 min 690 max 1140 275 300 doorsnede koker WS1511QR 900 600 70 550 min 690 max 1140 302 302 doorsnede koker ES9011QR 1200 600 70 550 min 690 max 1140 302 302 doorsnede koker ES1211QR 1500 600 70 550 min 690 max 1140 302 302 doorsnede koker ES1511QR coupe conduit coupe conduit coupe conduit coupe conduit coupe conduit coupe conduit coupe conduit ...

Страница 41: ...rante 1 2 Tracez les 2 orifices de fixation de la bride murale 2 et des 4 orifices de fixation de la hotte aspirante 3 Le milieu de la bride est indiqué par le repère en forme de V Vous pouvez éventuellement utiliser 2 supports de fixation supplémentaires à l arrière de la hotte aspirante 4 3 Percez les orifices de fixation et enfoncez y alors des chevilles 4 Fixez la hotte aspirante parfaitement ...

Страница 42: ... 2 vis 6 1 Déterminez l emplacement de l étrier de plafond par rapport à la plaque de cuisson et tracez les orifices de fixation 1 2 Percez les orifices de fixation et fixez l étrier de plafond en utilisant les vis et les chevilles livrées 3 Fixez les pièces latérales à la hotte aspirante à l aide de 2 vis au niveau de la plaque supérieure du bâti de moteur 2 et des 2 vis de la partie inférieure d...

Страница 43: ...ons de prises 7 Connectez le tuyau d évacuation 8 Faites descendre la partie inférieure du tuyau télescopique au niveau de la hotte aspirante 5 4 6 données techniques numéro du modèle voir plaque signalétique dans la hotte type d énergie 230V 50 Hz puissance connectée voir plaque signalétique dimensions h x l x p voir dimensions d encastrement Cet appareil satisfait aux normes CE en vigueur ...

Страница 44: ...ilisation le produit ne doit pas être éliminé avec les déchets urbains Le produit doit être remis à l un des centres de collecte sélective prévus par l administration communale ou auprès des revendeurs assurant ce service Éliminer séparément un appareil électroménager permet d éviter les retombées négatives pour l environnement et la santé dérivant d une élimination incorrecte et permet de récupér...

Страница 45: ...ische Ventilation mit Rezirkulation Die fettige und feuchte Kochluft wird durch die metallenen Fettfilter gereinigt die Gerüche werden durch den auswaschbaren Kohlenstofffilter eliminiert Ein Teil der Luft wird durch den mechanischen Ventilationskanal nach außen abgeführt der restliche Teil wird als gereinigte Luft in die Küche zurückgeleitet Durch dieses System wird die Absaugkapazität wenn nötig...

Страница 46: ...Nutzen sein Inhaltsangabe Allgemeines 1 2 Einleitung 1 Zu Ihrer Sicherheit 2 Bedienung 3 Beleuchtung 3 Gebläse 3 Störungen 4 Pflege des Gerätes 5 6 Allgemeines 5 Außenseite 5 Fettfilter 5 Aktiv Kohlefilter 6 Fettfilter herausnehmen einsetzen 6 Aktiv Kohlefilter austauschen 6 Installation 7 8 Allgemeine hinweise 7 Elektrischer Anschuß 7 Ausblasöffnung 8 Einstellen Volumenregelklappe 8 Einbaumaße 9 ...

Страница 47: ...ieb Reinigen Sie das Gerät regelmäßig so wie unter Pflege des Gerätes angegeben ist Damit verhindert man das Entstehen einer feuergefährlichen Situation und sorgt dafür dass die Funktionstüchtigkeit der Abzugshaube gewährleistet bleibt Sollte unerwarteterweise eine Reparatur am Gerät notwendig sein dann trennen Sie das Gerät vom Stromkreis bevor mit der Reparatur begonnen wird Ziehen Sie darum imm...

Страница 48: ...ung regeln Drücken Sie oder für einem höheren oder niedrigeren Wert Die Anzahl der leuchtenden LEDs zwischen den Tasten zeigt den eingestellten Stand an Gebläse ausschalten Drücken Sie mehrmals auf die Taste bis der Ventilator ausgeschaltet ist Nachlaufautomatik Wählen Sie die gewünschte Stufe und drücken Sie die Taste Die LED Anzeige blinkt um anzuzeigen das die Nachlaufautomatik gewählt wurde Da...

Страница 49: ...en im Kanal Motor defekt Motor oder Bedienung defekt Anschlußkabel defekt Störung Beleuchtung brennt nicht Abzugshaube macht Lärm Keine Absaugung Störungen Wenn das Gerät nicht gut funktioniert bedeutet dies nicht zwangsläufig daß es defekt ist Versuchen Sie das Problem zuerst selbst mithilfe der folgenden Tabelle zu lösen Sollten Sie auch dort keine Lösung finden können dann rufen Sie den Kundend...

Страница 50: ...Verwenden Sie keine Scheuermittel Schwämme mit Scheuerseite sonstige Topfreiniger oder polierende Reinigungsmittel wie flüssige Scheuermittel Verwenden Sie keine aggressiven Reinigungsmittel Sie können auf Edelstahl Verfärbungen verursachen Reinigen Sie den Fettfilter mindestens einmal monatlich Sie können die Fettfilter im Geschirrspüler reinigen Da die Fettfilter durch Essensreste verstopfen kön...

Страница 51: ...r darf nur auf eine Art und Weise eingesetzt werden Auf die richtige Position des Filters siehe Abbildung ist zu achten Der Griff befinded sich an die vordere Seite Zur Einsetzung des Filters erst die Rückseite in die Halterung drücken Die Verriegelung im Handgriff gedrückt halten und gleichzeitig die Vorderseite nach oben drehen bis es nicht mehr weitergeht Jetzt die Verriegelung loslassen Der Fi...

Страница 52: ...ass eine ausreichende Frischluftzufuhr zur Abzugshaube gewährleistet ist Deshalb muss in dem Raum in dem die Abzugshaube eingesetzt wird für eine gute Luftzufuhr gesorgt werden Nach Montage der Dunstabzugshaube muß der Stecker erreichbar sein Andernfalls muß gewährleistet sein daß die Dunstabzugshaube mit Hilfe eines zweipoligen Schalters spannungslos gemacht werden kann Ein beschädigtes Anschlußk...

Страница 53: ...iehen Sie das flexible Rohr soweit wie möglich aus Der Abluftstutzen hat einen Durchmesser von 125 mm Vorzugsweise sollte das Abluftrohr auch diesen Durchmesser haben Die Abzugshaube ist mit einer Volumenregelklappe VRK ausgestattet Dieser muss auf die Abzugskapazität der zentralen Ventilation eingestellt werden Die Einstellung geschieht mithilfe von Lamellen Standardmäßig sind beide Lamellen plat...

Страница 54: ... koker WS1211QR 1200 500 70 550 min 690 max 1140 275 300 doorsnede koker WS1511QR 900 600 70 550 min 690 max 1140 302 302 doorsnede koker ES9011QR 1200 600 70 550 min 690 max 1140 302 302 doorsnede koker ES1211QR 1500 600 70 550 min 690 max 1140 302 302 doorsnede koker ES1511QR Durchmesser Turm Durchmesser Turm Durchmesser Turm Durchmesser Turm Durchmesser Turm Durchmesser Turm Durchmesser Turm ...

Страница 55: ...igungslöcher für den Wandbügel 2 und die 4 Löcher für die Abzugshaube 3 an Die V Markierung kennzeichnet die Mitte des Bügels Eventuell können Sie 2 zusätzliche Löcher auf der Rückseite der Abzugshaube benutzen 4 3 Bohren Sie die Löcher und setzen Sie Dübel in die gebohrten Löcher 4 Befestigen Sie mithilfe der oberen 2 Schlüssellöcher des Motorgehäuses die Abzugshaube absolut waagerecht 5 Fixieren...

Страница 56: ...auben am Wandbügel 6 1 Bestimmen Sie den Platz des Deckenbügels über der Kochplatte und zeichnen Sie die Löcher an 1 2 Bohren Sie die Löcher und befestigen Sie den Deckenbügel mit den mitgelieferten Schrauben und Dübeln 3 Befestigen Sie die Seitenteile an der Abzugshaube mit 2 Schrauben in der Deckplatte des Motorgehäuses 2 und 2 Schrauben in der Unterseite des Seitenteils 3 über die Unterseite de...

Страница 57: ...Stellen Sie die Steckerverbindung her 7 Schließen Sie die Abzugsleitung an 8 Lassen Sie den unteren Teil des Teleskoprohrs auf die Abzugshaube sinken 5 4 6 Technische Daten Typennummer siehe Typenschild in der Haub Energieart 230 V 50 Hz Anschlußwert siehe Typenschild Abmessungen HxBxT siehe Einbaumaße Dieses Gerät entspricht der geltenden CE Markierung ...

Страница 58: ...all beseitigt werden darf Es kann zu den eigens von den städtischen Behörden eingerichteten Sammelstellen oder zu den Fachhändlern die einen Rücknahmeservice anbieten gebracht werden Die getrennte Entsorgung eines Haushaltsgerätes vermeidet mögliche negative Auswirkungen auf die Umwelt und die menschliche Gesundheit die durch eine nicht vorschrifts mässige Entsorgung bedingt sind Zudem ermöglicht ...

Отзывы: