background image

32

•  The safety level of the device can only be held if it is regularly tested for damage and wear. Particu- 
 

lar attention must be paid to the end caps / castors of the feet, the pedals, the handles and the m- 


ving elements.

•  If you pass this device or use it by another person, make sure that the user is aware of the contents  
 

of this manual.

•  This unit can only be used by one person to exercise

• 

Check that all screws, bolts and other connections are firmly seated before using them for the first 


time and then at regular intervals.

•  Remove all sharp objects from the vicinity of the unit before starting the workout.

•  Exercise only on the device if it works properly.

•  Defective parts must be exchanged immediately and / or the appliance cannot be used until the 
 maintenance.

•  Parents and other supervisors should be aware of their responsibilities because, due to the child‘s  
 

natural playfulness and the ability to experiment, the children will be faced with situations for which  


the training equipment is not built.

•  When you have children trained on the device, you should consider their mental and physical  
 

development and, above all, their temperament. You should supervise the children, if necessary, 


and should point out the correct use of the appliance. As a toy, the training equipment is by no m- 


ans suitable.

• 

When installing the unit, please ensure that there is sufficient clearance in each direction.

•  Children should not be near the unit unattended, as they can use the unit in a kind and fashion due  
 

to their natural play, for which it is not intended and can cause accidents.

•  Please note that incorrect and excessive training can endanger your health.

•  Please note that levers and other adjustment mechanisms do not extend into the range of motion  

  during the exercise and interfere with the flow.

•  When setting up the appliance, make sure that the appliance is stable and possibly ground uneven- 
 

ness are compensated for.

• 

Always wear training clothes and shoes that are suitable for a fitness training when you are working 


on the device. The clothing must be designed in such a way that it cannot get stuck anywhere  


during the workout due to its shape. The shoes should be chosen according to the training device,  

  give the foot a firm hold and have a non-slip sole.

•  In general, you should consult your doctor before taking a training course. He can provide you with 
 

concrete information about the stress intensity that is appropriate for you and give you tips on tra- 


ning and nutrition.

IMPORTANT SAFETY INSTRUCTIONS

Содержание RA 14

Страница 1: ...1 BENUTZERHANDBUCH MANUAL RA14 VERSION A BU www AsVIVA de Produktinfo ...

Страница 2: ...WÄRMEN UND DEHNEN 23 TRAININGSHINWEISE 25 PULSMESSTABELLE 26 WARTUNG UND PFLEGE 27 STÖRUNGSSUCHE 28 GEWÄHRLEISTUNGSRECHT 29 TABLE OF CONTENTS WARRANTY TERMS 30 IMPORTANT INFO ABOUT YOUR PRODUCT 31 IMPORTANT SAFETY INSTRUCTIONS 32 EXPLOSIONSZEICHNUNG 34 PART LIST 36 ASSEMBLY PARTS 38 ASSEMBLY 40 COMPUTER 48 EXERCISE INSTRUCTIONS 50 PULSE MEASURING TABLE 52 TROUBLESHOOTING 53 WARRANTY DEVICE 54 ...
Страница 3: ...nungsnummer an Ihren Händler oder direkt an uns Unsere Serviceadresse service asviva de Damit Ihnen unsere Service Mitarbeiter optimal weiterhelfen können beachten Sie bitte folgende Vorgehensweise 1 Ist ein bestimmtes Teil beschädigt Teilen Sie uns bitte anhand der Teileiste die genaue Teilenummer mit 2 Liegt eine Störung beim Gerät vor Sollten Sie die Möglichkeit einer Videoaufnahme z B Handykam...

Страница 4: ...e Versandverpackung für den Zeitraum des 30 tägigen Widerrufsrechts auf Bitte beachten Sie dass im Rahmen des Widerrufsrechtes die Produkte nur getestet und auspro biert werden sollten Eine 30 tägige Nutzung der Produkte oder Fahrleistungen von über 5km z B bei Fahrrädern oder Indoor Cycles fallen nicht unter die übliche Testphase Der von Ihnen erworbene Artikel wurde frei Bordsteinkante und verpa...

Страница 5: ...ren Temperament berücksichtigen Sie sollten die Kinder ggf beaufsichti gen und vor allem auf die richtige Benutzung des Gerätes hinweisen Als Spielzeug sind die Trainingsgeräte auf keinen Fall geeignet Bitte beachten Sie beim Aufstellen des Gerätes dass in jede Richtung ausreichend Freiraum vor handen ist Kinder sollten nicht unbeaufsichtigt in die Nähe des Gerätes kommen da sie aufgrund Ihres nat...

Страница 6: ...te Unterlage unter das Gerät zu legen Generell gilt dass Sportgeräte kein Spielzeug sind Sie dürfen daher nur bestimmungsgemäß und von entsprechend informierten bzw unterwiesenen Personen benutzt werden Wenn Sie Schwindelgefühle Übelkeit Brustschmerzen oder andere anormale Symptome verspü ren stoppen Sie sofort das Training und konsultieren Sie Ihren Arzt Personen wie Kinder Invaliden und behinder...

Страница 7: ... 15 14R 15 16 16 16 16 16 16 16 16 17 17 17 17 17 17 18 18 18 18 19 19 20L 16 16 10 21 21 22 22 23 23 24 25 26 27 28 29 30 31 32 33 20R 34 34 34 34 34 35 36 36 34 36 36 37 38 39 40L 40R 41 40R 40L 39 38 37 42 43 43 43 44 45 46L 46R 47 47 47 47 47 47 47 47 47 2 48 49 50 51 52 53 54 55 55 56 56 77 ...

Страница 8: ...8 57 58 2 10 16 2 2 43 43 81 80 79 80 78 81 2 2 59 59 60 61 74 10 10 71L 72 75 75 76 73 70 82 10 10 71R 83 83 83 83 83 83 83 62 63 64 65 75 75 66 67 67 68 68 69 69 EXPLOSIONSZEICHNUNG ...

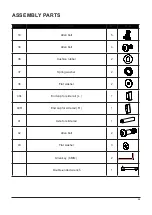
Страница 9: ...l 2 43 Flat washer 11 13 Allen bolt for pedal 4 44 Square end cap 1 14L Pedal L 1 45 Slide rail 1 14R Pedal R 1 46L Slide rail L 1 15 Fixed bracket for pedal 2 46R Slide rail R 1 16 Cross head screw 22 47 Self tapping screw 10 17 Nylon nut 16 48 Axle for roller 6 18 Fixed plate for strap 4 49 Roller 6 19 Allen bolt 5 50 Cross head screw 6 20L Decorative cover for tension control knob L 1 51 Allen ...

Страница 10: ...ssembly 4 65 Spring 1 76 Spring clutch 1 66 Axle for flywheel 1 77 Sensor Wire 2 1 67 Clamp spring 2 78 Axle for pulley 1 68 Bearing 2 79 Pulley 1 69 Washer 2 80 Bearing 2 70 Strap for Spring clutch 1 81 Powder metal 2 71L Chain cover L 1 82 Belt 1 71R Chain cover R 1 83 Self tapping screw 7 72 Air outlet 1 73 Rubber ring 1 TEILELISTE ...

Страница 11: ...r Beschreibung Menge 1 Main frame 1 13 Allen bolt for pedal 4 9 Front support tube 1 35 Ball pin 1 54 Rear support tube 1 8L End cap for front stabilizer L 1 53 Seat 1 8R End cap for front stabilizer R 1 45 Slide rail 1 User manual 1 14L Pedal L 1 Hardware parts 1 14R Pedal R 1 3 Roller 2 55 Foot mat 2 CHECKLISTE ...

Страница 12: ...en bolt 5 34 Allen bolt 4 36 Cushion rubber 2 37 Spring washer 2 38 Flat washer 2 40L End cap for side rail L 1 40R End cap for side rail R 1 41 Axle for slide rail 1 42 Allen bolt 2 43 Flat washer 3 Allen key 6MM 2 Double ended wrench 1 CHECKLISTE ...

Страница 13: ...M8 35mm 4 2X M8 2 2X 1 Demontieren Sie die Muttern 2 und die Schrauben 4 von dem Hauptrahmen 1 welche vormon tiert sind 2 Montieren Sie die Transportrollen 3 an dem Hauptrahmen 1 und befestigen Sie diese mit den Muttern 2 und den Schrauben 4 ...

Страница 14: ...16 86mm 1X 6mm 1 Entfernen Sie den Ball Pin 35 von dem Hauptrahmen 1 Befestigen Sie die Gleitschiene 45 an der Halterung des Hauptrahmens 1 mit der Achse 41 zwei Schrauben 34 und den Unterlegschei ben 37 38 2 Stecken Sie den Ball Pin 35 zur Stabilisation in den Hauptrahmen 1 ZUSAMMENBAU ...

Страница 15: ...ie Laufschiene 45 und befestigen Sie diese mit zwei Innensechskantenschrauben 34 3 Befestigen Sie die zwei Füße 55 auf dem hinteren Stützrohr 54 4 Bringen Sie das hintere Stützrohr 54 an der Laufschiene an 45 befestigen Sie dieses mit einer Innensechskantschraube 19 drei Unterlegscheiben 43 und zwei Innensechskantschrauben 42 5 Befestigen Sie zwei Endkappen für die Seitenschiene 40L R an das Ende ...

Страница 16: ...ntere Stützrohr auf den Boden 2 Nehmen Sie vier selbstschneidende Schrauben 10 von den Endkappen des vorderen Stabilisator Rohrs 8L 8R die an den Endkappen vormontiert sind 3 Befestigen Sie das vordere Stützrohr 9 mit dem Hauptrahmen 1 und befestigen Sie dieses mit vier Innensechskantschrauben 19 ZUSAMMENBAU ...

Страница 17: ...uptrahmen und klappen Sie den Hauptrahmen um Dann stecken Sie den Kugelbolzen 35 zur Fixierung wieder in den Hauptrahmen Hinweis Vor dem Einsatz des Kugelbolzen 35 1 Heben Sie den Hauptrahmen 2 Versichern Sie sich dass die Befestigungslöcher auf gleicher Position sind 3 Legen Sie den Kugelbolzen 35 in die Befestigungslöcher ZUSAMMENBAU ...

Страница 18: ...f 11L R in die Löcher auf dem Frontstützrohr des Hauptrahmens 1 2 Befestigen Sie das linke Pedal 14L auf der linken Seite des Hauptrahmens 1 befestigen Sie die ses mit zwei Innensechskantschrauben 13 3 Wiederholen Sie den Vorgang für das rechte Pedal 14R auf der rechten Seite des Hauptrahmens 1 ZUSAMMENBAU ...

Страница 19: ...19 Schritt 7 29 24 1 Klappen Sie den Computer 24 nach oben um Ihren Trainingsstatus zu sehen 2 Der Handgriff 29 kann ebenfalls in der festen Halterung abgelegt werden ZUSAMMENBAU ...

Страница 20: ...20 Schritt 8 35 1 Um das Gerät zusammen zu klappen müssen Sie den Kugelbolzen rausziehen 35 die Gleitschiene anheben und den Kugelbolzen wieder zur Befestigung reinstecken ZUSAMMENBAU ...

Страница 21: ... automatisch zurück in den Fenstermodus schaltet Funktionen und Anwendungen 1 SCAN Drücken Sie die MODE Taste bis SCAN angezeigt wird Anschließend wird der Computer zwischen folgenden Funktionen wechseln Zeit Geschwindigkeit Distanz Kalorien Ruderzüge Ru derzüge pro Minute und Puls Jede Funktion wird 5 Sekunden lang angezeigt 2 TIME Zeigt die Trainingszeit an 3 SPEED Anzeige der aktuellen Geschwin...

Страница 22: ...oder mit dem Training beginnen 4 Der Computer startet automatisch die Berechnung sobald Sie anfangen zu trainieren Er beendet die Berechnung wenn 4 Sekunden lang nicht trainiert wurde Spezifikationen AUTO SCAN Alle 5 Sekunden ZEIT 00 00 99 59 AKTUELLE GESCHWINDIGKEIT Das maximale Signal das aufgerufen wer den kann ist 99 9 km h KILOMETER 0 0 999 9 km KALORIEN 0 0 999 9 kcal ZÄHLUNG 0 9999 RPM 0 99...

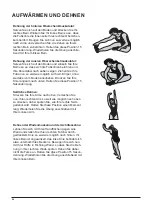
Страница 23: ...cker während Sie versuchen Ihre Zehen zu berühren Gehen Sie soweit runter wie Sie können und halten Sie die Position 15 Sekunden lang Schulterheben Heben Sie Ihre rechte Schulter nach oben hin zu Ihrem Ohr und halten Sie die Position einen Moment lang Wiederholen Sie die Übung anschließend mit Ihrer linken Schulter Kopfrollen Legen Sie Ihren Kopf nach rechts und halten Sie die Position einen Momen...

Страница 24: ... Sie Ihre Knie langsam nach unten Halten Sie diese Position 15 Sekunden lang Seitliches Dehnen Strecken Sie Ihre Arme nach oben Versuchen Sie nun Ihren rechten Arm so weit wie möglich nach oben zu strecken dabei spüren Sie wie Ihre rechte Seite gedehnt wird Halten Sie diese Position einen Moment lang Wiederholen Sie die Übung anschließend mit Ihrem linken Arm Dehnen der Wadenmuskeln und der Achill...

Страница 25: ...pergewicht zu verändern benötigt er mindestens 3 Trainingseinheiten je Woche 3 Gestaltung des Trainings Jede Trainingseinheit sollte aus 3 Trainingsphasen bestehen Aufwärm Phase Trainings Phase und Abkühl Phase In der Aufwärm Phase soll die Körpertemperatur und die Sauerstoffzufuhr langsam gesteigert wer den Dieses ist durch gymnastische Übungen über eine Dauer von 5 bis 10 Minuten möglich Danach ...

Страница 26: ... 73 110 Schläge pro Minute 145 80 Jahre 70 105 Schläge pro Minute 140 85 Jahre 68 100 Schläge pro Minute 135 90 Jahre 65 98 Schläge pro Minute 130 Ihr Maximum Puls beträgt ungefähr 220 minus Ihres Alters Die obigen Zahlen sind Durchschnitts werte und sollten als allgemeine Richtlinien verwendet werden ACHTUNG bitte folgendes beachten Einige Bluthochdruck Medikamente erniedrigen Ihren Maximum Puls ...

Страница 27: ...ten von Zeit zu Zeit mit handelsüblichem Schmierfett eingefettet werden Informationen zur Batterieverordnung Im Zusammenhang mit dem Vertrieb von Batterien oder Akkus oder mit der Lieferung von Geräten die Batterien oder Akkus enthalten sind wir verpflichtet Sie gemäß der Batterieverordnung auf folgendes hinzuweisen Batterien dürfen nicht in den Hausmüll gegeben werden Sie sind zur Rückgabe ge bra...

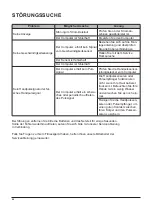
Страница 28: ...ignal Prüfen Sie die Handpulssensor leitungsstecker zum Computer Der Computer erhält ein schwa ches oder periodisch auftreten des Pulssignal Die Handpulssensoren oder Pulsempfänger funktionieren nicht wenn Ihre Haut äußerst trocken ist Befeuchten Sie Ihre Hände mit ein wenig Wasser und versuchen Sie es noch ein mal Reinigen Sie die Handpulssen soren oder Pulsempfänger um einen guten Kontakt zwisch...

Страница 29: ...der Missbrauch entstanden ist 1 Die Gewährleistung bezieht sich nicht auf alle Teile die einem funktionsbedingten Verschleiß unterliegen soweit es sich nicht um Produktions oder Materialfehler handelt Schäden die durch unsachgemäße oder mangelhafte Pflege und nicht fachmännisch durchgeführ te Reparaturen Umbauten oder Austausch von Teilen entstehen Schäden die durch unsachgemäßen Gebrauch und höhe...

Страница 30: ...r or invoice number Our service is available 24 hours Our service adress https www asviva de contact To ensure that our service staff can help you optimally please consider the following procedure 1 Is a specific part damaged Please tell us the exact part number using the parts list 2 Is there a fault with the unit Should you have the possibility of a video recording e g mobile phone camera pickup...

Страница 31: ...leage over 5km for example bikes or indoor cycles does not fall in the usual test phase Your order was delivered packed and free curbside therefore in case of revocation or defect it will be picked up again packaged and free curbside If you have no more packaging please contact us and after consultation we can send you one Notice reception of the packaging and collection of the device do not occur...

Страница 32: ... supervise the children if necessary and should point out the correct use of the appliance As a toy the training equipment is by no m ans suitable When installing the unit please ensure that there is sufficient clearance in each direction Children should not be near the unit unattended as they can use the unit in a kind and fashion due to their natural play for which it is not intended and can cau...

Страница 33: ...ce a suitable non slip support underneath the unit In general sports equipment is not a toy They may therefore only be used according to the regula tions and by appropriately informed or instructed persons If you experience dizziness nausea chest pain or other abnormal symptoms stop training and consult immediately your doctor Persons such as children disabled persons and disabled persons should o...

Страница 34: ...L 15 14R 15 16 16 16 16 16 16 16 16 17 17 17 17 17 17 18 18 18 18 19 19 20L 16 16 10 21 21 22 22 23 23 24 25 26 27 28 29 30 31 32 33 20R 34 34 34 34 34 35 36 36 34 36 36 37 38 39 40L 40R 41 40R 40L 39 38 37 42 43 43 43 44 45 46L 46R 47 47 47 47 47 47 47 47 47 2 48 49 50 51 52 53 54 55 55 56 56 77 ...

Страница 35: ...35 57 58 2 10 16 2 2 43 43 81 80 79 80 78 81 2 2 59 59 60 61 74 10 10 71L 72 75 75 76 73 70 82 10 10 71R 83 83 83 83 83 83 83 62 63 64 65 75 75 66 67 67 68 68 69 69 EXPLOSIONSZEICHNUNG ...

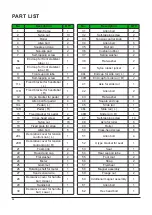
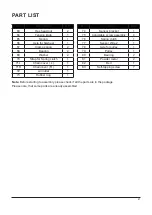
Страница 36: ...lat washer 11 13 Allen bolt for pedal 4 44 Square end cap 1 14L Pedal L 1 45 Slide rail 1 14R Pedal R 1 46L Slide rail L 1 15 Fixed bracket for pedal 2 46R Slide rail R 1 16 Cross head screw 22 47 Self tapping screw 10 17 Nylon nut 16 48 Axle for roller 6 18 Fixed plate for strap 4 49 Roller 6 19 Allen bolt 5 50 Cross head screw 6 20L Decorative cover for tension control knob L 1 51 Allen bolt 4 2...

Страница 37: ...Wire 2 1 67 Clamp spring 2 78 Axle for pulley 1 68 Bearing 2 79 Pulley 1 69 Washer 2 80 Bearing 2 70 Strap for Spring clutch 1 81 Powder metal 2 71L Chain cover L 1 82 Belt 1 71R Chain cover R 1 83 Self tapping screw 7 72 Air outlet 1 73 Rubber ring 1 Note Before starting to assembly please check if all the parts are in the package Please note that some parts are already assembled PART LIST ...

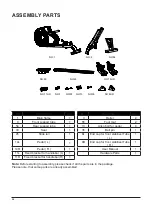
Страница 38: ...be 1 13 Allen bolt for pedal 4 33 Seat 1 35 Ball pin 1 45 Slide rail 1 8L End cap for front stabilizer Tube L 1 14L Pedal L 1 8R End cap for front stabilizer Tube R 1 14R Pedal R 1 User Manual 1 11L Fixed bracket for handlebar L 1 Hardware Parts 1 11R Fixed bracket for handlebar R 1 Note Before starting to assembly please check if all the parts are in the package Please note that some parts are al...

Страница 39: ...t 5 34 Allen bolt 4 36 Cushion rubber 2 37 Spring washer 2 38 Flat washer 2 40L End cap for side rail L 1 40R End cap for side rail R 1 41 Axle for slide rail 1 42 Allen bolt 2 43 Flat washer 3 Allen key 6MM 2 Double ended wrench 1 ASSEMBLY PARTS ...

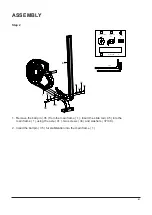
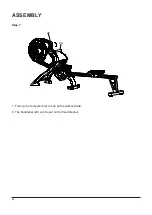
Страница 40: ... 1 2 3 4 3 4 2 1 M8 35mm 4 2X M8 2 2X 1 Unscrew the nut 2 and bolt 4 of the main frame 1 which are preassembled already 2 Insert the transportation wheels 3 into the main frame 1 by using the nuts 2 and bolts 4 for it ...

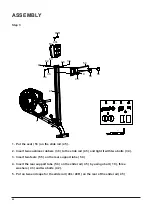
Страница 41: ...20mm 34 2X 37 φ8mm 2X 41 φ16 86mm 1X 6mm 1 Remove the ball pin 35 from the main frame 1 Insert the slide rail 45 into the main frame 1 using the axle 41 two screws 34 and washers 37 38 2 Insert the ball pin 35 for stabilization into the main frame 1 ASSEMBLY ...

Страница 42: ...3 on the slide rail 45 2 Insert two cushions rubbers 36 to the slide rail 45 and tight it with two bolts 34 3 Insert two feets 55 on the rear support tube 54 4 Insert the rear support tube 54 on the slide rail 45 by using a bolt 19 three washers 43 and two bolts 42 5 Put on two end caps for the slide rail 40L 40R on the rear of the slide rail 45 ASSEMBLY ...

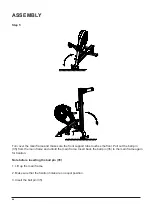
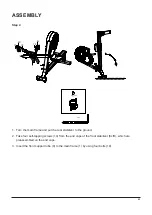
Страница 43: ...he main frame and put the rear stabilizer to the ground 2 Take four self tapping screws 10 from the end caps of the front stabilizer 8L R which are preassembled on the end caps 3 Insert the front support tube 9 to the main frame 1 by using four bolts 19 ASSEMBLY ...

Страница 44: ...r Pull out the ball pin 35 from the main frame and unfold the main frame Insert back the ball pin 35 to the main frame again for fixation Note before inserting the ball pin 35 1 Lift up the main frame 2 Make sure that the fixation holes are on equal position 3 Insert the ball pin 35 ASSEMBLY ...

Страница 45: ...wo fixed brackets for handlebar 11L R into the holes of the front support tube of the main frame 1 2 Fix the left pedal 14L to the left side of the main frame 1 3 Repeat this process for the right pedal 14R on the right side of the main frame 1 ASSEMBLY ...

Страница 46: ...46 Step 7 29 24 1 Fold up the computer 24 to see all the workout data 2 The handlebar 29 can be put on the fixed bracket ASSEMBLY ...

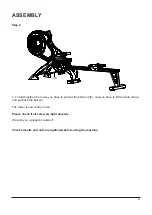
Страница 47: ...ut the ball pin 35 now you have to lift the slide rail up und put back the ball pin The rower is now ready to use Please check if all screw are tight properly We wish you a pleasent workout Check all bolts and nuts are tightened before using the machine ASSEMBLY ...

Страница 48: ...the clock switch back to the homescree Functions 1 SCAN Press the MODE button until SCAN appears on the screen The computer will switch bet ween time speed distance calories rowing trains and rowing trains per minute Each funtion will show up for 5 seconds 2 TIME Shows the workout time 3 SPEED Shows the current speed 4 DISTANCE Shows the distance 5 CALORIE Shows the calorie consumption 6 COUNT Sho...

Страница 49: ...sing or pressing the button 4 The computer starts to calculate as soon as you start to exercise The calculation will be finished when you stop training for longer than 4 seconds Specifications AUTO SCAN Every 5 seconds TIME 00 00 99 59 CURRENT SPEED The maximum speed is 99 9 km h KILOMETER 0 0 999 9 km CALORIE 0 0 999 9 kcal COUNT 0 9999 RPM 0 999 HEART RATE 40 240 BPM BATTERY TYPE 2x AAA WORKING ...

Страница 50: ...repeated again remembering not to force or jerk your muscles into the stretch As you get fitter you may need to train longer and harder It is advisable to train at least three times a week and if possible space your workouts evenly throughout the week Muscle Toning To tone muscle while on your Crosstrainer you will need to have the resistance set quite high This will put more strain on your leg mu...

Страница 51: ...al flexion stretch one side then the other Harmstring Stretch commence with knee slightly bent then push knee straight as tension allows push chest towards foot Adductor stretch push down with elbows on knees very gently keep back straight Lateral stretching Stretch your arms upwards Now try to stretch your right arm up as far as you can feeling your right side stretch Hold this position for a mom...

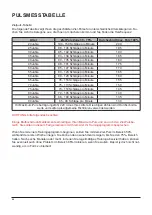
Страница 52: ...0 55 83 123 beats per minute 165 60 80 120 beats per minute 160 65 78 116 beats per minute 155 70 75 113 beats per minute 150 75 73 110 beats per minute 145 80 70 105 beats per minute 140 85 68 100 beats per minute 135 90 65 98 beats per minute 130 Your maximum heart rate is about 220 minus your age The above numbers are averages and should be used as general guidelines Important please note follo...

Страница 53: ...r display broken Kein Handpulssignal oder fal sches Handpulssignal The computer display receives no signal from the hand pulse sensor Check the hand pulse sensor line connectors to the computer The computer receives a weak or periodically occurring pulse signal The hand pulse sensors or pulse receivers do not work if your skin is extremely dry Wet your skin with a little water and try again Clean ...

Страница 54: ...nt at the time of handing over and was not caused by improper use function related wear or abuse 1 The warranty does not cover all parts of the device which are subject to wear due to function in so far as they are not production or material defects Damage caused by improper or faulty maintenance and repairs alterations or replacement of parts which have not been carried out by a qualified person ...

Отзывы: