background image


28


4.

  If  the  above  mentioned  procedures  have  not  managed  to  solve  your  problem,  please  contact  your  local 

ASUSTOR dealer or ASUSTOR Customer Service 

http://support.asustor.com

.You are also encouraged 

to browse through the 

ASUSTOR Knowledgebase

.


Содержание AS3102T

Страница 1: ...Quick Installation Guide Applicable Models AS3102T AS3102T v2 AS3104T AS3202T AS3204T AS3204T v2 Ver 2 3 0903 2015 3 2 Ver 3 2 0117 2019 01 17 ...

Страница 2: ...nstallation 8 Hard Disk Installation 8 Securing the Power Cord 13 Connecting and Powering on the NAS 14 4 Software Installation Guide 16 Download Center Installation 16 Web Installation 18 Installation Using a Mobile Device 18 Installation Using a Direct Connection 21 Shutting Down Your NAS 21 5 Appendix 23 LED Indicators 23 Rear Panel 24 Troubleshooting 24 ...

Страница 3: ...antee that interference will not occur in a particular installation If this equipment does cause harmful interference to radio or television reception which can be determined by turning the equipment off and on the user is encouraged to try to correct the interference by one or more of the following measures Reorient or relocate the receiving antenna Increase the separation between the equipment a...

Страница 4: ...surface Use this product in environments with an ambient temperature between 0 C and 40 C DO NOT block the air vents on the case of this product Always provide proper ventilation for this product DO NOT insert any object or spill liquid into the air vents If you encounter technical problems with this product contact a qualified service technician or your retailer DO NOT attempt to repair this prod...

Страница 5: ...AS3104T AS3204T AS3204T v2 Model Name AS3102T AS3102T v2 AS3202T AS3104T AS3204T AS3204T v2 Power Cord x1 x1 Adapter x1 x1 RJ45 Network Cable AS3102T AS3202T AS3102T v2 AS3104T AS3204T AS3204T v2 x1 x2 x1 x2 Power Cord Bracket x1 x1 Screws for use with 3 5 HDD x8 x16 ...

Страница 6: ...6 Quick Installation Guide x1 x1 ...

Страница 7: ...7 2 Optional Accessories The items below may be purchased from the ASUSTOR Accessories Store http shop asustor com ...

Страница 8: ...rd disk For a list of compatible hard disks please see http www asustor com service hd id hd Hard Disk Installation 1 Remove the screws from the rear of the NAS as shown in the graphic below AS3102T AS3102T v2 AS3202T AS3104T AS3204T AS3204T v2 2 Place the device sideways on a flat surface Note the wording indicating the directions for opening and closing the cover Remove the cover by sliding it i...

Страница 9: ...2T AS3104T AS3204T AS3204T v2 3 Installing 3 5 inch hard disks Slide the hard disks all the way into the disk bay until they are firmly seated and connected with the SATA connector For 3 5 drives with 3 screw holes on each side ...

Страница 10: ...S3104T AS3204T AS3204T v2 Note Please insert the hard disk into the HDD 1 slot shown in the graphic in order to have it initialized For 3 5 drives with 2 screw holes on each side AS3102T AS3102T v2 AS3202T AS3104T AS3204T AS3204T v2 ...

Страница 11: ...102T v2 AS3202T Note If you wish to utilize the RAID function it is recommended that you use hard disks of the same capacity in order to fully utilize the capacity of all hard disks AS3104T AS3204T AS3204T v2 Note If you wish to utilize the RAID function it is recommended that you use hard disks of the same capacity in order to fully utilize the capacity of all hard disks For 3 5 drives with 2 scr...

Страница 12: ...apacity of all hard disks AS3104T AS3204T AS3204T v2 Note If you wish to utilize the RAID function it is recommended that you use hard disks of the same capacity in order to fully utilize the capacity of all hard disks 5 Replace the cover and tighten the screws that were removed previously AS3102T AS3102T v2 AS3202T AS3104T AS3204T AS3204T v2 ...

Страница 13: ...ed cord bracket to secure the power cord in place if you are concerned about the NAS power cord becoming detached when the NAS is moved 1 Take the cord bracket out of the accessories box 2 Attach the bracket to the power cord as shown in the graphic below ...

Страница 14: ... 4 Position the bracket over the hole for the removed fan screw Secure the bracket in place by replacing the fan screw AS3102T AS3102T v2 AS3202T AS3104T AS3204T AS3204T v2 Connecting and Powering on the NAS 1 Connect the NAS to its power supply 2 Connect the NAS to your router switch or hub using an Ethernet cable ...

Страница 15: ...r operation once the yellow system status LED indicator has stopped flashing and remains steadily lit At this time you should also hear a beep from the system buzzer Hardware installation is now complete Please move on to the software installation guide to configure your system settings Note If the device has been subjected to strong shaking or shock it is recommended that you remove the cover to ...

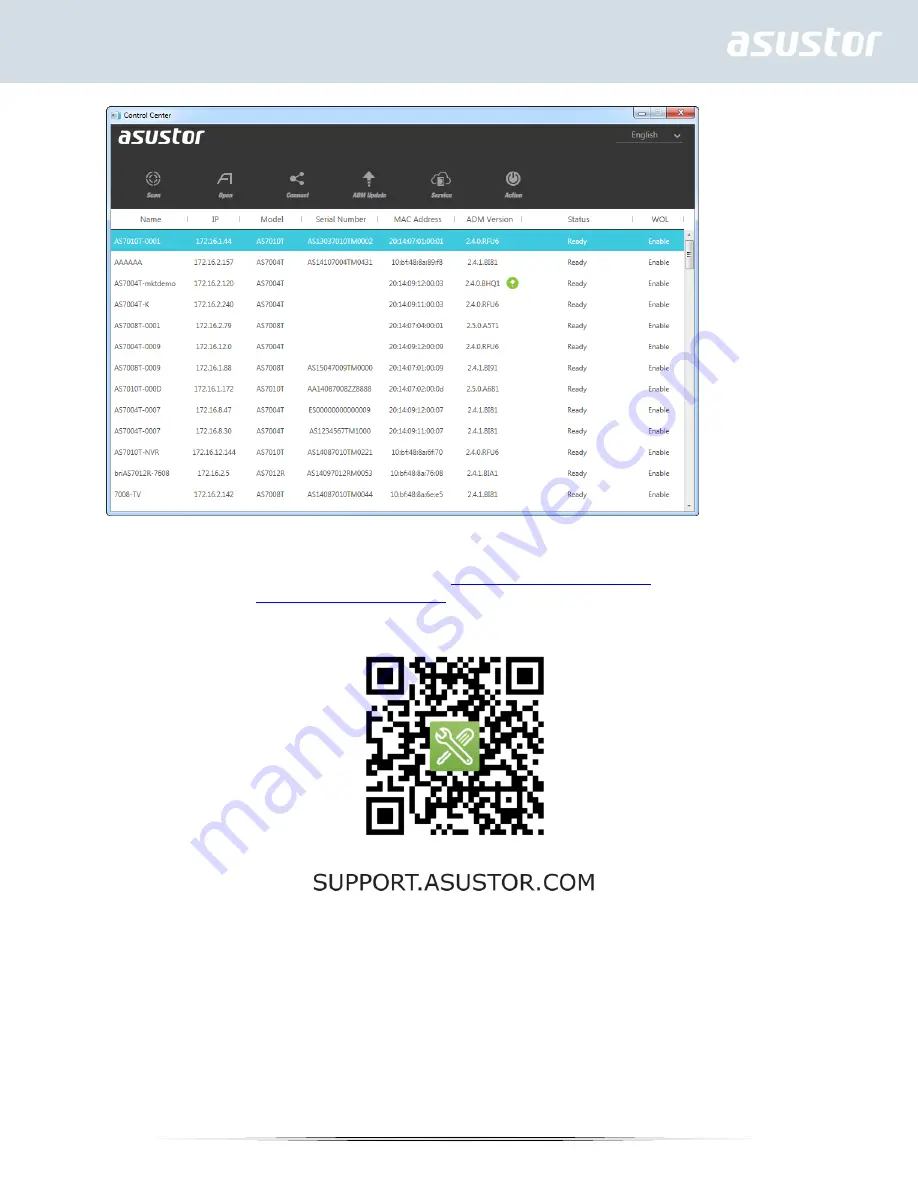
Страница 16: ...on of the ASUSTOR website http www asustor com service downloads to download the latest software Download Center Installation Windows Users 1 After ASUSTOR Control Center has been installed it will automatically begin to scan your network for ASUSTOR NAS devices 2 Select your NAS from the list and follow the installation wizard s instructions to complete the configuration process ...

Страница 17: ...R Control Center has been installed it will automatically begin to scan your network for ASUSTOR NAS devices 2 Select your NAS from the list and follow the installation wizard s instructions to complete the configuration process ...

Страница 18: ...tp 192 168 1 168 8000 to begin initialization 2 Please follow the instructions from the installation wizard to complete the configuration process Installation Using a Mobile Device 1 Search for AiMaster in Google Play or the Apple App Store You can also scan the QR codes provided below Download and install the AiMaster mobile app to your mobile device ...

Страница 19: ...at your mobile device is connected to the same local network that your NAS is connected to 3 Next open AiMaster and then select the icon from the toolbar at the top of the screen 4 Select Auto Discovery AiMaster will now scan the local network for your NAS ...

Страница 20: ...20 5 Select your NAS from the list that appears 6 Select Start Initialization to begin installation Follow the prompts and instructions to complete the configuration process ...

Страница 21: ...g Down Your NAS 1 Confirm the function settings for the power button as shown in the graphic below When the power button is held down for 1 5 seconds you can decide whether to shut down the NAS or have it enter into sleep mode This setting may be access from within ADM by selecting Settings Hardware Power Settings ...

Страница 22: ...d down the power button for 1 5 seconds You should be able to hear a beep from the system buzzer Let go of the power button and the NAS will either shut down or enter sleep mode depending on your configuration ...

Страница 23: ...ily lit System ready Red Steadily lit 1 System or hard disk abnormality 2 Fan or system temperature abnormality Network Yellow Steadily lit Network port connected Hard Disk Yellow Steadily lit Hard disk ready Flashing Data access in progress AS3102T AS3102T v2 AS3104T AS3202T AS3204T AS3204T v2 1 Power LED Indicator 2 System Status LED Indicator 3 Network LED Indicator 4 Hard Disk LED Indicator ...

Страница 24: ...XXT AS32XXT AS31XXT v2 AS32XXT v2 Troubleshooting Q Why can t I detect my ASUSTOR NAS using ASUSTOR Control Center 1 Power Button 2 Reset Button 3 USB 3 0 Port 4 HDMI Port 5 Network Port 6 DC Input 7 K Lock 8 System Fan ...

Страница 25: ...ry connecting your Ethernet cable to the other network port or try using a different Ethernet cable 2 Please first disable any firewalls that may be running on your computer Then try scanning for your NAS again using ASUSTOR Control Center 3 If you still cannot detect your NAS please connect your NAS to your computer using the provided RJ 45 network cable and change your computer s IP settings Sel...

Страница 26: ...26 Right click on Local Area Connection and select Properties Under the Networking tab select Internet Protocol Version 4 TCP IPv4 and click on Properties ...

Страница 27: ...the General tab select the Use the following IP address radio button Set the IP address to 169 254 1 1 and the Subnet mask to 255 255 0 0 and then click on OK Open up ASUSTOR Control Center to scan for your NAS ...

Страница 28: ...entioned procedures have not managed to solve your problem please contact your local ASUSTOR dealer or ASUSTOR Customer Service http support asustor com You are also encouraged to browse through the ASUSTOR Knowledgebase ...

Отзывы: