ROG MAXIMUS X HERO (WI-FI AC)
2-15
Chapter 2
2.3
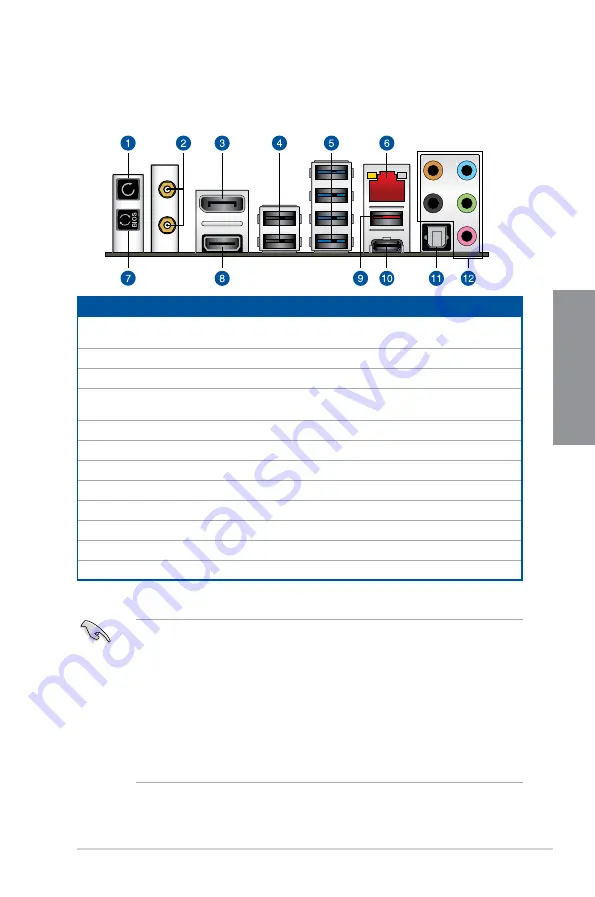
Motherboard rear and audio connections
2.3.1
Rear I/O connection
* and ** : Refer to the tables on the next page for LAN port LEDs, and audio port definitions.
Rear panel connectors
1.
Clear CMOS button (CLR_CMOS). Press this button to clear the BIOS setup
information only when the systems hangs due to overclocking.
2.
Wi-Fi 802.11 a/b/g/n/ac, Bluetooth V4.2
3.
DisplayPort
4.
Intel
®
USB 2.0 ports 7, and 8. Upper port supports the KeyBot II feature, and lower
port supports USB BIOS Flashback function.
5.
Intel
®
USB 3.1 Gen 1 ports 3, 4, 5, and 6
6.
LAN (RJ-45) port*
7.
USB BIOS Flashback button
8.
HDMI port
9.
USB 3.1 Gen 2 Type-A port EA1
10.
USB 3.1 Gen 2 Type-C™ port EC2
11.
Optical S/PDIF OUT port
12.
Audio I/O ports**
•
USB 3.1 Gen 1/Gen 2 devices can only be used as data storage only.
•
We strongly recommend that you connect your devices to ports with matching data
transfer rate. Please connect your USB 3.1 Gen 1 devices to USB 3.1 Gen 1 ports and
your USB 3.1 Gen 2 devices to USB 3.1 Gen 2 ports for faster and better performance
for your devices.
•
Due to the design of the Intel chipset, all USB devices connected to the USB 3.1 Gen
1 ports are controlled by the xHCI controller. Some legacy USB devices must update
their firmware for better compatibility.
• When KeyBot II is activated, USB hot plug function of the KeyBot port (USB 3.1 Gen 1
port 7) will be temporarily disabled.
Содержание MAXIMUS X HERO
Страница 1: ...Motherboard MAXIMUS X HERO WI FI AC ...
Страница 46: ...2 4 Chapter 2 Basic Installation Chapter 2 To uninstall the CPU heatsink and fan assembly ...
Страница 48: ...2 6 Chapter 2 Basic Installation Chapter 2 2 1 4 DIMM installation To remove a DIMM ...
Страница 52: ...2 10 Chapter 2 Basic Installation Chapter 2 To install Hyper M 2 x4 card ...
Страница 53: ...ROG MAXIMUS X HERO WI FI AC 2 11 Chapter 2 2 1 9 M 2 installation Supported M 2 type varies per motherboard ...
Страница 60: ...2 18 Chapter 2 Basic Installation Chapter 2 Connect to 4 Speakers Connect to 6 Speakers Connect to 8 Speakers ...
Страница 62: ...2 20 Chapter 2 Basic Installation Chapter 2 ...
Страница 116: ...A 14 Appendix Appendix ...


