


2-12
Chapter 2: Hardware information
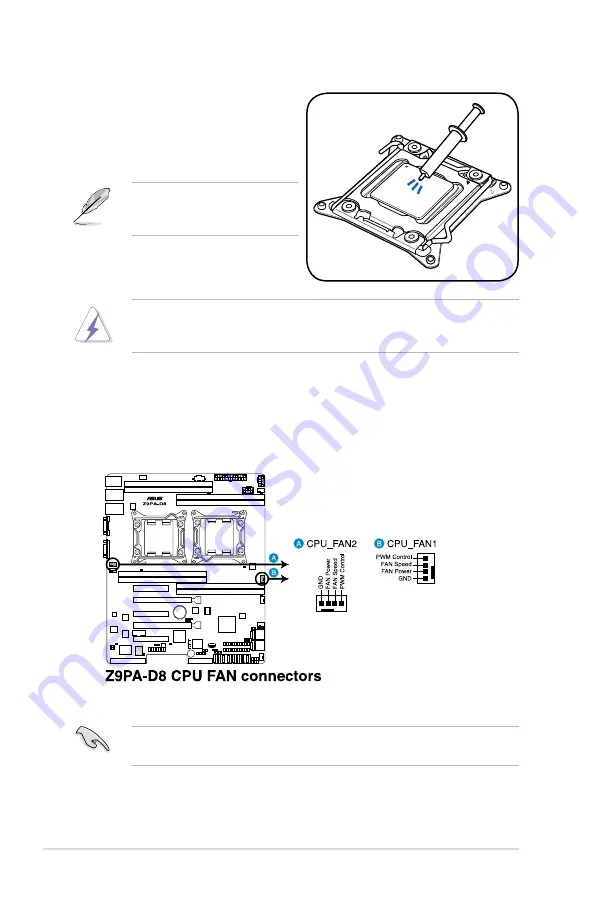
13. Connect the CPU fan cable to the connector on the motherboard labeled
CPU_FAN1 / CPU_FAN2.
DO NOT forget to connect the CPU fan connector! Hardware monitoring errors
can occur if you fail to plug this connector.
The Thermal Interface Material is toxic and inedible. DO NOT eat it. If it gets into
your eyes or touches your skin, wash it off immediately, and seek professional
medical help.
Some heatsinks come with pre-
applied thermal paste. If so, skip
this step.
11. Apply some Thermal Interface
Material to the exposed area of
the CPU that the heatsink will be
in contact with, ensuring that it is
spread in an even thin layer.
12. Install a compatible CPU heatsink and fan for each CPU socket.
Содержание Z9PA-D8
Страница 1: ...Motherboard Z9PA D8 Series ...
Страница 15: ...This chapter describes the motherboard features and the new technologies it supports 1 Product introduction ...
Страница 25: ...ASUS Z9PA D8 2 5 2 2 3 Motherboard layout Z9PA D8 ...
Страница 26: ...2 6 Chapter 2 Hardware information Z9PA D8C ...
Страница 60: ...2 40 Chapter 2 Hardware information ...
Страница 61: ...3 Chapter 3 Powering up This chapter describes the power up sequence and ways of shutting down the system ...
Страница 62: ...ASUS Z9PA D8 Chapter summary 3 3 1 Starting up for the first time 3 3 3 2 Powering off the computer 3 4 ...
Страница 112: ...4 48 Chapter 4 BIOS setup ...
Страница 182: ...6 30 Chapter 6 Driver installation 6 Click Finish to complete the installation and exit the wizard ...
Страница 190: ...Appendix summary A ASUS Z9PA D8 A 1 Z9PA D8 block diagram A 3 A 2 Z9PA D8C block diagram A 4 ...
Страница 191: ...ASUS Z9PA D8 A 3 A 1 Z9PA D8 block diagram ...
Страница 192: ...A 4 Appendix A Reference information A 2 Z9PA D8C block diagram ...


