background image

1-2

Chapter 1: Product introduction

1.3 

Monitor introduction

1.3.1.

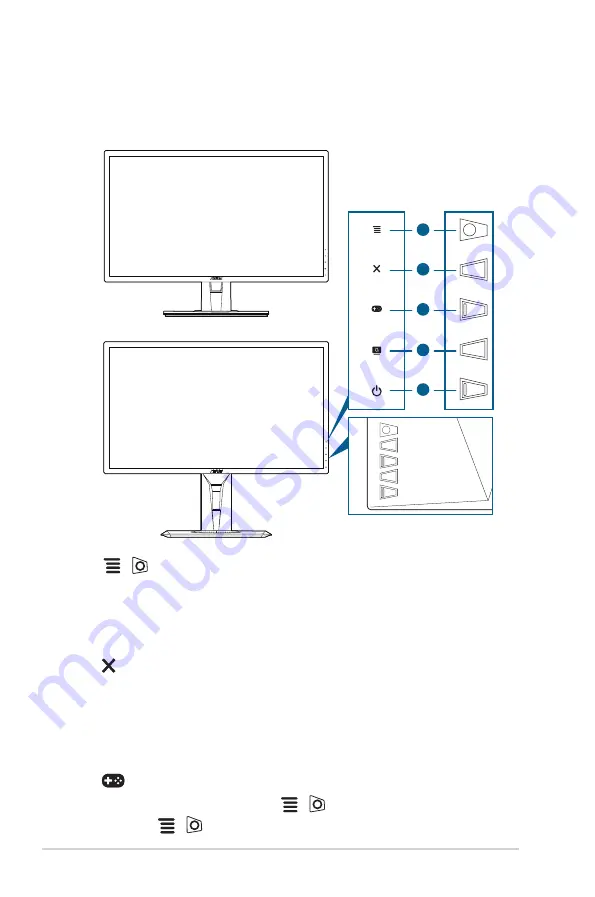
Front.view

1

2

3

4

5

VG245HE

VG245H/VG245Q

1. 

 (

 5-way) button:

•  Turns on the OSD menu. Enacts the selected OSD menu item. 
•  Increases/Decreases values or moves your selection up/down/left/right.
•  Displays the input selection bar when the monitor  enters standby mode 

or displays the “NO SIGNAL“ message.

2. 

 button

•  Exits the OSD menu item.
•  Displays the input selection bar when the monitor  enters standby mode 

or displays the “NO SIGNAL“ message.

•  Toggles the Key Lock function between on and off with a long press for 5 

seconds.

3. 

 button: 

•  GamePlus hotkey. Move the 

 (

) button up/down to select and 

press 

 (

) to confirm the function needed. 

Содержание VG245 series

Страница 1: ...VG245 series LCD Monitor User Guide ...

Страница 2: ...NTABILITY OR FITNESS FOR A PARTICULAR PURPOSE IN NO EVENT SHALL ASUS ITS DIRECTORS OFFICERS EMPLOYEES OR AGENTS BE LIABLE FOR ANY INDIRECT SPECIAL INCIDENTAL OR CONSEQUENTIAL DAMAGES INCLUDING DAMAGES FOR LOSS OF PROFITS LOSS OF BUSINESS LOSS OF USE OR DATA INTERRUPTION OF BUSINESS AND THE LIKE EVEN IF ASUS HAS BEEN ADVISED OF THE POSSIBILITY OF SUCH DAMAGES ARISING FROM ANY DEFECT OR ERROR IN THI...

Страница 3: ... 1 4 1 3 4 GameVisual Function 1 5 Chapter 2 Setup 2 1 Assembling the monitor arm base 2 1 2 2 Adjusting the monitor 2 2 2 3 Detaching the arm for VESA wall mount 2 4 2 4 Connecting the cables 2 5 2 5 Turning on the monitor 2 6 Chapter 3 General instructions 3 1 OSD On Screen Display menu 3 1 3 1 1 How to reconfigure 3 1 3 1 2 OSD function introduction 3 1 3 2 Specifications summary 3 7 3 3 Troubl...

Страница 4: ...y one or more of the following measures Reorient or relocate the receiving antenna Increase the separation between the equipment and receiver Connect the equipment to an outlet on a circuit different from that to which the receiver is connected Consult the dealer or an experienced radio TV technician for help The use of shielded cables for connection of the monitor to the graphics card is required...

Страница 5: ...oper ventilation is provided The monitor should be operated only from the type of power source indicated on the label If you are not sure of the type of power supply to your home consult your dealer or local power company Use the appropriate power plug which complies with your local power standard Do not overload power strips and extention cords Overloading can result in fire or electric shock Avo...

Страница 6: ...eaner directly on the screen as it may drip inside the monitor and cause an electric shock The following symptoms are normal with the monitor The screen may flicker during the initial use due to the nature of the fluorescent light Turn off the Power Switch and turn it on again to make sure that the flicker disappears You may find slightly uneven brightness on the screen depending on the desktop pa...

Страница 7: ...de optional documentation that may have been added by your dealer These documents are not part of the standard package Takeback Services ASUS recycling and takeback programs come from our commitment to the highest standards for protecting our environment We believe in providing solutions for our customers to be able to responsibly recycle our products batteries and other components as well as the ...

Страница 8: ...e year product warranty Minimum three year availability of spare parts Product takeback Packaging Limits on hazardous substances in product packaging Packaging prepared for recycling Ergonomic User centered design Visual ergonomics in products with a display Adjustability for user comfort displays headsets Acoustic performance protection against sound spikes headsets and fan noise projectors compu...

Страница 9: ... experience With these features you can enjoy the convenience and delightful visual experience that the monitor brings to you 1 2 Package contents Check your package for the following items LCD monitor Monitor base Quick start guide Warranty card Power adapter Power cord VGA cable optional Audio cable optional HDMI cable optional DisplayPort cable optional If any of the above items is damaged or m...

Страница 10: ...own left right Displays the input selection bar when the monitor enters standby mode or displays the NO SIGNAL message 2 button Exits the OSD menu item Displays the input selection bar when the monitor enters standby mode or displays the NO SIGNAL message Toggles the Key Lock function between on and off with a long press for 5 seconds 3 button GamePlus hotkey Move the button up down to select and ...

Страница 11: ...er button power indicator Turns the monitor on off The color definition of the power indicator is as the below table Status Description White ON Amber Standby mode No signal OFF OFF 1 3 2 Back view 8 8 VG245HE VG245H VG245Q 1 DC IN port This port connects the power cord 2 HDMI port This port is for connection with an HDMI compatible device 3 DisplayPort This port is for connection for a DisplayPor...

Страница 12: ...s per second counter lets you know how smooth the game is running Display Alignment displays alignment lines on 4 sides of the screen serving as an easy and handy tool for you to line up multiple monitors perfectly To active GamePlus 1 Press the GamePlus hotkey 2 Move the button up down to select among different functions 3 Press the button or move the button right to confirm the function you choo...

Страница 13: ...is the best choice for movie watching with GameVisualTM Video intelligence Technology RTS RPG Mode This is the best choice for Real Time Strategy RTS Role Playing Game RPG playing with GameVisualTM Video intelligence Technology FPS Mode This is the best choice for First Person Shooter game playing with GameVisualTM Video intelligence Technology sRGB Mode This is the best choice for viewing photos ...

Страница 14: ...1 6 Chapter 1 Product introduction ...

Страница 15: ... front of the monitor face down on a table 2 Attach the base into the arm making sure the tab on the arm fits into the groove on the base 3 Fix the base to the arm by fastening the bundled screw We recommend that you cover the table surface with soft cloth to prevent damage to the monitor VG245H VG245Q VG245HE ...

Страница 16: ...d to prevent the monitor from falling when you change its angle VG245HE The recommended adjusting angle is 33 to 5 VG245H VG245Q The recommended adjusting angle is 33 to 5 for tilt 90 to 90 for swiveling 130 mm for height adjustment 90 for portrait view 130mm 90 90 0 5 33 5 33 VG245HE VG245H VG245Q It is normal that the monitor slightly shakes while you adjust the viewing angle Tilt Swivel Height ...

Страница 17: ...monitor VG245H VG245Q 1 Lift the monitor to the highest position 2 Tilt the monitor to its maximum angle 3 Pivot the monitor to the angle you need 0 90 0 90 5 33 130mm It is normal that the monitor slightly shakes while you adjust the viewing angle ...

Страница 18: ...ur screw holes Figure 1 3 Remove the base Figure 2 4 Use a screwdriver to remove the screw on the hinge Figure 3 then remove the hinge 2 1 2 1 1 2 2 1 VG245HE VG245H VG245Q We recommend that you cover the table surface with soft cloth to prevent damage to the monitor The VESA wall mount kit 100 x 100 mm is purchased separately Use only the UL Listed Wall Mount Bracket with minimum weight load 22 7...

Страница 19: ...t the VGA HDMI DisplayPort cable a Plug one end of the VGA HDMI DisplayPort cable to the monitor s VGA HDMI DisplayPort port b Connect the other end of the VGA HDMI DisplayPort cable to your computer s VGA HDMI DisplayPort port c Tighten the two screws to secure the VGA connector To connect the audio cable connect one end of the audio cable to the monitor s Audio in port the other end to the compu...

Страница 20: ...2 6 Chapter 2 Setup 2 5 Turning on the monitor Press the power button See page 1 2 for the location of the power button The power indicator lights up in white to show that the monitor is ON ...

Страница 21: ...sub menu move the button up down again to navigate through the sub menu functions Highlight the desired sub menu function and press the button or move the button right to activate it 3 Move the button up down to change the settings of the selected function 4 To exit and save the OSD menu press the button or move the left repeatedly until the OSD menu disappears To adjust other functions repeat ste...

Страница 22: ...e following to alleviate eye strains Users should take some time away from the display if working for long hours It is advised to take short breaks at least 5 mins after around 1 hour of continuous working at the computer Taking short and frequent breaks is more effective than a single longer break To minimize eye strain and dryness in your eyes users should rest the eye periodically by focusing o...

Страница 23: ...ng Reddish Natural and Yellowish Smart View provides better display quality under big viewing angle 4 Image Set the image related setting from this menu Sharpness Trace Free Aspect Control VividPixel Position Focus Auto Adjust More Image ASUS VG245 Racing Mode HDMI 1 1920x1080 60Hz Sharpness The adjusting range is from 0 to 100 Trace Free Adjusts the response time of the monitor Aspect Control Adj...

Страница 24: ...nd phase for VGA mode only ASCR Turns on off the ASCR ASUS Smart Contrast Ratio function FreeSync HDMI DisplayPort input only Allows an FreeSync supported graphics source to dynamically adjust display refresh rate based on typical content frame rates for power efficient virtually stutter free and low latency display update FreeSync can only be activated within 40Hz 75Hz FreeSync supported AMD GPUs...

Страница 25: ...VG245 Racing Mode HDMI 1 1920x1080 60Hz VG245H VG245HE VG245Q 7 System Setup Allows you to adjust the system GameVisual Demo Mode ECO Mode OSD Setup Language Key Lock More System Setup ASUS VG245 Racing Mode HDMI 1 1920x1080 60Hz GameVisual Demo Mode Activate the demo mode for the GameVisual function ECO Mode reduces power consumption OSD Setup Adjusts the OSD timeout from 10 to 120 seconds Enable...

Страница 26: ...onal Chinese Japanese Korean Thai Indonesia Persian Keylock To disable all function keys Press over 5 seconds to cancel the key lock function Information Shows the monitor information Power Indicator Turn the power LED indicator on off Power Key Lock Enables or disables the power key All Reset Yes allows you to restore the default settings 8 MyFavorite Loads Saves all settings on the monitor Setti...

Страница 27: ... VG245Q HDMI v1 4 x 2 DisplayPort v1 2 Earphone jack Yes Audio input Yes Speaker Built in 2 W x 2 Stereo RMS USB 3 0 port No Colors Black Power LED White On Amber Standby Tilt 33 5 Swivel VG245HE No VG245H VG245Q 90 90 Height adjustment VG245HE No VG245H VG245Q 130 mm VESA wall mount 100 x 100 mm Kensington lock Yes Voltage rating AC 100 240V DC 19V 2 1A AC adapter Power consumption Power On 40 W ...

Страница 28: ...optional HDMI cable optional DiplayPort cable optional power adapter power cord Quick start guide warranty card Compliance and Standards VG245H VG245HE Energy Star UL cUL CB CE ErP FCC CCC CU RCM BSMI VCCI RoHS J MOSS WEEE Windows 7 8 1 10 WHQL CEL MEPS PSE ISO9241 307 UkrSEPRO KCC E Standby TUV Flicker Free TUV Low Blue Light TCO 7 0 TUV GS TUV Ergo VG245Q UL cUL FCC ICES 3 EPEAT Silver CB CE ErP...

Страница 29: ...t the computer with another available monitor to check if the computer is properly working Screen image is too light or dark Adjust the Contrast and Brightness settings via OSD Screen image is not centered or sized properly Adjust the H Position or V Position settings via OSD Screen image bounces or a wave pattern is present in the image Make sure the signal cable is properly connected to the moni...

Страница 30: ... P 46 86 P 832x624 74 55 P N 49 72 P N 1024x768 60 00 N 48 36 N 1024x768 70 069 N 56 476 N 1024x768 75 00 N 60 02 N 1152x864 75 00 P N 67 5 P N 1280x720 60 00 N 45 00 P 1280x768 60 00 N 47 78 P 1280x800 60 00 N 49 7 P 1280x960 60 00 N 60 00 P 1280x1024 60 02 P 63 98 P 1280x1024 75 02 P 79 98 P 1360x768 59 79 P 47 712 P 1366x768 59 79 P 47 712 P 1440x900 59 89 P 55 94 N 1600x1200 60 00 P 75 00 P 16...

Страница 31: ...rd definition video Preset Timing Name Pixel Format Horizontal Frequency kHz Vertical Frequency Hz Pixel Rate MHz OSD Display 1 480p 720 x 480 31 469 60 27 480p 60Hz 2 720p60 1280 x 720 45 60 74 25 720p 60Hz 3 576p 720 x 576 31 25 50 27 576p 50Hz 4 720p50 1280 x 720 37 5 50 74 25 720p 50Hz 5 1080p60 1920 x 1080 67 5 60 148 5 1080p 60Hz 6 1080p50 1920 x 1080 56 25 50 148 5 1080p 50Hz ...

Страница 32: ...Model Number VG245 Conforms to the following specifications FCC Part 15 Subpart B Unintentional Radiators Supplementary Information This device complies with part 15 of the FCC Rules Operation is subject to the following two conditions 1 This device may not cause harmful interference and 2 this device must accept any interference received including interference that may cause undesired operation R...

Страница 33: ...07 A11 2011 R TTE Directive 1999 5 EC EN 300 328 V1 8 1 2012 06 EN 300 440 1 V1 6 1 2010 08 EN 300 440 2 V1 4 1 2010 08 EN 301 511 V9 0 2 2003 03 EN 301 908 1 V6 2 1 2013 04 EN 301 908 2 V6 2 1 2013 10 EN 301 908 13 V6 2 1 2014 02 EN 301 489 1 V1 9 2 2011 09 EN 301 489 3 V1 6 1 2013 12 EN 301 489 4 V2 1 1 2013 12 EN 301 489 7 V1 3 1 2005 11 EN 301 489 9 V1 4 1 2007 11 EN 301 489 17 V2 2 1 2012 09 ...

Отзывы: