background image

ASUS V9520 Home Theater User Guide

24

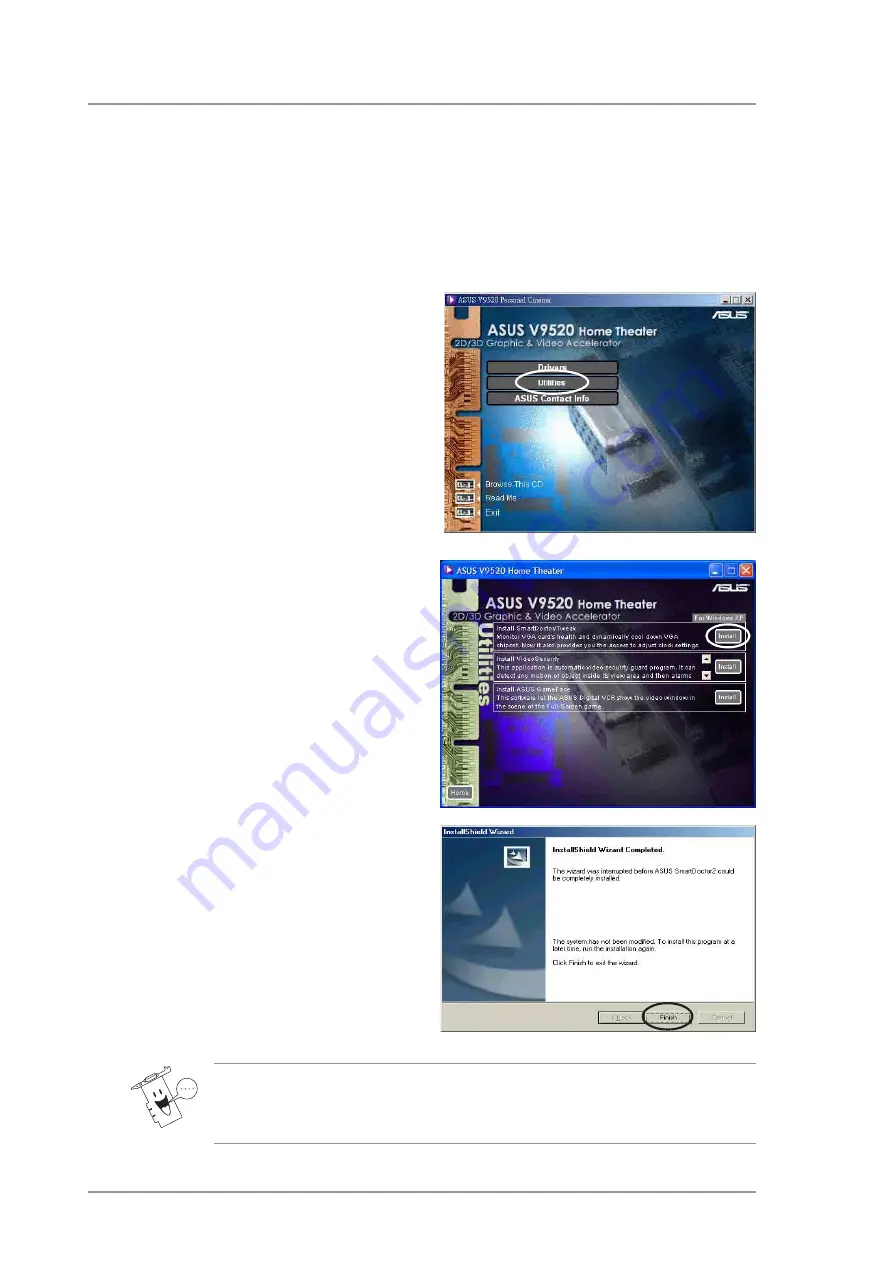
7.1 Install ASUS SmartDoctor

6. Click on Finish, after the setup

is complete.

7. Reboot computer to complete

setup.

The ASUS SmartDoctor monitor the VGA card’s health and dynamically cool
down VGA chipset. It also provides you access to adjust clock settings.

The Smart Doctor utility is works only for VGA card models with a
built-in monitor chipset. If the monitor chipset is not present, the ASUS
Tweak utility will be installed.

1. Insert the support CD into your

CD-ROM drive.

2. Double click the CD drive icon

in My Computer to bring up
the autorun screen or run
Setup.exe in the root directory
of your CD-ROM drive.

3. From the installation menu,

click Utilities.

4. Click Install SmartDoctor/

Tweak from the Utilities
dialog box 
to copy the
necessary files to your
computer.

5. Follow succeeding onscreen

instructions.

7.

ASUS SmartDoctor

Содержание V9520 Home Theater

Страница 1: ...V9520 Home Theater User Guide ...

Страница 2: ...FITNESS FOR A PARTICULAR PURPOSE IN NO EVENT SHALL ASUS ITS DIRECTORS OFFICERS EMPLOYEES OR AGENTS BE LIABLE FOR ANY INDIRECT SPECIAL INCIDENTAL OR CONSEQUENTIAL DAMAGES INCLUDING DAMAGES FOR LOSS OF PROFITS LOSS OF BUSINESS LOSS OF USE OR DATA INTERRUPTION OF BUSINESS AND THE LIKE EVEN IF ASUS HAS BEEN ADVISED OF THE POSSIBILITY OF SUCH DAMAGES ARISING FROM ANY DEFECT OR ERROR IN THIS MANUAL OR P...

Страница 3: ...ram 6 Method 2 Directly executing installer program 7 Method 3 Plug and Play 7 Method 4 Display Property Page 8 4 1 2 Windows 2000 XP 9 Method 1 ASUS Quick Setup Program 9 Method 2 Plug and Play 10 4 1 3 Windows NT 4 0 12 Method 1 Display Property Page 12 5 ASUS VideoSecurity 13 5 1 Installing ASUS VideoSecurity 13 5 2 Using ASUS VideoSecurity 14 6 ASUS GameFace 18 6 1 Introduction 18 6 2 Installi...

Страница 4: ...ASUS V9520 Home Theater User Guide iv 9 ASUS PowerDirector Pro 31 9 1 Introduction 31 9 2 Installing ASUS PowerDirector Pro 33 10 Remote control functions 34 11 Resolution Table 39 ...

Страница 5: ...ipment does cause harmful interference to radio or television reception which can be determined by turning the equipment off and on the user is encouraged to try to correct the interference by one or more of the following measures Reorient or relocate the receiving antenna Increase the separation between the equipment and receiver Connect the equipment to an outlet on a circuit different from that...

Страница 6: ...rrect voltage in your area If you are not sure about the voltage of the electrical outlet you are using contact your local power company If the power supply is broken do not try to fix it by yourself Contact a qualified service technician or your retailer Operation safety Before installing the motherboard and adding devices on it carefully read all the manuals that came with the package Before usi...

Страница 7: ... documents are not part of the standard package WARNING Information to prevent injury to yourself when trying to complete a task CAUTION Information to prevent damage to the components when trying to complete a task IMPORTANT Information that you MUST follow to complete a task NOTE Tips and additional information to aid in completing a task Macrovision Corporation Product Notice This product incor...

Страница 8: ...NAL America Address 44370 Nobel Drive Fremont CA 94538 USA General Fax 1 502 933 8713 General Email tmd1 asus com Technical Support Support Fax 1 502 933 8713 General Support 1 502 995 0883 Notebook Support 1 510 739 3777 x5110 Web Site usa asus com Support Email tsd asus com ASUS COMPUTER GmbH Germany and Austria Address Harkortstr 25 40880 Ratingen BRD Germany General Email sales asuscom de for ...

Страница 9: ...ed by the programmable precise and powerful CineFX GPU NVIDIA GeForce FX 5200 Delivers cinema quality video to your PC Optimized for DirectX 9 0 and OpenGL 1 4 features Ensures broad application support Built in 128MB Double Data Rate frame buffer More resolutions and color depths up to 2048 x 1536 85Hz AGP 8X support By adding support for the newest AGP 8X AGP 3 0 standard the V9520 series takes ...

Страница 10: ...e 2 Package Contents ASUS V9520 Home Theater Card Remote controller USB remote control receiver AV Breakout box ASUS Home Theater software CD ASUS PowerDirector software CD ASUS V9520 Home Theater driver CD ASUS Home Theater user guide ...

Страница 11: ...ices Drawings are for reference only actual cards may vary Frame Buffer DDR VGA Monitor Output 15pin Standard VGA Output Projector NVIDIA TM GeForce FX 5200 GPU Graphics Processing Unit RF in Microtune MT2050 Frame Buffer DDR Frame Buffer DDR Frame Buffer DDR CATV Antenna PUSH Composite OUT Audio OUT R Audio OUT L Composite IN Audio IN R Audio IN L Svideo OUT Svideo IN To Speaker Audio IN To Sound...

Страница 12: ... 7 Anchor the card mounting bracket to the rear of the chassis and secure it with a screw 8 Replace the system unit cover 9 Use a video signal cable to connect your analog monitor VGA connector 15 pin male to the connector on the card 15 pin female 10 Connect the power cables 11 Proceed to section 4 Drivers Installation 3 2 For systems with an existing VGA card 1 Boot your computer 2 Click on the ...

Страница 13: ...mputer to bring up the autorun screen or run Setup exe in the root directory of your CD ROM drive 3 From the installation menu click Drivers 4 1 Install ASUS enhanced driver 4 Click Install ASUS Enhanced Driver from the Drivers dialog box to copy the necessary files to your computer 5 Setup prompts you when it has finished copying all the files to your computer Click OK to finish the installation ...

Страница 14: ...our computer Click Yes then Finish to restart your computer Method 1 ASUS Quick Setup Program Installing the AGP GART driver will ensure that the chipset s AGP functions are available DirectX must be installed so that your video player can take advantage of hardware acceleration Install GART Driver and Install DirectX later in this manual for the setup steps 3 Insert the support CD into your CD RO...

Страница 15: ...n is complete 1 Boot the computer 2 When Windows detects your ASUS graphics card the New Hardware Found dialog box appears 3 Click Driver from disk provided by hardware manufacturer Before proceeding with the following steps replace your old VGA card with an ASUS graphic card Method 3 Plug and Play 4 The Setup prompts you for the location of the driver type the following path D WIN9xMe to direct S...

Страница 16: ...D ROM drive From the Drives box of the Open dialog box select your CD ROM drive and click OK 9 From the Folders box double click the WIN9x folder and select ASUSNV9X INF in the File name box 10 Click OK to display the list of compatible video cards Select your VGA card type for your operating system and click OK 11 From the Update Driver Warning box click Yes to confirm the setting up of the ASUS ...

Страница 17: ...ontrol Panel System Device Manager Disk Drives Properties Settings Options DMA Run the Disk Defragmenter defrag exe especially when the hard disk is almost full Make sure the system power supply can provide the minimum power requirement of the graphic card When using a motherboard with VIA chipset install VIA VGARTD in normal mode 4 1 2 Windows 2000 XP Method 1 ASUS Quick Setup Program 5 From the ...

Страница 18: ...o your CD ROM drive to bring up the Locate Driver Files item of the Found New Hardware Wizard dialog box 4 From the Found New Hardware Wizard dialog box selectSearchforasuitabledriver for my device recommended then click Next Method 2 Plug and Play 1 Boot your computer 2 When Windows detects your ASUS graphics card the Found New Hardware Wizard dialog box appears 3 Click Next ...

Страница 19: ...s item of the Found New Hardware Wizard dialog box 9 Follow succeeding onscreen instructions 8 When prompted to select the display driver to install in your system select the one that is located in the D WIN2KXP ASUS and click Next 10 When Setup has finished installing all the necessary files to your computer it will prompt you to restart your computer click OK to restart your computer and to comp...

Страница 20: ...ndows NT then click OK 10 Select your ASUS VGA Card model then click OK 11 Windows NT will once again prompt for confirmation Confirm installation of display drivers to copy all appropriate files When all files are copied click Close go back to the Display Properties box then click Apply 12 The System Settings Change dialog box is displayed Click Yes to reboot computer 13 Windows NT will restart w...

Страница 21: ...ure devices 5 From the Welcome screen click Next Follow succeeding screen instructions 1 Insert the support CD into your CD ROM drive 2 Double click the CD drive icon in My Computer to bring up the autorun screen or run Setup exe in the root directory of your CD ROM drive 3 From the installation menu click Utilities 4 Click Install VideoSecurity from the Utilities dialog box to copy the necessary ...

Страница 22: ...rors Before you execute VideoSecurity there are some limitations you have to understand so that you can appropriately use it Due to changing temperatures the captured image of some CCDs will be twisted which may give a wrong detection If the features e g color luminance of the object are similar to that of background the object may not be detected clearly The CCD cannot capture the object smoothly...

Страница 23: ...stores its temporary working and log files The default is C VIDEOSEC The directory is user configurable When VideoSecurity is ran a sub directory automatically created under the main directory using the current date and time as the folder name For example 1999 11 30_12 30 20 means that VideoSecurity was started on 30 November 1999 at 12 30 20 PM Detect Region Full window detects all visible area w...

Страница 24: ...et up personalized handling procedure through Recording Send email Make phone call or Execute specific program VideoSecurity will execute procedures set up by the user once any error is detected Devices Click the Devices tab to select capture devices and video standard Use mouse to fine tune the Video Security screen and then click OK when done Always on Top is like a Normal Window except that the...

Страница 25: ... to define your VideoSecurity video window Use your mouse to drag your intended rectangular region 5 2 3 Running ASUS VideoSecurity Click the ASUS icon on the taskbar s status area Clicking this icon opens the ASUS Control Panel then click the ASUS VideoSecurity to run VideoSecurity ...

Страница 26: ...ion feature that enhances interactive gaming experience by enabling point to point video conferencing functions and online gaming to take place simultaneously thus allowing you to see and talk to your opponents while playing full screen online games Visit the ASUS website www asus com for more information about the ASUS GameFace technology ...

Страница 27: ... the CD drive icon in My Computer to bring up the autorun screen or run Setup exe in the root directory of your CD ROM drive 3 From the installation menu click Utilities 4 Click Install ASUS GameFace from the Utilities dialog box 5 From the Welcome box click Next to start the installation 6 Follow succeeding on screen instructions 5 Click Finished after the installation is complete ...

Страница 28: ...Select OSD from in Advanced tab 1 d Check the Enable OSD check box and input the appropriate hotkey ASUS GameFace automatically detects the connected audio video WDM capture device upon start up You can change the input device from Options in the Tool menu if you have more than one audio video device You can also enable the On Screen Display OSD in the GameFace application STEP 1 Enabling ASUS OSD...

Страница 29: ...ress the Play Stop button to start or stop local playback 4 a Connect to remote computer Input the computer name Local Area Network or IP Address in the combo box Select New Call from the File menu or press the Make a Call button You will see and hear the remote audio video signal if the remote computer accepts the call For computer name and IP addresses go to Tools Info for lists of information S...

Страница 30: ...rs on an incoming call Click Yes to accept the call Select End Call from the File menu or press the End the Call button to disconnect 5 a Select Option from the Tool menu 5 b Select GameFace Option Dialogue 5 c Enter GameFace page to adjust transparency position and hotkey settings STEP 5 GameFace Settings ...

Страница 31: ... hotkey default is Ctrl Alt V to activate GameFace 6 c Press the On Screen Display hotkey to show the OSD menu 6 d Use the arrow keys to select the GameFace application page and adjust the Transparency Position X Position Y Size or toggle to enable or disable GameFace STEP 6 Launch Game and show GameFace ...

Страница 32: ...for VGA card models with a built in monitor chipset If the monitor chipset is not present the ASUS Tweak utility will be installed 1 Insert the support CD into your CD ROM drive 2 Double click the CD drive icon in My Computer to bring up the autorun screen or run Setup exe in the root directory of your CD ROM drive 3 From the installation menu click Utilities 4 Click Install SmartDoctor Tweak from...

Страница 33: ...ystem 7 2 1 Functions Timing adjustment includes engine and memory clock 2D Test lets you test your settings Timing test run when clock is larger than default setting and use current setting at next startup GPU Cooling Tweak automatically reduces the speed of the GPU When processing the GPU automatically throttles back to reduce component temperatures and increase longevity Dynamic Overclocking Tw...

Страница 34: ...ASUS V9520 Home Theater User Guide 26 7 2 2 Set Test When you click the Set Test button the Tweak Utility tests the graphic card onscreen memory and displays the following screen while testing ...

Страница 35: ...hing TV listening to MP3s playing DVD sorting and viewing video or pictures in one friendly user interface You can easily turn your PC into a multimedia center with ASUS Home Theater A Watch TV on your PC TV Recording Time shifting Playback function for temporary leave Multi channel previewing Scheduled recording Still image capture B Enjoy MP3s on your PC Listening to MP3 music Radio recording an...

Страница 36: ...Still image capture Slide show with music E Play DVD VCD on your PC DVD VCD playback Still image capture feature 5 1 channel audio support F Timeshifting feature Don t you hate that annoying phone call during your favorite TV show or an important game ASUS has the perfect answer The Timeshifting feature allos you to simultaneously watch replay and record a TV program on same computer You can now v...

Страница 37: ...nt game of the year and your phone starts ringing and your caller ID indicates that it s from your boss What do you do Continue to watch the game and lose your job or engage in a long boring conversation and miss the game No more dilemna Click the Pause button the computer will continue to record the rest of the game Get rid of your boss click Play and continue where you left off Scenario 3 Nice p...

Страница 38: ...w DVDs or video clips and browse pictures on your PC 1 Insert the ASUS Home Theater support CD into your CD ROM drive 2 Double click the CD drive icon in My Computer to bring up the autorun screen or run Setup exe in the root directory of your CD ROM drive 3 From the welcome screen click Next and follow succeeding instructions to copy the necessary files to your computer ...

Страница 39: ...pplications have taken off to astronomical heights Yet a great inherent limitation such as requiring a huge amount of disk space because of the raw video data it captures still remains This is why many still choose to edit with analog devices What makes PowerDirector the megastar of its industry in one quick flash is its ability to save precious producing time because of its Smart Video Rendering ...

Страница 40: ...rectly from DV camcorders in real time or non real time a disc wizard that creates and burns movie discs in a cinch adding titles to clips adding audio streams to clips picture in pictures adding video or images to an existing video clip a huge collection of transitions video and titles effects master audio files watermarks ...

Страница 41: ...ert the support CD into your CD ROM drive 2 Double click the CD drive icon in My Computer to bring up the autorun screen 3 Select a language from the combo list box then click Next 4 The PowerDirector Pro Setup window appears Click Next to start the installation 5 Follow the succeeding on screen instructions to complete setup ...

Страница 42: ...ASUS V9520 Home Theater User Guide 34 ASUS Remote Controller ASUS Remote Controller Layout 10 Remote Control Functions ...

Страница 43: ...e Close App Close App Close App Close App Close App Music Mode Pictures Mode Video Mode DVD Mode Mouse Arrow Keys LMouse Back OK OK OK OK OK Mouse Arrow Keys Mouse Arrow Keys Mouse Arrow Keys Mouse Arrow Keys LMouse Back LMouse Back LMouse Back LMouse Back Remote control button functions ...

Страница 44: ...wn Button Mode 1 Mode 2 Mode 3 Mode 4 Mode 5 Previous Chapter Previous Chapter Previous Chapter Previous Chapter Play Pause Play Pause Play Pause Play Pause Next Chapter Next Chapter Next Chapter Next Chapter Fast Forward Fast Forward Volume Up Down Volume Up Down Volume Up Down Volume Up Down Home Launch Home Launch Home Launch Home Launch Remote control button functions cont ...

Страница 45: ...ome Theater User Guide Mute Record Mute Mute Mute Mute Remote Toggle 1 2 3 4 5 6 7 Button Mode 1 Mode 2 Mode 3 Mode 4 Mode 5 Remote Toggle Remote Toggle Remote Toggle Remote Toggle Remote control button functions cont ...

Страница 46: ...h available FM tuner features Features 1 Innovation design of ASUS Remote Controller for controlling ASUSDVD XP PowerVCR II EPG software with desktop PC 2 Mouse mode can be used as mouse function while you aren t in front of your computer 3 Receiver with USB Port it s easy to connect with your computer Specifications Operation Voltage 3V Battery AAA Battery x 2 alkaline battery recommended Receive...

Страница 47: ... 170Hz 112 7 200Hz 135 1 240Hz 166 2 1024 x 768 60Hz 48 4 70Hz 56 4 72Hz 57 5 75Hz 60 0 85Hz 68 7 100Hz 81 7 120Hz 98 8 140Hz 116 6 144Hz 120 2 150Hz 125 7 170Hz 144 1 200Hz 172 8 240Hz 212 1 1152 x 864 60Hz 53 7 70Hz 62 9 72Hz 64 9 75Hz 67 5 85Hz 77 1 100Hz 91 3 120Hz 111 2 140Hz 131 3 144Hz 135 2 150Hz 141 4 170Hz 162 9 200Hz 194 9 1280 x 960 60Hz 60 0 70Hz 69 9 72Hz 72 1 75Hz 75 2 85Hz 86 0 100...

Страница 48: ...00Hz 95 3 120Hz 115 4 140Hz 136 8 144Hz 140 4 150Hz 146 8 1600 x 1200 60Hz 75 0 70Hz 87 5 72Hz 90 1 75Hz 94 0 85Hz 106 1 100Hz 127 5 120Hz 154 5 1920 x 1080 60Hz 67 1 70Hz 78 7 72Hz 81 1 75Hz 84 6 85Hz 96 4 100Hz 113 9 1920 x 1200 60Hz 74 6 70Hz 87 4 72Hz 90 0 75Hz 94 0 85Hz 106 7 100Hz 126 7 1920 x 1440 60Hz 89 4 70Hz 104 9 72Hz 108 5 75Hz 112 5 85Hz 129 4 2048 x 1536 60Hz 95 5 70Hz 111 9 72Hz 11...

Отзывы: