background image

87

ASUS V8200 Series User’s Manual

4. Software Reference

4

. S/W Reference

ASUS 

Digital VCR

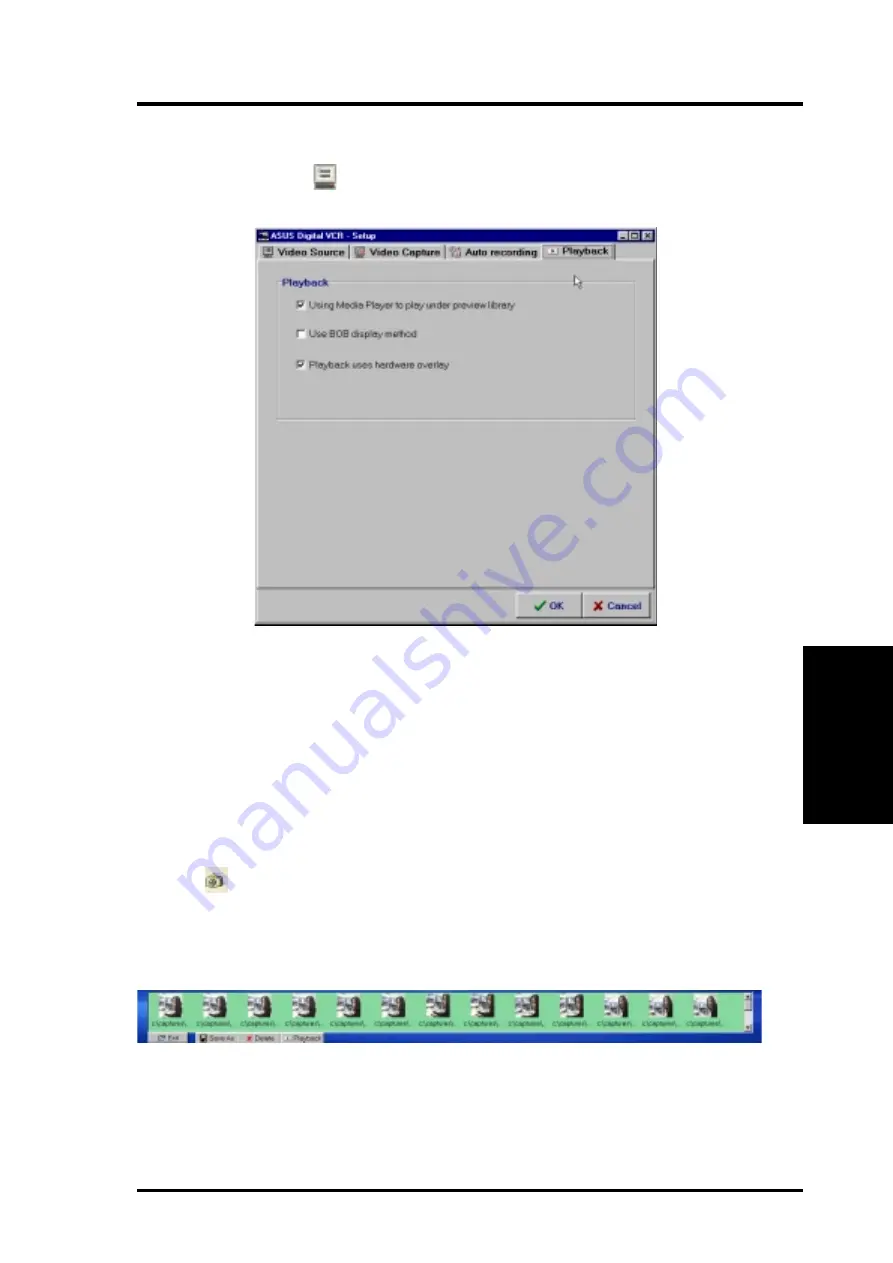
Playback

Playback lets you set the options when playing back video files.

To use Playback, click 

 (or use the

F9 

hot key) and then click the Playback tab or

simply select Playback on the Setup(S) menu.

Capturing Images

Video Snapshot F5

Video Snapshot (hotkey: F5) lets you capture video stream data as single images
and then show these images on your desktop almost simultaneously through the
default image viewer. It supports any plug-in picture viewer/image processing pro-
gram to view the captured images.

To begin capturing, do the following:

1. Click 

 on the ASUS Digital VCR toolbar or press the 

F5

 key to capture the

desired image from the ASUS Digital VCR monitor.

The screen will freeze momentarily and the captured image (saved as a 

BMP

 file,

using consecutive numbers) will be previewed in the Preview Library window.

You may click an image to view that captured image.

2. Repeat Step 1 as necessary.

Содержание V8200 Pure

Страница 1: ...R V8200 Series Programmable nFiniteFX Graphics Card USER S MANUAL Hardware Video Drivers V8200 Deluxe V8200 Pure ...

Страница 2: ...he serial number of the product is defaced or missing Products and corporate names appearing in this manual may or may not be registered trade marks or copyrights of their respective companies and are used only for identification or explanation and to the owners benefit without intent to infringe NVIDIA nFiniteFX GeForce3 and Lightspeed Memory Architecture are registered trademarks of NVIDIA Corpo...

Страница 3: ... tw pub ASUS ASUS COMPUTER INTERNATIONAL America Marketing Address 6737 Mowry Avenue Mowry Business Center Building 2 Newark CA 94560 USA Fax 1 510 608 4555 Email tmd1 asus com Technical Support Fax 1 510 608 4555 Email tsd asus com WWW www asus com FTP ftp asus com Pub ASUS ASUS COMPUTER GmbH Europe Marketing Address Harkortstr 25 40880 Ratingen BRD Germany Fax 49 2102 442066 Email sales asuscom ...

Страница 4: ...hod 2 Display Property Page 14 Method 3 Plug and Play 15 Windows 2000 15 Method 1 ASUS Quick Setup Program 15 Method 2 Plug and Play 16 Windows NT 4 0 18 Method 1 Display Property Page 18 Drivers 19 Install Display Driver 19 Install DirectX 20 Install GART Driver 21 Install ASUS TWAIN Driver 23 Uninstall Display Driver 24 Windows 98 24 Method1 Using the Autorun Screen 24 Method 2 Using Control Pan...

Страница 5: ...ion 49 Digital Vibrance 49 Active Color Channel 49 Brightness Contrast Gamma 49 Custom color settings 49 GeForce3 50 Additional Properties 50 3D Antialiasing Setting 50 Direct3D Settings 51 OpenGL Settings 53 Overly Controls 54 Desktop Utilities 55 Desktop Display Manager 56 Using the ASUS Utilities 59 ASUS Tweak Utility 59 ASUS VideoSecurity 61 ASUS Live Video 65 ASUS SmartDoctor 74 ASUS Digital ...

Страница 6: ...e separation between the equipment and receiver Connect the equipment to an outlet on a circuit different from that to which the receiver is connected Consult the dealer or an experienced radio TV technician for help WARNING The use of shielded cables for connection of the monitor to the graphics card is required to assure compliance with FCC regulations Changes or modifications to this unit not e...

Страница 7: ...SUS V8200 Deluxe DDR Frame Buffer VGA Video in TV out 3D glasses ASUS VR 100G Bundled Free ASUS V8200 Pure DDR Frame Buffer Pure VGA NVIDIA GeForce3 Graphics Processing Unit GPU with the new nFiniteFXTM engine Delivers earth shattering performance and fluid motion even for the most complex scenes Enables up to 32 matrix skinning custom lighting and texture blending models Breakthrough performance ...

Страница 8: ...ame rate Full Scene Anti aliasing FSAA Optimized for DirectX and OpenGL acceleration 8 texture mapped filtered lit texels per clock cycle Single pass multitexturing 32 bit colors Z stencil buffer Advanced per pixel lighting texturing and shading Cube environment mapping bump mapping S3 texture compression Programmable Vertex Shader offers complex animation to generate smooth ani mation and nature ...

Страница 9: ...1 JP1 Use the same TV standard for all devices For example if your TV uses the NTSC standard then you should set JP1 to NTSC Digital PC to TV Encoder J1 Fan Power The VIP Video Interface Port Connector are used for third party add on modules such as video capture cards or television tuners VGA BIOS Digital Video Decoder Frame Buffer DDR DDR Double Data Rate VIP Connector A NVIDIA TM nFiniteFX TM G...

Страница 10: ... Monitor Output 15pin standard Projector FAN_PWR Frame Buffer DDR VGA BIOS DDR Double Data Rate NVIDIA T M nFiniteFX T M GeForce3 T M GPU Graphics Processing Unit Chip with Fan Item Checklist ASUS AGP V8200 Graphics Card ASUS V8200 Series Driver Utility CD Disc This page was intentionally left blank ...

Страница 11: ... install the software drivers and utilities Systems with Existing VGA Card 1 Change your display driver to Standard VGA 2 Shut down your computer and unplug all electrical cords 3 Replace the existing VGA card with your graphics card 4 Restart your computer 5 Install the ASUS V7100 series display driver NOTE This graphics card series can only be installed in motherboards with an AGP slot WARNING C...

Страница 12: ... VGARTD see III Software Setup Install GART Driver NOTES VGARTD stands forVirtual GraphicsAddress RemappingTable Driver which is necessary to use the DIME feature of AGP DIME means Direct Memory Execute which is accessed directly by most AGP chips when VGARTD is installed for complex texture mapping operations For other notes or release information see the README files in the installa tion CD disc...

Страница 13: ...lso the DirectX runtime libraries DirectX must be installed so that your video player can take advantage of hardware acceleration See 3 Software Setup Install GART Driver and 3 Software Setup Install DirectX later in this manual for the setup steps Method 1 ASUS Quick Setup Program NOTE See 3 Software Setup Drivers Install Display Driver for more informa tion 1 Start Windows 2 Switch display to Wi...

Страница 14: ...therwise proceed to the next step 7 Click Browse to search the CD ROM drive In the Drives box of the Open dialog box select your CD ROM drive and then click OK 8 In theFoldersbox double click the WIN9x folder and then select ASUSNV9X INF in the File name box 9 Click OK Alist of video cards appears Select yourVGAcard type for your operat ing system and then click OK 10 The Update Driver Warning box...

Страница 15: ...he necessary files on your computer it will prompt you to restart your computer Click Yes to restart your computer and to complete Setup 3 Click Cancel to enter the Windows desktop 4 Insert the CD installation disc into your CD ROM drive 5 The ASUS Windows 2000 Install Shell appears Click Drivers and then click Install Display Driver on the Driver dialog box 6 Follow the onscreen instructions to c...

Страница 16: ...nstallation disc into your CD ROM drive to bring up the Locate Driver Files item of the FoundNewHardwareWizarddia log box 4 When the next Found New Hard ware Wizard dialog box appears select Search for a suitable driver for my device recommended and then click Next Method 2 Plug and Play 1 Start Windows 2 When Windows detects your ASUS graphics card the Found New Hardware Wizard dialog box ap pear...

Страница 17: ...les Search Results item of the Found New Hardware Wizard dialog box 9 Follow the onscreen instructions to complete the setup 10 When Setup has finished installing all the necessary files on your computer it will prompt you to restart your computer Click OK to restart your computer and to complete Setup 8 When prompted to select the display driver to install in your system se lect the one that is l...

Страница 18: ...ge 2 After your computer restarts right click the desktop and click Properties 3 Click the Settings tab 4 Select Change Display Type 5 Select Adapter Type and click Change 6 Click Have Disk 7 Insert the CD installation disc 8 Type D NT40 or click Browse to select the path of the display driver for Win dows NT Click OK 9 Select ASUS V7100 and then click OK 10 Windows NT will once again prompt for c...

Страница 19: ...een or run Setup exe in the root direc tory of your CD ROM drive Click Drivers If you prefer to install the drivers individually follow the steps on the following pages Windows 2000 Setup will only copy the display drivers Windows NT 4 0 SETUPNT TXT will appear Follow the instructions to install the display driver You may refer to the installation proce dures earlier in 3 Software Setup Windows NT...

Страница 20: ... your CD ROM drive Click Drivers Install DirectX Windows 98 Only Microsoft DirectX allows 3D hardware acceleration support in Windows 98 For Software MPEG support in Windows 98 you must first install Microsoft DirectX and then an MPEG compliant video player 2 The Drivers box appears Click In stall DirectX to select the DirectX version you want to install WARNING Some games written for older Direct...

Страница 21: ...set Follow the on screen instructions to finish the GART driver installation The succeeding steps as sume that you are installing for an Intel chipset 1 Insert the CD installation disc into your CD ROM drive or double click the CD drive icon in My Com puter to bring up the autorun screen or run Setup exe in the root direc tory of your CD ROM drive Click Drivers 2 The Drivers box appears ClickIn st...

Страница 22: ...If you selected No on the previ ous screen before clicking OK you will be presented with a selection of other drivers Make your driver selection and click Install 5 When the Welcome screen appears click Next to continue 6 Once the driver installation is fin ished click Finish ...

Страница 23: ... Deluxe Combo Windows 98 only 1 Insert the CD installation disc into your CD ROM drive or double click the CD drive icon in My Computer to bring up the autorun screen or run Setup exe in the root directory of your CD ROM drive Click Drivers 2 The Drivers box appears Click Install ASUS TWAIN Driver 3 When the Welcome box appears click Next to start copying the files Setup automatically starts copyi...

Страница 24: ...the CD installation disc into your CD ROM drive or double click the CD drive icon in My Computer to bring up the autorun screen or run Setup exe in the root directory of your CD ROM drive Click Drivers 2 Click Uninstall Display Driver and follow the on screen directions Method 2 Using Control Panel 1 Click Start and then point to Set tings 2 Click Control Panel 3 Double click the Add Remove Pro gr...

Страница 25: ... The system will prompt you to restart your computer Click Yes to restart Windows 2000 Method1 Using the Autorun Screen See Windows 98 Method 1 Using the Autorun Screen earlier in this section for the procedures Method 2 Using Control Panel 1 Click Start and then point to Set tings 2 Click Control Panel 3 Double click the Add Remove Programs icon 4 Click the Change Remove Pro grams icon 5 Click AS...

Страница 26: ...uter to bring up the autorun screen or run Setup exe in the root directory of your CD ROM drive Click Drivers 2 The Drivers box appears Click the Next Page arrow and then click In stall WDM Capture Driver 3 When the ASUS WDM Capture Driver Setup box appears click In stall ASUS WDM Capture driver and then click OK To complete the installation simply follow the on screen instructions or prompts 4 Wh...

Страница 27: ...tion disc into your CD ROM drive or double click the CD drive icon in My Computer to bring up the autorun screen or run Setup exe in the root directory of your CD ROM drive Click Drivers and when the Driv ers box appears click Install Video for Windows Capture Driver To complete the installation simply follow the on screen instructions or prompts NOTE Under Windows 98 the Video for Windows capture...

Страница 28: ...into your CD ROM drive or double click the CD drive icon in My Computer to bring up the autorun screen or run Setup exe in the root directory of your CD ROM drive Click Utilities To complete the installation simply follow the on screen instructions or prompts Install ASUS Live Utility TheASUS Live utility lets you view and capture video images from the card s video input port NOTE Make sure that y...

Страница 29: ...y may dam age your card and cause your system to be unstable 1 Insert the CD installation disc into your CD ROM drive or double click the CD drive icon in My Computer to bring up the autorun screen or run Setup exe in the root directory of your CD ROM drive Click Utilities 2 The Utilities box appears Click In stall ASUS Tweak Utility 3 When the Welcome box appears click Next To complete the instal...

Страница 30: ...tallation disc into your CD ROM drive or double click the CD drive icon in My Computer to bring up the autorun screen or run Setup exe in the root directory of your CD ROM drive Click Utilities 2 The Utilities box appears Click In stall SmartDoctor NOTE If your graphics card is not equipped with a monitor IC an error message warns you that monitor IC was not detected The installation will abort Sm...

Страница 31: ...by using a video capture device such as a digital camera 1 Insert the CD installation disc into your CD ROM drive or double click the CD drive icon in My Computer to bring up the autorun screen or run Setup exe in the root directory of your CD ROM drive Click Utilities 2 The Utilities box appears Click In stall VideoSecurity 3 When the Welcome box appears click Next to start the installation To co...

Страница 32: ...ASUS V8200 Series User s Manual 32 3 Software Setup This page was intentionally left blank ...

Страница 33: ...ed buttonontheSettingsmenu Click the appropriate tab to change the display settings Refresh Rate This control changes the refresh rate of the current screen resolution Click right click the ASUS Control Panel icon then point to Refresh Rate and click the desired refresh rate Next the system prompts whether to keep the setting Click OK to keep the setting otherwise click Cancel or press ESC 4 Softw...

Страница 34: ...xample from 800x600 HiColor to 800x600 TrueColor Click OK to restart your computer to make the change Click right click the ASUS Control Panel icon point to More Resolution and then click the desired screen reso lution Thesystemwillautomaticallyset the resolution selected without restart ing your computer Information Information lists pertinent data about the graphics card It supplies links to the...

Страница 35: ...values for each or all of the RGB colors These adjustments can be made for D3D Game and OpenGL environments D3D Game D3D Game lets you make your favorite color settings for D3D games OpenGL OpenGL lets you make your favorite color settings for OpenGL applications NOTE The color settings of D3D Game and OpenGL are not adjustable below 8 bit color depth ...

Страница 36: ...ol changes the appearance of many screen elements simultaneously and functions like a macro saving a scheme retains particular system presets Apply existing schemes or create and save schemes by saving the current settings existing schemes may be deleted A scheme may be developed to satisfy the requirements of special situations ie whenever play ing a certain game or a movie Color Spline This tool...

Страница 37: ...adjust the direction effect slider leftwards to gain added responsiveness Foreground Foreground is set in conjunction with background to stretch the histogram chart on the D3D OSD box of current games to scale the depth of 3D objects see pages 49 and 50 for an examples and more info Move the foreground slider leftwards to shift the foreground along the Z axis towards 0 Background Background is set...

Страница 38: ... for the best stereoscopic visual quality Page flipping provides double vertical resolution compared with Line Interleave The monitor must be able to support the high frequency at least 100Hz necessary for this mode Refresh Rate To prevent eye discomfort and fatigue high refresh rates are preferred Some monitors however may not be able to support a high refresh rate Consult documentation to make s...

Страница 39: ...key combination of your choice only CTRL ALT X key combinations can be defined Keys that are unavailable for hotkey X values include ESC ENTER TAB SPACEBAR PRINT SCREEN or BACKSPACE Press any other key to complete the combination For example to define the hot key combination CTRL ALT D having placed the cur sor in the box press D NOTE Hot keys will be available only if you selected the Enable OSD ...

Страница 40: ...nal idea and development by XPIRAL Efecto Caos S L D3D OSD Histogram The OSD Histogram Chart pinpoints the Z axis range upon which 3D objects appear as well as how they gather For example if the above chart simulated was displayed for a car racing game the vertices to the left of the E line could be the model of the game player s car and those objects to the right of the E line could be the road h...

Страница 41: ...sual quality set Embossment in conjunction with View Angle See On Screen Display later in this section for more details Mode Line Interleave Select this option for better monitor compatibility particularly for monitors with less bandwidth or less range of horizontal vertical frequency Stereoscopic visual quality however will be poor since only half the vertical lines are generated Page Flipping Se...

Страница 42: ...can support the selected refresh rate interlaced mode under the following display scales 16 bits 2048x1536 1024x768 Stereo Mode 32 bits 1280x960 640x480 Stereo Mode 1280x1024 640x480 Stereo Mode 1600x900 800x600StereoMode 1600x1200 800x600StereoMode On Screen Display Enable OSD Clicking on the check box enables access to the advanced box When selected this option opens the OpenGL On Screen Display...

Страница 43: ...ma In most games use the keyboard UP or DOWN arrow keys to select a new setting The PLUS or MINUS keys move the sliders To restore the defaults press the HOME key To close screen settings display use the END key Known Issues on Selected Games Applications See the included support CD for the latest information OPENGLVR TXT in the WIN9XME folder All registered and unregistered trademarks are the pro...

Страница 44: ...al 44 4 Software Reference TaskBar Utility This utility gives convenient access to various features and presets that may be configured in the Display Properties Menu directly from the Windows taskbar 4 S W Reference Taskbar Utility ...

Страница 45: ...roperties menu is useful to enable and configure the TwinView display and to make additional property adjustments To use Windows Display Properties click the ASUS icon on the taskbar s status area to open the ASUS Control Panel Menu Click Windows Display Properties click the Settings tab and then click Advanced NOTE Instead of clicking the ASUS Control Panel icon you may right click the Windows 98...

Страница 46: ...or fine adjustments use the arrows Display Timing Selects the proper timing mode Auto Detect allows Windows to receive the proper timing information directly from the monitor itself NOTE Some older monitors may not support this feature General Timing Formula GTF GTF is a standard used by most new hardware Discrete Monitor Timings DMT DMT is an older standard still in use on some hardware Select th...

Страница 47: ...play when running at resolutions lower than the maximum resolution supported Use display adapter scaling Adapter automatically scales the appearance of the display on the monitor default Centered output Centers the image on the flat panel and does not adjust the scale NOTE This funciton is only available with DVI 2V1D cards 4 S W Reference Device Selection ...

Страница 48: ...e arrows Click on the arrows to reposition output on the TV monitor Brightness Flicker Filter Contrast These sliders help calibrate the visual output of the display card Any changes to color settings are shown immediately on the monitor TV Change Format Opens a window that specifies a particular TV output format NOTE This function is only available with T Deluxe Combo cards Video output format Thi...

Страница 49: ...Green or Blue Brightness Contrast Gamma These sliders help calibrate the visual output of the display card Changes to color settings are shown immediately on the monitor Automatically apply these settings at startup Selecting this option will automatically restore the color adjustments when Windows is restarted NOTE If the PC is running on a network the color will be adjusted after you have logged...

Страница 50: ...s extra features and supplies an Internetlinkfordrivers productupdates and news Manually Select Anti aliasing Mode Off no antialiasing Disables anti aliasing in 3D applications Select Off if you require maximum speed performance in your applications 2x Enables antialiasing using the 2x mode Select this for improved image quality and high performance in 3D applications Quincunx Antialiasing Enables...

Страница 51: ...produce higher quality rendering of 3D images Display logo when running Direct3D applications This option lets you display the NVDIA logo in the lower corner of the screen while running Direct3D applications Mipmapping Mipmap detail level This option lets you adjust the Level of Detail LOD bias for mipmaps A lower biasprovidesbetterimagequalitywhileahigherbiasaugmentsperformance Choose from five p...

Страница 52: ...t values conform to the Direct3D specifications Some software may expect texel origin to be defined elsewhere The image quality of such applications will improve if the texel origin is redefined Dragging the slider leftward positions the texel origin closer to its upper left corner and moving the slider rightward positions it closer to the center Range 0 to 7 default 3 ...

Страница 53: ...This option determines whether textures of a specific color depth should be used by default in OpenGL applications Options are Use desktop color depth default Always use 16 bpp and Always use 32 bpp Buffer flipping mode This setting determines the buffer flipping mode for full screen OpenGL applications Options are Auto select default Use block transfer and Use page flip Vertical sync This setting...

Страница 54: ...o zoom in on a specific area of the video output screen NOTE when enabling overlay zoom Video players that are not able to detect the presence of Video Mirror may not update the zoom factor immediately while displaying a still frame Select screen region to zoom This option lets you select the region on the video playback to zoom in or out Zoom control This option lets you zoom in or out on the sel...

Страница 55: ...ilities dialog Enable Desktop Manager and Desktop Manager Configuration Click this button to access the Desktop Display Manager setup menus Using the Quick Tweak icon Right click the NVIDIA taskbar icon to display a popup menu of options including OpenGL Direct3D or Color settings The menu also contains items forrestoringdefaultsettings Leftclick on the icon twice and the Display Properties Menu a...

Страница 56: ...en click OK The program appears in the Application Management window Repeat this step for each program that you want to add to the Desktop Display Manager Desktop Display Manager In the TwinView Extended Desktop Mode this Display Manager sets up the PC to run one or more programs on one or both monitors or desktops Among others it also allows you to undertake program management features such as re...

Страница 57: ...ot Keys may be configured with different key combinations and assign them to actions like moving active windows to another monitor or moving open windows to a separate monitor Default key combinations for each action are Move the active window to another monitor ALT 1 Move all windows to another moni tor ALT 2 Gather all windows to one monitor ALT 3 Global Settings This field specifies settings th...

Страница 58: ... ESC ENTER TAB SPACEBAR PRINT SCREEN or BACKSPACE Zoom update frequency updates per second This setting updates the refresh frequency of the magnified view in number of times per seconds default 8 it can be set from 1 to 100 times per second Normally the magnified view is updated whenever the mouse cursor is moved and is updated at a fixed interval when the mouse cursor is still Delay before switc...

Страница 59: ...S Tweak Utility click Start and point to Programs Asus Tweak ing Utilities and then click Tweak Timing Adjustment Timing Adjustment lets you adjust the working frequency of the graphic engine and video memory Use tweak settings on next startup Selecting this allows you to use your settings when Windows starts Graphics Speed Engine Lets you adjust the working frequency of the graphic engine Memory ...

Страница 60: ...in safe mode hold the F8 key until the Windows Startup Menu appears For some machines and Windows 98 you can use CTRL to bring up the Startup Menu Enter the number for Safe mode and then press ENTER 2 In Windows click Start and point to Programs Asus Tweak Utility and then click Tweak Safe Mode Recovery 3 The ASUSTweak Safe Mode Prop erties box appears Click the appro priate settings Using Tweak S...

Страница 61: ...or editing software can then be used to view modify or distribute them Limitations Because of differences in hardware sensitivity VideoSecurity may not completely detect all possible errors Before you execute VideoSecurity there are some limita tions you have to understand so that you can appropriately use it Due to changing temperatures the captured image of some CCDs will be twisted which may gi...

Страница 62: ... in the lower right corner of your screen Whenever VideoSecurity detects a problem it will run You may also run VideoSecurity by clicking the icon VideoSecurity Working Directory The VideoSecurity Working Directory is the folder where the utility stores its temporary working and log files Default is C VIDEOSEC The directory is user configurable When VideoSecurity is ran a sub directory will automa...

Страница 63: ...ure Currently only one option is available to set the image format This is an important parameter when setting up VideoSecurity Your environment may change often but VideoSecurity is concerned only when there is a change in the environment Make sure that you select a suitable sensitivity for your environment Use this to stop tracing or to choose the error processing method to use while tracing Thi...

Страница 64: ...ain Control Panel Click to start detecting Click to open the VideoSecurity Setting dialog box Starts the Setup Wizard Lets you define a region with which VideoSecurity will monitor for errors or intrusion Lets you adjust the video source parameters such as Color Video Connector and Video Standard Opens online help Minimizes VideoSecurity to the status tray Click ASUS VideoSecurity icon on the stat...

Страница 65: ...digital cameras and laser disc players through the onboard RCA or SVHS VIDEO IN connectors 2 Capture live motion video up to 30 frames second minimum system require ment Pentium II 266 NOTE You should already have installed DirectX 7 or later to use ASUS Live see 3 Software Setup Install DirectX Running ASUS Live Video To run the utility click Start and point to Programs and then ASUS Live and the...

Страница 66: ... and or ASV2 Settings Quality Level 0 Best Compression 1 2 3 default 4 5 Normal Quality 6 7 8 9 Best Quality Click an image to view it with the associated image viewer or application a pop up window opens to show the path and filename of the selected image Right click an image to View Save As and Delete that image Shows hides the Video Source Option F9 see next page Opens the About ASUS Live ASUS ...

Страница 67: ...e Option When first using ASUS Live you must set up the video source By clicking the Video Source Option F9 button hotkey F9 on the ASUS Live Control Panel you can show or hide the video source setup screen Use your mouse pointing device or the Up or Down Buttons on the ASUS Live Control Panel or the UP and DOWN arrow keys on your keyboard to select Video Connector and then the Left and Right Butt...

Страница 68: ...et live video as wallpaper to display it To change video source settings click the Setup button on the ASUS Live Control Panel NOTES 1 Currently Live Mode does not work under Windows NT 4 0 Live Mode requires at least Direct Draw 6 which Windows NT 4 0 does not support 2 Before using the Wall Paper option make sure that the View as Web Page option of the Active Desktop setting is not selected see ...

Страница 69: ...4 x 480 30 frames second during the video capture process Otherwise your system may become unstable Windows 2000 NT 4 0 The video capture driver for Windows 2000 NT 4 0 is not automatically installed when you install the display drivers of your ASUS graphics card To install insert the CD installation disc into your CD ROM drive click Drivers and then click Install Video for Windows Capture Driver ...

Страница 70: ...g to ad just the basic video capture settings such as Capture Image Dimension and Format Capture CODEC se lection and CaptureAudio Format and Attribute Video Capture Setting Under Capture Image Dimension and Format select the Image Dimensions Image Format and ASV2 Settings of your choice NOTE Windows 2000 NT4 0 sup ports only the UYVY image format Under Capture CODEC selection select the video com...

Страница 71: ...lso lets you ad just the Brightness Contrast Satura tion and Hue of your images SnapShot Setting 1 Click Setup and point to and then click Video SnapShot to select your Capture Picture Format default 24 bit Image Setting and other set tings Under Image Setting you may set the desired Image File name and path default C CAPTURE BMP and for the filename to be consecu tively numbered Store image use c...

Страница 72: ... screen The screen will freeze momentarily and the captured image saved as a BMP file using consecutive numbers will be previewed in the Preview Files window You may click an image to view that captured image 2 Repeat Step 1 as necessary These settings include the Start Time Year Month Day Hour Minute Second Stop Time Year Month Day Hour Minute Second Channel Number Capture Frame Rate and options ...

Страница 73: ...on your desktop through your default movie player Frame Recording is useful in animation To begin capturing do the following 1 Click Frame Recording on the ASUS Live Control Panel or press the F6 key to open the Capture Frames box 2 Click Capture to begin capturing the desired frame or frames on ASUS Live Video s display screen and then click Done when the desired end frame is reached The initial ...

Страница 74: ...eat fan malfunction and out of safe range voltage Forcibly cools down the graphic chip when the graphic chip s temperature is over an acceptable temperature to protect the graphic chip from overheat damage Cools down the graphic chip s temperature when it is idle and restores it to its maxi mum capability once needed thus smartly extending the graphic chip s lifetime Cools down the CPU s temperatu...

Страница 75: ...t CPU is idle The CPU s temperature will then drop NOTE If you have already installed any CPU cooling software in your system you should just choose only one Running more than one CPU cooling software at the same time is redundant After CPU cooling is enabled and when you run System Monitor in Programs Accessories System Tools to monitor CPU usage you will find that CPU usage has reached its maxim...

Страница 76: ...omething is wrong with your card s graphic chip the message display region will display a detailed description of the error or trouble The component in question will also have a flashing red value If you enabled overheat protection in Advanced Setup dialog SmartDoctor will cool down the graphic chip in time to protect it from possible overheat damage 4 S W Reference SmartDoctor ...

Страница 77: ...em require ment Pentium II 266 For TimeShifting recording at MPEG II format 704x480 30 frames second minimum system requirement is Pentium III 600 recommended Pentium III 700 or higher NOTE You should already have installed DirectX 7 or later to useASUS Digital VCR see 3 Software Setup Install DirectX Running ASUS Digital VCR To run the utility click Start and point to Programs and then ASUS Digit...

Страница 78: ...2x240 To resize the monitor drag a window corner pointer becomes a double headed arrow when it is ready to the desired size The video size status will also change accordingly NOTES Users of PAL D K models of the graphics card should select PAL BGHI for the Video Standard Monitor Toolbox Exit Click to quit ASUS Digital VCR OSD Setup Click to set up the video source and adjust Brightness Contrast an...

Страница 79: ...lect the Always on Top Off command from the Window W menu OSD Setup When first using ASUS Digital VCR you must set up the video source Use the OSD Setup button on the ASUS Digital VCR Control Panel to show or hide the video source setup screen on the monitor Use your mouse pointing device or the UP and DOWN arrow keys on your keyboard to select options Brightness Contrast Saturation Hue Connector ...

Страница 80: ...ick the display and then click You may also use CTRL S or ESC to disable full screen display The display will then revert to its previous size Enable wallpaper display NOTE Before using the Enable wallpaper display option make sure that the View as Web Page option of theActive Desktop setting is not selected see Start Settings Active Desktop View as Web Page To Enable wallpaper display click or us...

Страница 81: ...esults from fast moving objects when rendering to video Normal uses both fields to render the video output For PAL output use Skip Odd Field and for NTSC output use Skip Even Field Video Standard Video Standard lets you select the video srandard to use for display NTSC M default NTSC N NTSC 4 43 PAL BGHI PAL M PAL N PAL 4 43 or SECAM NOTE Users of the PAL D K models should select PAL BGHI for the ...

Страница 82: ...de from Live Mode click or press F3 Captured images are shown on the Preview Library Double click an image to play it back or view it with the associated image viewer or application the path and file name of the selected image is shown below the image You may also right click an image or select an image and then click the appropriate button to Playback or view Save As a new file or Delete that ima...

Страница 83: ...y models with the VIDEO IN connector the video capture driver will automatically be installed on your system This video capture driver follows Microsoft Video for Windows standard and can open up to a capture window size of 704 x 480 It can be used withsomeapplicationsthatusevideocaptureasanoption suchasvideoconferencing net meeting or digital video authoring applications IMPORTANT You must enable...

Страница 84: ...Video Capture Store Video file use consecutive numbered filename Select preferred file naming convention default selected Capture Audio Select if you prefer to include audio when capturing video default not selected When selected the Set Audio option becomes available SnapShot Store image use consecutive numbered filename Select preferred file naming convention default selected Snapshot color bits...

Страница 85: ...z 16 Bit Stereo 172 KB s can make the sound quality of your video file better but your video file size will be larger Frame rate lets you select the preferred video data rate for the images to be cap tured default 30 frame sec which is full motion Maximum AVI split file size lets you set the maximum size for each video capture default 2000 M Bytes Enable capture time limit lets you limit the captu...

Страница 86: ...ording includes the Current time Hour Minute Second StartTime Year Month Day Hour Minute Second End Time Year Month Day Hour Minute Second Frame Rate Channel and options to Capture Audio to the recording View Log of auto recorded events and to Delete one or Delete All the pre recording settings Add lets you add while Clear lets you clear your pre recording setting s The video recording will start ...

Страница 87: ... images and then show these images on your desktop almost simultaneously through the default image viewer It supports any plug in picture viewer image processing pro gram to view the captured images To begin capturing do the following 1 Click on the ASUS Digital VCR toolbar or press the F5 key to capture the desired image from the ASUS Digital VCR monitor The screen will freeze momentarily and the...

Страница 88: ...reached The initial frame of the captured video saved as an AVI file will immediately be displayed on your movie player NOTE 1 With the newTimeShifting technology fromASUS you can start playing back the captured video anytime see TimeShifting later in this section even while recording Capture Video F7 Capture Video hotkey F7 lets you capture video stream data continuously and then show these image...

Страница 89: ...u re watching your favorite TV show on your computer and you had to leave but you don t want to miss the rest of the show all you need is to record it with ASUS TimeShifting When you come back you don t have to wait unlike traditional recorders for the recording to finish to be able to watch what s been recorded Just click Play and playback will start imme diately this while recording still contin...

Страница 90: ...ox opens Double click the video file you want to open You may need to locate the drive or folder that contains the file 3 Playback immediately begins A progress indicator will show the elapsed time NOTES During playback 1 You may apply some filters to create effects on your video Simply clickFilters to apply a filter to the video file 2 You may apply Fast Motion Slow Motion and other effects Simpl...

Страница 91: ...he First Time NOTE You do not need to repeat this step for subsequent uses of theASUS TWAIN module If more than one TWAIN device is installed in your system and you want to switch devices use Select TWAIN_32 Source command Importing an Image Using the ASUS TWAIN Interface ASUS TWAIN Interface Windows 98 Only TWAIN is a cross platform interface for acquiring images captured by scanners digital came...

Страница 92: ...click the capture button or click the Capture menu and then Single Frame Other Options Preferences Menu Click to adjust the background color of your image and other options Toggle preview video Click button or click the Options menu and then Preview to toggle between the preview video options A pressed button or a checked Preview command indicates that the preview is on and vice versa Toggle overl...

Страница 93: ... 3D glasses ASUS VR 100G and test your 3D glasses func tionality 1 Click the VR Effect menu and then click VR On to enable stereoscopic display Opening or Displaying a Stereoscopic or 3D File To run ASUS VR PictureViewer click or right click the ASUS Control Panel icon see 4 Software Reference ASUS Control Panel on the taskbar s status area to display the ASUS Control Panel point to VR PictureView...

Страница 94: ...en dialog box or select another folder and then click Open The 3D image appears on the VrViewer main window see preced ingpageforanopened3Dimagefile Note that the 3D effect is not shown in this picture Changing the View 1 Click the Zoom menu and then click the desired zoom percentage Testing the 3D Glasses 1 Click the Test 3D glasses and then follow the onscreen instructions ...

Страница 95: ... 94 0 170Hz 112 7 200Hz 135 1 240Hz 166 2 1024 x 768 60Hz 48 4 70Hz 56 4 72Hz 57 5 75Hz 60 0 85Hz 68 7 100Hz 81 7 120Hz 98 8 140Hz 116 6 144Hz 120 2 150Hz 125 7 170Hz 144 1 200Hz 172 8 240Hz 212 1 1152 x 864 60Hz 53 7 70Hz 62 9 72Hz 64 9 75Hz 67 5 85Hz 77 1 100Hz 91 3 120Hz 111 2 140Hz 131 3 144Hz 135 2 150Hz 141 4 170Hz 162 9 200Hz 194 9 1280 x 960 60Hz 60 0 70Hz 69 9 72Hz 72 1 75Hz 75 2 85Hz 86 ...

Страница 96: ...4 100Hz 95 3 120Hz 115 4 140Hz 136 8 144Hz 140 4 150Hz 146 8 1600 x 1200 60Hz 75 0 70Hz 87 5 72Hz 90 1 75Hz 94 0 85Hz 106 1 100Hz 127 5 120Hz 154 5 1920 x 1080 60Hz 67 1 70Hz 78 7 72Hz 81 1 75Hz 84 6 85Hz 96 4 100Hz 113 9 1920 x 1200 60Hz 74 6 70Hz 87 4 72Hz 90 0 75Hz 94 0 85Hz 106 7 100Hz 126 7 1920 x 1440 60Hz 89 4 70Hz 104 9 72Hz 108 5 75Hz 112 5 85Hz 129 4 2048 x 1536 60Hz 95 5 70Hz 111 9 72Hz...

Страница 97: ...us Master mode instead ofAGP execute mode for motherboards using this AGPset You must install DirectX 6 or later so that your player can take advantage of the hardware acceleration mode DirectDraw Try to switch to a lower resolution color depth or refresh rate Switching to a lower mode allows your player to use hardware acceleration mode Switch dual view mode to VGA or TV mode VideoSecurity curren...

Страница 98: ... there a way to recover my pass word The only way to remove password protection is to recall the original password that you assigned The password protection is still active even when you uninstallVideoSecurity and install a new copy Make sure that the password that you assigned can be eas ily remembered You may write down your password and store it in a safe place ...

Страница 99: ...models 7 B Background 37 40 Blind 37 40 Brightness 35 36 40 43 48 49 92 Buffer flipping mode 53 C Capture Audio format 70 84 86 Basic setting 70 CODEC 70 73 Frames 73 82 88 Image dimension 70 Menu 92 Mode 66 68 78 82 Video 82 88 Captured file name 85 Capturing images 70 87 CCD 61 97 Centered output 47 Change Default hot keys 39 42 Format 48 TV format 48 Changing the view 94 Channel Number 72 86 Ch...

Страница 100: ...lling 77 Using 78 Video source setup 80 Display video method 81 Video scan option 81 Video standard 81 Wallpaper display 80 Digital vibrance 49 Direct3D menu 35 40 50 General functions 36 VR Effect 37 Direct3D settings 51 Mipmapping 51 Custom 3D settings 51 Detail level 51 PCI texture memory size 51 More direct3D Texel alignment 52 Performance and compatibility 51 Adjust z buffer 51 Display logo 5...

Страница 101: ...5 36 40 43 49 GeForce3 50 3D antialiasing settings 50 Additional properties 50 Desktop utilities 55 Direct3d settings 51 Display manager 56 OpenGL settings 53 Overlay controls 54 Allow applications 50 Manually select antialiasing 50 General functions Color spline 36 Scheme 36 General timing formula 46 Global settings 57 Graphics speed 59 H Highlights 7 Histograms 40 Hotkey 39 42 57 58 Hue 54 92 I ...

Страница 102: ...monitor check 38 41 Line interleave 38 41 Page flipping 38 41 Refresh rate 38 41 Stereoscopic 37 Monitor Always on top 79 Analog 46 Check disable 38 41 Compatibility 38 Delay before switching zoom 58 Discrete timings 46 Drivers 12C bus control 77 IC 30 More resolution 34 Move the active window 57 Polling time 75 Refresh rates 42 Toolbox 78 VCR 80 More direct3D 52 More resolution 34 MPEG player 97 ...

Страница 103: ...heduled recording 72 Scheme 36 38 42 85 Screen adjustments 46 Screen positioning 48 SECAM 66 67 81 Sensibility 62 Set audio display 85 Shortcut keys 64 Single frame 92 Capture 59 Slow motion 90 SmartDoctor 74 Abnormal events 76 Advanced setup 75 Functions 74 SnapShot setting 71 72 84 Software Installation procedures 11 Sound selection 85 Start time 72 86 Stereoscopic 3D file 93 Stereoscopic mode 3...

Страница 104: ...MB 53 Utilities Desktop 55 Digital VCR 77 Live 65 SmartDoctor 30 74 TWAIN interface 91 Tweak 29 59 VideoSecurity 31 61 VR Picture Viewer 93 Utility Taskbar 44 V Vertical sync 53 Video Format 92 Output format 48 Recording 73 Scan option 81 Snapshot 82 87 Source option 67 79 80 Standard 81 Video capture 69 70 82 84 Capturing images 70 Enabling DMA transfer mode 69 Win 98 Win2000 NT 4 0 69 Video in T...

Страница 105: ...ng the 3d glasses 94 VR 100 upgrade kit 41 VR 100G 3 D glasses 41 93 94 W WARNING 11 18 20 29 33 38 42 45 59 Windows desktop 33 Properties and settings 33 Windows display properties 45 Working directory 63 Z Z axis range 40 Zoom control 54 58 INDEX ...

Страница 106: ...106 ASUS V8200 Series User s Manual NOTES INDEX ...

Отзывы: