


ASUS Transformer Book E-Manual
85
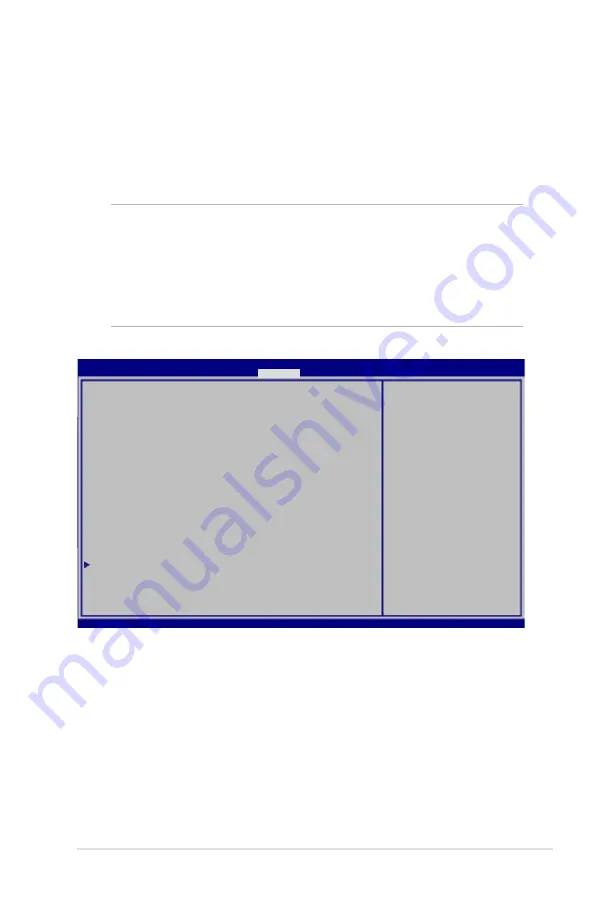
Security
This menu allows you to set up the administrator and user password
of your ASUS Transformer Book. It also allows you to control the
access to your ASUS Transformer Book’s hard disk drive, input/output
(I/O) interface, and USB interface.
Password Description
If ONLY the Administrator’s password is set,then this only
limits access to Setup and is only asked for when entering
Setup. If ONLY the user’s password is set, then this is
a power on password and must be entered to boot or enter
Setup. In Setup, the User will have Administrator rights.
Administrator Password Status
NOT INSTALLED
User Password Status
NOT INSTALLED
Administrator Password
User Password
HDD Password Status :
NOT INSTALLED
Set Master Password
Set User Password
I/O Interface Security
System Mode state
User
Secure Boot state
Enabled
Set Administrator
Password. The password
length must be in the
following range:
Minimum length 3
Maximum length 20
→←
: Select Screen
↑↓
: Select Item
Enter: Select
+/— : Change Opt.
F1 : General Help
F9 : Optimized Defaults
F10 : Save & Exit
ESC : Exit
Version 2.15.1226. Copyright (C) 2012 American Megatrends, Inc.
NOTE:
• If you install a
User Password, you will be prompted to input this
before entering your ASUS Transformer Book's operating system.
• If you install an Administrator Password, you will be prompted
to input this before entering BIOS.
Aptio Setup Utility - Copyright (C) 2012 American Megatrends, Inc.
Main Advanced Chipset Boot
Security
Save & Exit
Содержание Transformer Book
Страница 1: ...ASUSTransformer Book E Manual ...
Страница 11: ...ASUS Transformer Book E Manual 11 Chapter 1 Hardware Setup ...
Страница 22: ...22 ASUS Transformer Book E Manual ...
Страница 23: ...ASUS Transformer Book E Manual 23 Chapter 2 Using your ASUS Transformer Book ...
Страница 25: ...ASUS Transformer Book E Manual 25 Lift to open the touch panel display Press the power button ...
Страница 26: ...26 ASUS Transformer Book E Manual Undocking or docking the touch panel display Undocking ...
Страница 39: ...ASUS Transformer Book E Manual 39 Chapter 3 Working with Windows 8 ...
Страница 66: ...66 ASUS Transformer Book E Manual ...
Страница 67: ...ASUS Transformer Book E Manual 67 Chapter 4 ASUS apps ...
Страница 81: ...ASUS Transformer Book E Manual 81 Chapter 5 Power on Self Test POST ...
Страница 96: ...96 ASUS Transformer Book E Manual ...
Страница 97: ...ASUS Transformer Book E Manual 97 Appendices ...