background image

2-1

ASUS LCD Monitor SD222 Series

2.1 

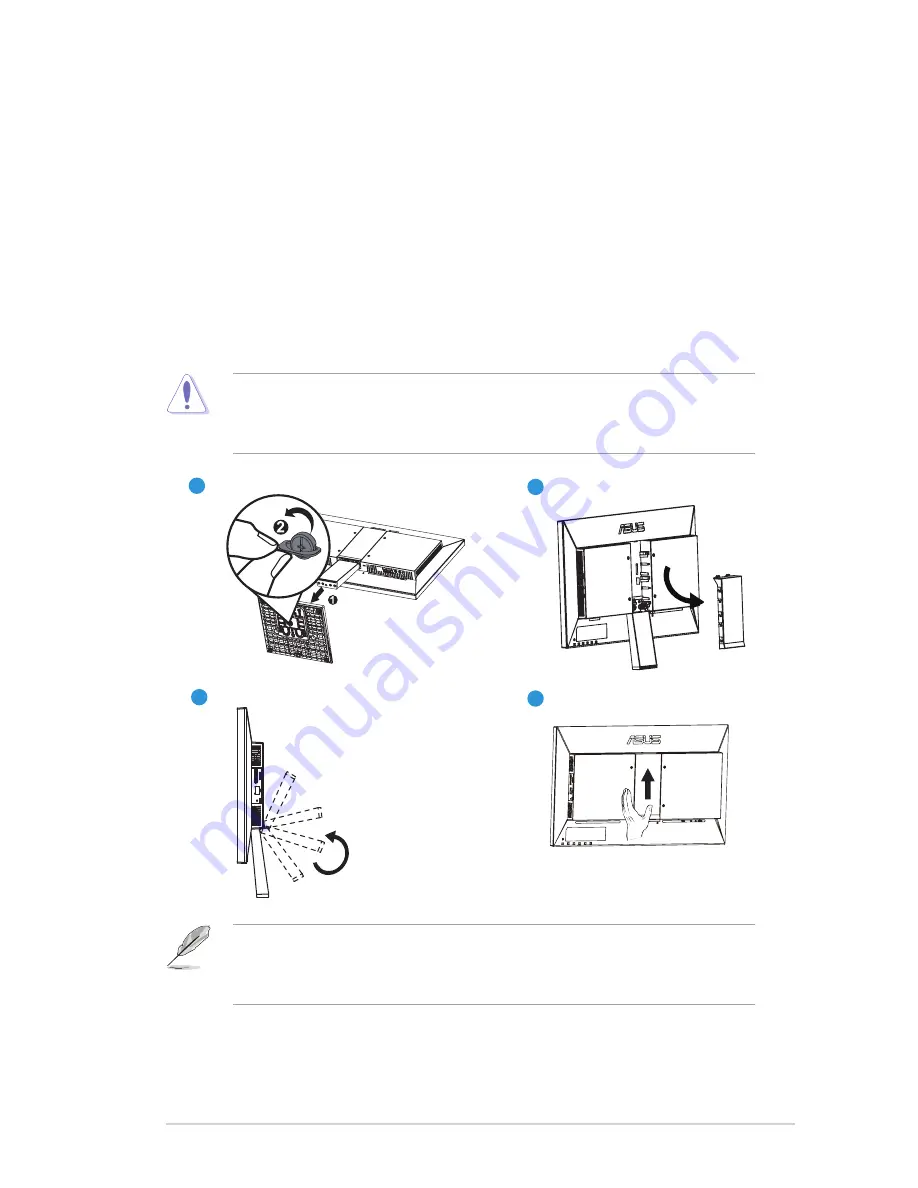
Detaching the arm/stand (for wall mounting)

The detachable stand of the display is specially designed for wall 

mounting.

1.  Disconnect the power cord and the signal cables. Carefully place the 

display face-side down on a clean surface, loosen the screw, and 

detach the base from the arm.

2.  Push down the rear cover to remove it from the groove.
3.  Fold the arm back to the groove.
4.  Place the rear cover back to the groove and push it upward.

•  We recommend that you cover the table surface with soft cloth to prevent from 

damaging the display.

•  Hold the stand while removing the screws.

3

2

4

1

•  The (100 x 100 mm) wall mount kit is not included in the product purchased.
•  Use only the UL listed wall mount bracket with minimum weight/load 14kg 

(Screw size: M4 x 10 mm).

Содержание SD222-YA Series

Страница 1: ...SD222 YA Series Display User Guide ...

Страница 2: ...oduction 3 1 3 2 Specifications 3 4 3 3 Get start with media player 3 5 3 3 1 Specification summary 3 5 3 3 2 System requirement 3 5 3 3 3 Getting to know the media player 3 5 3 3 4 Remote controller 3 6 3 3 5 Getting your media player ready 3 6 3 4 Using the media player 3 7 3 4 1 Main Menu 3 7 3 4 2 Configuring the media player setting 3 7 3 4 3 Playing a movie 3 7 3 4 4 Playing a music 3 7 3 4 ...

Страница 3: ... FITNESS FOR A PARTICULAR PURPOSE IN NO EVENT SHALL ASUS ITS DIRECTORS OFFICERS EMPLOYEES OR AGENTS BE LIABLE FOR ANY INDIRECT SPECIAL INCIDENTAL OR CONSEQUENTIAL DAMAGES INCLUDING DAMAGES FOR LOSS OF PROFITS LOSS OF BUSINESS LOSS OF USE OR DATA INTERRUPTION OF BUSINESS AND THE LIKE EVEN IF ASUS HAS BEEN ADVISED OF THE POSSIBILITY OF SUCH DAMAGES ARISING FROM ANY DEFECT OR ERROR IN THIS MANUAL OR ...

Страница 4: ...ence to radio communications However there is no guarantee that interference will not occur in a particular installation If this equipment does cause harmful interference to radio or television reception which can be determined by turning the equipment off and on the user is encouraged to try to correct the interference by one or more of the following measures Reorient or relocate the receiving an...

Страница 5: ...erated only from the type of power source indicated on the label If you are not sure of the type of power supply to your home consult your dealer or local power company Use the appropriate power plug which complies with your local power standard Do not overload power strips and extension cords Overloading can result in fire or electric shock Avoid dust humidity and temperature extremes Do not plac...

Страница 6: ...he screen may flicker during the initial use due to the nature of the fluorescent light Turn off the power switch and turn it on again to make sure that the flicker disappears You may find slightly uneven brightness on the screen depending on the desktop pattern you use When the same image is displayed for hours an afterimage of the previous screen may remain after switching the image The screen w...

Страница 7: ...e updates 1 ASUS websites The ASUS websites worldwide provide updated information on ASUS hardware and software products Refer to http www asus com 2 Optional documentation Your product package may include optional documentation that may have been added by your dealer These documents are not part of the standard package ...

Страница 8: ...enhance your viewing experience With these features you can enjoy the convenience and delightful visual experience that the display brings you 1 2 Package contents Check your package for the following items Display set Display base and screw Quick start guide Warranty card Power cord Remote controller and battery If any of the above items is damaged or missing contact your retailer immediately ...

Страница 9: ... hidden in the groove 3 Place the rear cover on the top of the groove and push it up with a click sound 4 Attach the base to the arm and fasten the screw tightly 5 Adjust the display to the angle that is the most comfortable to you 2 1 5 4 3 We recommend that you cover the table surface with soft cloth to prevent from damaging the display ...

Страница 10: ...roduction 1 4 1 Front of the display 1 2 1 Remote control sensor The display receives the command from the remote controller here 2 Power Indicator The color of power indicator is as below Status Description White Operating Amber Standby Dark Power off ...

Страница 11: ...urn To switch between media player and VGA input To return to the previous selection in the OSD Brightness up Next To adjust the brightness To rise the numerical value of the selected function OK Volume OK To adjust the volume To select the highlighted function in the OSD A Auto Back To adjust screen automatically in VGA input To lower the numerical value of the selected function MENU Menu To ente...

Страница 12: ...tach the base from the arm 2 Push down the rear cover to remove it from the groove 3 Fold the arm back to the groove 4 Place the rear cover back to the groove and push it upward We recommend that you cover the table surface with soft cloth to prevent from damaging the display Hold the stand while removing the screws 3 2 4 1 The 100 x 100 mm wall mount kit is not included in the product purchased U...

Страница 13: ...g we recommend that you look at the full face of the display and then adjust the display to the angle that is the most comfortable to you Hold the stand to prevent the display from falling while changing its angle You may adjust the display s angle from 5 to 23 5 23 ...

Страница 14: ... again to navigate through the sub menu Press the OK button to highlight and activate the desired sub menu function 3 Press and button to change the settings of the selected function 4 To exit from the OSD menu press the MENU button Repeat step 2 and step 3 to adjust any other function 3 1 2 OSD Function Introduction 1 Color Select the image color you like from this function SD222 Color Picture In...

Страница 15: ...60 Aspect Control To alter the aspect ratio among Full 4 3 Full Height only available for VGA input OverScan To adjust the over scan ratio for the media player Position To adjust the horizontal H Position and the vertical position V Position of the image from the VGA input The adjustable range is from 0 to 100 Focus To reduces the horizontal line and the vertical line noise of the image from the V...

Страница 16: ...t DDC CI Transparency OSD Rotation and Power indicator of the display Information To show the information of the display Language To select OSD language The selections are English French German Spanish Italian Dutch Russian Traditional Chinese Simplified Chinese Japanese Persian Thai Indonesian Poland Turkey Portugal Czech Croatia Hungary Romania and Korean Key Lock To disable all function keys Lo...

Страница 17: ...7 M Response Time Typ 5ms G to Gσ D Sub input Yes Media player input Yes Power ON Consumption 40 W Speaker Yes Earphone Yes Power saving mode 0 5 W Power off mode 0 5 W Tilt 5 to 23 Mounting Interface 100mm x 100mm Phys Dimension WxHxD 517 8 x 385 2 x 200 mm Box Dimension WxHxD 570 x 109 x 392 mm Net Weight Esti 3 8 kg Gross Weight Esti 5 1 kg Voltage Rating AC 100 240V Extemal Specifications are ...

Страница 18: ...G ID3 Supported image formats JPEG BMP PNG GIF TIFF Supported subtitle formats SRT SUB SMI SSA TXT I O ports 1 x SD card reader SDXC NTFS FAT32 USB2 0 Host Type A 3 3 2 System requirement 1 Storage device USB flash drive 2 Memory card SDXC NTFS and FAT32 3 3 3 Getting to know the media player Item I O Description 1 SD MMC Insert the SD MMC card into this slot support up SDXC NTFS and FAT32 2 USB 2...

Страница 19: ...ough the main menu in the home screen and menu bar in a submenu Press the left key to edit the selected file on return rename and delete 10 Guide Press to view the guide menu 12 Subtitle Press to select the supported subtitle 13 Volume down Decrease the volume 14 Mute Press to disable audio input 15 Volume up Increase the volume 16 Rewind Press to rewind the playback 17 Play Pause Toggle between p...

Страница 20: ...movie in the home screen 2 Use up down key to select your movie file and press OK 3 4 4 Playing a music 1 Press up down key and navigate to music in the main screen 2 Using up down key to select your music file and press OK 3 4 5 Configuring the audio playback settings The audio playback setting menu allows you to configure repeat Press repeat to select playback options Repeat off Repeat on Repeat...

Страница 21: ...enu and go to photo to start photo slide show 3 4 8 Renaming files folders 1 Select the files or folders you would like to rename from any of these Sources USB and card reader 2 Press edit key and select rename 3 Use the navigation keys to move through the virtual keyboard to rename 4 Press Enter on the virtual keyboard to confirm the new file or folder name ...

Страница 22: ...Press the button for two seconds to automatically adjust the image Adjust the H Position or V Position settings via OSD Screen image bounces or a wave pattern is present in the image Make sure the signal cable is properly connected to the monitor and the computer Move electrical devices that may cause electrical interference Screen image has color defects white does not look white Inspect the sign...

Страница 23: ...ge device Your USB storage device may not be detected because of problems with the USD hardware Try to re plug the USB storage device to the USB port again or use another USB storage device Remote Control The media player remote control is not working Ensure that the battery is properly inserted The battery may already be drained out Replace the battery with a new one Ensure that the path between ...

Страница 24: ...5KHz 848 x 480 60Hz 31 02KHz 1024 x 768 60Hz 48 363KHz 1024 x 768 70Hz 56 476KHz 1024 x 768 75Hz 60 023KHz 1152 x 864 75Hz 67 5KHz 1280 x 720 60Hz 44 772KHz 1280 x 800 60Hz 49 702KHz 1280 x 960 60Hz 60KHz 1280 x 1024 60Hz 63 981KHz 1280 x 1024 75Hz 79 976KHz 1366 x 768 60Hz 47 712KHz 1440 x 900 60Hz 55 935KHz 1680 x 1050 60Hz 65 29KHz 1680 x 1050 60Hz 64 674KHz 1920 x 1080 60Hz 67 5KHz 1920 x 1080...

Отзывы: