background image

19

Chapter 4: Configuring via the web GUI   


RT-N13

4

Configuring via the 

web GUI

Configuring via the web GUI

The router’s web graphics user interface (web GUI) allows you to configure these 

features: 

Network Map

EZQoS Bandwidth Management

, and other 

Advanced 

Setting

.

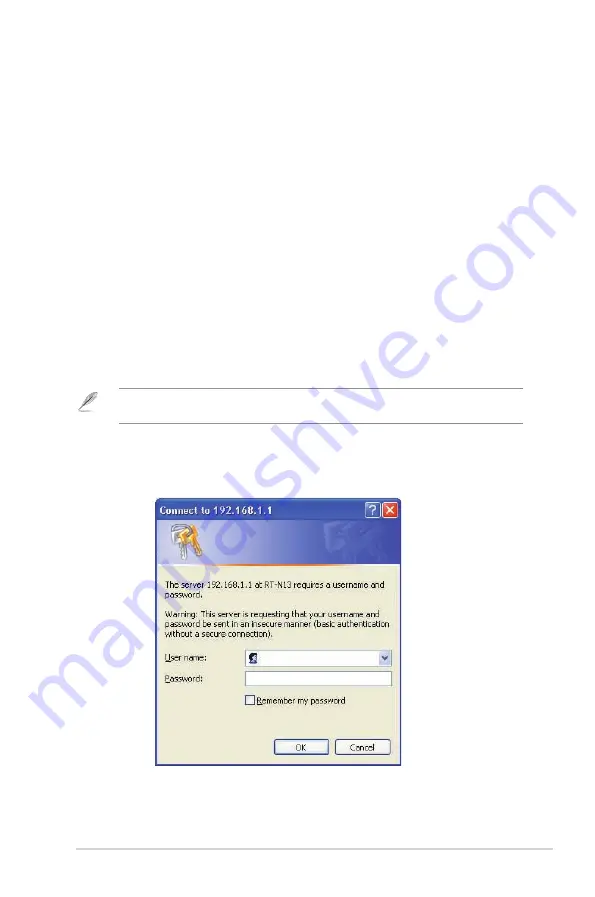
To configure via the web GUI:

1.  After setting up a wired or wireless connection, launch a web browser. The 

login page is automatically launched.

Note

: You may also manually key in the router’s default IP address (

192.168.1.1

) to launch the 

router’s web interface.

.  On the login page, key in the default user name (

admin

) and password 

(

admin

).

Содержание RT-N13

Страница 1: ...RT N13 SuperSpeed N Wireless Router User Manual ...

Страница 2: ...ICULAR PURPOSE IN NO EVENT SHALL ASUS ITS DIRECTORS OFFICERS EMPLOYEES OR AGENTS BE LIABLE FOR ANY INDIRECT SPECIAL INCIDENTAL OR CONSEQUENTIAL DAMAGES INCLUDING DAMAGES FOR LOSS OF PROFITS LOSS OF BUSINESS LOSS OF USE OR DATA INTERRUPTION OF BUSINESS AND THE LIKE EVEN IF ASUS HAS BEEN ADVISED OF THE POSSIBILITY OF SUCH DAMAGES ARISING FROM ANY DEFECT OR ERROR IN THIS MANUAL OR PRODUCT SPECIFICATI...

Страница 3: ...g up a wired connection 9 Setting up a wireless connection 10 Configuring the wireless router 10 Using the web GUI 10 Chapter 3 Configuring the network clients Accessing the wireless router 12 Setting an IP address for wired or wireless client 12 Chapter 4 Configuring via the web GUI Configuring via the web GUI 19 Using the Network Map 20 Setting up WAN using the Quick Internet Setup QIS 21 Managi...

Страница 4: ...e ASUS Wireless Router Chapter 2 Setting up the hardware This chapter provides instructions on setting up accessing and configuring the ASUS Wireless Router Chapter 3 Configuring the network clients This chapter provides instructions on setting up the clients in your network to work with your ASUS Wireless Router Chapter 5 Installing the utilities Installing the utilities 25 Device Discovery 27 Fi...

Страница 5: ...es you with a troubleshooting guide for solving common problems you may encounter when using the ASUS Wireless Router Appendices This chapter provides you with the regulatory Notices and Safety Statements Conventions used in this guide WARNING Information to prevent injury to yourself when trying to complete a task CAUTION Information to prevent damage to the components when trying to complete a t...

Страница 6: ...st one IEEE 802 11b g device with wireless capability An installed TCP IP and Internet browser Before you proceed Take note of the following guidelines before installing the ASUS Wireless Router The length of the Ethernet cable that connects the device to the network hub ADSL cable modem router wall patch must not exceed 100 meters Place the device on a flat stable surface as far from the ground a...

Страница 7: ...ct is operated in accordance with the RF Guidelines for Human Exposure adopted by the Federal Communications Commission Hardware features Front panel PWR AIR WAN LAN Status indicators LED Status Indication Power Off No power On System ready Flashing slow Firmware upgrade failed Flashing quick WPS processing AIR Wireless Network Off No power On Wireless system ready Flashing Transmitting or receivi...

Страница 8: ...WAN connection DC In Insert the AC adapter into this port to connect your router to a power source WPS Restore WAN LAN LAN 1 4 WAN DC In Restore button WPS button Rear panel LED Status Indication LAN 1 4 Local Area Network Off No power or no physical connection On Has physical connection to an Ethernet network Flashing Transmitting or receiving data through Ethernet cable WAN Wide Area Network Off...

Страница 9: ...use wired connection for initial configuration to avoid possible setup problems due to wireless uncertainty For more details on WPS refer to the section WPS in Chapter 5 of this user manual Setting up a wired connection The ASUS Wireless Router is supplied with an Ethernet cable in the package The wireless router has integrated auto crossover function so use either straight through or crossover ca...

Страница 10: ...ng the wireless router The ASUS Wireless Router includes a web graphics user interface web GUI which allows you to configure the wireless router using a web browser on your computer Using the web GUI If your PC connects to the router using a cable launch a web browser and the login page of the router s web GUI is automatically launched If your PC connects to the router wirelessly you have to selec...

Страница 11: ...eless connection launch a web browser Notes You may also manually key in the router s default IP address 192 168 1 1 to launch the router s web interface For more details on configuring your wireless router using the web GUI refer to Chapter 4 Configuring via the web GUI ...

Страница 12: ...ances you may want to manually assign static IP addresses on some of the clients or computers in your network rather than automatically getting IP addresses from your wireless router Follow the instructions below that correspond to the operating system installed on your client or computer Note If you want to manually assign an IP address to your client we recommend that you use the following setti...

Страница 13: ...l Network to display the Network setup window 2 Select TCP IP then click Properties 3 If you want your computer to automatically obtain an IP address click Obtain an IP address automatically then click OK Otherwise click Specify an IP address then key in the IP address and Subnet Mask ...

Страница 14: ...er 3 Configuring the clients 4 Select Gateway tab and key in New gateway then click Add 5 Select the DNS configuration tab and click Enable DNS Key in Host Domain and DNS Server Search Order then click Add 6 Click OK ...

Страница 15: ...Protocols tab 2 Select TCP IP Protocol from the Network Protocols list then click Properties 3 From the IP Address tab of the Microsoft TCP IP Properties windows you can Select the type of network adapter installed in your system Set the router to assign IP address automatically Manually set up the IP address subnet mask and default gateway ...

Страница 16: ...ing the clients 4 Select the DNS tab then click Add under the DNS Service Search Order and key in DNS Windows 2000 1 Click Start Control Panel Network and Dial up Connection Right click Local Area Connection then click Properties ...

Страница 17: ...e following IP address and key in IP address Subnet mask and Default gateway 4 Select Obtain an IP address automatically if you want the DNS server settings to be assigned automatically Otherwise select Use the following DNS server address and key in the Preferred and Alternate DNS server 5 Click OK when done Windows XP 1 Click Start Control Panel Network Connection Right click Local Area Connecti...

Страница 18: ...s to be assigned automatically Otherwise select Use the following IP address and key in IP address Subnet mask and Default gateway 4 Select Obtain DNS server address automatically if you want the DNS server settings to be assigned automatically Otherwise select Use the following DNS server addresses and key in the Preferred and Alternate DNS server 5 Click OK when done ...

Страница 19: ...Network Map EZQoS Bandwidth Management and other Advanced Setting To configure via the web GUI 1 After setting up a wired or wireless connection launch a web browser The login page is automatically launched Note You may also manually key in the router s default IP address 192 168 1 1 to launch the router s web interface 2 On the login page key in the default user name admin and password admin ...

Страница 20: ...on WPS in Chapter 5 of this user manual To view the status or configure the settings click on any of these icons displayed on the main page Icon Description Internet status Click this icon to display information on the Internet connection status WAN IP address DNS connection type and gateway address From the Internet status screen use the Quick Internet Setup QIS feature to quickly set up your WAN...

Страница 21: ...ick Internet Setup QIS The Quick Internet Setup QIS function automatically detects the Internet connection type It guides you in setting up your WAN when encountering special Internet connection types To set up your WAN using QIS 1 Under Internet status click GO in the QIS field 2 Select your connection type from these types of ISP services Automatic IP PPPoE PPTP L2TP and Static IP 3 Click Apply ...

Страница 22: ...k each of these four applications to set the bandwidth priority Icon Description Gaming Blaster The router handles gaming traffic at first priority Internet Application The router handles the e mail web browsing and other Internet applications traffic at first priority FTP The router handles at first priority the traffic of downloading uploading data to from the FTP server Voip Video Streaming The...

Страница 23: ...upgrade process fails the wireless router automatically enters the emergency or failure mode and the power LED indicator at the front panel flashes slowly To recover or restore the system use the Firmware Restoration utility For more details on this utility refer to the section Firmware Restoration in Chapter 5 of this user manual Configuring the advanced settings This page allows you to configure...

Страница 24: ...menu click Restore Save Upload Setting 3 Select the tasks that you want to do To restore to the default factory settings click Restore and click OK in the confirmation message To save the current system settings click Save and click Save in the file download window to save the system file in your preferred path To restore previous system settings click Browse to locate the system file that you wan...

Страница 25: ...ties for configuring the ASUS Wireless Router To install the ASUS WLAN Utilities in Microsoft Windows insert the support CD in the CD drive If Autorun is disabled run setup exe from the root directory of the support CD To install the utilities 1 Click Install Utilities Installing the utilities 2 Click Next ...

Страница 26: ...alling the utilities 3 Click Next to accept the default destination folder or click Browse to specify another path 4 Click Next to accept the default program folder or enter another name 5 Click Finish when setup is completed ...

Страница 27: ...utility that searches for an ASUS Wireless Router that failed during its firmware upgrading process then restores or re uploads the firmware that you specify The process takes about three to four minutes To launch the Firmware Restoration utility From your computer s desktop click Start All Programs ASUS Utility Firmware Restoration Note This is not a firmware upgrade utility and cannot be used on...

Страница 28: ...Support Vista 32 64 Intel wireless LAN card ASUS 167g V2 driver v3 0 6 0 or later ASUS 160N 130N driver v2 0 0 0 or later XP SP2 Intel wireless LAN card ASUS 167g V2 driver v1 2 2 0 or later ASUS 160N 130N driver v1 0 4 0 or later XP SP1 and 2000 ASUS LAN card with ASUS WLAN Utility ASUS 167g V2 driver v1 2 2 0 or later ASUS 160N 130N driver v1 0 4 0 or later To use WPS 1 Click Start All Programs ...

Страница 29: ...lashes and Internet connection pauses briefly and then reestablishes the connection WPS Restore WAN LAN WPS button Note Use the WPS utility with one wireless client at a time If the wireless client cannot discover the wireless router while in WPS mode shorten the distance between the client and the wireless router 2 Push the WPS button at the back panel of the wireless router 3 On the WPS Wizard c...

Страница 30: ...tween 8 and 63 characters Click Next 6 Installation is completed Click Save or print settings for future reference or Save settings to a USB flash drive to add other devices to the network Click Next to connect to the Internet Note For more details on adding devices to the network using a USB flash drive refer to the section Adding network devices using a USB flash drive on the next page ...

Страница 31: ...gure the Internet settings click Setup Click Finish to close the WPS Wizard Adding network devices using a USB flash drive With the WPS utility you can add devices to your network using a USB flash drive To add network devices using a USB flash drive 1 In the WPS Wizard click Save settings to a USB flash drive ...

Страница 32: ...the drive from the dropdown list When done click Next to continue 3 Remove the USB flash drive from this computer and then plug to the computer that you want to add to the wireless network 4 Locate the SetupWireless exe from the USB drive and double click to run it Click Yes to add this computer to the wireless network ...

Страница 33: ...33 Chapter 5 Installing the utilities RT N13 5 Click OK to exit the Wireless Network Setup Wizard ...

Страница 34: ...1 Launch a web browser then click Tools Internet Options 2 Under Temporary Internet files click Delete Cookies and Delete Files The client cannot establish a wireless connection with the router Out of Range Put the router closer to the wireless client Try to change the channel settings Authentication Use wired connection to connect to the router Check the wireless security settings Press the Resto...

Страница 35: ...Link light is ON not blinking this means Internet Access is possible Restart your computer Refer to the Quick Start Guide of the wireless router and re configure the settings Check if the WAN LED on the wireless router is ON Check the wireless encryption settings Check if the computer can get the IP address via both wired network and wireless network Ensure that your web browser is configured to u...

Страница 36: ...ow to restore the system to its default settings Press the Restore button at the rear panel of the wireless router for more than five seconds Refer to the section Restoring to the default settings in Chapter 5 of this user manual The following are the factory default settings User Name admin Password admin Enable DHCP Yes if WAN cable is plugged in IP address 192 168 1 1 Domain Name Blank Subnet M...

Страница 37: ...ce to radio communications However there is no guarantee that interference will not occur in a particular installation If this equipment does cause harmful interference to radio or television reception which can be determined by turning the equipment off and on the user is encouraged to try to correct the interference by one or more of the following measures Reorient or relocate the receiving ante...

Страница 38: ... for electromagnetic compatibility Article 3 1b Testing for electromagnetic compatibility according to EN 301 489 1 and EN 301 489 17 has been conducted These are considered relevant and sufficient Effective use of the radio spectrum Article 3 2 Testing for radio test suites according to EN 300 328 2 has been conducted These are considered relevant and sufficient CE Mark Warning This is a Class B ...

Страница 39: ...ware is free for all its users This General Public License applies to most of the Free Software Foundation s software and to any other program whose authors commit to using it Some other Free Software Foundation software is covered by the GNU Library General Public License instead You can apply it to your programs too When we speak of free software we are referring to freedom not price Our General...

Страница 40: ...program or work and a work based on the Program means either the Program or any derivative work under copyright law that is to say a work containing the Program or a portion of it either verbatim or with modifications and or translated into another language Hereinafter translation is included without limitation in the term modification Each licensee is addressed as you Activities other than copyin...

Страница 41: ...ions when you distribute them as separate works But when you distribute the same sections as part of a whole which is a work based on the Program the distribution of the whole must be on the terms of this License whose permissions for other licensees extend to the entire whole and thus to each and every part regardless of who wrote it Thus it is not the intent of this section to claim rights or co...

Страница 42: ...t copy modify sublicense or distribute the Program except as expressly provided under this License Any attempt otherwise to copy modify sublicense or distribute the Program is void and will automatically terminate your rights under this License However parties who have received copies or rights from you under this License will not have their licenses terminated so long as such parties remain in fu...

Страница 43: ...or donor to decide if he or she is willing to distribute software through any other system and a licensee cannot impose that choice This section is intended to make thoroughly clear what is believed to be a consequence of the rest of this License 8 If the distribution and or use of the Program is restricted in certain countries either by patents or by copyrighted interfaces the original copyright ...

Страница 44: ...LIED WARRANTIES OF MERCHANTABILITY AND FITNESS FOR A PARTICULAR PURPOSE THE ENTIRE RISK AS TO THE QUALITY AND PERFORMANCE OF THE PROGRAM IS WITH YOU SHOULD THE PROGRAM PROVE DEFECTIVE YOU ASSUME THE COST OF ALL NECESSARY SERVICING REPAIR OR CORRECTION 12 IN NO EVENT UNLESS REQUIRED BY APPLICABLE LAW OR AGREED TO IN WRITING WILL ANY COPYRIGHT HOLDER OR ANY OTHER PARTY WHO MAY MODIFY AND OR REDISTRI...

Страница 45: ...elephone 15029550883 Fax 15029338713 Website usa asus com Software download support asus com ASUS COMPUTER GmbH Germany and Austria Address Harkort Str 25 D40880 Ratingen Germany Telephone 49210295990 Fax 492102959911 Online contact www asus com de sales Technical Support Telephone 49210295990 Fax 492102959911 Online support www asus com de support Website www asus com de news Available on this si...

Страница 46: ...ds Part 2 Harmonized EN under article 3 2 of the R TTE Directive EN 55020 EN 55022 Immunity from radio interference of broadcast receivers and associated equipment Limits and methods of measurement of radio disturbance characteristics of information technology equipment EN 301511 Global System for Mobile communications GSM Harmonized EN for mobile stations in the GSM 900 and GSM 1800 bands coverin...

Отзывы: