background image

1

4.  A list of POIs is displayed�� sorted by their distance from the reference point.

•  Tap 

Search

 to narrow the list by entering a part of the POI name.

•  To see the name and address of additional POIs�� tap the 

left and right arrow

 but-

tons.

•  Tap 

By Name

 to list POIs in alphabetical order instead of their distance.

5.  Tap the name of the POI you were looking for. The location of the selected POI will be 

displayed on the map.

•  Tap 

Navigate

 To to select the POI as your destination and start navigating there.

•  Tap 

Add to Favorites

 to save the POI as one of your favourite destinations.

•  Tap

 Info

 to display detailed information on the POI.

Map and Navigation

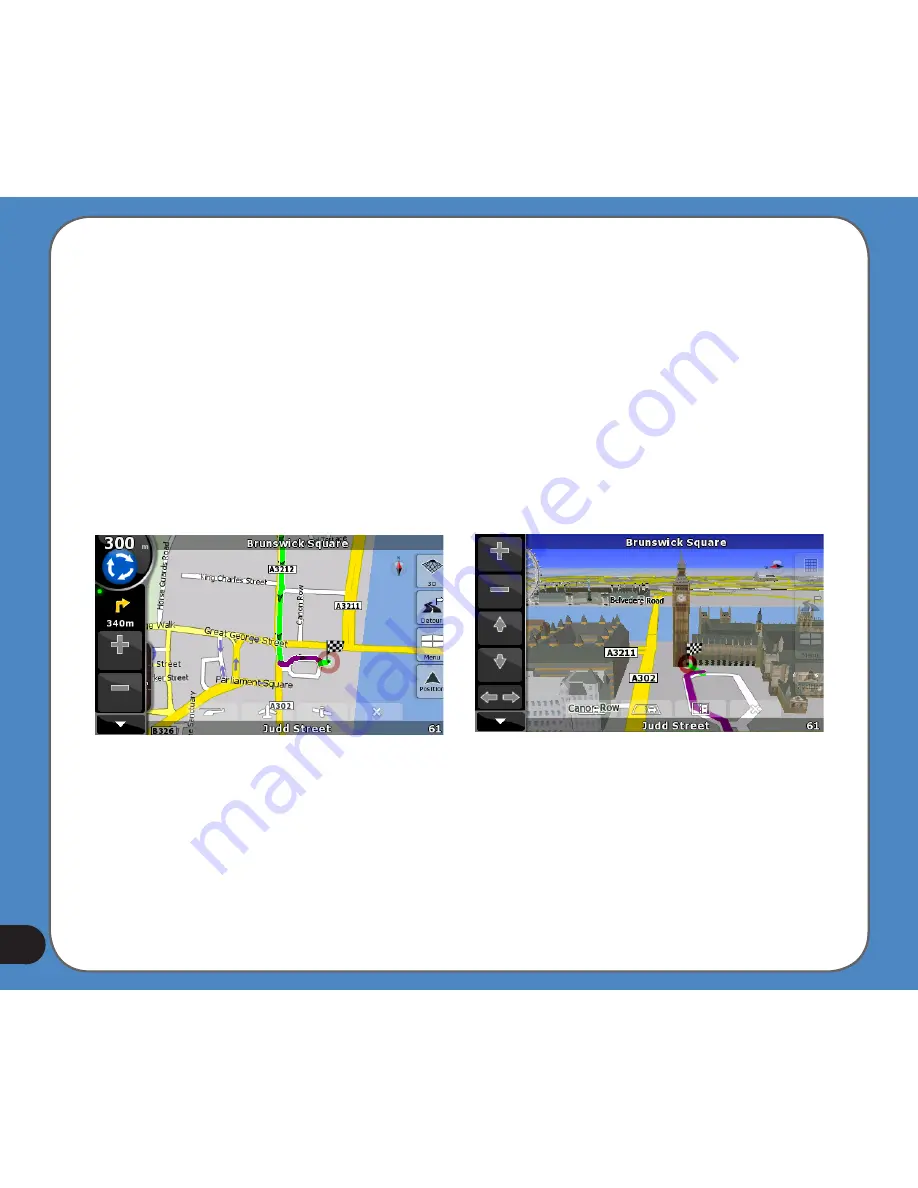
ASUS GO can display two types of maps: 

2D

 map that looks like a conventional road map 

and works best for browsing 

3D

 view that shows streets as well as buildings or landmarks 

(where available)�� and works best for navigation
•  Tap the 

2D

 or 

3D

 icon to change between the views.

•  To return to the 

Navigation Menu

�� tap the 

Menu

 icon. 

•  Tap the 

Cursor

 icon to open the 

Cursor menu

 and navigate to the current position of 

the cursor.

Содержание R700

Страница 1: ...Quick StartGuide Quick StartGuide E3453 15G06A364000 R700 ...

Страница 2: ...nt 5 Charging LED Red charging Green full charged 6 Microphone Microphone for handsfree function 7 Main Power switch Turns the main power on off 8 External Antenna port Connects to an external antenna for better signal performance the external antenna is optional 9 Micro SD Slot Insert the external Micro SD memory card to this slot 10 Speaker Allows you to listen to music the navigation voice and ...

Страница 3: ... power LED turns to green Charging may take several hours You can use the device while charging However the device takes much less time to be fully charged in sleep mode To check how much battery power remains 1 From the main menu tap Settings Figure 1 2 The Sub menu Settings appears Tap to display more options Figure 2 3 Tap the battery icon Figure 3 The battery screen appears and displays a batt...

Страница 4: ...nto sleep mode When the device is on it takes longer time for the battery to be fully charged When the device is in sleep mode the battery can be fully charged quickly NOTE Rise the lever 2b to release the cupula from the windshield 1 2 3 4 2a 2b 4 To install the car kit 1 Attached the cupula 1 to the windshield inside your car 2 Press the lever 2a to secure the cupula on the windshield surface 3 ...

Страница 5: ...igation to enter the navigation system Tap Video Player to play videos Tap Music Player to play music Tap Photo Viewer to view photos Tap Phone to set and use bluetooth and phone features Tap Settings to adjust the device settings see figures on the next page Main Menu and Basic Settings ...

Страница 6: ...or function that allows you to adjust LCD brightness for either a lighter or a darker environment The Date Time button allows you to set the date and time for your device The Bluetooth button allows you to connect R700 to a cellphone The Volume button allows you to adjust mute the sound for the device and phone calls The Screen button allows you to calibrate the LCD screen The Battery button allow...

Страница 7: ...tos Playing movies page up back to the main menu tap to view the photos as a slide show page down play randomly circulate playlist back to the main menu launch the playlist adjust the volume the name of the movie the length of the movie time remains back to the main menu launch the playlist adjust the volume tap to choose the default memory where the photos are stored Main Menu Music Player Video ...

Страница 8: ...tinations Tap Find POI to select one of the stored Points of Interest Tap My Favourites for one of your favourite destinations The following actions are also possible in the Navigation Menu Tap Map to browse the map Tap Settings to customise the way ASUS GO works Tap Exit to stop navigation and exit ASUS GO Operating modes ASUS GO can operate in two different modes Normal Mode designed for easy op...

Страница 9: ...xpert Mode tap Settings then tap Expert mode You can switch back from Expert Mode to Normal Mode in a similar way Find an address 1 In the Navigation Menu tap Find Address 2 Select the destination country Tap the first line on the list that shows the country you are currently in or searched for recently On the next screen select the country from the list In some countries you are also asked to sel...

Страница 10: ... Name and type the name of the destination street Follow the same method as for selecting the city 5 Enter the house number Tap the line that says House Number and type the house number You can also Tap City Center after selecting the city if you do not have a specific address on your mind Tap Street Center after selecting the street if you are just looking for a street and not a specific address ...

Страница 11: ...rch Center 2 Tap Around GPS Around Cursor Around Destination or Along Route to define the reference point around which you want to search for POIs 3 Enter the list of POIs in one of the following ways Tap one of the POI groups to open a list of its subgroups then tap the needed sub group to enter the list of POIs Use the left and right arrow buttons to see additional POI groups For a complete list...

Страница 12: ...To to select the POI as your destination and start navigating there Tap Add to Favorites to save the POI as one of your favourite destinations Tap Info to display detailed information on the POI Map and Navigation ASUS GO can display two types of maps 2D map that looks like a conventional road map and works best for browsing 3D view that shows streets as well as buildings or landmarks where availa...

Страница 13: ...navigating a thick line shows the recommended route and an arrow represents your current position A pictogram indicating the next manoeuvre is displayed on the left side along with its distance The left panel also shows information about your route including the planned arrival date the distance to your destination and the speed at which you are driving Full voice guidance is provided to enable sa...

Страница 14: ... the Phone Phone menu Figure 1 Figure 2 Figure 3 Main menu To connect R700 to your cellphone 1 Tap Dialer from the Phone Menu Figure 1 2 Tap Yes from the Connect to a Bluetooth handset first screen The Bluetooth Device Found screen displays the devices Figure 2 4 Tap a device name A screen appears asking you to input the PIN number to your cellphone Figure 3 5 Input the PIN number to your cellphon...

Страница 15: ...nnection is setup successfully To make and receive calls 1 Tap Dialer from the Phone Menu The phone pad appears Figure 1 2 Dial the number and tap the green phone icon to call 3 After talk tap the red phone icon to end a call Figure 2 To receive a call tap the green phone icon Figure 3 NOTE For more information please see the full User Manual which is included in the support CD of your R700 NOTE T...

Отзывы: