background image

ASUS PIKE 2108

3-13

3.4 

 Red Hat

®

 Enterprise Linux OS 5 Driver 

Installation

To install the RAID card driver when installing Red Hat

 Red Hat

®

 Enterprise OS:

1.  Boot the system from the Red Hat

®

 OS installation CD.

2.  At the 

boot:

, type 

linux dd

, then press <Enter>.

-  To install or upgrade in graphical mode, press the <ENTER> key.
-  To install or upgrade in text mode, type: linux text <ENTER>.
-  Use the function keys listed below for more information.

[F1-Main] [F2-Options] [F3-General] [F4-Kernel] [F5-Rescue]

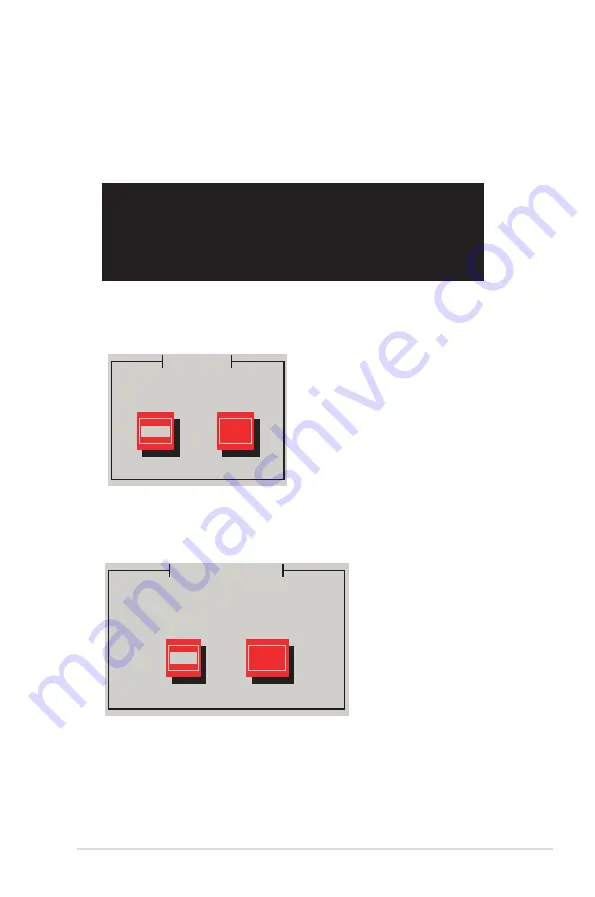
boot: linux dd

3.  Select 

Yes

 using the <Tab> key when asked if you have the driver disk, then 

press <Enter>.

Main Menu

Do you have a driver disk?

Yes

No

4.  Insert the Red Hat

®

 Enterprise RAID driver disk to the USB floppy disk drive, 

select 

OK

, then press <Enter>.


The drivers for the RAID card are installed to the system.

Insert Driver Disk

Insert your driver disk into /dev/sda 

and press “OK” to continue.

OK

Back

Содержание PIKE 2108

Страница 1: ...LSISAS RAID card PIKE 2108 User Guide ...

Страница 2: ...ERCHANTABILITY OR FITNESS FOR A PARTICULAR PURPOSE IN NO EVENT SHALL ASUS ITS DIRECTORS OFFICERS EMPLOYEES OR AGENTS BE LIABLE FOR ANY INDIRECT SPECIAL INCIDENTAL OR CONSEQUENTIAL DAMAGES INCLUDING DAMAGES FOR LOSS OF PROFITS LOSS OF BUSINESS LOSS OF USE OR DATA INTERRUPTION OF BUSINESS AND THE LIKE EVEN IF ASUS HAS BEEN ADVISED OF THE POSSIBILITY OF SUCH DAMAGES ARISING FROM ANY DEFECT OR ERROR I...

Страница 3: ...4 Viewing and Changing Device Properties 2 29 2 2 5 Viewing System Event Information 2 36 2 2 6 Managing Configurations 2 37 2 3 MegaRAID Storage Manager 2 41 2 3 1 Hardware and Software Requirements 2 41 2 3 2 Installing MegaRAID Storage Manager Software on Microsoft Windows OS 2 41 2 3 3 Installing MegaRAID Storage Manager Software for Linux 2 45 2 3 4 Linux Error Messages 2 46 2 3 5 Starting Me...

Страница 4: ... Installation 3 9 3 3 1 During Windows Server 2008 OS installation 3 9 3 3 2 After Windows Server 2008 OS installation 3 11 3 4 Red Hat Enterprise Linux OS 5 Driver Installation 3 13 3 5 SUSE Linux OS 11 Driver Installation 3 15 Contents ...

Страница 5: ...ID sets using the available utilities Chapter 3 Driver installation This chapter provides instructions for installing the RAID drivers on different operating systems Where to find more information Refer to the following sources for additional information and for product and software updates 1 ASUS websites The ASUS website provides updated information on ASUS hardware and software products Refer t...

Страница 6: ...that you must type the command exactly as shown then supply the required item or value enclosed in brackets Example At the DOS prompt type the command line format a DANGER WARNING Information to prevent injury to yourself when trying to complete a task CAUTION Information to prevent damage to the components when trying to complete a task NOTE Tips and additional information to help you complete a ...

Страница 7: ... onboard SDRAM Battery Backup Support Header reserved for LSI Standard BBU acquired from LSI existing distribution channel OS support Windows XP Professional SP3 Windows Server 2003 SP2 Enterprise Edition Windows Server 2003 SP2 Standard Edition Windows Server 2008 Enterprise Edition SP2 Windows Server 2008 Enterprise Edition R2 Windows Server 2008 Standard Edition SP2 Windows Server 2008 Standard...

Страница 8: ...viii ...

Страница 9: ...1 Chapter 1 Product introduction This chapter offers the PIKE 2108 SAS RAID card features and the new technologies it supports ...

Страница 10: ...art installing the RAID card check the items in your package with the list below 1 2 Package contents Check your package for the following items Standard Gift Box Pack Standard Bulk Pack ASUS PIKE 2108 SAS RAID card 1 1 Heatsink for 5U 2U system 1 1 Support CD 1 1 User Guide 1 1 BBU cable 1 SATA cable 8 Packing Quantity 1 pc per carton 3 pcs per carton The number of the BBU cable and SATA cable va...

Страница 11: ...ctivity failure and rebuild status so that users could build high performance and reliable storage systems Refer to the motherboard manual for detailed information about using the SGPIO connectors on the motherboard 1 4 System requirements Before you install the PIKE 2108 SAS RAID card check if the system meets the following requirements Workstation or server motherboard with a PIKE RAID card slot...

Страница 12: ...lot on the motherboard It is recommended to install a low profile form factor PCIe expansion card with full height bracket or with low profile bracket to the PCIe riser card to prevent mechanical interference with the PIKE 2108 card For 2U 5U or pedestal server attach the extension heatsink to ASUS PIKE 2108 SAS RAID card and then install the SAS RAID card to the PIKE RAID card slot on the motherb...

Страница 13: ...sure the card is completely inserted into the card slot and the heatsink latch is completely hooked to the edge of the card slot Install ASUS PIKE 2108 SAS RAID card to the server system 3 Secure the heatsink to the nearest screw hole on the motherboard DO NOT overtighten the screw or the motherboard component can be damaged 4 Connect the hard disk drives to the SAS connectors on the motherboard ...

Страница 14: ...D card to the motherboard 3 Release the heatsink latch from the card slot with a finger and then remove the RAID card from the slot If you have a LSI Battery Backup Unit BBU connect the BBU cable to the BBU connector on the PIKE RAID card Align the pin 1 wire red of the BBU cable to the triangle mark on the BBU connector and then firmly insert the cable Attach the Battery Backup Unit BBU cable ...

Страница 15: ...2 Chapter 2 RAID configuration This chapter provides instructions on setting up creating and configuring RAID sets using the available utilities ...

Страница 16: ...le simultaneous drive failure A minimum of four hard disk drives is required for this setup RAID 5 stripes both data and parity information across three or more hard disk drives Among the advantages of RAID 5 configuration include better HDD performance fault tolerance and higher storage capacity The RAID 5 configuration is best suited for transaction processing relational database applications en...

Страница 17: ...all an operating system to the selected hard disk drive 2 1 2 Installing hard disk drives The RAID card supports SAS for RAID set configuration For optimal performance install identical drives of the same model and capacity when creating a disk array To install SAS hard disks for RAID configuration 1 Install the SAS hard disks into the drive bays following the instructions in the system user guide...

Страница 18: ...torage configuration to a different RAID level Detect configuration mismatches Import a foreign configuration Display controller virtual drive drive and change parameters Scan devices connected to the controller Initialize virtual drives Check configurations for data consistency Create a CacheCade configuration You may use disks of different sizes however the size of the smallest disk determines t...

Страница 19: ...r Preboot CLI this option is for advanced debug only LSI MegaRAID SAS MFI BIOS Version 3 19 00 Build October 19 2010 Copyright C 2010 LSI Corporation HA 0 Bus 12 Dev 0 LSI MegaRAID SAS PCI Express ROMB FW package 12 12 0 0033 Battery Status Not present PCI SLOT ID LUN VENDOR PRODUCT REVISION CAPACITY 7 LSI LSI MegaRAID SAS PCI Expr 2 120 03 512MB 7 2 0 ATA ST3160812AS E 152627MB 7 3 0 ATA ST316081...

Страница 20: ... display information about the WebBIOS CU version bus number and device number 2 2 2 WebBIOS CU main screen options This is the Physical View screen which displays the drives that are connected to the controller To toggle between the physical view and logical view of the storage devices connected to the controller click Physical View or Logical View in the menu on the left When the Logical View sc...

Страница 21: ...he WebBIOS CU re scan the physical and virtual drives for any changes in the drive status or the physical configuration The WebBIOS CU displays the results of the scan in the physical and virtual drive descriptions Virtual Drives Select this to view the Virtual Drives screen where you can change and view virtual drive properties initialize drives and perform other tasks Drives Select this to view ...

Страница 22: ... the right figure 2 Select a configuration option If you choose the first or second option all existing data in the configuration will be deleted Make a backup of any data that you want to keep before choosing these options Clear Configuration Clears the existing configuration New Configuration Clears the existing configuration and lets you create a new configuration Add Configuration Retains the ...

Страница 23: ...figuration and Redundancy when possible WebBIOS creates a RAID 6 configuration if three or more disk drives are available 2 Click Yes when you are prompted to save the configuration 3 Click Yes when you are prompted to initialize the new virtual drive s WebBIOS CU begins a background initialization of the virtual drives Using Manual Configuration RAID 0 RAID 0 provides drive striping across all dr...

Страница 24: ...size read policy and other attributes for the new virtual drives 7 Change the virtual drive options from the defaults listed on the screen as needed Here are brief explanations of the virtual drive options RAID Level The drop down menu lists the possible RAID levels for the virtual drive Select RAID 0 Strip Size The strip size specifies the size of the segment written to each disk in a RAID config...

Страница 25: ...Unit BBU This is the default IO Policy The IO Policy applies to reads on a specific virtual drive It does not affect the read ahead cache Direct In direct I O mode reads are not buffered in cache memory Data is transferred to the cache and the host concurrently If the same data block is read again it comes from cache memory Cached In cached I O mode all reads are buffered in cache memory This is t...

Страница 26: ...storage capacity It is appropriate for small databases or any other environment that requires fault tolerance but small capacity When you select Manual Configuration and click Next the Drive Group Definition screen appears You use this screen to select drives to create drive groups 1 Hold Ctrl while selecting two ready drives in the Drives panel on the left 2 Click Add to Array to move the drives ...

Страница 27: ...l data but there is little improvement when accessing random data This is the default Write Policy Specify the write policy for this virtual drive Write Through In Write Through mode the controller sends a data transfer completion signal to the host when the drive subsystem has received all of the data in a transaction Always Write Back In Writeback mode the controller sends a data transfer comple...

Страница 28: ...fining virtual disks The configuration preview screen appears 11 Check the information in the configuration preview 12 If the virtual drive configuration is acceptable click Accept to save the configuration Otherwise click Back to return to the previous screens and change the configuration 13 If you accept the configuration click Yes at the prompt to save the configuration 14 Click Yes at the prom...

Страница 29: ...ton 8 Repeat the previous three steps until you have selected all the drives you want for the drive groups 9 After you finish selecting drives for the drive groups select each drive group and click Accept DG for each 10 Click Next The Span Definition screen appears This screen displays the drive group holes you can select to add to a span 11 Select one of the available drive groups with two drives...

Страница 30: ...ng that the data will be needed soon This speeds up reads for sequential data but there is little improvement when accessing random data This is the default Write Policy Specify the write policy for this virtual drive Write Through In Write Through mode the controller sends a data transfer completion signal to the host when the drive subsystem has received all of the data in a transaction Always W...

Страница 31: ...ew screen appears 19 Check the information in the configuration preview 20 If the virtual drive configuration is acceptable click Accept to save the configuration Otherwise click Cancel to end the operation and return to the WebBIOS main menu or click Back to return to the previous screens and change the configuration 21 If you accept the configuration click Yes at the prompt to save the configura...

Страница 32: ...om the defaults listed on the screen as needed Here are brief explanations of the virtual disk options RAID Level The drop down menu lists the possible RAID levels for the virtual drive Select RAID 5 Strip Size The strip size specifies the size of the segment written to each disk in a RAID configuration You can set the strip size up to 64 KB A larger strip size produces higher read performance If ...

Страница 33: ...e buffered in cache memory This is the default Drive Cache Specify the drive cache policy NoChange Leave the current drive cache policy unchanged This is the default Enable Enable the drive cache Disable Disable the drive cache Disable BGI Specify the background initialization status No Leave background initialization enabled This means that a new configuration can be initialized in the background...

Страница 34: ...u use this screen to select drives to create drive groups 1 Hold Ctrl while selecting at least three ready drives in the Drives panel on the left 2 Click Add To Array to move the drives to a proposed drive group configuration in the Drive Groups panel on the right 3 Select a preferred Power save mode The power save mode can be Max Max without cache Auto None and Controller defined If you need to u...

Страница 35: ...dom read requests choose a smaller strip size The default is 64 KB Access Policy Select the type of data access that is allowed for this virtual drive RW Allow read write access This is the default Read Only Allow read only access Blocked Do not allow access Read Policy Specify the read policy for this virtual drive Normal This disables the read ahead capability Ahead This enables read ahead capab...

Страница 36: ...alized in the background while you use WebBIOS to do other configuration tasks This is the default Yes Select Yes if you do not want to allow background initializations for configurations on this controller Select Size Specify the size of the virtual drive in terabytes gigabytes megabytes or kilobytes Normally this would be the full size for RAID 50 shown in the Configuration panel on the right Yo...

Страница 37: ...old Ctrl while you select at least three ready drives in the Drives panel on the left 2 Click Add To Arrary to move the drives to a proposed drive group configuration in the Drive Groups panel on the right 3 Select a preferred Power save mode The power save mode can be Max Max without cache Auto None and Controller defined If you need to undo the changes click the Reclaim button 4 When you have fi...

Страница 38: ...n Always Write Back In Writeback mode the controller sends a data transfer completion signal to the host when the controller cache has received all of the data in a transaction This setting is recommended in Standard mode Write Back with BBU In Writeback mode the controller sends a data transfer completion signal to the host when the controller cache has received all of the data in a transaction T...

Страница 39: ...o the previous screens and change the configuration 13 If you accept the configuration click Yes at the prompt to save the configuration 14 Click Yes at the prompt to start initialization Using Manual Configuration RAID 60 RAID 60 provides the features of both RAID 0 and RAID 6 and includes both parity and drive striping across multiple drive groups RAID 6 supports two independent parity blocks pe...

Страница 40: ... you can select to add to a span 10 Select one of the available drive groups from the Array With Free Space drop down list and then click Add to SPAN 11 Select a second drive group from the Array With Free Space drop down list and click Add to SPAN Both drive groups display in the right frame under Span 12 When finish click Next The Virtual Drive Definition screen appears You use this screen to se...

Страница 41: ...mended in Standard mode Write Back with BBU In Writeback mode the controller sends a data transfer completion signal to the host when the controller cache has received all of the data in a transaction This setting has to be used with a Battery Backup Unit BBU This is the default IO Policy The IO Policy applies to reads on a specific virtual drive It does not affect the read ahead cache Direct In d...

Страница 42: ...ndo the changes 16 Click Yes to confirm the write policy mode you have chosen 17 Click Next when you are finished defining virtual drives The configuration preview screen appears 18 Check the information in the configuration preview 19 If the virtual drive configuration is acceptable click Accept to save the configuration Otherwise click Cancel to end the operation and return to the WebBIOS main m...

Страница 43: ... is read only and cannot be modified directly Most of this information is self explanatory The screen lists the number of virtual drives that are already defined on this controller plus the number of drives connected to the controller Click Next to view the second Controller Properties screen as shown in the right figure Click Next to view the third Controller Properties screen as shown in the fol...

Страница 44: ...ces dedicated to background initialization of virtual drives connected to the selected controller The default is 30 percent CC Rate Use this option to select the amount of system resources dedicated to consistency checks of virtual drives connected to the selected contrroller The default is 30 percent Reconstruction Rate Use this option to select the amount of system resources dedicated to reconst...

Страница 45: ...stency check when the controller BIOS encounters an error The default is No Maintain PD Fail History Use this option to maintain the history of all drive failures The default is enable Controller BIOS Use this option to enable or disable the BIOS for the selected controller The default is Enabled If the boot device is on the selected controller the BIOS must be enabled Otherwise the BIOS should be...

Страница 46: ...on the virtual drive To perform an operation select it and click Go Then choose from the following options Select Delete to delete this virtual drive Select Locate to make the LEDs flash on the drives used by this virtual drive This works only if the drives are installed in a drive enclosure that supports SAFTE Select Fast or Slow to initialize this virtual drive A fast initialization quickly writ...

Страница 47: ...firm that you want to migrate the RAID level of the virtual drive A reconstruction operation begins on the virtual drive You must wait until the reconstruction is completed before you perform any other tasks in the WebBIOS CU Select Expand to increase the size of a virtual drive to occupy the remaining capacity in a drive group In addition you can add drives to the virtual drive in order to increa...

Страница 48: ...screen The drive properties are view only and are self explanatory Note that the properties include the state of the drive The operations listed at the bottom of the screen vary depending on the state of the drive After you select an operation click Go to start the operation Select Make Drive Offline if you want to force the drive offline If you force offline a good drive that is part of a redunda...

Страница 49: ...ilable to all of the virtual drives Select Enclosure Affinity so if there are drive failures present on a split backplane configuration then the hot spare will be used first on the backplane side that it resides in Select Make Unconf Bad to make the drive state to become Unconfigured Bad Select Prepare Removal to prepare the drive for removal from the enclosure ...

Страница 50: ...screen show you how many event entries are currently stored To view event information follow these steps 1 Select an Event Locale from the menu For example select Enclosure to view events relating to the drive enclosure 2 Select an Event Class Informational Warning Critical Fatal or Dead 3 Enter a Start Sequence number between the First Sequence and Last Sequence numbers The higher the number the ...

Страница 51: ...s that the data is accurate and automatically corrects the parity value Be sure to back up the data before running a consistency check if you think the data may be corrupted Deleting a Virtual Drive You can delete any virtual drive on the controller if you want to reuse that space for a new virtual drive The WebBIOS CU provides a list of configurable drive groups where there is a space to configur...

Страница 52: ...nfigurations including foreign configurations will not appear To use drives with existing configurations you must first clear the configuration on those drives Foreign configuration s found on adapter Press any key to continue or C to load the configuration utility or F to import foreign configuration s and continue If WebBIOS CU detects a foreign configuration the following screen appears when en...

Страница 53: ...e removed from a configuration by a cable pull or drive removal for example the configuration on those drives is considered a foreign configuration by the RAID controller Use the Foreign Configuration Preview screen to import or clear the foreign configuration in each case The following scenarios can occur with cable pulls or physical drive removals If you want to import the foreign configuration ...

Страница 54: ...rtual drive are removed but at different times and re inserted the controller considers the drives to have foreign configurations Import or clear the foreign configuration If you select Import all drives that were pulled before the virtual drive became offline will be imported and then automatically rebuilt Automatic rebuilds will occur in redundant virtual drives 4 Scenario 4 If the drives in a n...

Страница 55: ... on hardware and operating system requirements 2 3 2 Installing MegaRAID Storage Manager Software on Microsoft Windows OS Follow these steps if you need to install MegaRAID Storage Manager software on a system running Microsoft Windows OS 1 Insert the ASUS PIKE 2108 Support CD in the optical disc drive The CD automatically displays the Utilities menu if Autorun is enabled in your computer If Autor...

Страница 56: ...torage Manager software to view or change storage configurations If you select Only for current user the MegaRAID Storage Manager shortcuts and associated icons will be available only to the user with this user name 6 Click Next to continue 7 On the next screen accept the default Destination Folder or click Change to select a different destination folder Click Next to continue The Setup Type scree...

Страница 57: ...he next screen that appears 10 Select one of the custom setup options The options are fully explained in the screen text Select Client if you are installing MegaRAID Storage Manager software on a PC that will be used to view and configure servers over a network To begin installation click on Install on the next screen that appears Select Server to install only those components required for remote ...

Страница 58: ...available servers with a registered framework on the local subnet that is servers with a complete installation of MegaRAID Storage Manager software the server screen will appear as shown in the following figure The server screen will not list any servers You can use this screen to manage systems remotely If you select Custom a window listing the installation features appears as shown in the follow...

Страница 59: ...staller tar gz A new disk directory is created 3 Go to the new disk directory 4 In the disk directory find and read the readme txt file 5 To start the installation enter the following command csh install sh a If you select Client installation for a PC used to monitor servers and if there are no available servers with a registered framework on the local subnet that is servers with a complete instal...

Страница 60: ... all the rpm files manually before installing MegaRAID Storage Manager software with the procedure listed previously The version is already installed This message indicates that the version of MegaRAID Storage Manager software you are trying to install is already installed on the system The installed version is newer This message indicates that a version of MegaRAID Storage Manager software is alr...

Страница 61: ...ger shortcut on the desktop If a warning appears stating that Windows Firewall has blocked some features of the program click Unblock to allow MegaRAID Storage Manager software to start The Windows Firewall sometimes blocks the operation of programs that use Java To start MegaRAID Storage Manager software on a Red Hat Linux system select Applications System Tools MegaRAID Storage Manager StartupUI...

Страница 62: ...correct for the Login mode you have chosen the main MegaRAID Storage Manager window appears If the circle in Health column of the corresponding server is orange instead of green it means that the server is running in a degraded state for example because a drive used in a virtual drive has failed If the circle is red the storage configuration in the server has failed You can click Configure Host if...

Страница 63: ...the properties of the virtual drives and the physical drives total capacity configured capacity unconfigured capacity background operations in progress MegaRAID Storage Manager features and their status enabled or disabled and actions you can perform such as creating a virtual drive and updating the firmware as shown in the following figure ...

Страница 64: ...at the device has failed For example this icon indicates that a drive has failed A yellow circle to the right of an icon indicates that a device is running in a degraded state For example this icon indicates that a virtual drive is running in a degraded state because a drive has failed You can click the Physical tab to view the drives connected to the controller or Logical tab to view the virtual ...

Страница 65: ...ng the display in the MegaRAID Storage Manager window Refresh is seldom required the display normally updates automatically The Manage menu options also include Check Consistency Initialize and Show Progress Go To Menu The Go To menu is available when a controller physical drive or virtual disk is selected in the MegaRAID Storage Manager window The Go To menu options vary depending on what type of...

Страница 66: ... the MegaRAID Storage Manager software When you use the MegaRAID Storage Manager online help you may see a warning message that Internet Explorer has restricted the file from showing active content If this warning appears click on the active content warning bar and enable the active content If you are using the Linux operating system you must install Firefox or Mozilla for the MegaRAID Storage Man...

Страница 67: ...3 Chapter 3 Driver installation This chapter provides instructions for installing the RAID drivers on different operating systems ...

Страница 68: ...the RAID card support CD or from the Internet A floppy disk with the RAID driver is required when installing Windows Server 2003 or Linux operating system on a hard disk drive that is included in a RAID set You can create a RAID driver disk in DOS using the Makedisk application in the support CD To create a RAID driver disk in DOS environment 1 Place the RAID card support CD in the optical drive 2...

Страница 69: ...s XP 32 bit Windows XP 64 bit Windows Server 2003 32 bit Windows Server 2003 64 bit Windows Vista 32 bit Windows Vista 64 bit Windows Server 2008 32 bit Windows Server 2008 64 bit Windows 7 32 bit Windows 7 64 bit Windows Server 2008 R2 64 bit RHEL 3 UP9 32 64 bit RHEL 4 UP5 32 64 bit RHEL 4 UP6 32 64 bit RHEL 4 UP7 32 64 bit RHEL 4 UP8 32 64 bit RHEL 5 32 64 bit RHEL 5 UP2 32 64 bit RHEL 5 UP3 32...

Страница 70: ...ional Device ENTER Continue F3 Exit Setup could not determine the type of one or more mass storage devices installed in your system or you have chosen to manually specify an adapter Currently Setup will load support for the following mass storage devices s none To specify additional SCSI adapters CD ROM drives or special disk controllers for use with Windows including those for which you have a de...

Страница 71: ...ds the RAID card drivers from the RAID driver disk When next screen appears press Enter to continue installation 7 Setup then proceeds with the OS installation Follow screen instructions to continue Windows Setup ENTER Select F3 Exit You have chosen to configure a SCSI Adapter for use with Windows using a device support disk provided by an adapter manufacturer Select the SCSI Adapter you want from...

Страница 72: ... Server 2003 OS 1 Click Start right click My Computer and select Manage from the menu 2 In the Computer Management window click the Device Manager item 3 Double click RAID Controller under the Other Devices item 4 Click the Driver tab on the top then click Update Driver The controller name differs according to the installed SAS RAID card ...

Страница 73: ...to cancel searching driver from Windows Update and then click Next to continue 6 Toggle Install from a list or specific location Advanced then click Next to continue 7 Select the Include this location in the search check box and then click Browse ...

Страница 74: ...S RAID card Support CD into the optical drive 8 Locate the driver in the corresponding folder of the Support CD and then click OK to continue 9 The system automatically updates the driver After completing driver update click Finish to close the wizard ...

Страница 75: ...th the PIKE SAS RAID card Support CD into the optical drive Click Browse to continue 3 3 Windows Server 2008 OS Driver Installation 3 3 1 During Windows Server 2008 OS installation To install the RAID card driver when installing Windows Server 2008 OS 1 Boot the computer using the Windows Server 2008 OS installation disc Follow the screen instructions to start installing Windows Server 2008 2 When...

Страница 76: ...nue 6 Select LSI MegaRAID SAS PCI Express ROMB and click Next 7 When the system finishes loading the RAID driver replace the SAS RAID card Support CD with the Windows Server installation disc Select the drive to install Windows and click Next 8 Setup then proceeds with the OS installation Follow screen instructions to continue ...

Страница 77: ...RAID card driver after installing Windows Server 2008 OS 1 Click Server Manager on the Windows taskbar In the Server Manager window click the sign before Diagnostics and click Device Manager Click the sign before Storage controllers and double click LSI MegaRAID SAS Adapter The controller name differs according to the installed SAS RAID card ...

Страница 78: ...r After completing driver update click Close to exit the wizard 6 Insert the SAS RAID card Support CD into the optical drive Click Browse 7 In the Browse for Folder window locate the driver in the corresponding folder of the Support CD and then click OK to continue 8 In the Update Driver Software window click Next to continue ...

Страница 79: ...xt mode type linux text ENTER Use the function keys listed below for more information F1 Main F2 Options F3 General F4 Kernel F5 Rescue boot linux dd 3 Select Yes using the Tab key when asked if you have the driver disk then press Enter Main Menu Do you have a driver disk Yes No 4 Insert the Red Hat Enterprise RAID driver disk to the USB floppy disk drive select OK then press Enter The drivers for...

Страница 80: ...ss Enter 7 Follow the screen instructions to continue the OS installation More Driver Disks Do you wish to load any more driver disks Yes No 6 Select Skip and press Enter to continue CD Found To begin testing the CD media before installation press OK Choose Skip to skip the media test and start the installation OK Skip ...

Страница 81: ... F6 then select Yes from the menu Press Enter 4 Insert the RAID driver disk to the USB floppy disk drive Ensure that Installation from the Boot Options menu is selected then press Enter 5 When below screen appears select the USB floppy disk drive sdx as the driver update medium Select OK then press Enter The drivers for the RAID controller are installed to the system Please choose the Driver Updat...

Страница 82: ...3 16 Chapter 3 Driver installation ...

Страница 83: ...e 86 21 3407 4610 800 820 6655 Online Support http support asus com techserv techserv aspx ASUS COMPUTER INTERNATIONAL America Address 800 Corporate Way Fremont CA 94539 USA Fax 1 510 608 4555 Web site http usa asus com Technical Support Support fax 1 812 284 0883 General support 1 812 282 2787 Online support http support asus com techserv techserv aspx ASUS COMPUTER GmbH Germany and Austria Addre...

Страница 84: ...02 326 3 V1 3 1 2007 09 EN 301 357 2 V1 3 1 2006 05 2006 95 EC LVD Directive EN 60950 1 2001 A11 2004 EN 60950 1 2006 EN60065 2002 A1 2006 EN 60950 1 2006 A11 2009 2009 125 EC ErP Directive Regulation EC No 1275 2008 EN 62301 2005 Regulation EC No 642 2009 EN 62301 2005 Regulation EC No 278 2009 EN 62301 2005 CE marking Declaration Date Oct 28 2010 Year to begin affixing CE marking 2010 Position C...

Отзывы: