background image

7

ASUS Xonar DX 

2. 

Secure the audio card bracket to the back of your computer with the screw 
that you removed. Refer to section 3.1.
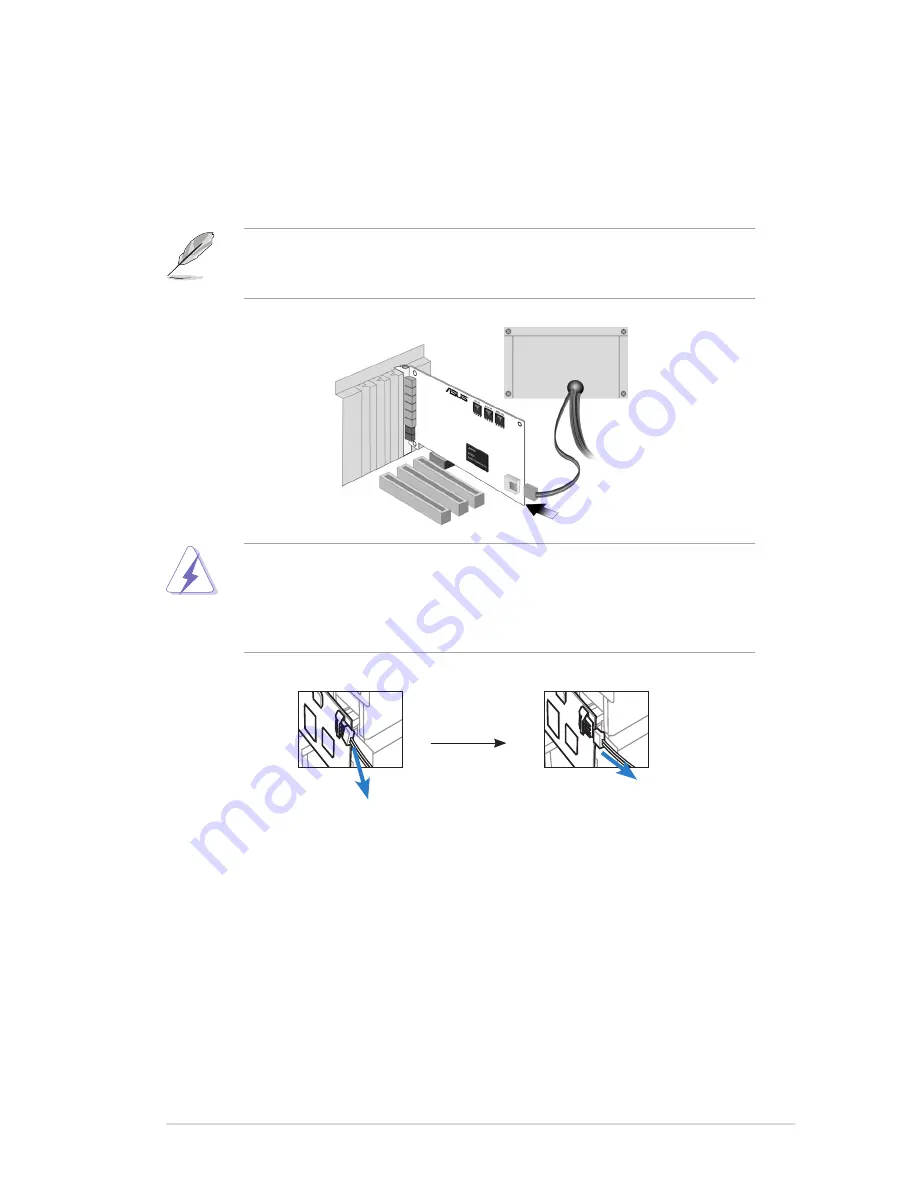
3. 

Connect the power cable of your power supply to the power connector on the 
Xonar DX audio card. 

The PCI Express high-quality audio card requires additional power from your 
computer. If the power cable is not connected properly, the audio card will not 
work at all.

When removing the power cable from the Xonar DX audio card, make sure to 
pull outward the 4-pin header first, then unplug it from the power connector as 
the following pictures show. Do not forcefully remove the header from the power 
connector; doing so may pull up the power connector from the audio card and 
cause damage!

3

3

Содержание PCI Express Audio Card Xonar DX

Страница 1: ...Xonar DX Audio Card User s manual ...

Страница 2: ...ERCHANTABILITY OR FITNESS FOR A PARTICULAR PURPOSE IN NO EVENT SHALL ASUS ITS DIRECTORS OFFICERS EMPLOYEES OR AGENTS BE LIABLE FOR ANY INDIRECT SPECIAL INCIDENTAL OR CONSEQUENTIAL DAMAGES INCLUDING DAMAGES FOR LOSS OF PROFITS LOSS OF BUSINESS LOSS OF USE OR DATA INTERRUPTION OF BUSINESS AND THE LIKE EVEN IF ASUS HAS BEEN ADVISED OF THE POSSIBILITY OF SUCH DAMAGES ARISING FROM ANY DEFECT OR ERROR I...

Страница 3: ...the Audio Card Driver 9 4 2 Installing the PMP software Portable Music Processor 10 4 3 Uninstalling or Reinstalling Software 11 5 Connecting Speakers and Peripherals 12 5 1 Connecting Digital Speaker Systems Home Theater 12 5 2 Connecting Headphones 13 5 3 Connecting Analog Speaker Systems 15 5 4 Connecting Microphone 20 5 5 Connecting Line In Audio Sources 20 6 Xonar DX Driver Guide 21 6 1 Intro...

Страница 4: ...e 50 7 1 Introduction 50 7 2 Converting music in Main Setting Page 52 7 3 Find Converted Music in PMP Music Page 54 8 RMAA Test Guide 55 8 1 Setting Up Xonar DX Audio Card 55 8 2 Configuration and Test with RMAA 58 8 3 RMAA Testing Results 63 9 RightMark Audio Analyzer test 64 10 Troubleshooting and FAQs 69 Troubleshooting 69 FAQs 72 ...

Страница 5: ...nce to radio communications However there is no guarantee that interference will not occur in a particular installation If this equipment does cause harmful interference to radio or television reception which can be determined by turning the equipment off and on the user is encouraged to try to correct the interference by one or more of the following measures Reorient or relocate the receiving ant...

Страница 6: ...ts and circuitry Avoid dust humidity and temperature extremes Do not place the product in any area where it may become wet Place the product on a stable surface If you encounter technical problems with the product contact a qualified service technician or your retailer Trademarks Xonar and ASUS logo are trademarks of ASUSTek Computer Inc Dolby and Dolby Digital Live Dolby Pro Logic IIx Dolby Virtu...

Страница 7: ...1 0 or higher compatible slot for the audio card One available 4 pin power cable from PC s power supply unit Microsoft Windows Vista XP 32 64bit MCE2005 Intel Pentium 4 1 4GHz or AMD Athlon 1400 CPU or faster CPU 256 MB DRAM system memory 60 MB available HDD space for driver installation package CD ROM drive or DVD ROM drive for software installation High quality headphones powered analog speakers...

Страница 8: ... jack supports 192KHz 24bit Driver Features Operation System Windows Vista 32 64bit XP 32 64bit MCE2005 Dolby Digital Live Dolby Digital Live encodes any audio signal on PC in real time to Dolby Digital AC3 5 1 surround sounds to your home theater environment through one single S PDIF connection Dolby Headphone Dolby Headphone technology allows users to listen to music watch movies or play games w...

Страница 9: ...p to 40dB speaker echo return and noise suppression technologies for best voice communication quality in VOIP applications or online gaming Smart Volume NormalizerTM Normalizes the volume of all audio sources into a constant level and also enhances your 3D sound listening range and advantages in gaming Karaoke Functions Music Key Shifting and Microphone Echo effects like professional Karaoke machi...

Страница 10: ... ASUS Xonar DX 1 2 3 4 5 2 About Hardware 2 1 Xonar DX Audio Processing Card 7 1 2 3 4 5 9 8 6 ...

Страница 11: ...powered speakers 3 Side surround output jack Connects to the surround channel input on 4 4 1 5 1 6 1 7 1 powered analog speakers 4 Center subwoofer output jack Connects to the front center subwoofer input on 5 1 6 1 7 1 powered analog speakers 5 Rear back Surround Output Jack Connects to the Back Surround input on 6 1 7 1 powered analog speakers 6 Front panel audio header Connect one end of the fr...

Страница 12: ...sed PCI Express x1 slot for the audio card and its adjacent slot for the MIDI board You can just remove one if you don t need to use the MIDI board in the package 3 2 Installing the Audio Processing Card 1 Face the bracket of the Xonar DX audio card toward the back panel of your computer and insert the audio card gently into an available PCI Express slot Make sure it s completely inserted into the...

Страница 13: ...udio card requires additional power from your computer If the power cable is not connected properly the audio card will not work at all When removing the power cable from the Xonar DX audio card make sure to pull outward the 4 pin header first then unplug it from the power connector as the following pictures show Do not forcefully remove the header from the power connector doing so may pull up the...

Страница 14: ... to the Aux In header of the audio card as shown in the figure below For optimum TV audio quality Xonar uses ADC recording to digitize the signal and loops it back to DAC playback Please select Aux In as the recording source in the Xonar Audio Center s recording mixer and enable the monitoring button to pass this signal to the audio output Using this setup you can even turn on sound effects such a...

Страница 15: ...n located on the CD ROM 3 The installation program will remind you to make sure you have connected the additional power cable from your power supply unit to the card If the power cable is not connected properly the audio card will not work at all If it has not been done please turn off the computer to install the power cable before you go on the installation process 4 Follow the instructions on th...

Страница 16: ...he PMP software Portable Music Processor 1 From the installation CD menu select the option to install the PMP software 2 Follow the instructions on the screen to complete the installation After the installation is complete click Finish ...

Страница 17: ...would like to remove and then click the Add Remove or Change Remove button 5 In the InstallShield Wizard dialog box select the Remove option 6 Restart your computer when prompted 4 3 2 Reinstalling Software 1 Before you reinstall any software it s recommended to uninstall the existing software first 2 After you finish the uninstallation of the software please follow the installation process again ...

Страница 18: ...eater system possible creating an immersive and impressive cinema surround sound experience A single digital cable connection can carry high quality Dolby Digital digital audio from any of your PC audio sources to any digital speakers or AV Receivers with Dolby Digital decoding capabilities 1 2 No Item Description 1 Optical adapter Plug the optical TOSLINK adapter into the S PDIF Out combo connect...

Страница 19: ... Headphones 5 2 1 Connecting Stereo Headphones No Item Description 1 Front Out Headphone Jack The Front Out jack has a built in high quality amplifier to drive headphones Please connect your stereo headphones directly to this jack 1 ...

Страница 20: ... Front Out Connect the front channel 3 5mm plug of your 5 1 headphones into this jack 2 Side Surround Out Connect the surround channel 3 5mm plug of your 5 1 headphone into this jack 3 Center Subwoofer Out Connect the Center Bass channel 3 5mm plug of your 5 1 headphone into this jack ...

Страница 21: ...h the mini jack to RCA cable 2 Side Surround Out Connects to the left surround and right surround input ports of the analog amplifier with the mini jack to RCA cable 3 Center Subwoofer Connects to the Center and subwoofer input ports of the analog amplifier with the mini jack to RCA cable 4 Back Surround Out Connects to the left back and right back input ports of the analog amplifier with the mini...

Страница 22: ...16 ASUS Xonar DX 5 3 2 Connecting 2 2 1 Channel Speakers No Item Description 1 Front Out Headphone Jack Connect the 2 2 1 speaker set s 3 5mm plug into this Front Out jack 1 2 Speakers 2 1 Speakers 1 ...

Страница 23: ...akers No Item Description 1 Front Out Connects to the Front input port of the 4 4 1 speakers with the mini jack cable 2 Side Surround Out Connects to the Surround input port of the 4 4 1 speakers with the mini jack cable 1 2 1 2 4 Speakers 4 1 Speakers ...

Страница 24: ...t Connects to the Front input port of the 5 1 speakers with the mini jack cable 2 Side Surround Out Connects to the Surround input port of the 5 1 speakers with the mini jack cable 3 Center Subwoofer Connects to the Center Subwoofer input port of the 5 1 speakers with the mini jack cable 1 2 3 4 1 2 3 5 1 Speakers 6 1 Speakers ...

Страница 25: ...Surround Out Connects to the Surround input port of the 6 1 7 1 speakers with the mini jack cable 3 Center Subwoofer Connects to the Center Subwoofer input port of the 6 1 7 1 speakers with the mini jack cable 4 Back Surround Out Connects to the Back Surround input port of the 6 1 7 1 speakers with the mini jack cable 7 1 Speakers 1 2 3 4 ...

Страница 26: ...mm plug into this Mic In jack for voice communication recording or karaoke 1 No Item Description 1 Line Input Jack Connect the 3 5mm plug of the CD MP3 Player or any other Line level analog audio sources into this Line In jack for sound recording or real time Dolby sound processing through the Monitoring path See the Mixer section of the driver guide 1 ...

Страница 27: ... open the Xonar Audio Center utility If the icon could not be found in the system tray go to the Windows Control Panel and double click the Xonar DX Audio Center icon 2 The Xonar DX Audio Center is the Graphic User Interface GUI for the Xonar DX driver You can control the functions and features of the Xonar DX driver on the Audio Center The following picture shows a basic overview of the Xonar DX ...

Страница 28: ...ll circle inside it to change the volume level 4 SVN Button Click this button to enable the Smart Volume Normalization feature for constant volume from all playback sources It will display a blue light when enabled 5 Mute Button Click this button to mute audio playback it will display a red light when playback is muted 6 DSP Mode These 4 buttons give access to quick sound effects combinations for ...

Страница 29: ...ur playback sources to get the best audio fidelity Even if your setting differs from the audio source s sample rate the Xonar DX engine will do super high fidelity sample rate conversion with a double floating point filter which can reduce total harmonic distortion THD N by 140dB No Item Description 1 Sample Rate Please select the sample rate that corresponds to or exceeds that of your playback so...

Страница 30: ... type for your connected speakers 2 Speaker Test Click this button to show the speaker test window in the right pane Click the play button to test each speaker one by one or click each speaker manually to test note the Speaker Test function is not available on Windows Vista due to a limitation in its audio stack 3 Speaker Swap Clicking this button will pop up an advanced setting window to allow yo...

Страница 31: ...high quality Dolby Digital surround audio from your PC to digital speakers and AV Receivers No Item Description 1 S PDIF Out enable disable Click this check box to enable S PDIF output 2 S PDIF Output Formats Functions This pull down menu allows you to select one of the following four formats PCM Pulse Code Modulation which is a typical raw audio data format Dolby Digital Live real time 5 1ch enco...

Страница 32: ... it Please note that this setting is synchronized with Vista s system speaker configuration and changing the setting during playback will cease the audio playback program You may have to restart the program after the change It s recommended that you close all playing programs before you change the setting No Item Description 1 Audio Channels Here are some typical suggestions MP3 WMA AAC CD VCD 2D ...

Страница 33: ...each speaker or listener to a different relative position virtually using only your mouse The Xonar DX audio card will process it and virtualize each speaker position in real time The Subwoofer has no directional sounds and hence can be moved only closer or further away 3 Reset Reset all Speaker Shifter settings to the defaults 4 Increase decrease volume Click to increase volume move speakers clos...

Страница 34: ...t window to the Pro Logic IIx page for manual adjustments 2 Music Mode Music mode is the default mode for regular music playback In this mode you can adjust the Center Width and Dimension parameters 3 Center Width This parameter is used to set the spread of the center mainly for the vocal signals of songs and music Drag the scroll bar to the left to centralize the vocal signal Drag to the right si...

Страница 35: ...d reduce listener fatigue from long listening over headphones No Item Description 1 Dolby Headphone enable disable Click this check box to enable Dolby Headphone Clicking the text bar will switch the right window to Dolby Headphone page for manual adjusting 2 DH1 Dolby Headphone DH provides three room filters that may be used with any type of audio They differ in the sense of the spatial dimension...

Страница 36: ...d listening experience from any high quality stereo source No Item Description 1 Dolby Virtual Speaker enable disable Click this check box to enable Dolby Virtual Speaker Clicking the text bar will switch the right window to a Dolby Virtual Speaker page for manual adjusting 2 Reference Mode Dolby Virtual Speaker provides two modes of virtualization The first is Reference mode which virtualizes the...

Страница 37: ...ider including WAVE All digital audio sources except MIDI files SW Software Synthesizer control the playback volume of the MIDI files CD CD ROM digital playback CD DA volume control LEFT RIGHT the volume control for each speaker channel Note Windows Vista doesn t support WAVE Synthesizer and CD In volume controls 3 Mute Unmute button Click this button to mute or unmute the audio channel 4 Volume S...

Страница 38: ...ernal audio devices WAVE recording from digital wave audio you are playing on PC Note Windows Vista doesn t support WAVE recording 3 Monitoring button Click this button to monitor and loopback recording audio to outputs PC speakers Therefore the recording volume will influence the monitoring signals from speaker outputs The audio will be mixed into the streams you are playing out from your PC and ...

Страница 39: ...ag this slider down to decrease the recording volume drag up to increase the recording volume The tool tip reveals the percentage number from 1 to 100 in terms of the full scale level 6 Left Right Balance This horizontal slider controls the volume between the left and right channels 7 Reset Reset all volume controls to the default settings 8 Microphone In Advanced Setting Click this button to open...

Страница 40: ...D sound sources like music No Item Description 1 Default Environments These four buttons activate Bathroom Concert hall Underwater and Music Pub environments respectively 2 More Option Clicking this button will apply the environment effect that you select from the pull down menu on the right side There are another 23 options in this menu 3 Environment Size There are three size settings for each en...

Страница 41: ... Equalizer Options There are 12 available equalizer patterns Click one to apply it 2 User Defined You can click this button to apply your own defined parameters saved in the pull down menu 3 Equalier Slider Adjust the gain for each band 30 16KHz 4 Save Name Key in a name for your own User Defined equalizer setting 5 Add Save Click this button to save the parameters into User Defined list 6 Delete ...

Страница 42: ...he music and symphony for karaoke No Item Description 1 On Off The switch to turn on or off the functions on this page 2 Key Shifting Check the box to enable or disable the key shifting feature for music playback from 4 semitones below to 4 semitones above 3 Vocal Cancellation Checkbox to enable or disable the vocal cancellation function and adjust the voice cancellation level from 0 to 100 100 wi...

Страница 43: ... Large speaker option Select the speaker type that you connected If your speaker type cannot perform low frequency signals bass please select Small speaker type and Xonar DX will filter out the bass signals and send them to the subwoofer channel If those speakers are full range you can select the Large speaker type Note Common cheap PC s 2 channel speakers are usually small type speakers Please re...

Страница 44: ...se omni direction electret microphone with 40dB sensitivity 4 The microphone is more than 30cm far from PC s speakers fix the distance and do NOT turn your speakers too loud 5 Put your microphone 20 30cm away from you fix the distance and do NOT speak too close or too loud into the microphone to avoid signal clipping and distortion Enable microphone boost on Xonar DX audio center mixer to get prop...

Страница 45: ...ecome the same level for example 10dB below full scale after you turn on SVN Please note that for lower volume music 2 it will become louder when you turn on SVN and for higher volume music 1 it will become quieter No Item Description 1 AEC Click AEC function page 2 Enable AEC Click the checkbox to enable AEC function A alert message will pop up This message implies the speaker configuration will ...

Страница 46: ... Display When SVN is enabled Smart Volume will be lit up at the bottom of the volume meter and the volume meter will show the level 3 SVN Blue Light When SVN is enabled the master volume knob will be illuminated by a blue light It will be lit red if the volume is muted 0dB Full scale 10 dB Music 1 Music 2 SVN Off SVN On T 1 3 2 ...

Страница 47: ...un EAX HD 5 0 games on both XP and Vista It provides the best compatibility with existing DirectX games GX2 0 also adds innovative VocalFX voice effects for existing EAX games or VOIP applications Besides the abundant sound effects described above the Xonar DX also provides quick Digital Sound Processing modes which are configured for typical applications including Music Movies and Games over diff...

Страница 48: ...g output quality as high as possible 3 Music Mode This mode is set for Music playback 4 Movie Mode This mode is set for DVD Movie playback 5 Game Mode This mode is set for Games 6 10 VocalFX VocalFX is an innovative voice processing technology to let your voice get into the realistic game landscape VoiceEX or to emulate the background scenes in online chat ChatEX It also allows you to change your ...

Страница 49: ... application into VOIP application List 4 ChatEX It emulates different background environment effects when you chat online 5 Magic Voice Changes your voice pitch to different types for disguising your real voice or just for fun in online chatting For 3D Games 1 Check the check box of VoiceEX and Local VoiceEX 2 Make sure you and your team member can talk each other in the game For VOIP 1 Press App...

Страница 50: ...44 ASUS Xonar DX 3 Look for the application s location and Open it 4 Your VOIP application has been added into list ...

Страница 51: ...ick the checkbox to enable VocalFX function then a prompt message will pop up This message implies the record device will be set to microphone Make sure the GX function is enabled Click OK to accept it or Cancel if you want to enable it later Check Don t remind me again if you don t want to see this messsage pop up next time ...

Страница 52: ...d an ASIO2 compatible driver for application programs that have ASIO or ASIO2 output ASIO can ensure lower latency during playback and recording on PCs which is very important for professional music creation and editing The Xonar DX package also provides Ableton Live and Sonar LE audio editing software which all support ASIO output The setup reference is described below When Using Ableton Live 2 5...

Страница 53: ...ASIO as the driver type WDM and MME are other Windows driver types 3 Audio Device Step 3 is to choose ASUS Xonar DX ASIO as the Audio Device 4 Hardware Setup Step 4 is to click the Hardware Setup to configure the Bit depth 16 24bit and latency 1ms 300ms 5 Sample Rate Step 5 is to select the sample rate from 44 1 48 96 192KHz When Using Sonar LE 1 ...

Страница 54: ...48 ASUS Xonar DX 2 3 4 5 7 ...

Страница 55: ...ram next time 3 Playback Timing Master After step 2 Sonar LE will display 4 output drivers ASUS Xonar DX ASIO Out 00 06 Make sure you are using 00 or another one 4 Recording Timing Master After step 2 Sonar LE will display 1 input driver ASUS Xonar DX ASIO In 00 Make sure you are using it 5 Sample Rate Step 5 is to select the default file sample rate 44 1 48 96 or 192KHz for your Sonar project 6 A...

Страница 56: ...r 128 320Kbps data rates Windows Media Player 9 or later version and MP3 WMA codecs are required Supports transformation speed up to a maximum of 40 times of the normal playback speed High Speed mode The maximum speed is just for your reference because it s related to your PC s performance and the sound effects you choose to add Before you use PMP software make sure the following items have been c...

Страница 57: ...ersion 2 PMP Music page This page will display the converted music files saved in the PMP Music folder 3 Software Update This button is used to check online for upgrades to the PMP software and download it for upgrade make sure your computer is connected to the Internet before you click the button 1 2 3 ...

Страница 58: ... path is locked and refers to C Documents and Settings My Documents My Music 2 Others The default path refers to C Documents and Settings My Documents My Music but can be designated to other folder by clicking In the right side of the window you will see all of the music files from the selected folders that can be converted by PMP You can select all or click each check box to choose which file to ...

Страница 59: ...ogic II virtual surround effect for stereo speakers 3 Destination This tab allows you to choose to save converted music to the default PMP Music folder or to Other folder by clicking 3 Convert Stop The final step is to click the button to start Converting Clicking this button again while PMP is converting files will stop the process Please note that the audio card will suspend operation while PMP ...

Страница 60: ...data rate and DH ie Dolby Headphone or DVS ie Dolby Virtual Speaker if the effect is applied For example Original file name ABCD mp3 Converted file name ABCD_192K_DH mp3 meaning the data rate is 192Kbps with Dolby Headphone post processing applied No Item Description 1 PMP Music page This page shows the converted music library stored in the PMP Music folder 2 Music Information This window will dis...

Страница 61: ...ms The following provides a step by step loop back test guide for your Xonar DX audio card 8 1 Setting Up Xonar DX Audio Card Open the Xonar DX Audio Center Use the settings below 1 Select the sample rate you will be using with RMAA here we set 48KHz for testing 48KHz 24bit signals 2 Set analog output to 2 speaker mode to get rid of any channel processing over RMAA stereo signals in the driver 3 T...

Страница 62: ...t highest level 0dB This allows you to get realistic output and input quality ratings for the Xonar DX audio card You should use an external 3 5mm line cable as follows as short as possible to connect the Front Out jack to the Line In jack for loop back testing In that case please select Line In as the recording source on the mixer page 4 3 5mm Line Cable ...

Страница 63: ...57 ASUS Xonar DX 5 Click Reset on the playback volume mixer page to keep the volume setting on default 6 Turn the master volume to the MAX level 0dB 5 6 ...

Страница 64: ...es as ASUS Xonar DX Audio 2 Select 24bit and 48KHz for the test signals If you change the format here please remember to go back to set the same sample rate output in the Xonar DX Audio Center 3 Click Test options button in RMAA and check Analyze noise and distortion only in 20Hz 20KHz range audio in band for human hearing in the General tab 1 2 3 ...

Страница 65: ... DirectSound as the Driver Model because Windows MME mode doesn t support high resolution 24bit audio playback and the data may be manipulated by Windows so that the real hardware quality can not be measured properly 5 Click loop back mode test button 4 5 ...

Страница 66: ...e level meter will be green 7 If the recording volume level is not high enough please check and make the WAVE and Master Volume have been at the maximum level Instead if the recording volume level is too high please lower the WAVE and Master volumes gradually until the level is ok 6 7 ...

Страница 67: ...in the test by clicking the Done button If you cannot get the level to be OK after the previous step click Done anyways and proceed 9 Enter ASUS Xonar DX Audio in the New slot name and select one Empty slot Then click OK 8 9 ...

Страница 68: ...2 ASUS Xonar DX 10 RMAA will pop up the Test results window You can click the Select checkbox and click to Make html report 11 Check and key in the report name options as follows and then click OK 10 11 ...

Страница 69: ... and plots in your browser The following report is a sample and you can see how high fidelity and crystal clean the Xonar DX audio card is for both output and input one of the world s finest sound cards it has higher quality than most CE devices You can also try testing the performance for other sample rates and bit depths with the same procedure ...

Страница 70: ...rnal loopback line out line in Sampling mode 24 bit 48 kHz Summary General performance Excellent Frequency response Frequency response from 40 Hz to 15 kHz dB 0 01 0 05 Excellent Noise level dB A 112 7 Excellent Dynamic range dB A 112 6 Excellent THD 0 0006 Excellent IMD Noise 0 0009 Excellent Stereo crosstalk dB 102 4 Excellent IMD at 10 kHz 0 0010 Excellent ...

Страница 71: ...65 ASUS Xonar DX Noise level Dynamic range Parameter Left Right RMS power dB 111 4 112 0 RMS power A weighted dB 112 4 113 0 Peak level dB FS 87 5 88 4 DC offset 0 00 0 00 ...

Страница 72: ...oise at 3 dB FS Parameter Left Right Dynamic range dB 111 4 111 8 Dynamic range A weighted dB 112 4 112 8 DC offset 0 00 0 00 Parameter Left Right THD 0 0006 0 0006 THD Noise 0 0008 0 0008 THD Noise A weighted 0 0010 0 0009 ...

Страница 73: ...67 ASUS Xonar DX Intermodulation distortion Stereo crosstalk Parameter Left Right IMD Noise 0 0010 0 0009 IMD Noise A weighted 0 0008 0 0007 ...

Страница 74: ... Parameter Left Right Crosstalk at 100 Hz dB 109 107 Crosstalk at 1 KHz dB 101 101 Crosstalk at 10 KHz dB 82 82 Parameter Left Right IMD Noise at 5 KHz 0 0011 0 0011 IMD Noise at 10 KHz 0 0009 0 0009 IMD Noise at 15 KHz 0 0009 0 0009 ...

Страница 75: ...ccessfully 3 Windows Media Player Ver 9 or above has been installed in your PC 4 PMP Lite will also need an MP3 encoder installed to encode music into MP3 format If you don t have it yet the PMP Lite installer will provide a guide message to download a free MP3 encoder I couldn t find the Xonar DX Audio Center Instructions 1 Make sure you have installed the driver 2 Find the Xonar DX Audio Center ...

Страница 76: ...y Digital Live encoder through the S PDIF output the analog output will be muted to get rid of the interference between your digital speaker system and analog speakers or headphones Please check if this is the case 5 Please go to the sound and audio device of Windows Control Panel to check if the playback default device is set to Xonar DX Audio Device instead of other onboard AC97 or HDA codec dev...

Страница 77: ... Windows Vista How could I use it Instructions Windows Vista doesn t show MPU 401 MIDI port on system However Xonar DX did support MIDI I O and you can directly use it to connect MIDI instruments on Vista without any setting I found no sound effects when playing 96K or 192KHz sound sources Instructions 1 Currently Xonar DX effects including Dolby support common 44 1K 48KHz sound sources processing...

Страница 78: ...3D GX 1 0 on Windows Vista which can recover DirectSound 3D hardware and EAX gaming sound effects on Vista for a lot of existing DirectX games Q2 Why does the Xonar DX support Dolby technology Answer Dolby is the ONLY brands and technology recognized by the CE industry and available on a wide range of audio equipment Xonar includes these features to make your PC a powerful media and entertainment ...

Страница 79: ...f audio in out for the cleanest sound production 2 Duplex HD Supports audio sampling rates up to 24bit 192KHz for all inputs and outputs 3 ASIO 2 0 Xonar DX includes an ASIO 2 0 driver for low latency low distortion music creation application 4 Xonar DX contains the Portable Music Processor Lite to convert and process regular music with Dolby Headphone Dolby Virtual Speaker and Smart Volume Normal...

Страница 80: ...74 ASUS Xonar DX ...

Отзывы: