background image

English

29

ASUS All-in-One PC

Windows® apps

These are apps pinned on the Start screen and displayed on tiled-format for easy access.

IMPORTANT!   

A screen resolution of 1024 x 768 pixels or higher is required to run Windows® apps.

NOTE:

  Some apps require signing in to your Microsoft account before they are fully launched.

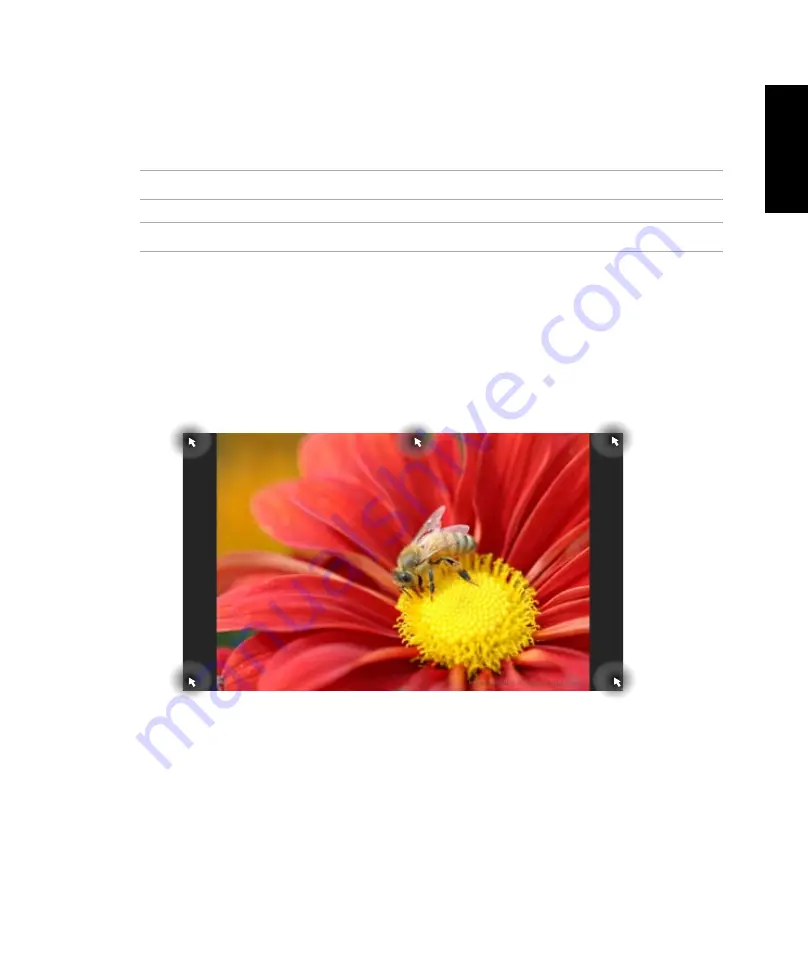
Hotspots

Onscreen hotspots allow you to launch programs and access the settings of your PC. The 

functions in these hotspots can be activated using your mouse.

Hotspots on a running app

Содержание P1801 Series

Страница 1: ...English User Manual All in One PC P1801 Series ...

Страница 2: ...UT NOTICE AND SHOULD NOT BE CONSTRUED AS A COMMITMENT BY ASUS ASUS ASSUMES NO RESPONSIBILITY OR LIABILITY FOR ANY ERRORS OR INACCURACIES THAT MAY APPEAR IN THIS MANUAL INCLUDING THE PRODUCTS AND SOFTWARE DESCRIBED IN IT Copyright 2012 ASUSTeK COMPUTER INC All Rights Reserved LIMITATION OF LIABILITY Circumstances may arise where because of a default on ASUS part or other liability you are entitled ...

Страница 3: ...tioning your ASUS All in One PC 17 Mounting your ASUS Tablet on your PC Station 17 Placing your ASUS Tablet on the table or desk 18 Connecting the wireless keyboard and mouse 19 Turning your ASUS All in One PC on 20 Using your ASUS Tablet separately 20 Seamless transition 21 Switching between Windows 8 and Android 21 Using Gestures 22 Setting up a secondary display via the HDMI output port 25 Chap...

Страница 4: ...ur ASUS All in One PC off 38 Entering the BIOS Setup 39 Quickly enter the BIOS 39 Connecting to the Internet 40 Wi Fi connection 40 Using Connection Builder 42 Wired connection 44 Recovering your system 48 Resetting your PC 48 Recovering from a system image file 49 Removing everything and reinstalling Windows 50 Appendices Notices 51 ...

Страница 5: ...g Windows 8 in your ASUS All in One PC Conventions used in this manual To highlight key information in this manual some text are presented as follows IMPORTANT This message contains vital information that must be followed to complete a task NOTE This message contains additional information and tips that can help complete tasks WARNING This message contains important information that must be follow...

Страница 6: ...ion before you operate your system Do not use this product near water or a heated source such as a radiator Set up the system on a stable surface Openings on the chassis are for ventilation Do not block or cover these openings Ensure that you leave plenty of space around the system for ventilation Never insert objects of any kind into the ventilation openings Use this product in environments with ...

Страница 7: ...t function properly even if you follow the operating instructions The system was dropped or the cabinet is damaged The system performance changes Sound Pressure Warning Excessive sound pressure from earphones or headphones can cause hearing damage or loss Adjustment of the volume control as well as the equalizer to settings other than the center position may increase the earphones or headphones ou...

Страница 8: ...n Cleaning cloth Power adapter for ASUS Tablet Wireless mouse KBM USB receiver dongle Quick Guide NOTE The keyboard mouse power supply remote control and KBM USB receiver dongle illustrations are for reference only Actual product specifications may vary with territories Quick Start Guide Warranty Card Remote Control optional ...

Страница 9: ...pter 1 Hardware Setup Getting to know your ASUS All in One PC PC Station Front view Hard Disk Drive LED Indicates hard disk drive activity Power button Press this button to turn on both your All in One PC PC Station and ASUS Tablet ...

Страница 10: ...gital TV Cable service connection can receive digital TV analog TV depending on paid services Power input The supplied power adapter converts AC power to DC power for use with this jack Power supplied through this jack supplies power to the PC Station To prevent damage to the PC Station always use the supplied power adapter WARNING The power adapter may get warm or hot when in use Do not cover the...

Страница 11: ... Connect this port with devices equipped with HDMI input port such as LCD monitor or projector Side views Memory card reader The PC Station has a single built in memory card reader slot that supports MMC SD and SDHC formats USB 3 0 ports These USB Universal Serial Bus ports provide a transfer rate of up to 5Gbit s and are backward compatible with USB2 0 ...

Страница 12: ...c You can also eject the optical drive tray through any software player or by right clicking the optical drive in Windows Computer and selecting Eject Optical Drive The built in optical drive may support compact discs CD or digital video discs DVD and may have recordable R or re writable RW capabilities See the marketing specifications for details on each model USB 2 0 port dedicated for KBM USB r...

Страница 13: ...English 13 ASUS All in One PC ASUS Tablet Front view Webcam The built in webcam allows you to start video chats online ...

Страница 14: ...volume up down for the current operating system being used Windows or Android Mode button Press this button to switch your operating system from Windows 8 to Android Mini USB port This mini Universal Serial Bus USB 2 0 port allows you to connect compatible USB 2 0 or USB 1 1 devices to your ASUS Tablet using a mini USB cable MicroSD card reader Your ASUS Tablet comes with an additional built in me...

Страница 15: ...nect your All in One PC to an external microphone Power input The supplied power adapter converts AC power to DC power for use with this jack Power supplied through this jack supplies power to the PC To prevent damage to the PC always use the supplied power adapter WARNING The power adapter may get warm or hot when in use Do not cover the adapter and keep it away from your body Bottom view Connect...

Страница 16: ...rt for your ASUS Tablet when it is placed on a table or desk Tablet handle Carry the ASUS Tablet easily using the ergonomic tablet handle NOTES When docking your ASUS Tablet to your PC Station ensure that your tablet stand is returned to its original position The magnet at the back of your ASUS Tablet helps you to dock it into your PC Station This magnet may de magnetize nearby objects ...

Страница 17: ... PC Positioning your ASUS All in One PC Mounting your ASUS Tablet on your PC Station 1 Place your PC Station on a flat surface such as a table or desk 2 Align and insert the guiding poles into the connecting holes to securely attach your ASUS Tablet to your PC Station ...

Страница 18: ...ng your ASUS Tablet on the table or desk To place your ASUS Tablet on the table or desk 1 Detach your ASUS Tablet from your PC Station 2 Pull and adjust the tablet stand 3 Place your ASUS Tablet on a flat surface such as a table or desk ...

Страница 19: ...ns above are for reference only Actual appearances and specifications wired or wireless of the keyboard and mouse may vary by territory Connecting the wireless keyboard and mouse 1 Install batteries to the wireless keyboard and mouse 2 Connect the wireless dongle for keyboard and mouse to the dedicated USB port located on the right side of the PC Station 3 You can begin using the wireless keyboard...

Страница 20: ...he power adapter to your PC Station s DC in port and plug to the correct socket outlet with the correct input rating The input voltage of the adapter is 100Vac 240Vac 2 Press the power button on your PC Station to turn it on Using your ASUS Tablet separately 110V 220V 110V 220V ...

Страница 21: ...m letting you to seamlessly transition and enjoy between Windows 8 or Android 4 1 Jelly Bean latest features and functions IMPORTANT Ensure that both your ASUS Tablet and your PC Station are powered on before switching modes Switching between Windows 8 and Android Press the Mode button to change from Windows 8 to Android and vice versa ...

Страница 22: ...ght edge swipe on Windows 8 only Swipe from the left edge of the screen to shuffle your running apps Swipe from the right edge of the screen to launch the Charm bar Top edge swipe on Windows 8 only Finger slide on Windows 8 only In the Start screen swipe from the top edge of the screen to view the All Apps bar In a running app swipe from the top edge of the screen to view its menu Slide your finge...

Страница 23: ...touch panel Tap Double tap Tap and hold Tap an app to launch it On Windows 8 only On Desktop mode double tap an item to launch it To move an app tap and hold the app tile and drag it to a new location On Windows 8 only To close an app tap and hold the top side of the running app and drag it down to the bottom of the screen to close it ...

Страница 24: ...English 24 ASUS All in One PC Flip On Android only Use your finger back and forth between home screens through different images in the Gallery or pages in MyLibrary and SuperNote ...

Страница 25: ...o configure the audio settings To configure the audio output via an HDMI device 1 From the Start screen click Desktop to launch the Desktop Mode NOTE For more details refer to the section Start screen under Using Windows 8 2 Right click the Volume Mixer icon on the Windows taskbar and click Playback devices 3 From the Playback screen select Digital Audio HDMI 4 Click Configure and the Speaker Setu...

Страница 26: ...English 26 ASUS All in One PC 5 Select Stereo and click Next 6 Tick the Front left and right option and click Next 7 Click Finish to exit the speaker setup ...

Страница 27: ...refully read the License Terms Tick I accept the terms for using Windows then click Accept 4 Follow the onscreen instructions to configure the following basic items Personalize Wireless Settings Sign in to your PC 5 Once you are done configuring the basic items a Windows 8 tutorial appears Watch this to learn more about Windows 8 functionalities 6 The Start screen appears after successfully signin...

Страница 28: ... It includes the following features you can use while working on your ASUS All in One PC Start screen The Start screen appears after successfully signing in to your user account It helps organize all the programs and applications you need in just one place User account Zoom in out button for live tiles live tiles ...

Страница 29: ...n resolution of 1024 x 768 pixels or higher is required to run Windows apps NOTE Some apps require signing in to your Microsoft account before they are fully launched Hotspots Onscreen hotspots allow you to launch programs and access the settings of your PC The functions in these hotspots can be activated using your mouse Hotspots on a running app ...

Страница 30: ...English 30 ASUS All in One PC Hotspots on the Start screen NOTE Refer to the next page for the Hotspots functions ...

Страница 31: ...indows key on your keyboard to go back to the Start screen From the Start screen Hover your mouse pointer then tap on the running app s thumbnail to go back to that app Hover your mouse pointer then click on the recent app s thumbnail to go back to that app top Hover your mouse pointer until it changes to a hand icon Drag then drop the app to a new location NOTE This hotspot function only works on...

Страница 32: ... through the apps 2 Press to launch your selected app Resizing apps Swipe down the app tile to select and launch its settings bar Tap to reduce or tap to enlarge an app Tap and hold the app tile and drag it to a new location Customizing apps You can move resize or unpin apps from the Start screen using the following steps Moving apps Swipe down the app tile to select and launch its settings bar Ta...

Страница 33: ...pe down the app tile to select and launch its settings bar 2 Tap to show all installed apps in your ASUS All in One PC From the Start screen press to select the All Apps icon then press Closing apps Tap and hold the top side of the running app then drag it down to the bottom of the screen to close it From the running app s screen press Launching the Apps screen Launch the Apps screen using your AS...

Страница 34: ...an be triggered on the right side of your screen It consists of several tools that allow you to share applications and provide quick access for customizing the settings of your ASUS All in One PC Launching the Charm bar NOTE When called out the Charm bar initially appears as a set of white icons The image above shows how the Charm bar looks like once activated Use your ASUS All in One PC s touchsc...

Страница 35: ... or email Start This tool reverts the display back to the Start screen From the Start screen you can also use this to revert back to a recently opened app Devices This tool allows you to access and share files with the devices attached to your ASUS All in One PC such as an external display or printer Settings This tool allows you to access the PC settings of your ASUS All in One PC Inside the Char...

Страница 36: ...fore using the Snap feature Using Snap Perform the following steps to activate Snap using your ASUS All in One PC s touchscreen or keyboard Snap bar 1 Launch the app you wish to snap 2 Hover the mouse point on the top side of your screen 3 Once the pointer changes to a hand icon drag then drop the app to the left or right side of the display panel 4 Launch another app 1 Launch the app you wish to ...

Страница 37: ...ws 8 Switches between the Start screen and the last running app Launches the desktop Launches the Computer window on Desktop mode Opens the File search pane Opens the Share pane Opens the Settings pane Opens the Devices pane Activates the Lock screen Minimizes the Internet Explorer window Opens the Second screen pane Opens the Apps search pane Opens the Run window ...

Страница 38: ...s the Narrator Settings Enables the print screen function Turning your ASUS All in One PC off Do either of the following to shut down your ASUS All in One PC Tap from the Charm bar then tap Shut down to do a normal shutdown From the log in screen tap Shut down If your ASUS All in One PC is unresponsive press and hold the power button for at least four 4 seconds until your ASUS All in One PC turns ...

Страница 39: ...that you change the BIOS settings only with the help of a trained service personnel Quickly enter the BIOS Windows 8 boot time is quite fast so we developed these three ways for you to quickly access the BIOS When your ASUS All in One PC is off press the power button for at least four 4 seconds to access the BIOS directly Press the power button for at least four 4 seconds to shut down your ASUS Al...

Страница 40: ...l networking sites on or from your PC using wireless Wi Fi or wired connection Wi Fi connection 1 Launch the Charm bar from the Start screen or from any application mode NOTE For details refer to the section Charm bar under Working with Windows apps Charm Bar 2 From the Charm bar select Settings and click the network icon ...

Страница 41: ...lish 41 ASUS All in One PC 3 Select the wireless network that you want to connect to from the list 4 Click Connect NOTE You may be prompted to enter a security key to connect to a secured wireless network ...

Страница 42: ... Wi Fi connection through the Connection Builder 1 Connect your ASUS All in One PC to a Wi Fi hotspot NOTE Refer to the Wi Fi connection section in this manual for more details 2 Press the ASUS Transformer AIO icon on the Start Screen or on Desktop mode ASUS Transformer AIO icon on the Start Screen ASUS Transformer AIO icon on Desktop mode 2 In the ASUS Transformer AIO home page select Connection ...

Страница 43: ...English 43 ASUS All in One PC 3 In the Connection Builder window key in the password for your selected Wi Fi hotspot If your Wi Fi hotspot does not have a password just click OK ...

Страница 44: ...tings NOTES For more details refer to the sections Configuring a dynamic IP PPPoE network connection or Configuring a static IP network connection Contact your Internet Service Provider ISP for details or assistance in setting up your Internet connection Configuring a dynamic IP PPPoE network connection To configure a dynamic IP PPPoE or static IP network connection 1 From the Start screen click D...

Страница 45: ...Center 3 From the Open Network and Sharing Center screen click Change Adapter settings 4 Right click on your LAN and select Properties 5 Click Internet Protocol Version 4 TCP IPv4 and click Properties 6 Click Obtain an IP address automatically and click OK NOTE Continue to the next steps if you are using PPPoE connection ...

Страница 46: ... up a new connection or network 9 Select Broadband PPPoE and click Next 10 Enter your Username Password and Connection name Click Connect 11 Click Close to finish the configuration 12 Click the network icon in the taskbar and click the connection you just created 13 Enter your user name and password Click Connect to connect to the Internet ...

Страница 47: ...nection 1 Repeat steps 1 to 4 of the previous section Configuring a dynamic IP PPPoE network connection 2 Click Use the following IP address 3 Enter the IP address Subnet mask and Gateway from your service provider 4 If needed enter the preferred DNS Server address and alternative address 5 When done click OK ...

Страница 48: ...all your data before using this option To reset your PC 1 Press F9 during bootup IMPORTANT To go through POST follow any of the ways described in the section Quickly enter the BIOS in Chapter 3 2 From the screen click Troubleshoot 3 Select Reset your PC 4 Click Next 5 Select Only the drive where the Windows is installed 6 Select Just remove my files 7 Click Reset ...

Страница 49: ...ve WARNING All files on your USB storage device will be permanently deleted during the process Before you proceed ensure that you back up all your important data To create a USB recovery drive 1 Launch the Control Panel from the All Apps screen NOTE For details refer to Launching the All Apps screen under Working with Windows apps 2 From the Control Panel s System and Security click Find and fix p...

Страница 50: ...ove everything and reinstall option in PC Settings Refer to the steps below to use this option IMPORTANT Back up all your data before using this option NOTE This process may take a while to complete 1 Launch the Charm bar 2 Click Settings Change PC Settings General 3 Scroll down to view the Remove everything and reinstall Windows option Under this option click Get Started 4 Follow the onscreen ins...

Страница 51: ...e areas where the I O ports are located Beschichtungshinweis WICHTIG Um die elektrische Isolation und die elektrische Sicherheit zu gewährleisten ist das Gehäuse mit einer Beschichtung zur Isolation versehen Diese Beschichtung ist an den E A Anschlüssen des Gerätes nicht vorhanden Federal Communications Commission Statement This device complies with Part 15 of the FCC Rules Operation is subject to...

Страница 52: ... or modifications not expressly approved by the guarantee of this device could void the user s authority to operate the equipment RF exposure warning This equipment must be installed and operated in accordance with provided instructions and the antenna s used for this transmitter must be installed to provide a separation distance of at least 20 cm from all persons and must not be co located or ope...

Страница 53: ...interference and 2 this device must accept any interference including interference that may cause undesired operation of the device Canada avis d Industry Canada IC Cet appareil numérique de classe B est conforme aux normes canadiennes ICES 003 et RSS 210 Son fonctionnement est soumis aux deux conditions suivantes 1 cet appareil ne doit pas causer d interférence et 2 cet appareil doit accepter tou...

Страница 54: ... 2004 108 EC Electromagnetic compatibility and 2006 95 EC Low voltage directive CE marking for devices with wireless LAN Bluetooth This equipment complies with the requirements of Directive 1999 5 EC of the European Parliament and Commission from 9 March 1999 governing Radio and Telecommunications Equipment and mutual recognition of conformity is for class II device Wireless Operation Channel for ...

Страница 55: ...uctions This symbol of the crossed out wheeled bin indicates that the product electrical electronic equipment and mercury containing button cell battery should not be placed in municipal waste Check local regulations for disposal of electronic products DO NOT throw the battery in municipal waste The symbol of the crossed out wheeled bin indicates that the battery should not be placed in municipal ...

Страница 56: ...oduct ENERGY STAR is a joint program of the U S Environmental Protection Agency and the U S Department of Energy helping us all save money and protect the environment through energy efficient products and practices All ASUS products with the ENERGY STAR logo comply with the ENERGY STAR standard and the power management feature is enabled by default The monitor and computer are automatically set to...

Страница 57: ...English 57 ASUS All in One PC ...

Страница 58: ...in One PC Manufacturer ASUSTeK Computer Inc Tel 886 2 2894 3447 Address 4F No 150 LI TE RD PEITOU TAIPEI 112 TAIWAN Authorised representative in Europe ASUSTeK Computer GmbH Address HARKORT STR 21 23 40880 RATINGEN GERMANY ...

Отзывы: