background image

P/E-P55T2P4D Motherboard

USER'S MANUAL

Содержание P E-P55T2P4D

Страница 1: ...P E P55T2P4D Motherboard USER S MANUAL ...

Страница 2: ...se or data interruption of business or for indirect special incidental or consequential damages of any kind even ifASUS has been advised of the possibility of such damages arising from any defect or error in this manual or product ASUS may revise this manual from time to time without notice For updated BIOS drivers or product release information you may visit ASUSTeK s home page at http www asus c...

Страница 3: ...P E P55T2P4D User s Manual III ...

Страница 4: ...ings 7 2 System Memory DRAM SRAM 14 DRAM Installation Procedures 15 Static RAM SRAM for Level 2 External Cache 16 Compatible Cache Modules for this Motherboard 16 3 Central Processing Unit CPU 17 4 Expansion Cards 18 Expansion Card Installation Procedure 18 Assigning IRQs for Expansion Cards 18 Assigning DMA Channels for ISA Cards 19 ASUS MediaBus Card 20 5 External Connectors 21 Power Connection ...

Страница 5: ...r Password 44 IDE HDD Auto Detection 45 Save and Exit Setup 46 Exit Without Saving 46 Flash Memory Writer Utility 47 The Flash Memory Writer Utility Screen 48 V DESKTOP MANAGEMENT 51 Desktop Management Interface DMI 51 Introducing the DMI utility 51 System Requirements 51 Using the DMI utility 52 Notes 52 VI PCI SC200 SCSI Card 55 NCR SCSI BIOS and Drivers 55 The PCI SC200 SCSI Interface Card 56 S...

Страница 6: ...lar installation If this equipment does cause harmful interference to radio or television reception which can be determined by turning the equipment off and on the user is encouraged to try to correct the inter ference by one or more of the following measures Re orient or relocate the receiving antenna Increase the separation between the equipment and receiver Connect the equipment to an outlet on...

Страница 7: ...our retailer The P E P55T2P4D motherboard 2 serial port ribbon cables attached to a mounting bracket 1 parallel ribbon cable with mounting bracket 1 IDE ribbon cable 1 floppy ribbon cable 1 diskette containing support software as follows Flash Memory Writer utility to update motherboard BIOS Binary file containing a BIOS version Desktop Management Interface DMI software System Configuration Utilit...

Страница 8: ...ompatible cache modules Versatile DRAM Memory Support Supports eight 72 pin SIMMs of 4MB 8MB 16MB 32MB or 64MB to form a memory size between 8MB to 512MB SupportsbothFastPageMode FPM andExtendedDataOutput EDO SIMMs see page 14 EISA ISA and PCI Expansion Slots Provides four 32 bit EISA slots one 16 bit ISA slot three 32 bit PCI slots and one PCI MediaBus 2 0 which al lows the use of either a standa...

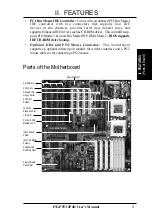
Страница 9: ... Master IDE DMA Mode 2 BIOS supports IDE CD ROM drive bootup Optional IrDA and PS 2 Mouse Connector This motherboard supports an optional infrared port module for wireless interface and a PS 2 mouse cable set for connecting a PS 2 mouse Parts of the Motherboard II FEATURES Parts of Board Intel s 430HX PCIset 2 CPU ZIF Socket 7 PCI 4 or ASUS MediaBus 2 0 3 PCI Slots Super Multi I O Programmable Fla...

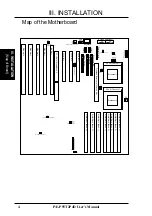
Страница 10: ...P30 JP32 Pipelined Burst Level 2 Cache Slot SIMM Slot 1 Bank 0 SIMM Slot 2 Bank 0 SIMM Slot 3 Bank 1 SIMM Slot 4 Bank 1 SIMM Slot 5 Bank 2 SIMM Slot 6 Bank 2 SIMM Slot 7 Bank 3 SIMM Slot 8 Bank 3 Primary IDE Secondary IDE JP37 JP38 JP34 JP3 JP2 JP11 JP12 JP9 JP10 COM2 Infrared ECP DMA CH1 3 256 512 L2 Cache JP5 JP6 JP7 JP8 JP19 JP20 JP21 CPU Freq Ratio APIC P54C P55C Processor 12V Fan Pwr Boot Blo...

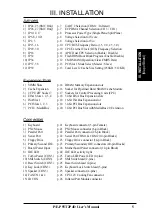
Страница 11: ...sing Units CPU 4 EISA Slots 1 2 3 4 p 18 32 bit EISA Bus Expansion slots 5 ISA Slot 1 p 18 16 bit ISA Bus Expansion slot 6 PCI Slots 1 2 3 p 18 32 bit PCI Bus Expansion slots 7 PCI 4 MediaBus p 20 32 bit PCI Bus Slot with MediaBus 2 0 Extension Connectors 1 Keyboard p 21 Keyboard connector 5 pin Female 2 PS 2 Mouse p 21 PS 2 Mouse connector 6 pin Block 3 Parallel Port p 22 Parallel Port connector ...

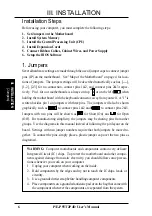
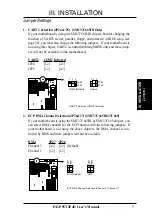
Страница 12: ... The jumpers will also be shown graphically such as to connect pins 1 2 and to connect pins 2 3 Jumpers with two pins will be shown as for Short On and for Open Off For manufacturing simplicity the jumpers may be sharing pins from other groups Use the diagrams in this manual instead of following the pin layout on the board Settings with two jumper numbers require that both jumpers be moved to geth...

Страница 13: ...board UART2 COM2 Infrared JP24 1 2 2 3 JP25 1 2 2 3 UART 2 Selection COM2 Infrared COM2 Default Infrared JP25 JP24 1 2 3 JP25 JP24 1 2 3 2 ECP DMA Channel Selection JP26 27 SMC37C665IR 37C669 If your motherboard is using the SMC37C665IR or SMC37C669 chipset you can select DMA channels for the ECP function with the following jumpers If your motherboard is not using the above chipsets the DMA channe...

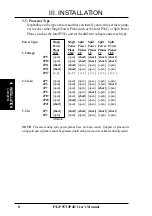
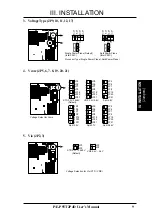
Страница 14: ...hort JP10 open open short short short short JP11 short short open open open open JP12 short short open open open open JP17 1 2 1 2 2 3 2 3 2 3 2 3 4 Vcore JP5 open open open open open open JP6 open open open open open short JP7 open open open open short open JP8 open open open short open open JP19 open open short open open open JP20 open short open open open open JP21 short open open open open ope...

Страница 15: ... JP17 4 Vcore JP5 6 7 8 19 20 21 JP19 JP20 JP21 JP6 JP7 JP8 JP5 Split 2 7V Split 2 88V JP19 JP20 JP21 JP6 JP7 JP8 JP5 Split 2 5V JP19 JP20 JP21 JP6 JP7 JP8 JP5 Split 2 8V JP19 JP20 JP21 JP6 JP7 JP8 JP5 VRE 3 4V 3 6V JP19 JP20 JP21 JP6 JP7 JP8 JP5 Voltage Select for Vcore JP19 JP20 JP21 JP6 JP7 JP8 JP5 STD 3 3V 3 465V Default 5 Vio JP2 3 Voltage Selection for Vio STD VRE STD 3 3V 3 465V Default VRE...

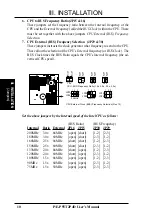
Страница 16: ...nternal frequency the ad vertised CPU speed 50MHz 60MHz 66MHz 1 2 3 CPU External Clock BUS Frequency Selection Rev 1 3 CPU BUS Frequency Ratio 1 5x 2 0x 2 5x 3 0x 1 5 x 2 0 x 2 5 x 3 0 x JP30 JP29 JP16 JP15 JP16 JP15 JP16 JP15 JP16 JP15 1 2 3 JP30 JP29 1 2 3 JP30 JP29 Set the above jumpers by the Internal speed of the Intel CPU as follows BUS Ratio BUS Frequency Internal Ratio External JP16 JP15 J...

Страница 17: ...t operating systems allow dual CPU support to be enabled even though one CPU is installed which will allows upgrading to dual CPU s without having to reinstall the operating system Dual CPU JP18 Enable 1 2 Default Disable 2 3 APIC Dual CPU Enable Disable Enable Default Disabled 1 2 3 JP18 1 2 3 JP18 Jumpers III INSTALLATION ...

Страница 18: ...abled Default Enabled JP32 1 2 3 JP32 1 2 3 10 CMOS RAM JP34 This clears the user entered information stored in the Dallas Real Time Clock such as hard disk information and passwords To clear the CMOS data 1 Turn off the PC 2 Short this jumper 3 Power on the PC 4 Turn off the PC 5 Remove this jumper 6 Power on the PC 7 Hold down Delete during bootup and enter BIOS setup to re enter user informa ti...

Страница 19: ...JP38 JP37 Master 2 3 2 3 default Slave 1 2 1 2 PCI Slot 1 Mode Select BUS Master Slave PCI 1 Master Default PCI 1 Slave 1 2 3 JP38 1 2 3 JP38 JP37 JP37 12 Total Level 2 Cache Size Setting JP39 There is no level 2 cache onboard you can upgrade usingASUS Pipelined Burst Cache Module Rev 1 6 with TAG SRAM for either 256KB or 512KB cache size IMPORTANT See page 16 External Cache for information concer...

Страница 20: ...e same size memory installed in pairs IMPORTANT Memory setup is required in BIOS Chipset Setup Auto Con figuration on page 36 IMPORTANT Do not use memory modules with more than 24 chips per module Modules with more than 24 chips exceed the design specifications of the memory subsystem and will cause unreliable operation Install memory in any or all of the banks in any combination as follows Memory...

Страница 21: ...irmly into place starting from a 45 degree angle making sure that all the contacts are aligned with the socket 3 With your finger tips rock the memory module into a vertical position so that it clicks into place Metal Clip Plastic Safety Tab This Side Only Mounting Hole 72 Pin DRAM in SIMM Socket 4 The plastic guides should go through the two Mounting Holes on the sides and the Metal Clips should ...

Страница 22: ...e module as shown Because the number of pins are different on either side of the break the module will only fit in the orientation as shown Compatible Cache Modules for this Motherboard IMPORTANT ASUS CM1 Rev 1 6 cache module must have a TAG RAM when it is used on this motherboard SIMM Cache Module 0KB to 256 512KB ASUS CM1 Rev 1 0 No ASUS CM1 Rev 1 3 No ASUS CM4 Rev 1 5 No ASUS CM1 Rev 1 6 TAG Ye...

Страница 23: ... correct orientation as shown Use the notched corner of the CPU with the white dot as your guide The white dot should point towards the end the of the lever Notice that there is a blank area where one hole is missing from that corner of the square array of pin holes and a 1 printed on the motherboard next to that corner Because the CPU has a corner pin for three of the four corners the CPU will on...

Страница 24: ...r pos sible future use 5 Carefully align the card s connectors and press firmly 6 Secure the card on the slot with the screw you removed in step 4 7 Replace the computer s cover 8 Setup the BIOS if necessary 9 Run the EISA configuration utility if you add or remove any EISA expansion cards 10 Install the necessary software drivers for your expansion card Assigning IRQs for Expansion Cards Some exp...

Страница 25: ...s IRQs are as signed automatically from those available If the system has both Legacy and PNP ISA cards installed IRQs are assigned to PNP cards from those not used by Legacy cards The PCI and PNP configuration of the BIOS setup utility can be used to indicate which IRQs are being used by Legacy cards For older Legacy cards that does not work with the BIOS you can contact your vendor for an ISA Co...

Страница 26: ...otherboard s PCI Slot 4 can meet standard specifications The gap between the MediaBus extension and the PCI Slot 4 has been increased from 0 32 to 0 40 in order to prevent Rev 1 2 MediaBus cards from being installed into the new motherboards and vice versa The following are MediaBus cards designed for MediaBus 2 0 that can be used on this motherboard PCI AS2940UW Ultra Fast Wide SCSI Audio MediaBu...

Страница 27: ... as a 101 enhanced keyboard Connector Plug from Keyboard Keyboard Connector 5 pin female 2 PS 2 Mouse Connector 6 pin block If you are using a PS 2 mouse you must purchase an optional PS 2 mouse set which connects to the 6 pin block and mounts to an open slot on your computer s case When a PS 2 mouse is detected during bootup IRQ12 will be used for the PS 2 mouse If a PS 2 mouse is not detected IR...

Страница 28: ...ort and choose the IRQ through BIOS Setup on page 38 Onboard Parallel Port Onboard Parallel Printer Connector Pin 1 4 Serial port COM1 and COM2 connectors Two 10 pin blocks These connectors support the provided serial port ribbon cables with mounting bracket Connect the ribbon cables to these connectors and mount the bracket to the case on an open slot The two serial ports on the mounting bracket ...

Страница 29: ...nnector supports the provided IDE hard disk ribbon cable After con necting the single end to the board connect the two plugs at the other end to your hard disk s If you install two hard disks you must configure the second drive to Slave mode by setting its jumpers accordingly Please refer to the documentation of your hard disk for the jumper settings You may also config ure two hard disks to be bo...

Страница 30: ...ient the connectors so that the black wires are located in the middle Using a slight angle align the plastic guide pins on the lead to their receptacles on the connector Once aligned press the lead onto the connector until the lead locks into place Power Connector on Motherboard P9 P8 RED RED RED WHT BLK BLK BLK BLK BLU YLW RED ORG Power Plugs from Power Supply 5V GND 12V 12V 5V 5V PG 8 IDE activi...

Страница 31: ...s depending on the position of the switch Wake up can be controlled by settings in the BIOS but the keyboard will always allow wake up the SMI lead cannot wake up the system If you want to use this connector Suspend Switch in the POWER MANAGEMENT SETUP of the BIOS software should be on the default setting of Enable see Suspend Switch in Power Management Setup of Section IV 11 Reset switch lead CON...

Страница 32: ...ing order a Your monitor b External SCSI devices starting with the last device on the chain c Your system power 6 The power LED on the front panel of the system case will light and the moni tor LED as well The system will then run power on tests While the tests are running additional messages will appear on the screen If you do not see anything within 30 seconds from the time you turn on the power...

Страница 33: ...are installing the motherboard reconfiguring your system or you receive a Run Setup message you will need to enter new setup information This section describes how to configure your system using this utility The BIOS ROM of the system stores the Setup utility When you turn on the com puter the system provides you with the opportunity to run this program This ap pears during the Power On Self Test ...

Страница 34: ...ard is already installed in a working system you will not need to select this option anymore However if the configuration stored in the CMOS memory on the board gets lost or damaged or if you change your system hardware configuration you will need to renter the configuration values The configuration values usually get lost or corrupted when the power of the onboard CMOS battery weakens The above s...

Страница 35: ...I hard disk drives installed in your system The onboard PCI IDE connectors provide Primary and Secondary channels for connecting up to four IDE hard disks or other IDE devices Each chan nel can support up to two hard disks the first of which is the master and the second is the slave Specifications for SCSI hard disks need not to be entered here since they operate using device drivers and are not s...

Страница 36: ... ignored for MFM and ESDI drives This entry provides three options Normal Large LBA or Auto see be low Set MODE to the Normal for IDE hard disk drives smaller than 528MB set it to LBA for drives over 528MB that support Logical Block Addressing LBA to allow larger IDE hard disks set it to Large for drives over 528MB that do not sup port LBA Large type of drive can only be used with MS DOS and is ve...

Страница 37: ...ort This is the Japanese standard floppy drive The standard stores 1 2MB in a 3 5 diskette This is normally disabled but you may choose from either Drive A Drive B Both Disabled Default Video Set this field to the type of video display card installed in your system The options are EGA VGA Default Mono for Hercules or MDA CGA 40 CGA 80 If you are using a VGA or any higher resolution card choose the...

Страница 38: ... will appear to provide you with the information you need To load the last set values press the F5 key F6 and F7 load the BIOS default values and Setup default values respectively Details of BIOS Features Setup Virus Warning This field protects the boot sector and partition table of your hard disk against acci dental modifications Any attempt to write to them will cause the system to halt and disp...

Страница 39: ...etup default this field is set to Disabled Boot Up Floppy Seek When enabled the BIOS will seek the floppy A drive one time By setup default this field is set to Disabled Floppy Disk Access Control This allows protection of files from the computer system to be copied to floppy drives by allowing the setting of Read Only to only allow reads from the floppy but not writes The setup default R W allows...

Страница 40: ...GA such as graphics accelerators or MPEG Video Cards may not show colors properly The setting Enabled should correct this problem Otherwise leave this on the setup default setting of Disabled OS 2 Onboard Memory 64M When using OS 2 operating systems with installed DRAM of greater than 64MB you need to Enable this option otherwise leave this on the setup default of Disabled Video BIOS Shadow This f...

Страница 41: ... Recovery Time Timing for 16 bit ISA cards Leave on default setting of 1 BUSCLK 8 bit I O Recovery Time Timing for 8 bit ISA cards Leave on default setting of 1 BUSCLK Video BIOS Cacheable Allows the Video BIOS to be cached to allow faster execution Leave on default setting of Enabled Memory Hole at 15M 16M Enabling this features reserves 15MB to 16MB memory address space to ISA ex pansion cards t...

Страница 42: ... pages 12 13 for more information on DRAM memory modules Onboard FDC Controller The default of Enabled allows you to connect your floppy disk drives to the onboard floppy drive connector instead of a separate controller card If you want to use a different controller card to connect the floppy drives set this field to Disabled Onboard FDC Swap A B This field reverses the drive letter assignments of...

Страница 43: ...ault is DMA Channel 3 UART2 Use Infrared When enabled this field activates the onboard infrared feature and sets the second serial UART to support the infrared module connector on the motherboard If your system already has a second serial port connected to the onboard COM2 connector it will no longer work if you enable the infrared feature By default this field is set to Disabled which leaves the ...

Страница 44: ...ing except that this time the system inac tivity period is longer Disabled disables the power saving features and User De fined allows you to set power saving options according to your preference IMPORTANT Advanced Power Management APM should be installed to keep the system time updated when the computer enters suspend mode acti vated by the BIOS Power Management For DOS environments you need to a...

Страница 45: ...the system case De fault setting for this field is Enabled Doze Speed Stdby Speed These two fields set the CPU speed during each mode The number indicates what the normal CPU speed is divided by PM Timers This section controls the time out settings for the Power Management scheme The fields included in this section are HDD Power Down which places the hard disk into its lowest power consumption mod...

Страница 46: ...use is using you can enable the Wake up Event for that IRQ here and the system will wake up when you move the mouse or click its button IRQ3 to IRQ15 You can set IRQs 3 15 individually Activity detected from any enabled IRQ channel will wake up the system PNP and PCI Setup This PNP and PCI Setup option configures the PCI bus slots All PCI bus slots on the system use INTA thus all installed PCI car...

Страница 47: ...Yes The first option the default setting indicates either that the displayed DMA channel is not used or an ECU is being used to determine if an EISA ISA card is using that channel If you install a Legacy EISA ISA card that requires a unique DMA channel and you are not using an ECU you must set the field for that channel to Yes ISA MEM Block BASE This field allows you to set the base address and bl...

Страница 48: ...e Enter key to confirm Press the N key and then the Enter key to abort This feature does not affect the fields on the Standard CMOS Setup screen Load Setup Defaults This Load Setup Defaults option allows you to load the default values to the sys tem configuration fields These default values are the optimized configuration set tings for the system To load these default values highlight Load Setup D...

Страница 49: ...itive and can be up to 8 alphanumeric characters long type in your password and then press the Enter key The system confirms your password by asking you to type it again After setting a password the screen automatically reverts to the main screen To implement the password protection specify in the Security Option field of the BIOS Features Setup screen when the system will prompt for the password ...

Страница 50: ...upport the Enhanced IDE features in order to use Drive E and Drive F The onboard PCI IDE controller supports Enhanced IDE with two connectors for connecting up to four IDE devices If you want to use another con troller that supports four drives you must disable the onboard IDE controller in the Chipset Features Setup screen When auto detection is completed the program automatically enters all entr...

Страница 51: ...will not be readable If the auto detected parameters do not match the ones that should be used for your drive do not accept them Press the N key to reject the presented settings and enter the correct ones manually from the Standard CMOS Setup screen Save and Exit Setup Select this option to save into the CMOS memory all modifications you specify during the current session To save the configuration...

Страница 52: ...otherboard To determine whether or not the provided BIOS file is newer than the current motherboard BIOS compare the diskette s BIOS file name with the last four numbers of the code displayed on the upper left hand corner of your screen during bootup If the number of the BIOS file in the support diskette is larger continue with this section to reprogram the motherboard BIOS If the number is smalle...

Страница 53: ... the same directory as the utility To run change to the directory containing PFLASH EXE and then at the DOS prompt type PFLASH Enter The Flash Memory Writer Utility Screen IMPORTANT Flash Type may also be INTEL 28F001BXT If unknown is after Flash type then this ROM chip is not programmable or not sup ported with the PnP BIOS and therefore cannot be programmed by the Flash Memory Writer This screen...

Страница 54: ...if advanced features if necessary Boot Block of New BIOS is different from old one Please Use Advanced Feature to flash whole bios 3 Advanced Features Selecting this option brings up the Advanced Features screen for clearing the PnP configuration record and updating the motherboard BIOS To terminate the program and return to the DOS prompt press the Esc key Se lecting the third option displays the...

Страница 55: ...te name of the file including the file name extension and then press the Enter key The utility then downloads the new BIOS file The following message appears DO NOT TURN OFF THE SYSTEM IF THERE IS A PROBLEM If you encounter problems while downloading the new BIOS DO NOT turn off your system since this might prevent your system from booting up Just repeat the process and if the problem still persis...

Страница 56: ...ing the user to update the whole BIOS This DMI utility also allows the system integrator or end user to add additional information into the MIFD such as serial numbers housing configurations and vendor information Those information not detected by the motherboard BIOS and has to be manually entered through the DMI Utility and updated into the MIFD This DMI utility provides the same reliability as ...

Страница 57: ...ilable for editing The blue text Press ENTER for detail contains a second pop up menu is available use the plus minus keys to change the settings Enter to exit and save ESC to exit and not save If the user has made changes ESC will prompt you to answer Y or N Enter Y to go back to the left hand screen and save enter N to go back to left hand screen and not save If editing has not been made ESC wil...

Страница 58: ... press ESC and a message Bad File Name appears here to show it was not saved Load MIFD You can load the disk file to memory by entering a drive and path and file name Load BIOS Defaults You can load the BIOS defaults from a MIFD file and can clear all user modified and added data You must reboot your computer in order for the defaults to be saved back into the Flash BIOS V DMI Using DMI Utility ...

Страница 59: ...54 P E P55T2P4D User s Manual This page was intentionally left blank ...

Страница 60: ...e drivers provide higher performance than the direct BIOS support To use these drivers you must install them into your system and add them to your system configuration files Driver support for SCSI devices used with SCO UNIX is also provided These drivers are included in the second SCO UNIX floppy disk Win dows 95 support is also available using the device drivers included within the Win dows soft...

Страница 61: ...system you can connect SCSI devices installed in your system case to the internal connector on the card You also have the additional option of connecting external SCSI devices to the external SCSI 2 connector on the card If you get the PCI SC200 later on as an option you will need to install it yourself The setup procedure is explained here Setting Up the PCI SC200 There are two jumper settings yo...

Страница 62: ...r in a chain by cables Internal devices con nect to the PCI SC200 with a fifty pin flat ribbon cable External devices connect to the external port with a SCSI 2 cable If there are more than one internal or external devices additional devices are connected with cables to form a daisy chain The SCSI chain must be terminated at both ends or the devices in the chain will not work properly Many SCSI de...

Страница 63: ...ernal devices connected to the PCI SC200 then you must terminate the PCI SC200 If you have both internal and external devices connected you must not terminate the card See the following example which illustrates this concept SCSI Device 1 SCSI Device 2 Termination Required End Device Termination Required JP5 Open Termination Required End Device SCSI Device 3 SCSI Device 4 SCSI Device 2 SCSI Device...

Отзывы: