background image

ASUS NOVA LITE SURF EP10-Red Flag

31

Installing Windows

®

 XP

You can install Windows® XP operating system to your EP10-Red 
Flag with the official Windows® XP Service Pack 2 disc. To do so,  
follow the instructions below:

You must connect an external USB DVD-ROM to your computer 
before inserting the Windows® XP Service Pack 2 disc.

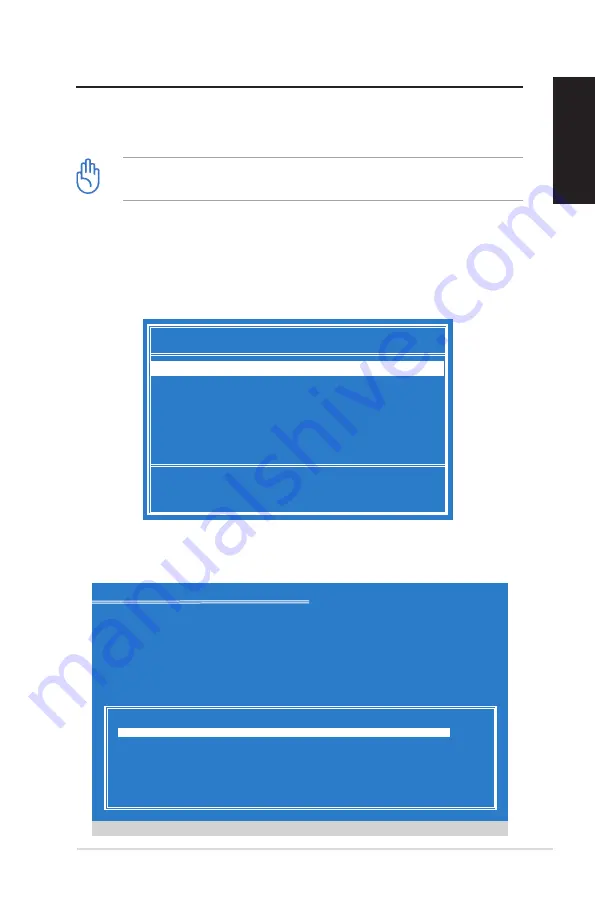
1.  Turn on your computer and press 

<F8>

 to enter the 

Please 

select boot device

 menu.

2.  Insert your Windows® XP disc into the optical drive and select 

CDROM: XXX

 as the boot device. Press 

<ENTER>

 and then 

press any key to continue.

3.  The Windows XP Setup screen appears. Press 

<D>

 and follow 

the on-screen instructions to delete the existing partitions.

Please select boot device:

↑ 

and 

↓ 

to move selection

ENTER to select boot device

CDROM:PS-MATSHITADVD-RAM UJ-85J

HDD:3M-ST9120822AS

Windows XP Professional Setup

The following list shows the existing partitions and 

unpartitioned space on this computer. 

Use the UP and DOWN ARROW keys to select an item in the list.
 

•  To set up Windows XP on the selected item, Press ENTER.


•  To create a partition in the unpartitioned space, press C.


•  To delete the selected partition, press D.

Enter=Install  D=Delete Partition  F3=Quit

204798 MB Disk 0 at Id 0 on bus 0 on atai [MBR]


C:   Partition1 [Unknown] 

       102 MB (   101 MB free)


E:   Partition2 [Unknown] 

     202703 MB ( 202702 MB free) 


F:   Partition3 [Unknown] 

      1992 MB (  1992 MB free)

English

Содержание NOVALITE SURF PX10

Страница 1: ...English NOVA LITE SURF PX10 User Manual ...

Страница 2: ...n permission of ASUSTeK COMPUTER INC ASUS Products and corporate names mentioned in this manual may or may not be registered trademarks or copyrights of their respective companies and are used for identification purposes only All trademarks are the property of their respective owners Every effort has been made to ensure that the contents of this manual are correct and up to date However the manufa...

Страница 3: ...X10 14 Display connection 14 USB devices connection 15 Network connection 16 Configuring audio output 17 Connecting to speakers 18 Using your PX10 19 Setting up a network connection 19 Using a static IP 19 Using a dynamic IP PPPoE connection 20 Configuring audio output settings 23 Using ASUS Easy Update 25 Recovering your system 26 Using the recovery DVD 26 Using the hidden partition 28 Entering R...

Страница 4: ...ay cause harmful interference to radio communications However there is no guarantee that interference will not occur in a particular installation If this equipment does cause harmful interference to radio or television reception which can be determined by turning the equipment off and on the user is encouraged to try to correct the interference by one or more of the following measures Reorient or ...

Страница 5: ... Canadian ICES 003 Macrovision Corporation Product Notice This product incorporates copyright protection technology that is protected by method claims of certain U S patents and other intellectual property rights owned by Macrovision Corporation and other rights owners Use of this copyright protection technology must be authorized by Macrovision Corporation and is intended for home and other limit...

Страница 6: ...entilation Never insert objects of any kind into the ventilation openings Use this product in environments with ambient temperatures between 0 C and 40 C If you use an extension cord make sure that the total ampere rating of the devices plugged into the extension cord does not exceed its ampere rating Care during use Do not walk on the power cord or allow anything to rest on it Do not spill water ...

Страница 7: ... electrical electronic equipment and mercury containing button cell battery should not be placed in municipal waste Check local regulations for disposal of electronic products NO DISASSEMBLY The warranty does not apply to the products that have been disassembled by users Lithium Ion Battery Warning CAUTION Danger of explosion if battery is incorrectly replaced Replace only with the same or equival...

Страница 8: ...ke note of the following symbols used throughout this manual WARNING Vital information that you MUST follow to prevent injury to yourself IMPORTANT Instructions that you MUST follow to complete a task TIP Tips and useful information that help you complete a task NOTE Additional information for special situations ...

Страница 9: ...URF PX10 The following illustration displays the package contents of your new PX10 If any of the below items is damaged or missing contact your retailer Package contents NOVA LITE SURF PX10 Stand DVI D Sub adapter Power cord AC adapter Support DVD Recovery DVD Warranty card Quick Guide Quick guide ...

Страница 10: ...NOVA LITE SURF PX10 English Knowing your PX10 Front view Refer to the diagram below to learn about the system front panel Power switch touch sensitive The power switch allows powering ON and OFF the system 1 1 ...

Страница 11: ...he adapter and keep it away from your body USB port The USB Universal Serial Bus port is compatible with USB devices such as keyboards mouse devices cameras and hard disk drives USB allows many devices to run simultaneously on a single computer with some peripherals acting as additional plug in sites or hubs Display output The Digital Visual Interface DVI port supports a high quality VGA compatibl...

Страница 12: ...one jack 3 55mm is used to connect the system s audio out signal to amplified speakers or headphones Using this jack automatically disables the built in speakers Microphone jack The microphone jack is designed to connect the microphone used for video conferencing voice narrations or simple audio recordings Bottom view Refer to the diagram below to identify the components on this side of the system...

Страница 13: ...F PX10 13 English Positioning your PX10 CORRECT CORRECT INCORRECT Use the support stand if you want to stack up your PX10 Stacking up the system without the support stand will hamper the ventilation and damage the system ...

Страница 14: ...X10 Display connection Follow the instructions below to connect a display 1 Connect one end of the DVI cable to the display 2 Connect the other end of the cable to the DVI port on the rear side of system If your display comes with a D Sub port use the DVI to D Sub adapter in the package when connecting the display 1 2 ...

Страница 15: ...USB port is compatible with USB devices like keyboards mouse devices and printers The illustration below shows a USB keyboard and mouse connected to the system The package contents does not include USB keyboard and mouse Purchase USB peripherals based on your needs ...

Страница 16: ...ect one end of the network cable to the network port on the system and the other end to a hub or switch The illustration below is the example of your PX10 connected to a network hub or switch for use with the built in Ethernet controller Network cable with RJ 45 connectors I Network hub or switch ...

Страница 17: ...r has a left right front and left right rear channel and it may include a subwoofer and a center speaker A subwoofer provides enhanced bass sounds 1 indicates a subwoofer For instance 5 1 channel refers to a six speaker mode and uses two front speakers left right two rear speakers left right a center speaker and a subwoofer Name Speaker system 2 channel stereo Left speaker and right speaker 5 1 ch...

Страница 18: ...ure an up to 5 1 channel audio setup Refer to the table below for the audio jacks on the rear panel and their functions For stereo speakers or headphones For a 5 1 channel speaker system Audio jack Description Connects to the FRONT jack on your subwoofer Connects to the REAR jack on your subwoofer Connects to the CENTER BASS jack on your subwoofer Audio jack Description Connects to stereo speakers...

Страница 19: ... To establish a wired network follow the instructions below Using a static IP 3 Hightlight Internet Protocol TCP IP and click Properties 2 Right click Local Area Connection and select Properties 1 Right click the network icon on the Windows taskbar and select Open Network Connections ...

Страница 20: ...6 If needed enter the Preferred DNS server address 7 After entering all of the related values click OK to finish the configuration Using a dynamic IP PPPoE connection 1 Repeat Step 1 3 in the previous section 2 Select Obtain an IP address automatically and click OK 3 Click Create a new connection to start the New Connection Wizard ...

Страница 21: ...lish 4 Click Next 5 Select Connect to the Internet and click Next 6 Select Set up my connection manually 7 Select your connection type and click Next 8 Enter your ISP Name and click Next 9 Enter your User name and Password Click Next ...

Страница 22: ...PX10 English Contact your Internet Service Provider ISP if you have problems connecting to the network 10 Click Finish to finish the configuration 11 Enter your user name and password Click Connect to connect to the Internet ...

Страница 23: ...llow the steps below to configure speaker setup 2 Click the Volume tab and then click Advanced to configure speaker settings 1 Right click the volume icon on the Windows taskbar and select Adjust Audio Properties 3 Click the Speakers tab From the drop down menu select the speaker configuration you are using and click OK ...

Страница 24: ...0 English To adjust volume and audio effects 1 Right click the volume icon on the Windows taskbar and select Open Volume Control 2 From the control panel adjust volume and balance according to your needs or mute the audio output ...

Страница 25: ...s the latest BIOS drivers and applications for your PX10 2 Select Schedule to set how often you want to update your system 3 Select Update to activate the update 1 From the Windows taskbar right click on the ASUS Easy Update icon 4 Click OK to display the items you can download 5 Check the item s you want to download and then click OK ...

Страница 26: ...our computer and press F8 to enter the Please select boot device menu 2 Insert the recovery DVD into the optical drive and select the optical drive DVDROM XXX as the boot device Press Enter and then press any key to continue 3 The ASUS Recovery System window appears Select where to install a new system min 20GB space is required Options are Recover Windows to a partition This option will delete on...

Страница 27: ...eted restart the computer 6 After the system reboots Windows will begin system configurations and install drivers and utilities 7 Set up your language time zone keyboard computer name and user name to enter the Windows OS This recovery DVD is for PX10 only DO NOT use it on other computers Visit the ASUS website www asus com for any updates ...

Страница 28: ...figuration settings such as network settings DO NOT delete the partition named RECOVERY The recovery partition is created at the factory and cannot be restored by the user if deleted Take your system to an authorized ASUS service center if you have problems with the recovery process 1 Press F9 during bootup requires a recovery partition 2 Press Enter to select Windows Setup EMS Enabled 3 The ASUS ...

Страница 29: ...URF EP10 Red Flag User Manual NOTE EP10 Red Flag is the PX10 model with Red Flag Linux operating system installed To install Windows XP operating system to your EP10 Red Flag purchase an official Windows XP Service Pack 2 ...

Страница 30: ...mes with the Red Flag Linux operating system OS To enter the OS follow the instructions below 2 Wait for a few seconds to enter the login screen 1 Turn on your computer and the following screen appears 4 You have successfully entered the OS 3 Enter root and press Enter to log in English ...

Страница 31: ...en appears Press D and follow the on screen instructions to delete the existing partitions Please select boot device and to move selection ENTER to select boot device CDROM PS MATSHITADVD RAM UJ 85J HDD 3M ST9120822AS Windows XP Professional Setup The following list shows the existing partitions and unpartitioned space on this computer Use the UP and DOWN ARROW keys to select an item in the list T...

Страница 32: ...stall the drivers and utilities 4 After all of the existing partitions are deleted the unpartitioned space is shown Windows XP Professional Setup The following list shows the existing partitions and unpartitioned space on this computer Use the UP and DOWN ARROW keys to select an item in the list To set up Windows XP on the selected item Press ENTER To create a partition in the unpartitioned space ...

Отзывы: