background image

A-2

Appendices

REACH

Complying with the REACH (Registration, Evaluation, Authorisation, and Restriction of 

Chemicals) regulatory framework, we published the chemical substances in our products at 

ASUS REACH website at http://csr.asus.com/english/REACH.htm.

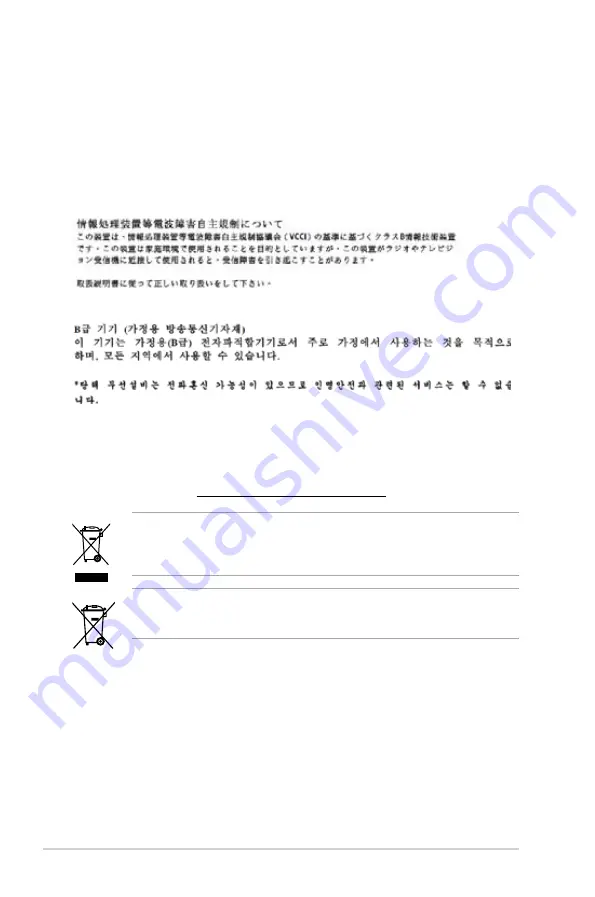
DO NOT throw the motherboard in municipal waste. This product has been designed to 

enable proper reuse of parts and recycling. This symbol of the crossed out wheeled bin 

indicates that the product (electrical and electronic equipment) should not be placed in 

municipal waste. Check local regulations for disposal of electronic products.

DO NOT throw the mercury-containing button cell battery in municipal waste. This symbol 

of the crossed out wheeled bin indicates that the battery should not be placed in municipal 

waste.

ASUS Recycling/Takeback Services

ASUS recycling and takeback programs come from our commitment to the highest standards 

for protecting our environment. We believe in providing solutions for you to be able to 

responsibly recycle our products, batteries, other components as well as the packaging 

materials. Please go to http://csr.asus.com/english/Takeback.htm for detailed recycling 

information in different regions.

Canadian Department of Communications Statement

This digital apparatus does not exceed the Class B limits for radio noise emissions from 

digital apparatus set out in the Radio Interference Regulations of the Canadian Department 

of Communications.
This class B digital apparatus complies with Canadian ICES-003.

VCCI: Japan Compliance Statement
VCCI Class B Statement

KC: Korea Warning Statement

Содержание H61M-D

Страница 1: ...Motherboard H61M D ...

Страница 2: ...spective companies and are used only for identification or explanation and to the owners benefit without intent to infringe Offer to Provide Source Code of Certain Software This product contains copyrighted software that is licensed under the General Public License GPL under the Lesser General Public License Version LGPL and or other Free Open Source Software Licenses Such software in this product...

Страница 3: ...U 1 3 1 4 System memory 1 7 1 5 Expansion slots 1 9 1 6 Jumpers 1 10 1 7 Connectors 1 12 1 8 Onboard LEDs 1 17 1 9 Software support 1 18 BIOS information 2 1 Managing and updating your BIOS 2 1 2 2 BIOS setup program 2 5 2 3 Main menu 2 9 2 4 Ai Tweaker menu 2 9 2 5 Advanced menu 2 10 2 6 Monitor menu 2 11 2 7 Boot menu 2 12 2 8 Tools menu 2 13 2 9 Exit menu 2 13 Appendices Notices A 1 ASUS contac...

Страница 4: ...erboard and adding components carefully read all the manuals that came with the package Before using the product ensure all cables are correctly connected and the power cables are not damaged If you detect any damage contact your dealer immediately To avoid short circuits keep paper clips screws and staples away from connectors slots sockets and circuitry Avoid dust humidity and temperature extrem...

Страница 5: ...s properly take note of the following symbols used throughout this manual DANGER WARNING Information to prevent injury to yourself when completing a task CAUTION Information to prevent damage to the components when completing a task IMPORTANT Instructions that you MUST follow to complete a task NOTE Tips and additional information to help you complete a task Typography Bold text Indicates a menu o...

Страница 6: ...it operating system may only recognize less than 3GB We recommend a maximum of 3GB system memory if you are using a Windows 32 bit operating system Expansion slots 1 x PCI Express 3 0 2 0 x16 slot 2 x PCI Express 2 0 x1 slots PCIe 3 0 speed is supported by Intel 3rd generation CoreTM processors Graphics D Sub with max resolution of 2048 x 1536 75Hz Maximum UMA memory 1024 MB Storage Intel H61 Expr...

Страница 7: ...1 1 ports 3 x Audio jacks support 8 channel audio output Internal connectors 3 x USB 2 0 1 1 connectors support additional 6 USB 2 0 ports 4 x SATA 3 0 Gb s connectors 1 x CLRTC jumper 1 x 4 pin CPU fan connector 1 x 4 pin Chassis fan connectors 1 x Front panel audio connector AAFP 1 x System panel connector 1 x Speaker connector 1 x 24 pin EATX power connector 1 x 4 pin EATX 12V power connector B...

Страница 8: ...nt ensure that the ATX power supply is switched off or the power cord is detached from the power supply Failure to do so may cause severe damage to the motherboard peripherals or components 1 2 Motherboard overview Before you install the motherboard study the configuration of your chassis to ensure that the motherboard fits Unplug the power cord before installing or removing the motherboard Failur...

Страница 9: ...NEL CLRTC PS2_USBPW1 4 USBPW5 10 USB78 USB910 USB56 AAFP ATX12V VGA LPT COM EATXPWR CPU_FAN CHA_FAN BATTERY Super I O ALC 887 VD2 RTL 8111F RT 8876 64Mb BIOS SB_PWR 22 6cm 8 9in LGA1155 Intel H61 DDR3 DIMM_A1 64bit 240 pin module DDR3 DIMM_B1 64bit 240 pin module SATA3G_4 SATA3G_3 SATA3G_2 SATA3G_1 AUDIO KBMS LAN_USB12 USB34 17 5cm 6 9in 2 4 1 5 3 3 2 8 9 10 11 12 13 6 7 ...

Страница 10: ...14 7 System panel connector 10 1 pin F_PANEL 1 17 8 Intel H61 Serial ATA 3 0Gb s connector 7 pin SATA3G_1 4 1 15 9 Clear RTC RAM 3 pin CLRTC 1 10 10 USB 2 0 connectors 10 1 pin USB56 USB78 USB910 1 16 11 USB device wake up USBPW5 10 1 12 12 Front panel audio connector 10 1 pin AAFP 1 15 13 Onboard LED SB_PWR 1 17 1 3 Central Processing Unit CPU This motherboard comes with a surface mount LGA1155 s...

Страница 11: ...are not bent Contact your retailer immediately if the PnP cap is missing or if you see any damage to the PnP cap socket contacts motherboard components ASUS will shoulder the cost of repair only if the damage is shipment transit related Keep the cap after installing the motherboard ASUS will process Return Merchandise Authorization RMA requests only if the motherboard comes with the cap on the LGA...

Страница 12: ...ASUS H61M D 1 5 A B C 5 4 1 3 2 CPU heatsink and fan assembly installation Apply the Thermal Interface Material to the CPU heatsink and CPU before you install the heatsink and fan if necessary ...

Страница 13: ...1 6 Chapter 1 Product introduction 3 4 A B B A To uninstall the CPU heatsink and fan assembly 2 1 To install the CPU heatsink and fan assembly 2 B A A B 1 ...

Страница 14: ...higher sized channel is then mapped for single channel operation DDR3 1600MHz and higher memory frequency is supported by Intel 3rd generation processors Due to the CPU behavior DDR3 2133 1866 MHz memory modules will run at DDR3 2000 1800 MHz frequency Always install DIMMs with the same CAS latency For optimal compatibility we recommend that you install memory modules of the same version or date c...

Страница 15: ...re adding or removing DIMMs or other system components Failure to do so can cause severe damage to both the motherboard and the components 1 Press the retaining clips outward to unlock a DIMM socket 2 Align a DIMM on the socket such that the notch on the DIMM matches the DIMM slot key on the socket A DIMM is keyed with a notch so that it fits in only one direction DO NOT force a DIMM into a socket...

Страница 16: ...it cover if your motherboard is already installed in a chassis 3 Remove the bracket opposite the slot that you intend to use Keep the screw for later use 4 Align the card connector with the slot and press firmly until the card is completely seated on the slot 5 Secure the card to the chassis with the screw you removed earlier 6 Replace the system cover 1 5 2 Configuring an expansion card After ins...

Страница 17: ...al Time Clock RTC RAM in CMOS You can clear the CMOS memory of date time and system setup parameters by erasing the CMOS RTC RAM data The onboard button cell battery powers the RAM data in CMOS which include system setup information such as system passwords IRQ assignments for this motherboard H61M D H61M D Clear RTC RAM 1 2 2 3 Normal Default Clear RTC CLRTC A B C D E F G H LAN shared PCIE x16_1 ...

Страница 18: ...in low power mode using the connected USB devices Set to 5VSB to wake up from S3 and S4 sleep modes no power to CPU DRAM in slow refresh power supply in reduced power mode H61M D H61M D Keyboard Power Setting PS2_USBPW1 4 2 1 2 3 5V Default 5VSB The USB device wake up feature requires a power supply that can provide 500mA on the 5VSB lead for each USB port otherwise the system would not power up T...

Страница 19: ...er allows you to enable or disable the USB device wake up feature When you set this jumper to pins 2 3 5VSB you can wake up the computer by pressing a key on the USB keyboard or by clicking on the USB mouse This feature requires an ATX power supply that can supply at least 1A on the 5VSB lead and a corresponding setting in the BIOS H61M D H61M D USB Device Wake Up 2 1 2 3 5V Default 5VSB USBPW5 10...

Страница 20: ...ut Front Speaker Out Front Speaker Out Front Speaker Out Pink Rear panel Mic In Mic In Bass Center Bass Center Lime Front panel Side Speaker Out 6 Microphone port pink This port connects to a microphone 7 USB 2 0 ports 1 and 2 These two 4 pin Universal Serial Bus USB ports are for USB 2 0 1 1 devices 8 USB 2 0 ports 3 and 4 These two 4 pin Universal Serial Bus USB ports are for USB 2 0 1 1 devices...

Страница 21: ... Calculator at http support asus com PowerSupplyCalculator PSCalculator aspx SLanguage en us for details 1 7 2 Internal connectors 1 ATX power connectors 24 pin EATXPWR 4 pin ATX12V These connectors are for ATX power supply plugs The power supply plugs are designed to fit these connectors in only one orientation Find the proper orientation and push down firmly until the connectors completely fit H...

Страница 22: ...1M D H61M D Front panel audio connector AAFP PIN 1 AGND NC SENSE1_RETUR SENSE2_RETUR PORT1 L PORT1 R PORT2 R SENSE_SEND PORT2 L HD audio compliant pin definition PIN 1 AGND NC NC NC MIC2 MICPWR Line out_R NC Line out_L Legacy AC 97 compliant definition 4 Intel H61 Serial ATA 3 0Gb s connector 7 pin SATA3G_1 4 This connector connects to Serial ATA 3 0 Gb s hard disk drives via Serial ATA 3 0 Gb s s...

Страница 23: ...61M D H61M D Fan connectors CPU_FAN CPU FAN PWM CPU FAN IN 12V GND CHA_FAN CHA FAN PWM CHA FAN IN 12V GND 6 USB 2 0 connectors 10 1 pin USB56 USB78 USB910 These connectors are for USB 2 0 ports Connect the USB module cable to any of these connectors then install the module to a slot opening at the back of the system chassis These USB connectors comply with USB 2 0 specifications and supports up to...

Страница 24: ...button soft off button 2 pin PWR_BTN This connector is for the system power button Reset button 2 pin RESET This 2 pin connector is for the chassis mounted reset button for system reboot without turning off the system power H61M D PIN 1 PWR BTN PLED PLED PWRBTN GND HDD_LED HDD_LED Ground RSTCON NC F_PANEL PWR_LED HDD_LED RESET H61M D System panel connector 1 8 Onboard LEDs 1 Standby Power LED The ...

Страница 25: ... contains the drivers software applications and utilities that you can install to avail all motherboard features The contents of the Support DVD are subject to change at any time without notice Visit the ASUS website at www asus com for updates The following screen is for reference only To run the Support DVD Place the Support DVD into the optical drive If Autorun is enabled in your computer the D...

Страница 26: ... drive The Specials menu appears 2 Click the Utilities tab then click AI Suite II 3 Follow the onscreen instructions to complete the installation Quit all Windows applications before you update the BIOS using this utility Updating the BIOS To update the BIOS 1 From the Windows desktop click Start Programs ASUS AI Suite II AI Suite II X XX XX to launch the AI Suite II utility The AI Suite II Quick ...

Страница 27: ...gram Go to the Tool menu to select ASUS EZ Flash 2 Utility and press Enter to enable it 3 Press Tab to switch to the Drive field 4 Press the Up Down arrow keys to find the USB flash disk that contains the latest BIOS and then press Enter 5 Press Tab to switch to the Folder Info field 6 Press the Up Down arrow keys to find the BIOS file and then press Enter to perform the BIOS update process Reboot...

Страница 28: ...alues DO NOT shut down or reset the system while updating the BIOS Doing so can cause system boot failure 2 1 4 ASUS BIOS Updater The ASUS BIOS Updater allows you to update BIOS in DOS environment This utility also allows you to copy the current BIOS file that you can use as a backup when the BIOS fails or gets corrupted during the updating process The succeeding utility screens are for reference ...

Страница 29: ...he FreeDOS prompt type bupdater pc g and press Enter 2 The BIOS Updater screen appears as below ASUSTek BIOS Updater for DOS V1 30 BOARD H61M D VER 0302 DATE 06 02 2013 H61MD CAP 4194304 2013 06 02 17 30 48 Booting the system in DOS environment 1 Insert the USB flash drive with the latest BIOS file and BIOS Updater to the USB port 2 Boot your computer When the ASUS Logo appears press F8 to show th...

Страница 30: ... Defaults item under the Exit menu Refer to section 2 9 Exit menu for details Ensure to connect all SATA hard disk drives after updating the BIOS file if you have disconnected them 2 2 BIOS setup program Use the BIOS Setup program to update the BIOS or configure its parameters The BIOS screens include navigation keys and brief online help to guide you in using the BIOS Setup program Entering BIOS ...

Страница 31: ...lity and stability Select the Load Optimized Defaults item under the Exit menu See section 2 9 Exit Menu for details If the system fails to boot after changing any BIOS setting try to clear the CMOS and reset the motherboard to the default value See section 1 7 Jumpers for information on how to erase the RTC RAM BIOS menu screen The BIOS setup program can be used under two modes EZ Mode and Advanc...

Страница 32: ... resets the system or enters the Advanced Mode Selects the display language of the BIOS setup program Displays the CPU motherboard temperature CPU 5V 3 3V 12V voltage output CPU chassis fan speed Silent mode Standard mode Turbo mode Loads optimized default Selects the boot device priority Selects the boot device priority Displays the system properties of the selected mode on the right hand side Se...

Страница 33: ...g the system boot configuration Tool For configuring options for special functions Exit For selecting the exit options and loading default settings Navigation keys General help Menu bar Submenu item Configuration fields Menu items Pop up window Back button Advanced Mode The Advanced Mode provides advanced options for experienced end users to configure the BIOS settings The figure below shows an ex...

Страница 34: ... password See section 1 7 Jumpers for information on how to erase the RTC RAM The Administrator or User Password items on top of the screen show the default Not Installed After you set a password these items show Installed 2 4 Ai Tweaker menu The Ai Tweaker menu items allow you to configure overclocking related items Be cautious when changing the settings of the Ai Tweaker menu items Incorrect fie...

Страница 35: ...5 Advanced menu The Advanced menu items allow you to change the settings for the CPU and other system devices Be cautious when changing the settings of the Advanced menu items Incorrect field values can cause the system to malfunction ...

Страница 36: ...ASUS H61M D 2 11 2 6 Monitor menu The Monitor menu displays the system temperature power status and allows you to change the fan settings Scroll down to display the following items ...

Страница 37: ...2 12 Chapter 2 Getting started 2 7 Boot menu The Boot menu items allow you to change the system boot options Scroll down to display the following items ...

Страница 38: ...ptions for special functions Select an item then press Enter to display the submenu 2 9 Exit menu The Exit menu items allow you to load the optimal default values for the BIOS items and save or discard your changes to the BIOS items You can access the EZ Mode from the Exit menu ...

Страница 39: ...fferent from that to which the receiver is connected Consult the dealer or an experienced radio TV technician for help The use of shielded cables for connection of the monitor to the graphics card is required to assure compliance with FCC regulations Changes or modifications to this unit not expressly approved by the party responsible for compliance could void the user s authority to operate this ...

Страница 40: ...out wheeled bin indicates that the battery should not be placed in municipal waste ASUS Recycling Takeback Services ASUS recycling and takeback programs come from our commitment to the highest standards for protecting our environment We believe in providing solutions for you to be able to responsibly recycle our products batteries other components as well as the packaging materials Please go to ht...

Страница 41: ... Support Telephone 1 812 282 2787 Support fax 1 812 284 0883 Online support support asus com ASUS COMPUTER GmbH Germany and Austria Address Harkort Str 21 23 D 40880 Ratingen Germany Fax 49 2102 959911 Web site www asus de Online contact www asus de sales Technical Support Telephone 49 1805 010923 Support Fax 49 2102 9599 11 Online support support asus com EUR 0 14 minute from a German fixed landl...

Страница 42: ...otherboard Model name H61M D conform with the essential requirements of the following directives 2004 108 EC EMC Directive EN 55022 2010 EN 61000 3 2 2006 A2 2009 EN 55013 2001 A1 2003 A2 2006 EN 55024 2010 EN 61000 3 3 2008 EN 55020 2007 A11 2011 1999 5 EC R TTE Directive EN 300 328 V1 7 1 2006 10 EN 300 440 1 V1 6 1 2010 08 EN 300 440 2 V1 4 1 2010 08 EN 301 511 V9 0 2 2003 03 EN 301 908 1 V5 2 ...

Отзывы: