background image

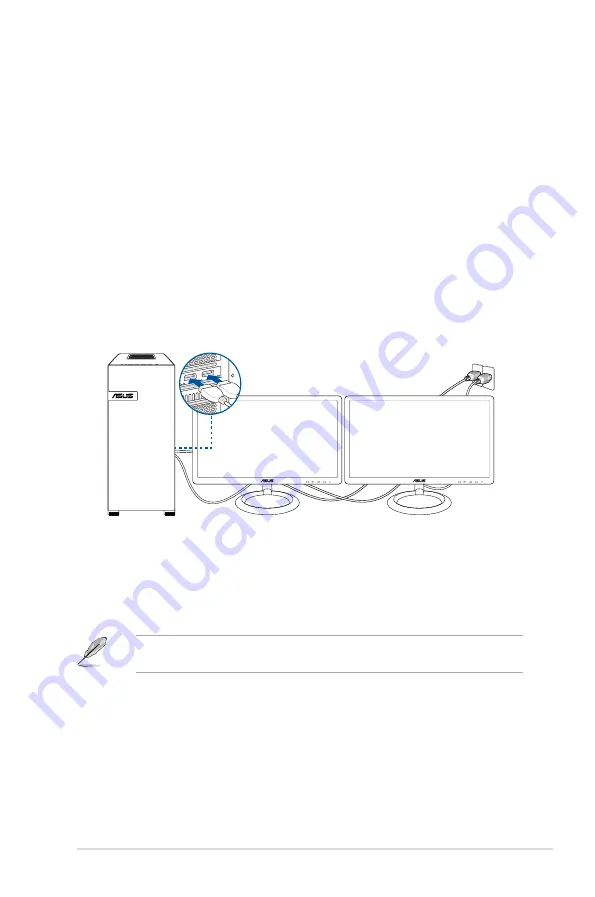
Connecting multiple external displays

Your Gaming Station may come with Display Port, HDMI, or DVI ports and allows you to connect 
multiple external displays.

Setting up multiple displays

When using multiple monitors, you are allowed to set display modes. You can use the additional 
monitor as a duplicate of your main display, or as an extension to enlarge your Windows desktop.

To set up multiple displays: 

1. 

Turn off your Gaming Station.

2. 

Connect the two monitors to your Gaming Station and connect the power cords to the 
monitors. Refer to Setting up your Gaming Station section in Chapter 1 for details on how to 
connect a monitor to your Gaming Station.

3. 

Turn on your Gaming Station. 

4. 

From the Start menu, click 

Settings 

System

 > 

Display

.

5. 

Configure the settings for your displays.

For some graphic cards, only the monitor that is set to be the primary display has display during 
POST. The dual display function works only under Windows.

ASUS Gaming Station

21

Содержание GS30

Страница 1: ...GS30 Gaming Station User Guide ...

Страница 2: ...CULAR PURPOSE IN NO EVENT SHALL ASUS ITS DIRECTORS OFFICERS EMPLOYEES OR AGENTS BE LIABLE FOR ANY INDIRECT SPECIAL INCIDENTAL OR CONSEQUENTIAL DAMAGES INCLUDING DAMAGES FOR LOSS OF PROFITS LOSS OF BUSINESS LOSS OF USE OR DATA INTERRUPTION OF BUSINESS AND THE LIKE EVEN IF ASUS HAS BEEN ADVISED OF THE POSSIBILITY OF SUCH DAMAGES ARISING FROM ANY DEFECT OR ERROR IN THIS MANUAL OR PRODUCT SPECIFICATIO...

Страница 3: ... Station 13 Turning your Gaming Station ON 15 Chapter 2 Connecting devices to your Gaming Station Connecting a USB storage device 17 Connecting microphone and speakers 18 Connecting multiple external displays 21 Connecting an HDTV 22 Chapter 3 Using your Gaming Station Proper posture when using your Gaming Station 23 Chapter 4 Connecting to the Internet Wired connection 25 Chapter 5 Troubleshootin...

Страница 4: ... Connect the equipment to an outlet on a circuit different from that to which the receiver is connected Consult the dealer or an experienced radio TV technician for help The use of shielded cables for connection of the monitor to the graphics card is required to assure compliance with FCC regulations Changes or modifications to this unit not expressly approved by the party responsible for complian...

Страница 5: ...mitment to the highest standards for protecting our environment We believe in providing solutions for you to be able to responsibly recycle our products batteries other components as well as the packaging materials Please go to http csr asus com english Takeback htm for detailed recycling information in different regions Australia statement notice From 1 January 2012 updated warranties apply to al...

Страница 6: ...aper clips screws and staples away from connectors slots sockets and circuitry Avoid dust humidity and temperature extremes Place the server on a stable surface The thumbscrews on the chassis should be tightened with a tool after both initial installation and subsequent access to the panel The product is suitable for mounting on concrete or other non combustible surfaces only This product is equip...

Страница 7: ...updates ASUS websites The ASUS websites worldwide provide updated information for all ASUS hardware and software products Refer to the ASUS contact information DANGER WARNING Information to prevent injury to yourself when trying to complete a task CAUTION Information to prevent damage to the components when trying to complete a task IMPORTANT Instructions that you MUST follow to complete a task NO...

Страница 8: ...of the above items is damaged or missing contact your retailer The illustrated items above are for reference only Actual product specifications may vary with different models Gaming Station x 1 Power cord x1 Warranty card x1 8 ...

Страница 9: ...hese values are encapsulated in a stunningly futuristic and stylish system casing Read the ASUS Warranty Card before setting up your ASUS Gaming Station Getting to know your Gaming Station Illustrations are for reference only The ports their locations and the chassis color vary with different models ASUS Gaming Station 9 Chapter 1 Getting started Chapter 1 Getting started ...

Страница 10: ...connects to USB devices USB 3 1 Gen 1 ports The port connects to USB devices Power button Press this button to turn on your Gaming Station Reset button Press this button to restart your Gaming Station HDD SSD access LED This LED blinks when the system is accessing the internal HDD SSD devices Front panel 10 Chapter 1 Getting started ...

Страница 11: ...ort This DVI Digital Visual Interface port allows you to connect to an external display LAN RJ 45 ports These ports allow Gigabit connection to a Local Area Network LAN through a network hub Activity Link LED Speed LED Status Description Status Description OFF No link OFF 10Mbps connection ORANGE Linked ORANGE 100Mbps connection BLINKING Data activity GREEN 1Gbps connection LAN port SPEED LED ACT ...

Страница 12: ...s Microphone port pink This port connects to a microphone Line Out port lime This port connects to a headphone or speaker In a 2 1 4 1 5 1 or 7 1 channel configuration the function of this port becomes Front Speaker Out Supported by ASUS Audio Wizard Line In port light blue This port connects to the audio sources in a 2 1 4 1 or 5 1 channel configuration and connects to the side speakers in a 7 1 ...

Страница 13: ...al monitor keyboard mouse and power cord to your Gaming Station Connecting an external monitor Using the ASUS Graphics Card Connect your monitor to the display output port on the discrete ASUS Graphics Card To connect an external monitor using the ASUS Graphics Card 1 Connect a monitor to a display output port on the ASUS Graphics Card 2 Plug the monitor to a power source The display output ports ...

Страница 14: ...d and a USB mouse to the USB ports on the rear panel of your Gaming Station Connecting the power cord Connect one end of the power cord to the power connector on the rear panel of your Gaming Station and the other end to a power source 14 Chapter 1 Getting started ...

Страница 15: ... turn on your Gaming Station after setting up your Gaming Station Turning your Gaming Station ON To turn your Gaming Station ON 1 Turn your monitor ON 2 Press the power button on your Gaming Station 3 Wait until the operating system loads automatically ASUS Gaming Station 15 ...

Страница 16: ...16 Chapter 1 Getting started ...

Страница 17: ...nd rear panels The USB ports allow you to connect USB devices such as storage devices To connect a USB storage device Insert the USB storage device to your Gaming Station Front panel Rear panel ASUS Gaming Station 17 Chapter 2 Connecting devices to your Gaming Station Chapter 2 Connecting devices to your Gaming Station ...

Страница 18: ...with microphone ports and speaker ports on both the front and rear panels The audio I O ports located on the rear panel allow you to connect 2 1 channel 4 1 channel 5 1 channel and 7 1 channel stereo speakers Connecting headset and microphone 18 Chapter 2 Connecting devices to your computer ...

Страница 19: ...Connecting 2 1 channel Speakers Connecting 4 1 channel Speakers ASUS Gaming Station 19 ...

Страница 20: ...Connecting 7 1 channel Speakers Connecting 5 1 channel Speakers 20 Chapter 2 Connecting devices to your computer ...

Страница 21: ...o set up multiple displays 1 Turn off your Gaming Station 2 Connect the two monitors to your Gaming Station and connect the power cords to the monitors Refer to Setting up your Gaming Station section in Chapter 1 for details on how to connect a monitor to your Gaming Station 3 Turn on your Gaming Station 4 From the Start menu click Settings System Display 5 Configure the settings for your displays...

Страница 22: ...ort of your Gaming Station You need an HDMI cable to connect the HDTV and the Gaming Station The HDMI cable is purchased separately To get the best display performance ensure that your HDMI cable is less than 15 meters 22 Chapter 2 Connecting devices to your computer ...

Страница 23: ...ur knees are slightly higher than your hips to relax the backs of your thighs If necessary use a footrest to raise the level of your knees Adjust the back of your chair so that the base of your spine is firmly supported and angled slightly backward Sit upright with your knees elbows and hips at an approximately 90º angle when you are at the Gaming Station Place the monitor directly in front of you...

Страница 24: ...24 Chapter 3 Using your computer ...

Страница 25: ... the rear panel of your Gaming Station and the other end to a DSL cable modem 3 Turn on the DSL cable modem and your Gaming Station 4 Configure the necessary Internet connection settings Contact your network administrator for details or assistance in setting up your Internet connection For more details refer to the sections Configuring a dynamic IP PPPoE network connection or Configuring a static ...

Страница 26: ...e other end to your LAN 2 Turn on your Gaming Station 3 Configure the necessary Internet connection settings Contact your network administrator for details or assistance in setting up your Internet connection For more details refer to the sections Configuring a dynamic IP PPPoE network connection or Configuring a static IP network connection 26 Chapter 4 Connecting to the Internet ...

Страница 27: ...g Center b From the Start menu click Settings Network Internet Ethernet Network and Sharing Center 2 From the Open Network and Sharing Center screen click Change Adapter settings 3 Right click on your LAN and select Properties 4 Click Internet ProtocolVersion 4 TCP IPv4 and click Properties 5 Click Obtain an IP address automatically and click OK Continue to the next steps if you are using PPPoE co...

Страница 28: ...structions to complete the setup Configuring a static IP network connection To configure a static IP network connection 1 Repeat steps 1 to 4 of the previous section 2 Click Use the following IP address 3 Enter the IP address Subnet mask and Gateway from your service provider 4 If needed enter the preferred DNS Server address and alternative address 5 When done click OK 28 Chapter 4 Connecting to ...

Страница 29: ...t responding then click EndTask If the keyboard is not responding press and hold the Power button on the top of your chassis until the Gaming Station shuts down Then press the Power button to turn it on I cannot connect to a wireless network using the ASUSWLAN Card on selected models only Ensure that you enter the correct network security key for the wireless network you want to connect to Connect...

Страница 30: ...s installed on your Gaming Station ensure that you connect the monitors to the output port on the graphics card Check if the multiple displays settings are correct My Gaming Station cannot detect my USB storage device The first time you connect your USB storage device to your Gaming Station Windows automatically installs a driver for it Wait for a while and go to My Computer to check if the USB st...

Страница 31: ... speakers to the Line out port lime on the front panel or the rear panel Check if your speak is connected to an electrical source and turned on Adjust your speakers volume Ensure that your Gaming Station s system sounds are not Muted If it is muted the volume icon is displayed as To enable the system sounds click from the Windows notification area then click If it is not muted click and drag the s...

Страница 32: ...sure that the power cord is unplugged from the power outlet Your Gaming Station is not turned on Press the power key on the front panel to ensure that your Gaming Station is turned on Your Gaming Station s power cord is not properly connected Ensure that the power cord is properly connected Use other compatible power cord PSU Power supply unit problems Contact the ASUS Service Center about install...

Страница 33: ...another monitor LAN Problem Possible Cause Action Cannot access the Internet The LAN cable is not connected Connect the LAN cable to your Gaming Station LAN cable problems Ensure the LAN LED is on If not try another LAN cable If it still does not work contact the ASUS service center Your Gaming Station is not properly connected to a router or hub Ensure that your Gaming Station is properly connect...

Страница 34: ...eed is too slow Too many programs are running Close some of the programs Gaming Station virus attack Use an anti virus software to scan for viruses and repair your Gaming Station Reinstall the operating system The system often hangs or freezes Hard disk drive failure Send the damaged hard disk drive to ASUS Service Center for servicing Replace with a new hard disk drive Memory module problems Repl...

Страница 35: ...est BIOS versions Gaming Station is too noisy when in use The CPU fan has been replaced Ensure that you are using a compatible or ASUS recommended CPU fan There is not enough air ventilation for the Gaming Station Ensure that your Gaming Station is working in an area with good air flow The system temperature is too high Update the BIOS If you know how to reinstall the motherboard try to clean the ...

Страница 36: ...ERNATIONAL America Address 48720 Kato Rd Fremont CA 94538 USA Fax 1 510 608 4555 Web site https www asus com us Technical Support Support fax 1 812 284 0883 General support 1 812 282 2787 Online support https www asus com support Product ContactUs Services questionform lang en us ASUS COMPUTER GmbH Germany and Austria Address Harkort Str 21 23 40880 Ratingen Germany Fax 49 2102 959911 Web site htt...

Отзывы: