Notebook PC E-Manual
7
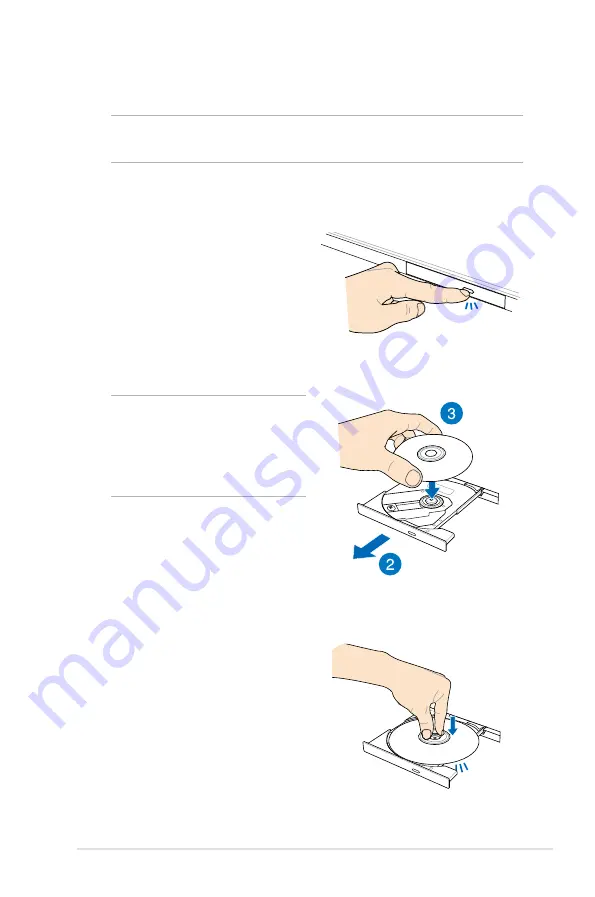
Inserting an optical disc
1. While the Notebook PC is
on, press the electronic eject
button to partially eject the
optical drive tray.
2. Gently pull out the drive tray.
IMPORTANT!
Be careful not
to touch the optical drive lens.
Ensure that there are no objects
that may get jammed under the
drive tray.
Using the optical drive
3. Hold the disc by the edge,
with its printed side up, then
gently place it inside the hub.
4. Push down the disc’s plastic
hub until it snaps onto the
optical drive hub.
NOTE:
The actual location of the electronic eject button may vary
depending on your Notebook PC model.
Содержание G750JH
Страница 1: ...Notebook PC E Manual ...
Страница 12: ...12 Notebook PC E Manual ...
Страница 13: ...Notebook PC E Manual 13 Chapter 1 Hardware Setup ...
Страница 25: ...Notebook PC E Manual 25 Chapter 2 Using your Notebook PC ...
Страница 28: ...28 Notebook PC E Manual Lift to open the display panel Press the power button ...
Страница 39: ...Notebook PC E Manual 39 Chapter 3 Working with Windows 8 ...
Страница 65: ...Notebook PC E Manual 65 Chapter 4 ASUS apps ...
Страница 72: ...72 Notebook PC E Manual ...
Страница 73: ...Notebook PC E Manual 73 Chapter 5 Power on Self test POST ...
Страница 87: ...Notebook PC E Manual 87 Chapter 6 Upgrading your Notebook PC ...
Страница 99: ...Notebook PC E Manual 99 C Align and insert the new battery pack into the Notebook PC s battery slot ...
Страница 100: ...100 Notebook PC E Manual ...
Страница 101: ...Notebook PC E Manual 101 Appendices ...
Страница 123: ...Notebook PC E Manual 123 ...


