Asus Fonepad E9021b Скачать руководство пользователя страница 89

89

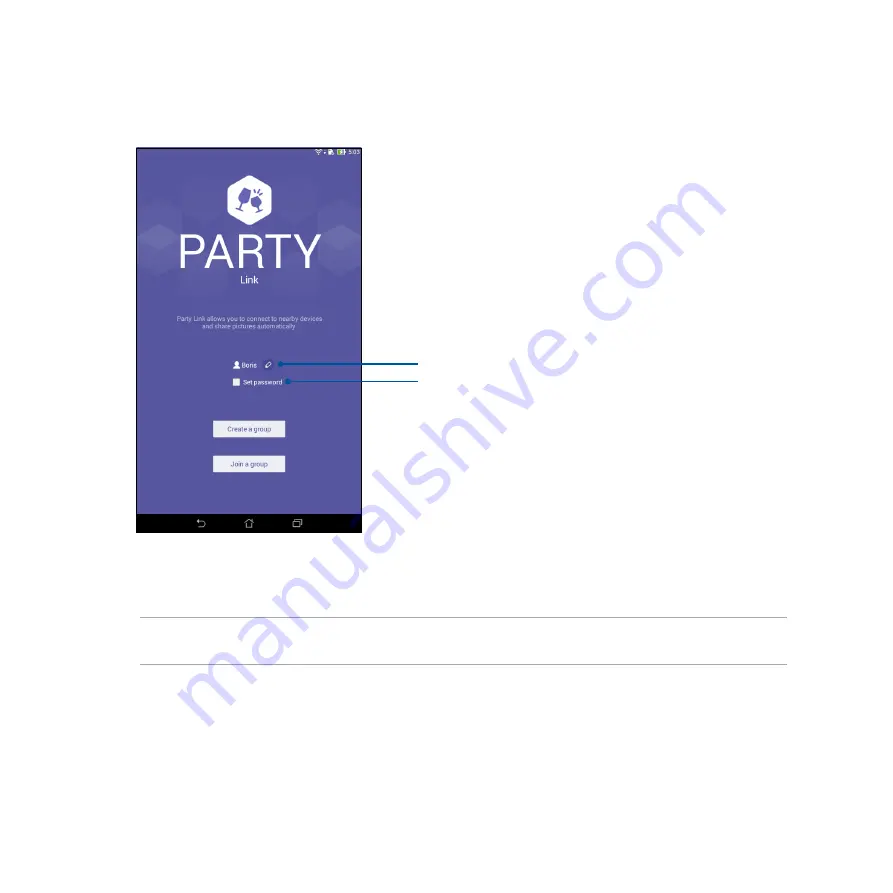
3.  (optional) In the Party Link home screen, set the following items:

4. Tap 

Create a group

 or 

Join a group

 to start sharing photos captured from your Fonepad.

IMPORTANT!

 If you created a password-protected group, you need to share the password to intended recipients 

for them to receive your photos.

Tap this to create a new group name for your Fonepad.
Tap this if you want to  password-protect access to your group.

Содержание Fonepad E9021b

Страница 1: ......

Страница 2: ...2 E9021b April 2015 Revised EditionV2 ...

Страница 3: ...4 Turning your Fonepad on or off 27 2 There s no place like Home Zen Home features 32 Home screen 32 Managing your home 34 Quick settings 38 ASUS keyboard settings 42 Voice Search 43 Lock Screen 46 Connecting your Fonepad to your computer 47 Connecting with your notebook 47 Connecting with your desktop PC 48 3 Call in style Managing contacts 50 Adding contacts 50 Importing contacts 51 Exporting co...

Страница 4: ...ackups 58 4 Send messages and more Messaging 60 Sending or replying to messages 60 Setting up your messaging options 61 Omlet Chat 62 Registering to Omlet Chat 62 Using Omlet chat 65 Sending multimedia messages 66 5 Access your emails Email 68 Setting up an email account 68 Adding email accounts 69 Gmail 70 Setting up a Gmail account 70 6 Capture moments Launching the Camera app 74 From the lock s...

Страница 5: ...reen 76 Image settings 77 Video settings 79 Advanced camera features 80 Time Rewind 80 HDR 81 Panorama 81 Night 82 Selfie 83 Miniature 84 Smart remove 85 All Smiles 85 Beautification 86 GIF animation 86 Time lapse 87 Party Link 88 Sharing photos 88 Receiving photos 90 7 Gallery Using the Gallery 92 Main screen 92 Viewing files from other source locations 93 ...

Страница 6: ...te 100 Calendar 101 Creating an event from your Fonepad 101 Adding an account to Calendar 102 Creating an event from your account 102 What s Next 103 Do It Later 104 Accessing or creating to do tasks 104 Weather 105 Weather home screen 106 Clock 107 Launching Clock 107 World Clock 108 Alarm clock 109 Stopwatch 110 Timer 111 File Manager 113 Accessing the internal storage 113 Accessing the external...

Страница 7: ...122 Using Play Games 122 Music 123 Launching Music 123 Playing songs 123 Playing songs from your SD card 123 Playing Cloud music 124 Sound recorder 125 Launching Sound Recorder 125 Sound Recorder home screen 125 11 Maintain your Zen Keeping your device up to date 128 Updating your system 128 Storage 128 Backup and reset 129 Securing your Fonepad 130 Unlocking your screen 130 Setting your Fonepad i...

Страница 8: ...nepad to a Bluetooth device 140 Unpairing your Fonepad from the Bluetooth device 140 Miracast 141 Share Link 142 The Cloud 144 ASUS WebStorage 144 13 App essentials Switching apps 146 Locking apps 146 Downloading apps 147 14 There s more to your Zen Power saver 150 Setting up Power Saver 150 Customizing Power Saver 151 ASUS Splendid 152 Appendix Notices 154 ...

Страница 9: ...ontains vital information that must be followed to complete a task NOTE This message contains additional information and tips that can help complete tasks CAUTION This message contains important information that must be followed to keep you safe while performing tasks and prevent damage to your Fonepad data and components ...

Страница 10: ...ensure that your power adapter complies with this rating Do not use damaged power cables accessories and other peripherals with your device Keep your device dry Do not use or expose your device near liquids rain or moisture You can put your device through x ray machines such as those used in conveyor belts for airport security but do not expose the device to magnetic detectors and wands The device...

Страница 11: ...ut wheeled bin indicates that the product electrical electronic equipment and mercury containing button cell battery should not be placed in municipal waste Check local regulations for disposal of electronic products Do not throw the battery in municipal waste The symbol of the crossed out wheeled bin indicates that the battery should not be placed in municipal waste ...

Страница 12: ...12 ...

Страница 13: ...Chapter Get your Zen ready 1 Get your Zen ready ...

Страница 14: ... Take a hold of your device and have it up and running in a jiffy Touch screen Front camera Receiver Power lock button Volume keys Headphone jack Micro USB connector Rear camera Micro SIM memory card compartment Microphone ...

Страница 15: ... with two micro SIM card slots that allow you to setup and use two mobile network services without having to carry two mobile devices at the same time CAUTION This device is designed for use with a mobile carrier approved micro SIM card only We do not recommend the use of trimmed SIM cards in the micro SIM card slot Turn off your device before inserting a micro SIM card Be extra careful when handl...

Страница 16: ...rtment cover or injure your fingernails when you remove the cover Do not forcibly remove shear or distort the micro SIM memory card compartment cover 3 Orient the micro SIM card with its gold plated contacts facing upward then insert it into the Micro SIM card 1 slot 4 Push the micro SIM card all the way into the slot until it is seated firmly in place Micro SIM card 1 slot ...

Страница 17: ...o micro SIM cards go to Settings Dual SIM card settings for information and configuration of your SIM cards 5 If you wish to install another micro SIM card orient the micro SIM card with its gold plated contacts facing upward then insert it into the Micro SIM card 2 slot Micro SIM card 2 slot ...

Страница 18: ...to your micro SIM card To remove a micro SIM card 1 Turn off your device 2 Orient your device as shown then open the micro SIM memory card compartment CAUTION Be careful not to damage the compartment cover or injure your fingernails when you remove the cover Do not forcibly remove shear or distort the micro SIM memory card compartment cover ...

Страница 19: ...19 3 Press the micro SIM card that you want to remove then pull it out Repeat the same step if you wish to remove the other micro SIM card 4 Put back the micro SIM memory card compartment cover ...

Страница 20: ... ASUS is not responsible for any data loss or damage incurred to your memory card Do not insert a micro SIM card into the memory card slot If a micro SIM card happens to be inserted into the memory card slot bring your device to an ASUS qualified service personnel To install a memory card 1 Orient your device as shown then open the micro SIM memory card compartment CAUTION Be careful not to damage...

Страница 21: ...its contents from ASUS File Manager SD Memory Card 2 Align and insert a memory card into the memory card slot 3 Push the memory card all the way into the slot until it is seated firmly in place Memory card slot 4 Put back the micro SIM memory card compartment cover ...

Страница 22: ...emove it from device To eject the memory card go to Home All Apps Settings Storage Unmount external storage To remove a memory card 1 Orient your device as shown then open the micro SIM memory card compartment CAUTION Be careful not to damage the compartment cover or injure your fingernails when you remove the cover Do not forcibly remove shear or distort the micro SIM memory card compartment cove...

Страница 23: ...23 2 Press the memory card to eject then pull it out 3 Put back the microSD compartment cover ...

Страница 24: ...le 100 240 V outlet The output voltage of the AC power adapter for this device is DC 5 2V 1 35A When using your Fonepad while plugged in to a power outlet the power outlet must be near your device and easily accessible To conserve electricity unplug the AC power adapter from the power outlet when not in use Do not place heavy objects on top of your Fonepad CAUTION While charging your Fonepad can b...

Страница 25: ...the AC power adapter to a grounded power outlet 3 Connect the micro USB cable to your Fonepad IMPORTANT Charge your Fonepad for eight 8 hours before using it in battery mode for the first time The status of battery charge is indicated by the following icons Low Not Charging Charging Full ...

Страница 26: ...TES You can use your device while charging but it may take longer to fully charge the device Charging your device via USB port of a computer may take longer to fully charge the device If your computer does not provide enough power for charging via USB port charge your Fonepad using the AC power adapter plugged to a power outlet instead ...

Страница 27: ...ts up Turning your device off To turn your device off 1 If your screen is turned off press the power button to turn it on If your screen is locked unlock the device screen 2 Press and hold the power button then when prompted tap Power off then tap OK Sleep mode To put your device in sleep mode press the power button once until the screen turns off ...

Страница 28: ...e Account allows you to fully utilize these Android OS features Organize and see all your information from anywhere Automatically backup all your data Leverage Google services conveniently from anywhere ASUS Account Having an ASUS Account gets you to enjoy the following perks Personalized ASUS support service and warranty extension for registered products Free 5 GB of Cloud storage space with an a...

Страница 29: ...ery When not in use press the power button to put the device in sleep mode Activate Smart Saving in Power Saver app Set audio to Power Saving mode Decrease brightness of display Keep the speaker volume to a low level Disable Wi Fi feature Disable Bluetooth feature Disable Miracast feature Disable GPS Disable the screen auto rotate feature Disable all auto sync features in your device ...

Страница 30: ...30 ...

Страница 31: ...Chapter There s no place like Home 2 There s no place like Home ...

Страница 32: ...ght from your Home screen Swipe the Home screen to the left or right to display the extended Home screen Swipe down this area to display System notifications Swipe down this area to display Quick settings Tap to update Weather settings Tap to displayTime settings Tap to open Google Search page Tap to open Voice Search Tap to open an app Tap to open All Apps screen ...

Страница 33: ... This icon shows that you have an unread message This icon shows the signal strength of your Wi Fi connection This icon shows the battery status of your Fonepad This icon shows that a microSD card is inserted in your Fonepad This icon shows that you took screenshots of your Fonepad This icon shows that your Fonepad is on Airplane mode This icon shows that Wi Fi hotspot of your Fonepad is enabled T...

Страница 34: ...d add widgets for a quick review of important info You can also add more pages so you can add and quickly access or review more apps or widgets on your Home screen To add items to home tap and hold an empty area on your Home screen and select any of these categories Apps Widgets Wallpaper and Edit page To go through the pages of your Home screen swipe left or right ...

Страница 35: ...n tap and hold an app then drag it to X Remove on the top of your screen Widgets Add widgets for a quick review of your calendar maps battery status and more To add a widget 1 Tap and hold an empty area on your Home screen and select Widgets 2 From Widgets tap and hold a widget then drag it to an empty area on your Home screen To remove an app shortcut From your Home screen tap and hold a widget t...

Страница 36: ...nt background tint to your wallpaper for readability and clarity You can also select an animated wallpaper to make your screen come alive Tap to apply a background tint Tap to select the background tint Move the slider to adjust the transparency of the wallpaper Tap to select a wallpaper Tap to apply the wallpaper settings ...

Страница 37: ...ansparency level 4 Tap then select a color 5 Select a wallpaper then tap Apply NOTES A background tint can be applied to your Home screen or Home screen and Lock screen You can also set up your wallpaper settings from Settings Display Applying an animated wallpaper To apply an animated wallpaper 1 Tap and hold an empty area on your Home screen and select Wallpapers 2 Select where you want your wal...

Страница 38: ...epad You can launch Quick settings anytime you need it even if you are currently using an app on your Fonepad Launching Quick settings Swipe down from the upper right corner of your Fonepad s screen Tap these buttons to enable or disable their functions Slide left or right to adjust the screen s brightness Tap to open Settings Tap to enable disable features in Quick settings Tap to view current Sy...

Страница 39: ...otification panel View system notifications Tap to view the current updates and changes made on your Fonepad Go back to the Quick settings home screen From the System notifications screen tap to go back to the home screen Access Display settings Tap to launch the Display app Inside Quick settings Use Quick settings as a one tap access for some of the features and programs of your Fonepad ...

Страница 40: ...ton indicates a disabled feature Adding or removing buttons To add or remove existing buttons from the ASUS Quick Settings notification panel 1 Launch Quick settings then tap 2 Tap the box beside the feature to add or remove it from the ASUS Quick Setting Notification Panel NOTE A checked box indicates that the feature s button is accessible via the ASUS Quick Settings Notification Panel while an ...

Страница 41: ... your Fonepad Most of these changes are data and system related The System notifications screen is intuitive and can be navigated through the following ways Tap this to delete all of the listed notifications Swipe the notification to the left or right to remove it from the list Tap on the notification to view its details ...

Страница 42: ...ords using your Fonepad s touch keyboard To access the ASUS keyboard settings 1 Launch Quick settings then tap 2 Scroll down the Settings screen and select Language input 3 Tap beside ASUS keyboard settings 4 Configure the settings according to your personal preferences ...

Страница 43: ...your Fonepad Launch apps inside your Fonepad Get directions going to a location IMPORTANT Your Fonepad must be connected to the Internet to be able to use this feature LaunchingVoice Search 1 Tap Voice Search 2 Once the mic icon turns red start saying your voice command NOTE Speak clearly and use concise phrases when talking to your Fonepad It also helps to start your commands with a verb related ...

Страница 44: ...theTablet search group If you want to set parameters for the voice search results gathered from your Google account and your Fonepad s data you may do so using the following steps 1 On your Fonepad s home screen tap Voice Search 2 Tap Settings ...

Страница 45: ...45 3 Tap Tablet search 4 Tick the box of the search groups you would like to include as source when using Voice Search ...

Страница 46: ...n panel Your device s lock screen can also be customized to regulate access to your mobile data and apps Customizing your lock screen If you want to change your lock screen settings from the default Swipe option refer to the following steps 1 Launch Quick settings then tap 2 Scroll down the Settings screen and select Lock screen 3 In the next screen tap Screen lock 4 Tap the screen lock option you...

Страница 47: ...ort to charge it or transfer files between devices NOTES Charging through a USB port of a computer may take longer time to complete If your computer does not provide enough power for charging the Fonepad charge your Fonepad via the grounded power outlet instead Connecting with your notebook ...

Страница 48: ...48 To connect your Fonepad to your computer 1 Plug the micro USB connector into your Fonepad 2 Plug the USB connector to the USB port of your computer Connecting with your desktop PC ...

Страница 49: ...Chapter Call in style 3 Call in style ...

Страница 50: ...ontacts 1 Tap Contacts app then tap Create a new contact 2 On the Contacts screen select the account that you want to save your contact a Device b SIM card storage SIM1 or SIM2 c E mail account NOTE If you don t have an e mail account tap Add account then create one 3 Follow the succeeding onscreen instructions to add and save the new contact ...

Страница 51: ...cts 1 Tap Contacts app then tap Manage contacts 2 Tap Import export then select from the following importing options a Import from SIM 1 card Import from SIM 2 card b Import from storage 3 Select from the following accounts to save the contact a Email account s b Device c SIM1 SIM2 4 Tick to select the contacts that you wish to import and when done tap Import ...

Страница 52: ...ge contacts 2 Tap Import export then select from the following exporting options a Export to SIM 1 card Export to SIM 2 card b Export to storage 3 Tap to select the contacts from the following accounts a All contacts b E mail account s c Device d SIM1 SIM2 4 Tick the contacts that you want to export 5 When done tap Export ...

Страница 53: ...from Contacts app Use the Contacts app to make a call from your contacts list To call via the Contacts app 1 From your Home screen tap Contacts app then look for the contact name that you wish to call NOTE To view all contacts from all contact accounts tap Contacts to display dropdown list then tick all accounts 2 Tap the contact name then tap the number 3 If there are two SIM cards installed tap ...

Страница 54: ...your Home screen tap Phone app then tap the number keys 2 Select from call buttons SIM1 or SIM2 to dial the number NOTE The labels of the call buttons may vary depending on the setting that you made to your micro SIM cards Refer to section Dual SIM feature of this user manual for more information Call buttons ...

Страница 55: ...onepad Answering a call There are two ways to answer a call depending on the status of your Fonepad If your device is active tap Answer To reject a call tap Decline If your device is locked drag to to answer or to to reject the call NOTE You can also send a message to reject the call Swipe up Reject with message then select from the displayed options to send the message ...

Страница 56: ...hange the names of your micro SIM cards on your Fonepad so that you can identify them easily To change the names of your micro SIM cards tap SIM1 name SIM1 or SIM2 name SIM2 then key in the names for your micro SIM cards NOTE If your SIMs have different mobile service providers we recommend you to use the names of these providers for your SIM names If both SIMs have the same mobile service provide...

Страница 57: ...ake a call from your contacts list or from call logs your Fonepad automatically uses the preferred micro SIM card to connect the call To assign a micro SIM card for voice calls tap Voice call then tap the SIM that you want to use SIM card for data service To assign a micro SIM card for data service tap Data service network then select from SIM1 or SIM2 ...

Страница 58: ...eypad 2 Tap then tap Backup call log 3 Tap Backup call log to device to save the call log backup in your Fonepad To email the call log backup tap Backup call log to device and send out 4 Key in a backup file name then tap OK After the backup is successful tap OK Restoring call log backups To restore call log backups 1 From the Home screen tap Phone then tap to hide the keypad 2 Tap then tap Restor...

Страница 59: ...Chapter Send messages and more 4 Send messages and more ...

Страница 60: ... your message threads or conversations to others to keep them in the loop Sending or replying to messages To start a message thread 1 From the Home screen tap then tap 2 In the To field enter the number or tap to select a contact from your list 3 Start composing your message in the Type message field 4 When you re done select the SIM account where you re going to send your message from ...

Страница 61: ...ssage from The conversation will be forwarded as an MMS Multimedia Messaging Service message NOTES Ensure that you have MMS subscription with your mobile service provider Ensure that data access is enabled on your device From your Home screen tap Settings More Mobile networks then tick Data enabled Mobile data and messaging rates apply when forwarding conversations to others To set a message as a ...

Страница 62: ... tap Omlet Chat app 2 On the Sign in page select your country and key in your mobile phone number then tap Next Omlet Chat app sends a text message containing the PIN to proceed with the registration 3 Key in the PIN then tap Next 4 Key in your name then tap Get Started 5 If you want Omlet Chat to automatically update your friends from your contacts list tap Okay Let s do it If you want to add you...

Страница 63: ...n message to your e mail account If you select Facebook Omlet Chat app will take you to Facebook to log in to your Facebook account 3 Key in your name then tap Get Started 4 If you want Omlet Chat to automatically update your friends from your contacts list tap Okay Let s do it If you want to add your friends manually tap No thanks NOTES A series of screens appear for the app s introduction Follow...

Страница 64: ...Phone number Key in the mobile phone number or e mail of your friend then tap Go Invite Facebook friends Tap to log in to your Facebook account Invite address book friends Tap to invite friends from the contacts list of your e mail 3 Omlet Chat app gathers the contacts of your account After selecting the contacts follow the onscreen instructions to complete the operation For Facebook app tick to s...

Страница 65: ...rsation To start conversation tap Contacts from the Omlet Chat menu then tap the contact name Sending a chat message To send a chat message key in your message in What s up field then tap Sending a voice message To send a voice message tap and hold while saying your message then release to send ...

Страница 66: ...dress with a map snippet Tap to create and send drawings or doodles Tap to send a picture from your Fonepad Tap to launch Camera app and send the captured picture Tap and hold an app then tap Pin it to add to the list of apps in Omlet Chat Tap to edit and send a photo Tap to create a sticker from a saved picture Tap to search GIF files in the Internet and send the GIF file to your message thread S...

Страница 67: ...Chapter Access your emails 5 Access your emails ...

Страница 68: ...g up an email account To set up an email account 1 From the Home screen tap Email to launch the Email app 2 Tap the mail provider you want to setup 3 Key in your email address and password and tap Next NOTE Wait while your device automatically checks your incoming and outgoing mail server settings 4 Configure the Account settings such as inbox checking frequency sync days or notification for incom...

Страница 69: ...mail app 2 Tap Settings then add an email account 3 Tap the mail provider you want to setup 4 Follow the succeeding instructions to complete setting up your new email account NOTE You may also refer to steps 3 to 5 in the Setting up an email account section of this manual to complete this setup process ...

Страница 70: ...ve and browse emails right from your device Setting up a Gmail account 1 Tap Google then tap Gmail 2 Tap Existing and key in your existing Gmail account and password then tap NOTES Tap New if you do not own a Google account When signing in you have to wait while your device communicates with Google servers to setup your account ...

Страница 71: ...count to backup and restore your settings and data Tap right arrow icon to sign in to your Gmail account IMPORTANT If you have several email accounts aside from Gmail use Email app to set up and access all your email accounts ...

Страница 72: ...72 ...

Страница 73: ...Chapter Capture moments 6 Capture moments ...

Страница 74: ...ock screen swipe to the left to launch the Camera widget that automatically opens the Camera app From the home screen Tap Camera From the All Apps screen Tap then tap Camera Using the volume key While your Fonepad is on sleep mode double click the volume key to wake it up and immediately launch the Camera app NOTE Before using the volume key to launch the Camera app enable this function from Setti...

Страница 75: ...ic tutorial about using Camera 2 After tapping either of these options you will then proceed to the Remember Photo Locations screen Photo Locations After going through the Tutorial screen the Remember Photo Locations screen appears to help you create automatic location tags for your images Refer to the following steps to proceed from this screen 1 On the Remember Photo Locations screen tap No than...

Страница 76: ...your camera and explore the image and video features of your Fonepad Use advanced camera settings Switch between the front and rear cameras See the gallery Zoom in or zoom out Record videos Take photos Use Turbo Burst Adjust settings Apply image effects ...

Страница 77: ...mages by configuring your camera s settings using the steps below IMPORTANT Apply the settings first before taking images 1 On the camera s home screen tap 2 Scroll down and configure the available options Image Configure the image quality using these options ...

Страница 78: ...78 Shoot mode Set your shutter speed to Timer mode or change the Burst speed under this option Exposure Enable Touch auto exposure or Face detection under this option ...

Страница 79: ...amera s settings using the steps below IMPORTANT Apply the settings first before taking images 1 On the camera s home screen tap 2 Scroll down and configure the available options Image Configure the video quality using these options Exposure Enable Touch auto exposure under this option ...

Страница 80: ... you get a timeline of images where you can choose the best image to save on your Gallery NOTE The Time Rewind feature can only be used on the rear camera CapturingTime Rewind photos 1 From the Camera app s home screen tap 2 Tap Time Rewind 3 Tap or the volume key to start capturing photos Using theTime Rewind viewer 1 After pressing the shutter the Time Rewind viewer appears onscreen on top of a ...

Страница 81: ...ap or the volume key to start capturing HDR photos Panorama Capture images from various angles using Panorama Images captured from a wide angle perspective are automatically stitched together using this feature Capturing panoramic photos 1 From the Camera app s home screen tap 2 Tap Panorama 3 Tap or the volume key then pan your Fonepad to the left or right to capture the scenery NOTE While pannin...

Страница 82: ...ing the Night feature of your Fonepad NOTE Keep your hands steady while before and while the Fonepad is capturing the image to prevent blurry results Capturing Night photos 1 From the Camera app s home screen tap 2 Tap Night 3 Tap or the volume key to start capturing Night photos ...

Страница 83: ...p selfie Capturing Selfie photos 1 From the Camera app screen tap 2 Tap Selfie 3 Tap to choose how many people should be included in the photo 4 Use the rear camera to detect faces and wait for your Fonepad to start beeping counting down until it captures the photo 5 The Time Rewind viewer appears onscreen on top of a captured photo Rotate the button on the viewer to browse through the photos you ...

Страница 84: ...ect adding a bokeh effect that can be used on both photos and video using your Fonepad Capturing Miniature photos 1 From the Camera app screen tap 2 Tap Miniature 3 Tap or to select your focus area then use your two fingers to adjust the focus area s size and position 4 Tap or to increase or decrease the background blur 5 Tap to capture Miniature photos ...

Страница 85: ...om it 5 Tap to remove the detected objects or to delete the photo and go back to the Camera app All Smiles Capture the perfect smile or the wackiest facial expression from a range of photos using the All Smiles feature This feature lets you take five consecutive photos after pressing the shutter button automatically detecting faces on the image for comparison Capturing All smiles photos 1 From the...

Страница 86: ...ton Capturing Beautification photos 1 From the Camera app s home screen tap 2 Tap Beautification 3 Tap to start capturing photos that can be edited using Beautification features GIF animation Create GIF Graphics Interchange Format images straight from your Fonepad s camera using the GIF animation feature Capturing GIF animation photos 1 From the Camera app s home screen tap 2 Tap GIF 3 Tap to star...

Страница 87: ...lls for automatic time lapse playback In effect events seem to move in a fast forward manner though they actually occured and were recorded between long intervals RecordingTime lapse videos 1 From the Camera app s home screen tap 2 Tap Time lapse 3 Tap to start taking Time lapse videos ...

Страница 88: ...ing group Send and receive freshly captured images among friends even without internet connection using this Zen feature IMPORTANT This feature is only available with devices that also have Party Link Sharing photos To share photos captured straight from your Fonepad s camera 1 Launch Camera then tap 2 Tap OK ...

Страница 89: ...p to start sharing photos captured from your Fonepad IMPORTANT If you created a password protected group you need to share the password to intended recipients for them to receive your photos Tap this to create a new group name for your Fonepad Tap this if you want to password protect access to your group ...

Страница 90: ...es 1 Launch Camera then tap 2 Tap OK 3 Tap Join a group Scan to start searching for other Party Link enabled devices 4 From the list tap the group you would like to join then tap Join 5 optional If you the group is password protected ask the owner for the password to proceed ...

Страница 91: ...Chapter Gallery 7 Gallery ...

Страница 92: ...epad using the Gallery app This app also allows you to edit share or delete image and video files stored in your Fonepad From Gallery you can display images in a slideshow or tap to view the selected image or video file To launch Gallery tap Gallery Main screen ...

Страница 93: ...according to their album folders To view files from other locations accessible via your Fonepad 1 From the main screen tap 2 Tap any of the following source locations to view their respective files IMPORTANT Internet connection is required for viewing photos and videos under My cloud photos and Friends photos ...

Страница 94: ...nt to share A check mark appears on top of the image you select 4 Tap then select from the list where you want to share the images Deleting files from the gallery To delete files from the gallery 1 From the Gallery screen tap the folder where the files you want to delete are located 2 After opening the folder tap to activate file selection 3 Tap the files you want to delete A check mark appears on...

Страница 95: ...the folder tap the image you want to edit 3 Once the image is opened tap it again to show its functions 4 Tap to open the image editing toolbar 5 Tap any of the icons on the editing toolbar to apply changes to the image Zooming in out the thumbnails or an image From the Gallery screen or your selected image spread apart your fingers on the touchscreen panel to zoom out To zoom in bring your finger...

Страница 96: ...96 ...

Страница 97: ...Chapter Work hard play harder 8 Work hard play harder ...

Страница 98: ...ate notes organized per notebook by directly writing or drawing on the touchscreen While creating notes you can also add multimedia files from other apps and share them via social networks or your Cloud storage account Tap to select the input mode Tap to configure the settings for the notebook Tap to redo the change made Tap to undo the change made ...

Страница 99: ... write your notes Select this draw mode when you want to create drawings or doodles When in write or type mode tap this icon to select text weight and color When in draw mode tap this icon to select the drawing tool to use and the stroke color or size When in draw mode tap this icon to erase some contents in your notes Tap this icon to take a photo or video record audio add timestamp and more to y...

Страница 100: ...ook you would like to share 2 In the pop up screen tap Enable cloud sync 3 Input your ASUS WebStorage account s User name and Password details to proceed with syncing your notebook to the Cloud 4 Once the notebook has been successfully synced to the Cloud the Cloud icon appears on top of the shared notebook Sharing a note Aside from your notebook you may also share individual notes from your Super...

Страница 101: ...ng your selected note Calendar The Calendar app enables you to keep track of important events using your Fonepad Along with creating events you may also add notes set reminders or create a countdown notice to ensure you don t forget these important occasions Creating an event from your Fonepad 1 Tap Calendar 2 Tap New Event to start creating a new event 3 In the New event screen input all the nece...

Страница 102: ... adding online accounts that you would like to sync with Calendar you may now use your Fonepad to create notifications for those online accounts by following these steps NOTE Your online account must already be added to Calendar before you can proceed with the following steps You may refer to the Adding an account to Calendar section in this e manual for more details 1 Tap Calendar 2 Tap New Event...

Страница 103: ...s from the Lock screen Systems Notification panel and What s Next widget or app If you re using What s Next for the first time you would have to set up your calendar account or use the Calendar app in your Fonepad NOTES Set up your favorite contacts and VIP groups to receive alerts for missed calls and unread messages or emails from people who matter to you Get details on creating your calendar of...

Страница 104: ...opular third party apps that support Do It Later include Google Maps Google Chrome Google Play YouTube and iMDb Not all apps can share and add tasks to Do It Later Accessing or creating to do tasks When you ve previously set a message or email as Reply Later or a call as Call Later or a web page as Read Later you can go back to these important message email call web page on the Do It Later app To ...

Страница 105: ...105 Weather Get real time weather updates straight from your Fonepad using the weather app Using Weather you can also check other weather details from around the world Weather app launcher ...

Страница 106: ...106 Weather home screen Swipe down to see other weather information Tap this to configure the Weather settings Tap this to search for weather information from other cities ...

Страница 107: ...ttings of your Fonepad set alarms and use your Fonepad as a stop watch using the Clock app Launching Clock Launch the Clock app using either of the following options From your Fonepad s home screen tap the digital clock display Tap Clock ...

Страница 108: ...ock settings of your Fonepad Tap this to set your clock on night mode and access the settings of the world clock feature Tap this to view the list of cities marked on your world clock Tap this to add a new city to mark on your world clock s map ...

Страница 109: ...arm clock Tap to access the world clock settings of your Fonepad Tap this to access the settings of the alarm clock feature Tap this to delete any of the previously set alarms Tap this to set a new alarm time ...

Страница 110: ...110 Stopwatch Tap to use your Fonepad as a stopwatch Tap this button to start running the stopwatch feature ...

Страница 111: ...timer options for your Fonepad To do this follow the steps below Setting the timer 1 Tap to access the timer feature of your Fonepad 2 Use the numeric keypad to input your target time then tap start to start the timer numeric keypad ...

Страница 112: ... options refer to the following steps 1 Tap to access the timer feature of your Fonepad 2 If you previously created a timer setting these would appear on your Timer home screen You may delete or add new timer settings using the icons on your Timer home screen Tap this to delete the previously set timer Tap this to create a new timer setting ...

Страница 113: ... manage your data on the internal storage of your Fonepad and its connected external storage devices Accessing the internal storage To access the internal storage 1 Tap File Manager 2 Tap Internal storage to view the contents of your Fonepad then tap an item to select ...

Страница 114: ...To access the external storage device 1 Insert the microSD card into your Fonepad NOTE For more details refer to the Installing a memory card section in this user guide 2 Tap File Manager 3 Tap MicroSD to view the contents of your microSD card ...

Страница 115: ...loud Storage IMPORTANT Enable Wi Fi on your Fonepad to view files from Cloud Storage To access files saved on your cloud storage accounts 1 Tap File Manager 2 Tap then tap a cloud storage location under Cloud Storage ...

Страница 116: ...116 ...

Страница 117: ...Chapter The Internet 9 The Internet ...

Страница 118: ...ng a page Go to page that you want to share then tap Tap share a page tap Share page then select the account or app where you want to share the page to To send a page for later reading tap Read later The page is added a to do task in your Do It Later app NOTES Ensure that your Fonepad is connected to a Wi Fi or mobile network If you connect to a mobile network charges may apply based on your netwo...

Страница 119: ...Chapter Fun and entertainment 10 Fun and entertainment ...

Страница 120: ... objects into the audio jack port Do not insert a cable with electric power output into the audio jack port Listening at a high volume for long periods can damage your hearing NOTES We highly recommend to use only compatible headsets or the bundled headset with this device Unplugging the audio jack while listening to music automatically pauses the music played Unplugging the audio jack while watch...

Страница 121: ...e the sound modes of your Fonepad for a clearer audio output that fits actual usage scenarios Using AudioWizard To use AudioWizard 1 Tap ASUS AudioWizard 2 In the AudioWizard window tap the sound mode you want to activate then tap Done to save and exit ...

Страница 122: ...o use Tap to see an overview of your gaming activity It also shows the gaming activity of your Google contacts Tap to show your gaming activities under the following options ALL MY GAMES MOST RECENTLY PLAYED INSTALLED Tap to see all the games you played using your Google account Tap to view all your fellow contacts in Google who are also playing games via Play Store You may view them under these o...

Страница 123: ...l the songs saved in your Fonepad s internal storage system Start playing songs by tapping on them Playing songs from your SD card To play songs saved from your SD card 1 Ensure that your SD card is already inserted in your Fonepad NOTE For details on how to install the SD card refer to the Insert micro SD card section in this e Manual 2 From the Music home screen tap 3 Under My Device tap Music t...

Страница 124: ... play songs saved from any of these cloud storage accounts 1 From the Music home screen tap 2 Under Cloud Music select Add cloud service 3 Select the cloud storage service where you want to play music files from 4 Follow the succeeding instructions to complete signing in to your cloud storage account Playing songs from a cloud storage account 1 Launch the Music app then tap 2 Under Cloud Music sel...

Страница 125: ...abling the Sound Recorder app Launching Sound Recorder To launch Sound Record tap Sound Recorder Sound Recorder home screen Tap this to start audio recording Tap this to customize the Sound Recorder settings Tap this to view the list of saved audio recording files ...

Страница 126: ...126 ...

Страница 127: ...Chapter Maintain your Zen 11 Maintain your Zen ...

Страница 128: ... About 3 Tap System update then tap Check Update NOTE You can preview the last time your Fonepad s system was updated at the Last update check of the System update window Storage You can store data apps or files on your Fonepad internal storage on an external storage or on an online storage You need an internet connection to transfer or download your files on an online storage Use the bundled USB ...

Страница 129: ...window you can Backup my data This feature backs up your data Wif Fi passwords and other settings to Google servers when enabled Backup account Allows you to specify the acount you to be associated when you save your backup Automatic Restore This features facilitates restoration of backed up settings and data when you renintall an app Factory data reset Erases all data on phone ...

Страница 130: ... can open it with the security unlocking options that the Fonepad offers you To select the screen unlock of your Fonepad 1 Tap then tap Settings Lock Screen 2 Tap Screen lock then select an option to unlock your Fonepad NOTES Refer to section Unlock screen options for more information To deactivate the unlock screen option that you set tap None on Choose screen lock screen ...

Страница 131: ...131 Unlock screen options Choose from these options to lock your Fonepad Slide Slide your finger to any direction to unlock your Fonepad ...

Страница 132: ...132 Pattern Slide your finger on the dots and create a pattern IMPORTANT You can create a pattern with a minimum of four dots Ensure to remember the pattern that you created to unlock your device ...

Страница 133: ...133 PIN Key in at least four numbers to set a PIN IMPORTANT Ensure to remember the PIN that you created to unlock your device ...

Страница 134: ...134 Password Key in at least four characters to create a password IMPORTANT Ensure to remember the password that you created to unlock your device ...

Страница 135: ...e Screen security window Quick Access Slide the Quick Access switch to ON to launch apps on the lock screen What s Next widget Slide the What s Next Widget switch to ON to show the said widget on the lock screen Owner info Tap this to edit and key in the information that you want to appear even when your screen is locked ...

Страница 136: ...nd provide the information to blacklist the unauthorized use of your Fonepad To display your Fonepad s identity 1 Tap All Apps then tap Settings 2 On the Settings screen slide down to display other items then tap About The About screen displays the status legal information model number operating system version hardware and software information of your Fonepad 3 To see the serial number SIM contact...

Страница 137: ...Chapter Connect your Zen 12 Connect your Zen ...

Страница 138: ...OTE You can also enable the Wi Fi from Quick Settings screen Refer to section Quick Settings on how to launch Quick Settings screen Connecting to aWi Fi network To connect to a Wi Fi network 1 On the Settings screen tap Wi Fi to display all detected Wi Fi networks 2 Tap a network name to connect to it For a secured network you may be prompted to key in a password or other security credentials NOTE...

Страница 139: ...ceive files and stream multimedia files with other smart devices over short distances With Bluetooth you can share your media files with your friends smart devices send data for print with a Bluetooh printer or play music files with a Bluetooth speaker Enabling Bluetooth To enable Bluetooth 1 Tap on the Home screen then tap Settings app 2 Slide the Bluetooth switch to the right to turn on the Blue...

Страница 140: ... is discoverable See the user guide that came with your device to learn how to enable its Bluetooth and and set it to discoverable 2 Tap SEARCH FOR DEVICES to scan for more Bluetooth devices 3 In the list of available devices tap the Bluetooth device that you want to pair with Follow the succeeding instructions to complete the pairing NOTE Turn off Bluetooth feature to help save battery power Unpa...

Страница 141: ...tap Miracast 4 Slide the Wireless display Miracast option to ON 5 Refer to the SSID shown on your Miracast supported display and select the same SSID on your Fonepad to start pairing 6 Once the connection is made your Miracast supported display shows the same content currently shown on your Fonepad From Settings 1 Tap Settings 2 Under Device select Wireless display Miracast 3 Set the Wireless disp...

Страница 142: ...s via a Wi Fi connection With this app you can send or receive files that are larger than 100 MB and lets you share or receive multiple files at the same time Share Link app sends and receives files faster than using Bluetooth Sharing files To share files 1 From your Home screen tap then tap Share Link 2 Tap Send file then select from the options that appear on your screen ...

Страница 143: ... tap Done 4 After your Fonepad detects the other devices tap the device that you want to share your files with Receiving files To receive files 1 From your Home screen tap then tap Share Link 2 Tap Receive file to receive the files from the sender ...

Страница 144: ...ropbox ASUSWebStorage Register for or sign in to ASUS WebStorage and get up to 5GB of free cloud storage account Automatically upload newly captured photos for instant sharing sync files among different devices or share files via your ASUS WebStorage account NOTE To the enjoy auto upload function enable Instant Upload from Settings Instant Upload in your ASUS WebStorage ...

Страница 145: ...Chapter App essentials 13 App essentials ...

Страница 146: ...e an app simply swipe it to the left or right Locking apps Secure your apps from unauthorized use with a 4 12 digit password To lock your apps 1 From All Apps tap Lock 3 Enter a password containing 4 12 digits then tap OK To change the password of your locked apps 1 From All Apps tap Lock app settings Enter your password when prompted 2 Tap Change password and enter your old and new password ...

Страница 147: ...rs you may need to purchase using a credit card or other payment form To download apps 1 Tap Play Store from your Home screen 2 Follow the onscreen instructions to sign in to your existing Gmail account If you don t have a Gmail account please create one 3 After successfully signing in you can start downloading an app from Play Store ...

Страница 148: ...148 ...

Страница 149: ...Chapter There s more to your Zen 14 There s more to your Zen ...

Страница 150: ... your network Smartly customize the power settings for your frequent activities such as reading emails or watching videos Setting up Power Saver Maximize optimize or customize the power of your Fonepad with some smart power saving options To set up Power Saver 1 From All Apps tap Power Saver 2 Slide Smart saving to ON ...

Страница 151: ...s reading emails or books watching videos browsing websites and listening to music You can also enable the power saving function for some apps or enable the auto disconnection of your network when your Fonepad is asleep To customize Power Saver 1 From Power Saver tick Customized mode then tap 2 Tick an activity then set the brightness level in percentage 3 If you want to enable the auto disconnect...

Страница 152: ...US Splendid 2 Adjust the screen color temperature and contrast through the Temperature and Enhancement tabs 3 Tap Done to apply the changes Tap to switch between tabs Move to turn on off the Vivid Mode Move to adjust the color temperature Tap to set to factory defaults Tap to reset to the last changes you made ...

Страница 153: ...Appendix Appendix ...

Страница 154: ... of Hearing Loss To prevent possible hearing damage do not listen at high volume levels for long periods For France headphones earMrs for this device are compliant with the sound pressure level requirement laid down in the applicable EN50332 1 2000 and or EN50332 2 2003 standard required by French Article L 5232 1 À pleine puissance l écoute prolongée du baladeur peut endommager l oreille de l uti...

Страница 155: ... 5 EC of the European Parliament and Commission from 9 March 1999 governing Radio and Telecommunications Equipment and mutual recognition of conformity The highest CE SAR value for the device is 0 528 W Kg This equipment may be operated in AT BE BG CH CY CZ DE DK EE ES FI FR GB GR HU IE IT IS LI LT LU LV MT NL NO PL PT RO SE SI SK TR ...

Страница 156: ...is radar could cause interference and or damage to LE LAN devices RF Exposure information SAR CE This device meets the EU requirements 1999 519 EC on the limitation of exposure of the general public to electromagnetic fields by way of health protection The limits are part of extensive recommendations for the protection of the general public These recommendations have been developed and checked by ...

Страница 157: ...nment We believe in providing solutions for you to be able to responsibly recycle our products batteries other components as well as the packaging materials Please go to http csr asus com english Takeback htm for detailed recycling information in different regions Coating notice IMPORTANT To provide electrical insulation and maintain electrical safety a coating is applied to insulate the device ex...

Страница 158: ...facturer ASUSTeK Computer Inc Address 4F No 150 LI TE RD PEITOU TAIPEI 112 TAIWAN Authorised represe ntative in Europe ASUS Computer GmbH Address HARKORT STR 21 23 40880 RATINGEN GERMANY Model name K012 FE170CG ...

Страница 159: ...ULD NOT BE CONSTRUED AS A COMMITMENT BY ASUS ASUS ASSUMES NO RESPONSIBILITY OR LIABILITY FOR ANY ERRORS OR INACCURACIES THAT MAY APPEAR IN THIS MANUAL INCLUDING THE PRODUCTS AND SOFTWARE DESCRIBED IN IT Copyright 2015 ASUSTeK COMPUTER INC All Rights Reserved LIMITATION OF LIABILITY Circumstances may arise where because of a default on ASUS part or other liability you are entitled to recover damage...

Страница 160: ...0 EN 300 440 1 V1 6 1 2010 08 EN 300 440 2 V1 4 1 2010 08 EN 301 511 V9 0 2 2003 03 EN 301 908 1 V6 2 1 2013 04 EN 301 908 2 V5 4 1 2012 12 EN 301 893 V1 6 1 2011 11 EN 50360 2001A1 2012 EN 50566 2013 EN 62209 1 2006 EN 62209 2 2010 EN 62479 2010 EN 301 489 1 V1 9 2 2011 09 EN 301 489 3 V1 6 1 2013 08 EN 301 489 7 V1 3 1 2005 11 EN 301 489 17 V2 2 1 2012 09 EN 301 489 24 V1 5 1 2010 10 EN 302 291 ...

Отзывы: