


2-7
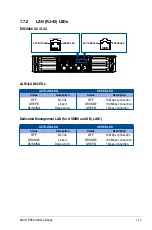
ASUS ESC4000 G4 Series
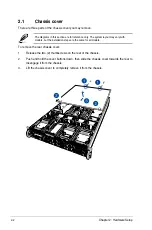
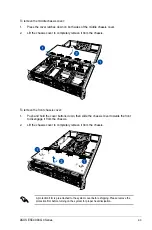
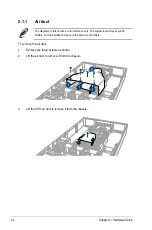
2
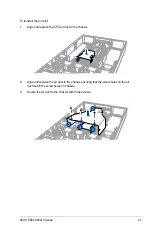
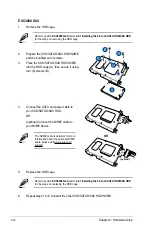
4.
Align the triangle mark on the CPU with
the triangle mark on the CPU Carrier
(A), install the CPU into the CPU Carrier
until it clicks firmly into place (B), and
then install the CPU Carrier into the
heatsink until it clicks firmly in place (C).
Ensure that the triangle mark on the
CPU matches the triangle mark on
the CPU Carrier.
CPU Carrier
CPU
Triangle mark
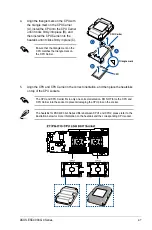
5.
Align the CPU and CPU Carrier in the correct orientation, and then place the heatsinks
on top of the CPU sockets.
The CPU and CPU Carrier fits in only one correct orientation. DO NOT force the CPU and
CPU Carrier into the socket to prevent damaging the CPU pins on the socket.
The heatsink for ESC4000 G4 Series differs between CPU1 and CPU2, please refer to the
illustration below for more information on the heatsink and the corresponding CPU socket.
Содержание ESC4000 G4
Страница 1: ...2U Rackmount Server ESC4000 G4 Series User Guide ...
Страница 12: ...xii ...
Страница 68: ...Chapter 2 Hardware Setup 2 40 ...
Страница 74: ...4 2 Chapter 4 Motherboard Information 4 1 Z11PG D16 Motherboard layout ...
Страница 154: ...6 18 Chapter 6 RAID Configuration ...
Страница 172: ...7 18 Chapter 7 Driver Installation ...
Страница 174: ...A 2 Appendix Z11PG D16 block diagram ...
Страница 178: ...A 6 Appendix ...


