background image

EeeBox PC 137

Fr

ançais

Configurer une connexion filaire

Pour établir une connexion réseau filaire, suivez les instructions 
suivantes :

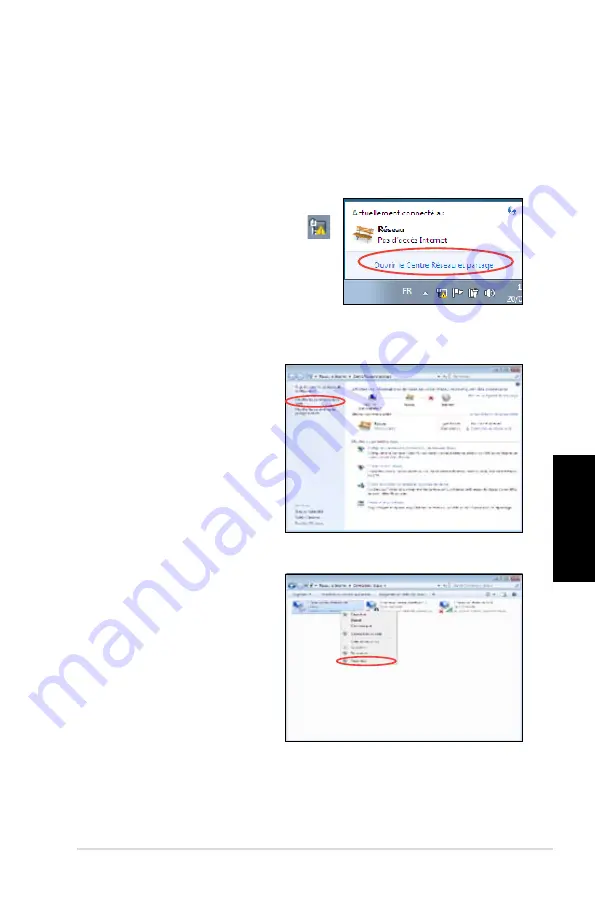
Utiliser une connexion à IP dynamique ou PPPoE :

1.  Cliquez sur l’icône réseau avec un 

triangle d’avertissement jaune 


de la zone de notification de  
Windows® et sélectionnez 

Ouvrir 

le Centre Réseau et partage

.

2.  Cliquez sur l’option 

Modifier les paramètres 
de la carte 

située sur la 

gauche.

3.  Faites un clic droit sur 

Connexion au réseau 
local

 et sélectionnez 

Propriétés.

Содержание EeeBox EB1007

Страница 1: ...English EeeBox PC User Manual ...

Страница 2: ...English Index 1 English 1 2 Deutsch 38 3 Français 74 4 Italiano 110 5 Nederlands 148 ...

Страница 3: ...n permission of ASUSTeK COMPUTER INC ASUS Products and corporate names mentioned in this manual may or may not be registered trademarks or copyrights of their respective companies and are used for identification purposes only All trademarks are the property of their respective owners Every effort has been made to ensure that the contents of this manual are correct and up to date However the manufa...

Страница 4: ...r optional 21 Setting up your EeeBox PC 22 Connecting to a display 22 Connecting to USB devices 22 Connecting to a network device 23 Turning on the system 24 Using your EeeBox PC 25 Configuring wireless connection 25 Configuring wired connection 26 ASUS Easy Update 30 Recovering your system 31 Using the Recovery Partition 31 Recovering the OS to the Factory Default Partition F9 Recovery 31 Backing...

Страница 5: ...talled and used in accordance with manufacturer s instructions may cause harmful interference to radio communications However there is no guarantee that interference will not occur in a particular installation If this equipment does cause harmful interference to radio or television reception which can be determined by turning the equipment off and on the user is encouraged to try to correct the in...

Страница 6: ...ccording to EN 301 489 1 EN 301 489 17 Effective use of the radio spectrum as in Article 3 2 Radio test suites according to EN 300 328 2 RF exposure warning This equipment must be installed and operated in accordance with provided instructions and the antenna s used for this transmitter must be installed to provide a separation distance of at least 20 cm from all persons and must not be co located...

Страница 7: ...ive CE marking for devices with wireless LAN Bluetooth This equipment complies with the requirements of Directive 1999 5 EC of the European Parliament and Commission from 9 March 1999 governing Radio and Telecommunications Equipment and mutual recognition of conformity Wireless Operation Channel for Different Domains N America 2 412 2 462 GHz Ch01 through CH11 Japan 2 412 2 484 GHz Ch01 through Ch...

Страница 8: ...483 5 MHz band Use outdoors on public property is not permitted In the departments listed below for the entire 2 4 GHz band Maximum authorized power indoors is 100mW Maximum authorized power outdoors is 10mW Departments in which the use of the 2400 2483 5 MHz band is permitted with an EIRP of less than 100mW indoors and less than 10mW outdoors 01 Ain 02 Aisne 03 Allier 05 Hautes Alpes 08 Ardennes ...

Страница 9: ...atement for Canada This equipment complies with IC radiation exposure limits set forth for an uncontrolled environment To maintain compliance with IC RF exposure compliance requirements please avoid direct contact to the transmitting antenna during transmitting End users must follow the specific operating instructions for satisfying RF exposure compliance Operation is subject to the following two ...

Страница 10: ...e plenty of space around the system for ventilation Never insert objects of any kind into the ventilation openings Use this product in environments with ambient temperatures between 0 C and 35 C If you use an extension cord make sure that the total ampere rating of the devices plugged into the extension cord does not exceed its ampere rating Care during use Do not walk on the power cord or allow a...

Страница 11: ...hould not be placed in municipal waste Check local technical support services for product recycling NO DISASSEMBLY The warranty does not apply to the products that have been disassembled by users DO NOT throw the battery in municipal waste This symbol of the crossed out wheeled bin indicates that the battery should not be placed in municipal waste Check local technical support services for battery...

Страница 12: ... new products And the environment is protected from any uncontrolled release of harmful chemicals ASUS works with recycling vendors with the highest standards for protecting our environment ensuring worker safety and complying with global environmental laws Our commitment to recycling our old equipment grows out of our work to protect the environment in many ways For further information about ASUS...

Страница 13: ... of the following symbols used throughout this manual WARNING Vital information that you MUST follow to prevent injury to yourself IMPORTANT Instructions that you MUST follow to complete a task TIP Tips and useful information that help you complete a task NOTE Additional information for special situations ...

Страница 14: ...ontact your retailer Package contents EeeBox PC Stand optional VESA mount and Screw pack optional Mini jack to S PDIF adapter optional AC adapter Power cord Quick Start Guide Warranty card Quick start guide If the device or its components fail or malfunction during normal and proper use within the warranty period bring the warranty card to the ASUS Service Center for replacement of the defective c...

Страница 15: ...to the diagram below to identify the components on this side of the system 1 2 Hard disk LED The hard disk LED blinks when data is being written into or read from the hard disk drive Power switch The power switch allows powering ON and OFF the system 3 2 1 6 5 4 ...

Страница 16: ... devices cameras and hard disk drives USB allows many devices to run simultaneously on a single computer with some peripheral acting as additional plug in sites or hubs Headphone Audio Out jack The stereo headphone jack 3 5mm is used to connect the system s audio out signal to amplified speakers or headphones Microphone jack The microphone jack is designed to connect the microphone used for video ...

Страница 17: ... Rear view Refer to the diagram below to identify the components on this side of the system 1 Wireless antenna jack The jack is used to connect the supplied wireless antenna to enhance wireless signal reception 5 6 1 2 3 4 ...

Страница 18: ...tandard VGA compatible device such as a monitor or projector to allow viewing on a larger external display Audio Out S PDIF Out jack Plug an 3 5mm mini jack audio cable into this jack for analog or digital audio transfer For S PDIF Out function use the optional mini jack to S PDIF adapter to connect to your amplifier 3 4 5 6 Power input DC 19V The supplied power adapter converts AC power to DC pow...

Страница 19: ...ide the computer It is up to six times faster than existing USB 2 0 1394 for external storage solutions and is also hot pluggable using shielded cables and connectors up to two meters USB port The USB Universal Serial Bus port is compatible with USB devices such as keyboards mouse devices cameras and hard disk drives USB allows many devices to run simultaneously on a single computer with some peri...

Страница 20: ...x PC English Using the wireless antenna The wireless antenna is connected to your EeeBox PC for enhancing wireless signal reception Do not rotate the wireless antenna to the 180 270 angle for preventing damage ...

Страница 21: ...he stand optional Erect your EeeBox PC with the optional stand To do so 1 Locate the screw hole on the bottom of the EeeBox PC 2 Align the stand screw to the PC screw hole and then secure the stand to the PC with a coin 1 Screw hole EeeBox PC bottom view 2 Stand screw ...

Страница 22: ...a monitor To do so 1 Secure the optional VESA mount to your monitor with four screws HNM M4 x 8 To fasten the VESA mount your monitor must comply with VESA75 or VESA100 standard 2 Place your EeeBox PC on the VESA mount noting the correct alignment and then secure the PC to the VESA mount with a coin EeeBox PC bottom view ...

Страница 23: ...a display Connect one end of the VGA cable to an LCD monitor 1 and the other end to the Display Monitor Output port on the system rear panel 2 1 2 Connecting to USB devices Connect USB devices like wired wireless keyboards varying with areas mouse devices and printers to the USB ports on the system rear panel LCD monitor ...

Страница 24: ...PC English Connecting to a network device Connect one end of a network cable to the LAN port on the system rear panel and the other end to a hub or switch Network cable with RJ 45 connectors Network hub or switch ...

Страница 25: ...on the system 2 4 1 3 When your EeeBox PC is not in use unplug the power adapter or switch off the AC outlet to save on power consumption Adjust the power management settings in the Window Control Panel This is to ensure that your EeeBox PC is set to a low power consumption mode and is fully operational at the same time To enter the BIOS setup press F2 repeatedly during bootup ...

Страница 26: ...mitted information without encryption might be visible to others 1 Click the wireless network icon with an orange star in the Windows Notification area 3 When connecting you may have to enter a password 4 After a connection has been established the connection is shown on the list 5 You can see the wireless network icon in the Notification area 2 Select the wireless access point you want to connect...

Страница 27: ...tions below Using a dynamic IP PPPoE network connection 1 Click the network icon with a yellow warning triangle in the Windows Notification area and select Open Network and Sharing Center 2 Click Change adapter settings in the left blue pane 3 Right click Local Area Connection and select Properties ...

Страница 28: ...rotocol Version 4 TCP IPv4 and click Properties 5 Click Obtain an IP address automatically and click OK 6 Return to the Network and Sharing Center and then click Set up a new connection or network Continue the following steps if using PPPoE ...

Страница 29: ...PoE and click Next 9 Enter your User name and Password and Connection name Click Connect 10 Click Close to finish the configuration 11 Click the network icon in the taskbar and click the connection you just created 12 Enter your user name and password Click Connect to connect to the Internet ...

Страница 30: ...static IP network configuration 2 Click Use the following IP address 3 Enter the IP address Subnet mask and Gateway from your service provider 4 If needed enter the preferred DNS Server address and alternative address 5 After entering all the related values click OK to build the network connection ...

Страница 31: ... drivers and applications for your EeeBox PC 2 Select Schedule to set how often you want to update your system 3 Select Update to activate the update 1 From the Windows notification area right click the ASUS Easy Update icon 4 Click OK to display the items you can download 5 Check the item s you want to download and then click OK ...

Страница 32: ...very You will lose all your data on the selected partition Ensure to back up your important data beforehand 8 When the recovery is completed successfully click Reboot to restart the system Backing up the Factory Default Environment Data to a USB Drive F9 Backup 1 Repeat the step 1 4 in the previous section 2 Select Backup the Factory Environment to a USB Drive and click Next 3 Connect a USB storag...

Страница 33: ...e USB storage device USB Restore When the Recovery Partition in your system is crashed use the USB storage device to restore the system to the factory default partition or the factory environment data to the entire hard disk 1 Disable Boot Booster in BIOS setup 2 Connect the USB storage device that you back up the factory environment data to 3 Press ESC for EeeTop PC or F8 for EeeBox PC on bootup ...

Страница 34: ...y default state This option deletes all data from your hard disk and creates a new system partition as drive C an empty partition as drive D and a Recovery Partition 7 Data on the factory default partition or on the whole hard disk will be cleared depending on the option you selected in the previous step Click Restore to start the task 8 When the restore is completed successfully click Reboot to r...

Страница 35: ...EeeBox PC 35 English ...

Страница 36: ...40 1 V1 4 1 2008 05 EN 300 440 2 V1 2 1 2008 03 EN 301 511 V9 0 2 2003 03 EN 301 908 1 V3 2 1 2007 05 EN 301 908 2 V3 2 1 2007 05 EN 301 893 V1 4 1 2005 03 EN 50360 2001 EN 50371 2002 EN 62311 2008 EN 50385 2002 EN 301 489 1 V1 8 1 2008 04 EN 301 489 3 V1 4 1 2002 08 EN 301 489 4 V1 3 1 2002 08 EN 301 489 7 V1 3 1 2005 11 EN 301 489 9 V1 4 1 2007 11 EN 301 489 17 V1 3 2 2008 04 EN 301 489 24 V1 4 ...

Страница 37: ...800 Corporate Way Fremont CA 94539 USA Telephone 1 510 739 3777 Fax 1 510 608 4555 Web site usa asus com Technical Support Telephone 1 812 282 2787 Support fax 1 812 284 0883 Online support support asus com ASUS COMPUTER GmbH Germany and Austria Address Harkort Str 21 23 D 40880 Ratingen Germany Fax 49 2102 959911 Web site www asus de Online contact www asus de sales Technical Support Component Te...

Страница 38: ...Deutsch Deutsch Eee Box PC Benutzerhandbuch ...

Страница 39: ...re Sprache übersetzt werden In diesem Handbuch angegebene Produkt und Firmennamen können u U eingetragene Warenzeichen oder Urheberrechte der entsprechenden Firmen sein und dienen nur der Identifizierung oder Erklärung zu Gunsten des Eigentümers ohne Rechte verletzen zu wollen Es wurden keine Mühen gescheut den Inhalt dieses Handbuchs korrekt und aktuell zu gestalten Dennoch kann für die Richtigke...

Страница 40: ...ositioning your Eee Box PC 20 Ständer installieren 20 Eee Box PC an einem Bildschirm befestigen 21 Eee Box PC vorbereiten 22 Bildschirm anschließen 22 USB Geräte anschließen 22 An ein Netzwerkgerät anschließen 23 System einschalten 24 Eee Box PC benutzen 25 Wireless Verbindung konfigurieren 25 Kabelverbindung konfigurieren 26 ASUS Easy Update 30 Systemwiederherstellung 31 Verwenden der versteckten...

Страница 41: ...e und kann wenn es nicht gemäß den Anweisungen des Herstellers installiert und bedient wird den Radio und Fernsehempfang empfindlich stören Es wird jedoch nicht garantiert dass bei einer bestimmten Installation keine Interferenzen auftreten Wenn das Gerät den Radio oder Fernsehempfang empfindlich stört was sich durch Aus und Einschalten des Geräts feststellen lässt ist der Benutzer ersucht die Int...

Страница 42: ...ur elektromagnetischen Verträglichkeit entsprechend EN 301 489 1 und EN 301 Tests entsprechend 489 17 Effektive Nutzung der Funkfrequenzen Artikel 3 2 Funktests entsprechend EN 300 328 2 RF Aussetzungswarnung Dieses Gerät und die integrierte Antenne dürfen nicht näher als 20 cm an Ihrem Körper oder in der Nähe befindenden Personen installiert und betrieben werden Dieses Gerät und seine Antenne n d...

Страница 43: ...ective CE Zeichen für Geräte mit Wireless LAN Bluetooth Diese Ausrüstung erfüllt die Anforderungen der Directive 1999 5 EC of the European Parliament and Commission from 9 March 1999 governing Radio and Telecommunications Equipment and mutual recognition of conformity Wireless Kanäle für unterschiedliche Gebiete N Amerika 2 412 2 462 GHz Kanal 01 bis Kanal 11 Japan 2 412 2 484 GHz Kanal 01 bis Kan...

Страница 44: ... 2483 5 MHz Band erlaubt Die Benutzung im Freien auf öffentlichen Grundstücken ist nicht gestattet In den unten aufgeführten Gebieten gilt für das gesamte 2 4GHz Band Maximal erlaubte Leistung in Innenräumen ist 100mW Maximal erlaubte Leistung im Freien ist 10mW Gebiete in denen der Gebrauch des 2400 2483 5 MHz Bandes mit einer EIRP von weniger als 100mW in Innenräumen und weniger als 10mW im Frei...

Страница 45: ...rmehrals10mW IC Strahlenbelastungserklärung für Kanada Dieses Gerät erfüllt die IC Strahlenbelastungsgrenzen für unkontrollierte Umgebungen Um die IC Bestimmungen einzuhalten vermeiden Sie während des Betriebes direkten Kontakt mit der Sendeantenne Der Endbenutzer muss den Bedienungsanweisungen Folge leisten um die Funkfrequenzbelastungsbestimmungen zu erfüllen Der Betrieb ist abhängig von folgend...

Страница 46: ...s rund um den Computer genügend Abstand mind 15 cm zur optimalen Belüftung vorhanden ist Stecken Sie keine Gegenstände in die Luftschlitze Benutzen Sie dieses Gerät in einer Umgebung deren Temperatur zwischen 0 C und 35 C liegt Wenn Sie ein Verlängerungskabel mit mehreren Steckdosen für das Gerät verwenden vergewissern Sie sich dass die zulässige Stromstärke insgesamt nicht überschritten wird Vors...

Страница 47: ...m normalen Hausmüll entsorgt werden darf Bitte erkundigen Sie sich nach lokalen Regelungen zur Entsorgung von Batterien und Akkus LASER PRODUKTWARNUNG LASER PRODUKT DER KLASSE 1 ttthbfkjhskjhgdfkjhgsdkjhfkjsdhfgkjhs NICHT AUSEINANDERNEHMEN Die Garantie verfällt wenn das Produkt vom Benutzer auseinandergenommen wurde Werfen Sie den Eee Box PC NICHT in den normalen Hausmüll Dieses Produkt wurde entw...

Страница 48: ...ukte wider verwendet Dadurch wird die Umwelt durch die unkontrollierte Freisetzung schädlicher Chemikalien geschützt ASUS arbeitet mit Recycling Firmen zusammen die die höchsten Standards für den Schutz der Umwelt der Arbeitssicherheit und den weltweiten Umweltgesetzen erfüllen Unsere Verpflichtung zur Wiederverwertung unserer alten Komponenten entstand aus unserer Arbeit zum Schutz der Umwelt auf...

Страница 49: ...enden Symbole die in diesem Handbuch verwendet werden GEFAHR WARNUNG Informationen zum Vermeiden von Verletzungen beim Ausführen einer Aufgabe WICHTIG Anweisungen die Sie beim Ausführen einer Aufgabe befolgen müssen TIPP Tipps und nützliche Informationen zur Durchführung einer Aufgabe ANMERKUNG Tipps und nützliche Informationen für besondere Umstände ...

Страница 50: ...Händler Paketinhalt Wenn das Gerät oder seine Komponenten während normaler Benutzung innerhalb der Garantiezeit nicht funktionieren oder fehlerhaft arbeiten bringen Sie es zusammen mit der Garantiekarte zur Reparatur oder zum Austausch der Komponenten zu Ihren ASUS Kundendienst EeeBox PC Ständer optional VESA Halterung Schrauben optional Mini Buchse S PDIF Adapter optional Netzteil Netzkabel Quick...

Страница 51: ... Eee Box PC Vorderseite Die nachstehende Abbildung zeigt die Komponenten auf dieser Seite des Systems Festplatten LED Diese LED blinkt wenn Daten auf der Festplatte gelesen oder auf ihr geschrieben werden Netzschalter Dieser Schalter schaltet das System EIN und AUS ...

Страница 52: ...e Laufwerke USB macht es möglich mehrere Geräte gleichzeitig an einem Computer zu nutzen Einige Peripherigeräte können dabei als zusätzliche Steck Möglichkeiten oder Hubs genutzt werden Kopfhörer Audio Ausgang Die Stereo Kopfhörerbuchse 3 5mm dient zum Verbinden des Audioausgangssignals des Systems mit verstärkten Lautsprechern oder einem Kopfhörer Mikrofonbuchse An den Mikrofonanschluss können Si...

Страница 53: ...ss Antenne um den Signalempfang zu verbessern Netzteileingang 12V Gleichspannung Hier schließen Sie das mitgelieferte Netzteil an das Wechselspannung zum Betrieb Ihres Eee PC in Gleichspannung umwandelt Wenn das Netzteil mit diesem Anschluss verbunden wird versorgt es Ihren Eee PC mit Strom Damit es nicht zu Schäden am Eee PC kommt benutzen Sie ausschließlich das mitgelieferte Netzteil 5 6 1 2 3 4...

Страница 54: ... unterstützt ein Standard Ethernet Kabel zum Anschluss an ein lokales Netzwerk Monitorausgang An den 15 poligen D SUB Monitorausgang können Sie VGA kompatible Anzeigegeräte wie Monitore oder Projektoren anschließen Audio Ausgangsbuchse S PDIF Ausgang Stecken Sie ein 3 5mm Mini Buchsenaudiokabel an diesen Anschluss um analoges oder digitales Audio zu übertragen Verbinden Sie das mitgelieferte Mini ...

Страница 55: ...n waren Diese verbindung ist für externe Speicherlösungen bis zu 6x schneller als USB 2 0 1394 und auch Hot Plug fähig bei der Benutzung abgeschirmter bis zu 2 Meter langen Kabel und Anschlüsse USB Anschluss Der USB Universal Serial Bus Anschluss ist kompatibel mit USB Geräten wie z B Tastaturen USB Mäuse Kameras und externe Laufwerke USB macht es möglich mehrere Geräte gleichzeitig an einem Compu...

Страница 56: ...h Benutzen der Wireless Antenne Die Wireless Antenne ist mit Ihren Eee Box PC verbunden um den Empfang des Wireless Signals zu verbessern Drehen Sie die Antenne nicht in einen Winkel von 180 270 um deren Beschädigung zu vermeiden ...

Страница 57: ... Box PC mit dem mitgelieferten Ständer folgendermaßen auf 1 Suchen Sie die Schraubenlöcher auf der Unterseite des Eee Box PCs 2 Richten Sie die Ständerschrauben auf die Löcher aus und befestigen Sie dann den Ständer mit Hilfe einer Münze am PC 1 Schraubenloch Eee Box PC Unterseite 2 Ständerschraube ...

Страница 58: ...lgendermaßen vor 1 Befestigen Sie die VESA Halterung mit vier HNM M4 x 8 Schrauben Um die VESA Halterung befestigen zu können muss Ihr Bildschirm dem Standard VESA75 oder VESA100 entsprechen 2 Stellen Sie den Eee Box PC auf die VESA Halterung Achten Sie auf die korrekte Ausrichtung Befestigen Sie den PC mit Hilfe einer Münze an der VESA Halterung Eee Box PC Unterseite ...

Страница 59: ...ildschirm anschließen Verbinden Sie ein Ende des HDMI VGA Kabels mit einen LCD TV oder einen LCD Monitor 1 und das andere Ende mit dem HDMI Display Monitor Ausgang auf der Rückseite des Systems 2 USB Geräte anschließen Verbinden Sie USB Geräte wie Tastatur Maus oder Drucker mit den USB Anschlüssen auf der Rückseite des Systems LCD Monitor 1 2 ...

Страница 60: ...utsch An ein Netzwerkgerät anschließen Verbinden Sie ein Ende des Netzwerkkabels mit dem LAN Anschluss auf der Rückseite des Systems und das andere mit einem Hub oder Netzwerkkabel mit RJ 45 Anschluss Netzwerk Hub oder Switch ...

Страница 61: ...cht benutzt wird ziehen Sie bitte den Stecker des Netzteils aus der Steckdose oder schalten den Stromverteiler aus um Energie zu sparen Regeln Sie die Energiespareinstellungen in der Window Systemsteuerung Damit stellen Sie sicher dass Ihr Eee Box PC auf einen niedrigen Stromverbrauchsmodus gesetzt wurde aber trotzdem voll funktionsfähig bleibt Um zum BIOS zu gelangen drücken Sie während des Start...

Страница 62: ... einem Wireless Netzwerk zu verbinden gehen Sie folgendermaßen vor Verbinden Sie sich aus Sicherheitsgründen NICHT mit einen ungesicherten Netzwerk da sonst die Möglichkeit besteht dass durch die fehlende Verschlüsselung Ihre Daten von anderen gesehen werden 1 Klicken Sie in der Taskleiste auf das Wireless Netzwerksymbol mit den orangen Stern 3 Bei der Verbindungsherstellung müssen Sie möglicherwe...

Страница 63: ...che IP PPPoE Netzwerkverbindung benutzen 1 Klicken Sie in der Taskleiste auf das Netzwerksymbol mit den gelben Ausrufezeichen und wählen Sie Netzwrk und Freigabecenter öffnen 2 Klicken Sie in der linken blauen Spalte auf Adaptereinstellungen öffnen 3 Rechtsklicken Sie auf LAN Verbindung und wählen Sie Eigenschaften ...

Страница 64: ...d klicken Sie auf Eigenschaften 5 Wählen Sie IP Adresse automatisch beziehen und klicken Sie auf OK 6 Kehren Sie zum Netzwerk und Freigabecenter zurück und klicken Sie dann auf Neue Verbindung oder Netzwerk einrichten Fahren Sie mit den folgenden Schritten fort falls Sie PPPoE benutzen ...

Страница 65: ... Geben Sie Ihren Benutzernamen und das Passwort ein Klicken Sie auf Weiter 10 Klicken Sie auf Schließen um die Konfiguration zu beenden 11 Klicken Sie in der Taskleiste auf das netzwerksymbol und dann auf die Verbindung die Sie gerade erstellt haben 12 Geben Sie Ihren Benutzernamen und das Passwort ein Klicken Sie auf Verbinden um sich mit dem Internet zu verbinden ...

Страница 66: ...rigen Abschnittes 2 Klicken Sie auf Folgende IP Adresse verwenden 3 Geben Sie Ihre IP Adresse Subnetzmaske und Standardgateway ein 4 Wenn nötig geben Sie die Adresse für den Bevorzugten DNS Server ein 5 Nach der Eingabe aller erforderlichen Daten klicken Sie auf OK um die Verbindung zu erstellen ...

Страница 67: ...unterlädt 2 Wählen Sie Schedule um einzustellen wie oft Sie Ihr System aktualisieren wollen 3 Wählen Sie Update um die Aktualisierungsfunktion zu aktivieren 1 Rechtsklicken Sie in der Windows Taskleiste auf das Symbol ASUS Easy Update 4 Klicken Sie auf OK um die Elemente anzuzeigen die Sie herunterladen können 5 Markieren Sie die Elemente die Sie herunterladen wollen und klicken Sie dann auf OK ...

Страница 68: ...mwiederherstellung zu beginnen Alle Daten auf der gewählten Partition werden gelöscht Vergewissern Sie sich dass Sie wichtige Daten vorher gesichert haben 8 Wenn die Systemwiederherstellung abgeschlossen ist klicken Sie bitte auf Reboot um das System neu zu starten Daten der Standard Umgebung auf einen USB Datenträger sichern F9 Backup 1 Wiederholen Sie die Schritte 1 4 des vorherigen Abschnittes ...

Страница 69: ...haben 6 Wenn die Sicherung der Standard Umgebung erfolgreich beendet wurde klicken Sie bitte auf Reboot um das System neu zu starten Benutzen des USB Datenträgers USB Wiederherstellung Wenn die Wiederherstellungspartition Ihres Systems beschädigt ist könnnen Sie einen USB Datenträger benutzen um Ihr System in den Werkszustand auf der gesamten Festplatte zurück zu versetzen 1 Deaktivieren Sie im BI...

Страница 70: ...artition 7 Die Daten auf der Standard Partition oder der gesamten Festplatte werden abhängig von den vorher gewählten Schritten gelöscht Klicken Sie auf Restore um die Wiederherstellung zu beginnen 8 Wenn die Systemwiederherstellung erfolgreich beendet wurde klicken Sie bitte auf Reboot um das System neu zu starten 6 Wählen Sie eine Aufgabe und klicken Sie auf Next Optionen Restore the OS to the D...

Страница 71: ...Eee Box PC 71 Deutsch Deutsch ...

Страница 72: ...72 Eee Box PC Deutsch Deutsch ...

Страница 73: ...CA 94539 USA Telefon 1 510 739 3777 Fax 1 510 608 4555 Webseite usa asus com Technische Unterstützung Telefon 1 812 282 2787 Support Fax 1 812 284 0883 Online Support support asus com ASUS COMPUTER GmbH Deutschland Österreich Adresse Harkort Str 21 23 40880 Ratingen Deutschland Fax 49 2102 959911 Webseite www asus de Online Kontakt www asus de sales Technische Unterstützung Komponenten Telefon 49 ...

Страница 74: ...Italiano Italiano Italiano EeeBox PC Manuale Utente ...

Страница 75: ...espressa autorizzazione scritta di ASUSTeK COMPUTER INC ASUS I prodotti e nomi delle aziende che compaiono in questo manuale possono o meno essere marchi registrati o diritti d autore delle rispettive aziende e sono usati solo a scopo identificativo Tutti i marchi sono di proprietà dei rispettivi proprietari E stato compiuto ogni sforzo per assicurare la correttezza e l aggiornamento dei contenuti...

Страница 76: ...pporto disponibili se previsti nonchè le spese e gli altri termini relativi all assistenza e al supporto se previsti verranno specificati nella documentazione destinata al cliente fornita a corredo con il Prodotto E responsabilità dell utente prima ancora di richiedere l assistenza effettuare il backup dei contenuti presenti sul Prodotto inclusi i dati archiviati o il software installato nel prodo...

Страница 77: ...ottura di furto o in ogni altra situazione che lo renda inutilizzabile anche la possibilità di utilizzare il prodotto OEM viene compromessa Chiunque acquisti unitamente al prodotto un software OEM è tenuto ad osservare i termini e le condizioni del contratto di licenza tra il proprietario del software e l utente finale denominato EULA End User Licence Agreement visualizzato a video durante la fase...

Страница 78: ... 22 Montaggio di EeeBox PC su un Monitor Opzionale 23 Installazione di Eee Box PC 24 Connessione con un Display 24 Connessione con Dispositivi USB 24 Connessione con un Dispositivo di Rete 25 Accensione del Sistema 26 Utilizzo di EeeBox PC 27 Configurazione Connessione Wireless 27 Configurazione Connessione via Cavo 28 ASUS Easy Update 32 Ripristino del Sistema 33 Tramite Partizione di Ripristino ...

Страница 79: ...ò emettere energia in radiofrequenza e se non viene installato e utilizzato come indicato dal manuale d uso può provocare interferenze dannose alle comunicazioni radio Non è tuttavia possibile garantire che non si verifichino interferenze in casi particolari Se questo apparecchio causa interferenze dannose alla ricezione di programmi radiofonici e televisivi fatto verificabile spegnendo e riaccend...

Страница 80: ...301 489 1 EN 301 489 17 Utilizzo effettivo dello spettro radio come in Articolo 3 2 Testato per i test radio secondo EN 300 328 2 Avvertenza contro l esposizione a RF Questo apparecchio deve essere installato e utilizzato attenendosi alle istruzioni fornite mentre l antenna e utilizzata e per questo trasmettitore deve essere installata in modo da creare una distanza di almeno 20cm da tutte le pers...

Страница 81: ...siti previsti dalla direttiva EEC 2004 108 EC Electromagnetic compatibility Compatibilità elettromagnetica e 2006 95 EC Low voltage directive Direttiva per i Sistemi in Bassa Tensione Marchio CE per dispositivi con WLAN Bluetooth Questo apparecchio è conforme ai requisiti previsti dalla direttiva 1999 5 EC del Consiglio e del Parlamento Europeo del 9 Marzo 1999 che regolamenta le apparecchiature r...

Страница 82: ... 2483 5 MHz Non è autorizzato l utilizzo all esterno in proprietà pubbliche Nei dipartimenti elencati di seguito per l intera banda dei 2 4 GHz La potenza massima autorizzata all interno è di 100mW La potenza massima autorizzata all interno è di 10mW Nei dipartimenti in cui è permesso l utilizzo della banda dei 2400 2483 5 MHz con un EIRP inferiore a 100mW all interno e inferiore a 10mW all estern...

Страница 83: ...ada Il presente apparecchio è conforme ai limiti IC per esposizione alle radiazioni evidenziati per un ambiente non controllato Per uniformarsi ai requisiti di conformità IC per l esposizione a RF si è pregati di evitare il diretto contatto con l antenna trasmittente quando è in fase di trasmissione L utente finale deve seguire le istruzioni operative specificate in modo da soddisfare tale requisi...

Страница 84: ...ssicurarsi di lasciare un ampio spazio intorno al sistema per la ventilazione Mai inserire oggetti di alcun tipo sulle scanalature fori destinati alla ventilazione Utilizzare il prodotto in ambienti a temperature comprese fra 0 C e 35 C In caso di impiego di un cavo di estensione assicurarsi che l amperaggio totale dei dispositivi inseriti non superi quello di Eee Box PC Precauzioni d Uso Non camm...

Страница 85: ...eve essere gettato nei rifiuti comunali Controllare le normative locali in materia di smaltimento dei prodotti elettronici NON gettare la batteria nei rifiuti comunali Il simbolo del bidone sbarrato conleruote comedafigura indicachelabatteria nondeve esseregettataneirifiuticomunali Verficareconilserviziodiassistenza tecnica nazionale le modalità di sostituizione delle batterie NON DISASSEMBLARE La...

Страница 86: ...care nuovi prodotti proteggendo l ambiente da emissioni incontrollate di sostanze chimiche pericolose ASUS lavora con i fornitori di prodotti riciclabili con standard elevati per proteggere l ambiente garantire la sicurezza dei lavoratori e rispettare le normative internazionali in materia Il nostro impegno nel riciclaggio di vecchi dispositivi risponde all esigenza di collaborare in modi diversi ...

Страница 87: ...nte simbologia ricorrente in tutto il manuale AVVERTENZA Informazioni importanti per un utilizzo sicuro del dispositivo IMPORTANTE Istruzioni da seguire OBBLIGATORIAMENTE per completare un operazione SUGGERIMENTO Informazioni utili di ausilio nel completamento di un attività NOTA Informazioni aggiuntive per situazioni particolari ...

Страница 88: ...o della Confezione In caso di mancato o errato funzionamento del dispositivo o dei suoi componenti in condizioni di normale e corretto utilizzo durante il periodo di garanzia consegnare il certificato di garanzia al Centro Assistenza ASUS per la sostituzione dei componenti difettosi EeeBox PC Piedistallo opzionale Pacch viti e ripianoVESA opzionale Mini jack x adatt S PDIF opzionale Adattatore AC ...

Страница 89: ...la figura sottostante per identificare i componenti su questo lato del sistema 1 2 LED Disco Rigido Il LED del disco rigido lampeggia in fase di scrittura o lettura dati dal disco rigido Pulsante di Accensione llpulsantediaccensioneconsentediACCENDEREe SPEGNERE il sistema 3 2 1 6 5 4 ...

Страница 90: ...i puntamento videocamere e dischi rigidi USB consente a molti dispositivi di operare contemporaneamente su uno stesso computer tramite periferiche che funzionano come hub o siti plugin aggiuntivi Jack Uscita Cuffie Audio Il jack per cuffie stereo 3 5mm è utilizzato per collegare il segnale audio in uscita del sistema con altoparlanti amplificati o cuffie Jack Microfono Il jack per il microfono è s...

Страница 91: ...si alla figura sottostante per identificare i componenti presenti su questo lato del sistema 1 Jack Antenna Wireless Questo jack è utilizzato per collegare l antenna wireless in dotazione in modo da migliorare la ricezione del segnale wireless 5 6 1 2 3 4 ...

Страница 92: ... VGA quale un monitor o un proiettore per la visualizzazione su un display esterno di maggiori dimensioni Jack Uscita Audio S PDIF Out Inserire un cavo audio con mini jack da 3 5mm in questo jack per il trasferimento audio analogico o digitale Per la funzione S PDIF Out utilizzare il mini jack in dotazione per adattatore S PDIF da collegare all amplificatore 3 4 5 6 Ingresso Alimentazione DC 19V L...

Страница 93: ...no del computer E sino a sei volte più veloce dell attuale USB 2 0 1394 per operazioni di archiviazione esterna ed è anche sostituibile a caldo mediante connettori e cavi schermati lunghi sino a due metri Porta USB La porta USB Universal Serial Bus è compatibile con i dispositivi USB come tastiere dispositivi di puntamento videocamere e dischi rigidi USB consente a molti dispositivi di operare con...

Страница 94: ...taliano Italiano Come Utilizzare l Antenna Wireless L antenna wireless si collega a EeeBox PC per migliorare la ricezione dei segnali wireless Non ruotare l antenna wireless a 180 270 per evitare che sia danneggiata ...

Страница 95: ... posizione verticale sul piedistallo in dotazione A questo fine 1 Individuare il foro per la vite sul lato inferiore di EeeBox PC 2 Allineare la vite del piedistallo con il foro per la vite del PC quindi fissare il piedistallo al PC con una moneta 1 Foro per la vite Vista inferiore di EeeBox PC Vite del piedistallo 2 ...

Страница 96: ... Fissare il ripiano per il montaggio VESA al monitor con quattro viti HNM M4 x 8 Per l installazione del ripiano per il montaggioVESA il monitor deve essere conforme allo standard VESA75 o VESA100 2 Collocare l EeeBox PC sul ripiano VESA prestando attenzione al corretto allineamento poi fissare con una moneta il PC al ripiano VESA Lato inferiore di EeeBox PC ...

Страница 97: ...isplay Collegare un estremità del cavo VGA ad un monitor LCD 1 e l altra estremità alla porta Uscita Display Monitor sul pannello posteriore del sistema 2 Connessione con Dispositivi USB Collegare dispositivi USB come tastiere con o senza cavo a seconda della zona mouse e stampanti alle porte USB sul pannello posteriore del sistema 1 2 Monitor LCD ...

Страница 98: ...iano Connessione con un Dispositivo di Rete Collegare un estremità del cavo di rete alla porta LAN sul pannello posteriore del sistema e l altra estremità ad un hub o switch Cavo di rete con connettori RJ 45 Switch o hub di rete ...

Страница 99: ...accendere il sistema Quando EeeBox PC non è in funzione disinserire l adattatore di corrente o disattivare la presa AC per ridurre i consumi Regolare le opzioni di risparmio energetico nel pannello di controllo di Windows per garantire che EeeBox PC sia impostato in una modalità a basso consumo mantenendo al tempo stesso una completa operatività Per accedere al BIOS premere ripetutamente F2 all av...

Страница 100: ...enti le informazioni trasmesse senza crittografia potrebbero essere visibili ad altri 1 Cliccare sull icona di rete wireless con la stella arancione in area di notifica di Windows 3 In fase di connessione potrebbe essere richiesto l inserimento di una password 4 La connessione così stabilita viene visualizzata nell elenco 5 L icona della rete wireless compare in area di notifica 2 Selezionare dall...

Страница 101: ... dinamico PPPoE 1 Cliccare sull icona di rete con il triangolo di avvertenza di colore giallo in area di notifica di Windows e selezionare Apri Centro connessioni di rete e condivisione 2 Cliccare Modifica impostazioni scheda nel pannello blu sul lato sinistro 3 Con il tasto di destra cliccare su Connessione alla rete locale LAN e selezionare Proprietà ...

Страница 102: ...sione 4 TCP IPv4 e cliccare Proprietà 5 Cliccare Ottieni automaticamente un indirizzo IP e poi premere OK 6 Ritornare a Centro connessioni di rete e condivisione e poi cliccare Configura nuova connessione o rete Se si utilizza PPPoE continuare con la procedura di seguito ...

Страница 103: ...liccare Avanti 9 Inserire Nome Utente Password e nome della Connessione Premere Connetti 10 Cliccare Chiudi per terminare la configurazione 11 Cliccare sull icona di rete nella barra delle applicazioni e cliccare sulla connessione appena creata 12 Inserire nome utente e password Premere Connetti per collegarsi a Internet ...

Страница 104: ...are la configurazione di rete dell IP statico 2 Cliccare Utilizza il seguente indirizzo IP 3 Inserire indirizzo IP Subnet mask e Gateway forniti dall ISP Internet Service Provider 4 Se necessario inserire l indirizzo del server DNS preferito e l indirizzo alternativo 5 Dopo avere inserito tutti i valori necessari premere OK per creare la connessione di rete ...

Страница 105: ...Selezionare Schedule Pianifica per impostare l intervallo di tempo per l aggiornamento del sistema 3 Selezionare Update Aggiorna per attivare l aggiornamento 1 Dalla barra delle applicazioni di Windows cliccare con il tasto di destra sull icona ASUS Easy Update 4 Cliccare OK per visualizzare gli elementi da scaricare 5 Selezionare gli elementi da scaricare e poi cliccare OK ...

Страница 106: ...utti i dati contenuti nella partizione selezionata andranno persi Prima dell operazione assicurarsi di aver eseguito una copia di riserva dei documenti importanti 8 Al termine del ripristino cliccare Reboot per riavviare il sistema Copia di Riserva delle Impostazioni Predefinite su Unità USB Backup con F9 1 Riperete i passaggi 1 4 del paragrafo precedente 2 Selezionare Backup the Factory Environme...

Страница 107: ...di un Dispositivo di Archiviazione USB Ripristino via USB Quando si verifica un crash della Partizione di Ripristino del sistema utilizzare un dispositivo di archiviazione USB per ripristinare la partizione predefinita o le impostazioni predefinite del sistema nell intero disco rigido 1 Disattivare Boot Booster nel BIOS 2 Collegare il dispositivo di archiviazione USB dove eseguire la copia di rise...

Страница 108: ...sta opzione eliminerà tutti i dati contenuti nel disco rigido e creerà una nuova partizione del sistema come disco C una partizione vuota come disco D ed una Partizione di Ripristino 7 I dati contenuti nella partizione predefinita o nell intero disco rigido saranno cancellati in base all opzione selezionata al punto precedente Premere Restore per avviare l operazione 8 Al termine del ripristino cl...

Страница 109: ...EeeBox PC 109 Italiano Italiano ...

Страница 110: ... 300 440 1 V1 4 1 2008 05 EN 300 440 2 V1 2 1 2008 03 EN 301 511 V9 0 2 2003 03 EN 301 908 1 V3 2 1 2007 05 EN 301 908 2 V3 2 1 2007 05 EN 301 893 V1 4 1 2005 03 EN 50360 2001 EN 50371 2002 EN 62311 2008 EN 50385 2002 EN 301 489 1 V1 8 1 2008 04 EN 301 489 3 V1 4 1 2002 08 EN 301 489 4 V1 3 1 2002 08 EN 301 489 7 V1 3 1 2005 11 EN 301 489 9 V1 4 1 2007 11 EN 301 489 17 V1 3 2 2008 04 EN 301 489 24...

Страница 111: ...asus com Supporto Tecnico Telefono 1 812 282 2787 Fax Supporto 1 812 284 0883 Supporto Online support asus com ASUSTeK ITALY S r l Italia Indirizzo Centro Direzionale Villa Fiorita Palazzo B Via Piero Gobetti 2 B 20063 Cernusco sul Naviglio MI Telefono Notebook Eee 199 400 089 Altri Prodotti 199 400 059 Dall Estero 39 02 20231101 Fax Supporto 39 02 20240555 Sito web www asus it Per chiamare da ret...

Страница 112: ...Français EeeBox PC Manuel ...

Страница 113: ...se de ASUSTeK COMPUTER INC ASUS Les produits et noms de sociétés qui apparaissent dans ce manuel ne sont utilisés que dans un but d identification ou d explication dans l intérêt du propriétaire sans intention de contrefaçon Toutes les marques mentionnées dans ce manuel sont la propriété de leur propriétaires respectifs Des efforts particuliers ont été faits pour garantir que le contenu de ce manu...

Страница 114: ...20 Configurer votre EeeBox PC 21 Connexion d un écran 21 Connexion de périphériques USB 21 Connexion réseau 22 Allumer le système 23 Utiliser votre EeeBox PC 24 Configurer une connexion sans fil 24 Configurer une connexion filaire 25 ASUS Easy Update 29 Restaurer le système 30 Utiliser la partition de restauration 30 Restaurer le système d exploitation dans sa configuration d usine Restauration F9...

Страница 115: ...isé selon les instructions du fabricant peut causer une interférence nocive aux communications radio Cependant il n est pas exclu qu une interférence se produise lors d une installation particulière Si cet équipement cause une interférence nuisible au signal radio ou télévisé ce qui peut être déterminé par l arrêt puis le réamorçage de celui ci l utilisateur est encouragé à essayer de corriger l i...

Страница 116: ... est un produit de classe B dans un environnement domestique ce produit peut causer des interférences radio auquel cas l utilisateur pourra être amené à prendre les mesure adéquates Canaux d opération sans fil régionaux Amérique du Nord 2 412 2 462 GHz Ch01 à CH11 Japon 2 412 2 484 GHz Ch01 à Ch14 Europe ETSI 2 412 2 472 GHz Ch01 à Ch13 Note sur l exposition aux ondes radio Cet équipement doit êtr...

Страница 117: ... les appareils avec fonction réseau sans fil Bluetooth intégrée Cet appareil est conforme aux directives 1999 5 CE du Parlement Européen et du Conseil votées le 9 Mars 1999 concernant les équipements hertziens et les terminaux de télécommunications et la reconnaissance mutuelle de leur conformité Canaux d opération sans fil régionaux Amérique du Nord 2 412 2 462 GHz Ch01 à CH11 Japon 2 412 2 484 G...

Страница 118: ...100mW dans la plage 2446 5 2483 5 MHz L utilisation en extérieur dans des propriétés publiques n est pas permise Danslesdépartementslistésci dessous pourlaplagede2 4GHzentière La puissance maximale autorisée en intérieur est de 100mW La puissance maximale autorisée en extérieur est de 10mW Départements pour lesquels l utilisation de la plage des 2400 2483 5 MHz est permise avec un EIRP inférieur à...

Страница 119: ...tif à l exposition aux radiations Cet équipement a été testé et s est avéré être conforme aux limites établies par industrie Canada en termes d exposition aux radiations dans un environnement non contrôlé Afin de rester en conformité avec ces exigences évitez tout contact direct avec l antenne pendant la transmission L utilisateur doit suivre les instructions de fonctionnement de ce manuel d utili...

Страница 120: ...eur sont destinées à la ventilation Veillez à ne pas les bloquer ou les recouvrir N insérez jamais d objet dans les ouvertures de ventilation Utilisez ce produit dans un environnement avec une température ambiante comprise entre 0 C et 35 C Sivousutilisezunerallonge vérifiezquelasommedesintensités nominalesdeséquipementsconnectésàlarallongenedépassepas cellesupportéeparcettedernière Précautions à ...

Страница 121: ...ublique Vérifiez auprès de votre municipalité les dispositions locales en matière de mise au rebut des déchets électroniques NE PAS jeter la batterie dans une benne à ordures municipale Le symbole de la benne à roue barrée indique que la pile ne doit pas être placée dans une décharge publique PAS DE DÉMONTAGE La garantie ne couvre pas les appareils ayant été désassemblés par les utilisateurs Avert...

Страница 122: ...lée de substances chimiques ASUS travaille en collaboration avec des centres de recyclage respectant des procédures exigeantes dans le but de protéger l environnement d assurer la sécurité des utilisateurs et de respecter les lois internationales sur la protection de l environnement Notre engagement dans le recyclage de nos produits usagés résulte de notre politique de protection de l environnemen...

Страница 123: ...t différents degrés d importance AVERTISSEMENT Instructions que vous DEVEZ suivre pour éviter de vous blesser lors de la réalisation d une tâche IMPORTANT Instructions que vous DEVEZ suivre pour mener une tâche à bien ASTUCE Trucs et informations additionnelles pour vous aider à mener une tâche à bien NOTE Informations additionnelles destinées à certaines situations spécifiques ...

Страница 124: ...u de la boîte Si l appareil ou l un de ses composants est défaillant lors d une utilisation normale et durant la période de garantie visitez un centre après vente ASUS muni de la carte de garantie pour tout remplacement des composants défectueux EeeBox PC Socle optionnel KitVESA et sachet de vis optionnel Adaptateur Mini jack S PDIF optionnel Adaptateur secteur Cordon d alimentation Quick Start Gu...

Страница 125: ...essous pour identifier les composants localisés en façade de l appareil 1 2 LED d activité du disque dur La LED du disque dur clignote lorsque des données sont lues ou inscrites sur le disque dur Bouton d alimentation L interrupteur d alimentation permet de mettre l appareil sous hors tension 3 2 1 6 5 4 ...

Страница 126: ...els que les claviers les périphériques de pointage les appareils photos et les disques durs La norme USB permet à plusieurs périphériques de fonctionner simultanément sur un ordinateur Port casque sortie audio Le port casque stéréo de 1 8 3 5mm est utilisé pour la connexion d un casque ou de haut parleurs externes Port microphone Le port microphone est destiné à la connexion d un microphone utilis...

Страница 127: ...agramme ci dessous pour identifier les composants localisés à l arrière de l appareil 1 Connecteur pour antenne sans fil Ce connecteur est utilisé pour la connexion de l antenne sans fil fournie afin d accroître la réception du signal sans fil 5 6 1 2 3 4 ...

Страница 128: ...VGA tel qu un moniteur ou un projecteur afin de permettre l affichage sur un écran large Port de sortie audio port S PDIF out Connectez un câble audio stéréo de 3 5mm sur ce port pour des transferts audio numériques Pour une sortie S PDIF connectez l adaptateur mini jack audio vers S PDIF fourni à votre amplificateur 3 4 5 6 Port d alimentation CC 19V L adaptateur d alimentation inclus convertit l...

Страница 129: ...r être connectés en interne Ce standard de stockage offre des débits six fois plus rapides que les normes USB 2 0 1394 pour les solutions de stockage externes et permet le branchement à chaud Le port USB Universal Serial Bus est compatible avec les périphériques USB tels que les claviers les périphériques de pointage les appareils photos et les disques durs La norme USB permet à plusieurs périphér...

Страница 130: ...s Utiliser l antenne sans fil L antenne sans fil est connectée à votre EeeBox PC pour améliorer la réception de signaux sans fil Ne faites pas pivoter l antenne sans fil dans un angle de 180 270 pour éviter de l endommager ...

Страница 131: ...le optionnel Placez le EeeBox PC sur son socle Pour ce faire 1 Localisez le pas de vis sous le EeeBox PC 2 Alignez la vis du socle au pas de vis du PC puis sécurisez le socle au PC à l aide d une pièce de monnaie Pas de vis Dessous du EeeBox PC Vis du socle E SATA 1 2 ...

Страница 132: ...1 Sécurisez la tablette métallique à votre moniteur à l aide de quatre vis HNM M4 x 8 Pour sécuriser la tablette métallique votre moniteur doit être compatible avec le standard VESA75 ou VESA100 2 Placez votre EeeBox PC sur la tablette métallique comme illustré ci dessous Puis sécurisez le PC à la tablette à l aide d une pièce de monnaie Dessous du EeeBox PC ...

Страница 133: ...onnexion d un écran Connectez une extrémité d un câbleVGA à un moniteur LCD 1 et l autre extrémité au port VGA Moniteur localisé à l arrière du système 2 Connexion de périphériques USB Connectez des périphériques USB tels qu un clavier avec ou sans fil varient selon les régions une souris ou une imprimante aux ports USB du système 1 2 Moniteur LCD ...

Страница 134: ...4 EeeBox PC Français Connexion réseau Connectez une extrémité du câble réseau au port Réseau localisé à l arrière du système et l autre extrémité à un hub ou switch Câble réseau RJ 45 Hub réseau ou switch ...

Страница 135: ... de l appareil Lorsque vous n utilisez pas votre EeeBox PC débranchez l adaptateur secteur pour économiser de l énergie Ajustez les paramètres de consommation électrique à partir du Panneau de configuration de Window Ceci permet à votre EeeBox PC d être pleinement opérationnel tout en économisant de l énergie Pour accéder au BIOS appuyez sur F2 au démarrage du système 2 4 1 3 ...

Страница 136: ...non sécurisé Le faire peut rendre les données transmises visibles par d autres personnes 1 Faites un clic droit sur l icône réseau avec une étoile orange de la zone de notification de Windows 3 La saisie d un mot de passe peut être nécessaire 4 Une fois la connexion établie celle ci apparaîtra dans la liste 5 L icône de réseau sans fil apparaîtra dans la zone de notification de Windows 2 Sélection...

Страница 137: ...nnexion à IP dynamique ou PPPoE 1 Cliquez sur l icône réseau avec un triangle d avertissement jaune de la zone de notification de Windows et sélectionnez Ouvrir le Centre Réseau et partage 2 Cliquez sur l option Modifier les paramètres de la carte située sur la gauche 3 Faites un clic droit sur Connexion au réseau local et sélectionnez Propriétés ...

Страница 138: ...is cliquez sur Propriétés 5 Cliquez sur Obtenir une adresse IP automatiquement puis cliquez sur OK 6 Retournez à la page Centre Réseau et partage et cliquez sur Configurer une nouvelle connexion ou un nouveau réseau Suivez les étapes suivantes si vous utilisez une connexion PPoE ...

Страница 139: ...sez les champs Nom d utilisateur Mot de passe et Nom de la connexion Cliquez sur Connecter 10 Cliquez sur Fermer pour terminer la configuration 11 Cliquez sur l icône réseau de la zone de notification puis sur la connexion que vous avez juste créée 12 Entrez votre nom d utilisateur et mot de passe Cliquez sur Connecter pour vous connecter à Internet ...

Страница 140: ...ente pour configurer une connexion à adresse IP fixe 2 Cliquez sur Utiliser l adresse IP suivante 3 Remplissez les champs Adresse IP Masque de sous réseau et Passerelle par défaut 4 Si nécessaire entrez l adresse de votre serveur DNS favori 5 Une fois terminé cliquez sur OK pour créer la connexion réseau ...

Страница 141: ...ez Schedule Programmer pour déterminer à quelle fréquence vous souhaitez que le système soit mis à jour 3 Sélectionnez Update Mettre à jour pour activer la mise à jour 1 Dans la zone de notification de Windows faites un clic droit sur l icône ASUS Easy Update 4 Cliquez sur OK pour afficher les éléments que vous souhaitez télécharger 5 Cochez le s élément s que vous souhaitez télécharger puis cliqu...

Страница 142: ...nt effacées Cliquez sur Recover pour lancer le processus de restauration Toutes les données de la partition sélectionnée seront supprimées Veillez donc à d abord faire une copie de sauvegarde de vos données avant de continuer 8 Une fois la restauration terminée cliquez sur Reboot pour redémarrer le système Sauvegarder les données d environnement par défaut sur un périphérique de stockage USB Sauve...

Страница 143: ...z donc à d abord faire une copie de sauvegarde de vos données avant de continuer 6 Une fois le processus terminé cliquez sur Reboot pour redémarrer le système Utiliser le périphérique de stockage USB Restauration USB Si la partition de restauration de votre système est défectueuse utilisez un périphérique de stockage USB pour restaurer la partition ou les données d environnement par défaut sur la ...

Страница 144: ...the Whole Hard Disk Sélectionnez cette option si vous souhaitez restaurer le EeeBox PC dans sa configuration d usine Cette option supprimera toutes les données du disque dur et créera une nouvelle partition système C une partition D ne contenant aucunes données et une partition de restauration 7 Les données contenues sur la partition par défaut ou sur la totalité du disque dur seront supprimées en...

Страница 145: ...EeeBox PC 145 Français ...

Страница 146: ...146 EeeBox PC Français ...

Страница 147: ...om ASUS COMPUTER INTERNATIONAL Amérique Adresse 800 Corporate Way Fremont CA 94539 USA Téléphone 1 510 739 3777 Fax 1 510 608 4555 Site Web usa asus com Support technique Téléphone 1 812 282 2787 Support fax 1 812 284 0883 Support en ligne support asus com ASUS France SARL Adresse 10 Allée de Bienvenue 93160 Noisy Le Grand France Téléphone 33 0 1 49 32 96 50 Site Web www france asus com Support te...

Страница 148: ...Nederlands Eee Box PC Gebruikershandleiding ...

Страница 149: ...per wordt gebruikt voor back updoeleinden Producten en bedrijfsnamen die in deze handleiding zijn vermeld kunnen al dan niet gedeponeerde handelsmerken of auteursrechten van hun respectievelijke bedrijven en worden alleen gebruikt voor identificatiedoeleinden Alle handelsmerken zijn eigendom van hun respectieve eigenaars Wij hebben elke inspanning gedaan om te garanderen dat de inhoud van deze han...

Страница 150: ...eren optioneel 21 Uw Eee Box PC instellen 22 Aansluiten op een scherm 22 Aansluiten op USB apparaten 22 Aansluiten op een netwerkapparaat 23 Het systeem inschakelen 24 Uw Eee Box PC gebruiken 25 De draadloze verbinding configureren 25 Een bekabelde verbinding configureren 26 ASUS Easy Update 30 Uw systeem herstellen 31 De herstelpartitie gebruiken 31 Het besturingssysteem herstellen naar de standa...

Страница 151: ...ies van de fabrikant schadelijke storingen kan veroorzaken aan radiocommunicaties Er kan echter geen garantie worden gegeven dat er geen interferentie zal optreden in een specifieke installatie Indien dit apparaat toch schadelijke storingen veroorzaakt aan radio of televisieontvangst wat kan worden vastgesteld door het apparaat in en uit te schakelen moet de gebruiker deze storing proberen te corr...

Страница 152: ...k van het radiospectrum zoals in Artikel 3 2 Radio testsuites volgens EN 300 328 2 Waarschuwing RF blootstelling Dit apparaat moet worden geïnstalleerd en gebruikt in overeenstemming met de geleverde instructies en de antennes die worden gebruikt voor deze zender moeten bij de installatie een afstand van minstens 20 cm bewaren van alle personen De antennes mogen niet op dezelfde plaats van andere ...

Страница 153: ...AN Blue tooth De bijgeleverde versie van dit apparaat voldoet aan de vereisten van de EEG richtlijnen 2004 108 EG Elektromagnetische compatibiliteit en 2006 95 EG Laagspanningsrichtlijn CE markering voor apparaten met draadloos LAN Bluetooth Dit apparaat voldoet aan de vereisten van de Richtlijn 1999 5 EG van het Europees parlement en de Europese Commissie van 9 maart 1999 betreffende radio en tel...

Страница 154: ... de 2446 5 2483 5 MHz band Het gebruik buitenshuis op openbare eigendom is niet toegelaten In de onderstaande departementen voor de volledige 2 4 GHz band Maximaal toegelaten vermogen binnenshuis is 100mW Maximaal toegelaten vermogen buitenshuis is 10mW Departementen waar het gebruik van de 2400 2483 5 MHz band is toegelaten met een EIRP van minder dan 100mW binnenshuis en minder dan 10mW buitensh...

Страница 155: ...r Canada DitapparaatvoldoetaandeIC beperkingenbetreffendeblootstelling aan stralen die werden opgesteld voor een niet gecontroleerde omgeving Om te blijven voldoen aan de IC vereisten met betrekking tot RF blootstelling moet u direct contact met de zendantenne vermijden tijdens het zenden Eindgebruikers moeten de specifieke gebruiksaanwijzingen volgen om norm met betrekking tot RF blootstelling na...

Страница 156: ...em laat voor ventilatie Stop nooit enige voorwerpen in de ventilatieopeningen Gebruik dit product in omgevingen met een omgevingstemperatuur van 0 C tot 40 C Als u een verlengkabel gebruikt moet u ervoor zorgen dat het totale ampèrevermogen van de apparaten die op de verlengkabel zijn aangesloten dit ampèrevermogen niet overschrijden Opgelet tijdens het gebruik Stap niet op de voedingskabel en laa...

Страница 157: ... lokale technische ondersteuningsdiensten voor informatie over het recyclen NIET DEMONTEREN De garantie is niet van toepassing op producten die door de gebruiker werden gedemonteerd Gooi de batterij NIET bij het huishoudelijk afval Dit symbool van de doorgehaalde vuilnisbak op wielen geeft aan dat de batterij niet met het huishoudelijk afval mag worden verwijderd Raadpleeg de lokale technische ond...

Страница 158: ...t het milieu gespaard doordat er geen grote hoeveelheden schadelijke chemicaliën vrijkomen ASUS werkt met recyclingleveranciers die de hoogste eisen stellen aan de bescherming van het milieu waarbij gelet wordt op de veiligheid van de arbeiders en voldaan wordt aan de wereldwijde milieuwetten Wij letten op de recycling van oude apparatuur omdat wij op veel manieren werken om het milieu te besscher...

Страница 159: ... te zijn dat u bepaalde taken op de juiste manier uitvoert WAARSCHUWING Essentiële informatie die u MOET volgen om lichamelijke letsels te voorkomen BELANGRIJK Instructies die u MOET volgen om een taak te voltooien TIP Tips en nuttige informatie om u te helpen bij het voltooien van uw taak OPMERKING Aanvullende informatie voor speciale situaties ...

Страница 160: ...uw leverancier Inhoud verpakking Als het apparaat of de onderdelen ervan slecht werken of defect raken tijdens normaal en correct gebruik binnen de garantieperiode moet u de garantiekaart naar het ASUS servicecentrum brengen voor het vervangen van de defecte onderdelen EeeBox PC Voet optioneel VESA montage en schroeve npakket optioneel Ini aansluiting naar S PDIF optioneel Voedingsadapter Voedings...

Страница 161: ...de schema om de onderdelen aan deze zijde van het systeem te identificeren 1 2 LED harde schijf De LED van de harde schijf knippert wanneer gegevens worden geschreven op of gelezen van de harde schijf Voedingsschakelaar Met de voedingsschakelaar kunt u het systeem IN en UITSCHAKELEN 3 2 1 6 5 4 ...

Страница 162: ...dio uitgang De aansluiting voor de hoofdtelefoon 3 5mm wordt gebruikt om het audio uitgangssignaal van het systeem aan te sluiten op luidsprekers met versterkers of een hoofdtelefoon Microfoonaansluiting De microfoonaansluiting is voorzien voor het aansluiten van de microfoon die wordt gebruikt voor videovergaderingen gesproken verhalen of eenvoudige audio opnamen 4 5 6 3 Geheugenkaartsleuf De ing...

Страница 163: ...am afbeelding om de onderdelen aan deze zijde van het systeem te identificeren 1 Aansluiting draadloze antenne De aansluiting wordt gebruikt om de bijgeleverde draadloze antenne aan te sluiten om de ontvangst van het draadloze signaal te verbeteren 5 6 1 2 3 4 ...

Страница 164: ...en projector voor weergave op een groter extern beeldscherm Audio uitgang S PDIF uitgang Sluit een 3 5mm ministekker van een stereo audiokabel aan op deze aansluiting voor analoge of digitale audio overdracht Gebruik voor de functie S PDIF Out de bijgeleverde ministekker op de S PDIF adapter om uw versterker aan te sluiten 3 4 5 6 2 Voedingsingang DC 12V De bijgeleverde voedingsadapter converteert...

Страница 165: ... gebruik binnenin de computer Dit type aansluiting is tot zes keer sneller dan de bestaande USB 2 0 1394 voor externe opslagoplossingen en is ook hot pluggable met afgeschermde kabels en aansluitingen tot twee meter USB poort De USB poort Universal Serial Bus is compatibel met USB apparaten zoals toetsenborden muisapparaten camera s en harde schijfstations Met USB kunnen meerdere apparaten tegelij...

Страница 166: ...draadloze antenne gebruiken De draadloze antenne wordt aangesloten op uw Eee Box PC voor het verbeteren van de ontvangst van uw draadloos signaal Draai de draadloze antenne niet naar een hoek van 180 tot 270 om schade te voorkomen ...

Страница 167: ...t bijgeleverde voetstuk Volg deze richtlijnen om dit te doen 1 Zoek de schroefopening op de onderkant van de Eee Box PC 2 Lijn de schroef van het voetstuk uit op de schroefopening van de pc en bevestig het voetstuk op de pc met behulp van een muntstuk Schroefopening Schroef voetstuk E SATA 1 EeeBox PC bottom view 2 ...

Страница 168: ...m dit te doen 1 Bevestig de VESA montage op uw monitor met de vier schroeven HNM M4 x 8 Om de VESA montage te bevestigen moet uw monitor voldoen aan de VESA75 of VESA100 standaard 2 Plaats uw Eee Box PC op de VESA montage en houd hierbij rekening met de juiste uitlijning Maak vervolgens de pc vast aan de VESA montage met behulp van een muntstuk Eee Box PC Onderaanzicht ...

Страница 169: ...A kabel aan op een LCD monitor 1 en sluit het andere uiteinde aan op de Display beeldschermuitgang monitor op het achterpaneel van het systeem 2 Aansluiten op USB apparaten Sluit USB apparaten zoals bekabelde draadloze toetsenborden verschillende afhankelijk van gebied muisapparaten en printers aan op de USB poorten op het achterpaneel van het systeem 1 2 LCD monitor ...

Страница 170: ...luiten op een netwerkapparaat Sluit het ene uiteinde van een netwerkkabel aan op de LAN poort op het achterpaneel van het systeem en het andere uiteinde op een hub of switch Netwerkkabel met RJ 45 aansluitingen Netwerkhub of switch ...

Страница 171: ...anneer uw Eee Box PC niet in gebruik is moet u de voedingsadapter loskoppelen of de wisselstroomuitgang uitschakelen om energie te sparen Pas de instellingen voor het energiebeheer aan in het Configuratiescherm van Windows Hierdoor zorgt u ervoor dat uw Eee Box PC is ingesteld in een modus met lager energieverbruik terwijl de pc tegelijkertijd toch volledig operationeel is Om BIOS setup te openen ...

Страница 172: ...website op www asus com voor de recentste informatie 1 Klik op het pictogram van het draadloos netwerk met een oranje ster in het systeemvak van Windows 3 Wanneer u een verbinding maakt is het mogelijk dat u een wachtwoord moet invoeren 4 Nadat een verbinding is gemaakt wordt deze weergegeven in de lijst 5 U ziet het pictogram voor draadloze netwerken in het systeemvak 2 Selecteer het draadloze to...

Страница 173: ...PPPoE netwerkverbinding 1 Klik op het netwerkpictogram met een gele waarschuwingsdriehoek in het systeemvak van Windows en selecteer Open Network and Sharing Center Netwerkcentrum 2 Klik in het blauwe paneel aan de linkerzijde op Change adapter settings Adapterinstellingen wijzigen 3 Klik met de rechtermuisknop op LAN verbinding en selecteer Eigenschappen ...

Страница 174: ... Eigenschappen 5 Klik Automatisch een IP adres verkrijgen en klik op OK 6 Keer terug naar het Network and Sharing Center Netwerkcentrum en klik vervolgens op Set up a new connection or network Een nieuwe verbinding of netwerk instellen Ga door met de volgende stappen als u PPPoE gebruikt ...

Страница 175: ... Voer uw gebruikersnaam wachtwoord en verbindingsnaam in Klik op Connect Verbinden 10 Klik op Close Sluiten om de configuratie te voltooien 11 Klik op het netwerkpictogram in de taakbalk en klik op de verbinding die u net hebt gemaakt 12 Voer uw gebruikersnaam en het wachtwoord in Klik op Verbinden om een verbinding te maken met het internet ...

Страница 176: ...atisch IP te starten 2 Klik op Use the following IP address Het volgende IP adres gebruiken 3 Voer het IP adres subnetmasker en gatewayadres van uw serviceprovider in 4 Voer indien nodig het adres van de voorkeurs DNS server en het alternatieve adres in 5 Klik op OK nadat alle verwante waarden zijn ingevoerd om de netwerkverbinding tot stand te brengen ...

Страница 177: ...cteert en downloadt 2 Selecteer Schedule Planning om in te stellen hoe vaak u uw systeem wilt bijwerken 3 Selecteer Update Bijwerken om de update te activeren 1 Klik in de taakbalk van Windows met de rechtermuisknop op het pictogram ASUS Easy Update 4 Klik op OK om de items die u kunt downloaden weer te geven 5 Selecteer de items die u wilt downloaden en klik vervolgens op OK ...

Страница 178: ...de geselecteerde partitie zullen verloren gaan Zorg dat u vooraf een back up maakt van belangrijke gegevens 8 Klik op Reboot Opnieuw opstarten nadat het herstel is voltooid om het systeem opnieuw op te starten Een back up maken van de standaard omgevingsgegevens op een USB station F9 Back up 1 Herhaal stappen 1 tot 4 van de vorige sectie 2 Selecteer Backup the Factory Environment to a USB Drive Ee...

Страница 179: ...pslagapparaat gebruiken USB herstel Wanneer de herstelpartitie in uw systeem is gecrasht kunt u het USB opslagapparaat gebruiken om het systeem naar de standaard fabriekspartitie of de gegevens van de fabrieksomgeving naar de volledige harde schijf terug te zetten 1 Schakel Boot Booster in BIOS setup uit 2 Sluit het USB opslagapparaat aan waarop u de back up van de fabrieksomgevingsgegevens hebt g...

Страница 180: ...stellingen Deze optie verwijdert alle partities van uw harde schijf en maakt een nieuwe systeempartitie als station C een lege partitie als station D en een herstelpartitie 7 De gegevens op de standaard partitie of op de volledige harde schijf worden gewist afhankelijk van de optie die u in de vorige stap hebt geselecteerd Klik op Restore Herstel om de taak te starten 8 Klik op Reboot Opnieuw opst...

Страница 181: ...Eee Box PC 181 Nederlands ...

Страница 182: ...0 440 1 V1 4 1 2008 05 EN 300 440 2 V1 2 1 2008 03 EN 301 511 V9 0 2 2003 03 EN 301 908 1 V3 2 1 2007 05 EN 301 908 2 V3 2 1 2007 05 EN 301 893 V1 4 1 2005 03 EN 50360 2001 EN 50371 2002 EN 62311 2008 EN 50385 2002 EN 301 489 1 V1 8 1 2008 04 EN 301 489 3 V1 4 1 2002 08 EN 301 489 4 V1 3 1 2002 08 EN 301 489 7 V1 3 1 2005 11 EN 301 489 9 V1 4 1 2007 11 EN 301 489 17 V1 3 2 2008 04 EN 301 489 24 V1...

Страница 183: ...ont CA 94539 USA Telefoon 1 510 739 3777 Fax 1 510 608 4555 Web site usa asus com Technische ondersteuning Telefoon 1 812 282 2787 Fax ondersteuningsdienst 1 812 284 0883 Online ondersteuning support asus com ASUS COMPUTER GmbH Duitsland en Oostenrijk Adres Harkort Str 21 23 D 40880 Ratingen Germany Fax 49 2102 959911 Web site www asus de Online contact www asus de sales Technische ondersteuning T...

Отзывы: