background image

ASUS Eee PC

1-11

Keyboard Usage

Special Function Keys

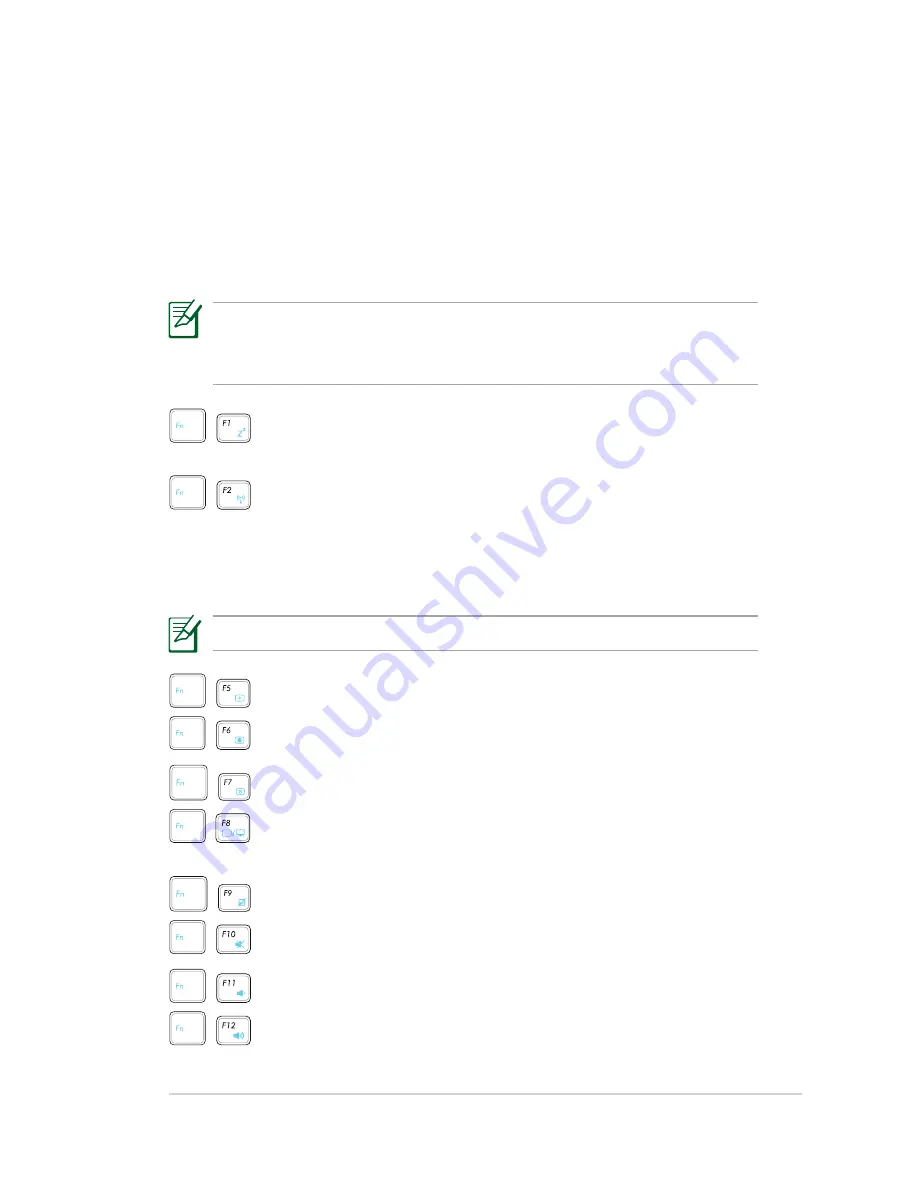
The following defines the colored hot keys on the Eee PC’s keyboard. The 
colored commands can only be accessed by first pressing and holding the 
function key while pressing a key with a colored command. Some function 
icons appear in the Notification area after activation.

The Hot Key locations on the function keys may vary depending on 
model but the functions should remain the same. Follow the icons 
whenever your hot key locations do not match the manual.


Z

z

 Icon (F1)

: Places the Eee PC in suspend mode 


   (Save-to-RAM).


Radio Tower (F2)

 (Wireless Models Only): Toggles  


  the internal wireless LAN or Bluetooth (on selected  


  models) ON or OFF with an on-screen-display.  


  When enabled, the corresponding wireless indicator  


  will light. 

The default setting is WLAN ON / Bluetooth OFF.


Sun Down Icon (F5

): Decreases the display brightness.


Sun Up Icon (F6)

: Increases the display brightness.


Crossed Screen Icon (F7)

: Turns off the display backlight.


LCD/Monitor Icons (F8)

: Toggles between the Eee PC’s   


LCD display and an external monitor.


Touchpad (F9

): Toggles the touchpad ON/OFF.


Crossed Speaker Icon (F10)

: Mutes the speaker.


Volume Down Icon (F11)

: Decreases speaker volume.


Volume Up Icon (F12)

: Increases the speaker volume.

Содержание Eee PC 1201HA

Страница 1: ...Eee PC User Manual Windows 7 Edition Eee PC 1201 Series E5050 15G06Q191000 ...

Страница 2: ...ction Keys 1 11 Touchpad Usage 1 13 Multi finger gesture input 1 13 Chapter 2 Getting Started Powering on your Eee PC 2 2 First time Startup 2 3 Desktop 2 5 Network Connection 2 6 Configuring a wireless network connection 2 6 Local Area Network 2 7 Browsing web pages 2 10 Chapter 3 Using the Eee PC ASUS Update 3 2 Updating the BIOS through the Internet 3 2 Updating the BIOS through a BIOS file 3 3...

Страница 3: ... Boot Booster 4 6 Appendix Declarations and Safety Statements A 2 Federal Communications Commission Statement A 2 FCC Radio Frequency RF Exposure Caution Statement A 3 Declaration of Conformity R TTE directive 1999 5 EC A 4 CE Marking A 4 IC Radiation Exposure Statement for Canada A 5 Wireless Operation Channel for Different Domains A 6 France Restricted Wireless Frequency Bands A 6 UL Safety Noti...

Страница 4: ...port DVD contents and system recovery 5 Appendix Gives you safety statements The actual bundled operating system and applications differ by models and territories There may be differences between your Eee PC and the pictures shown in this manual Please accept your Eee PC as being correct Notes for This Manual A few notes and warnings are used throughout this guide allowing you to complete certain ...

Страница 5: ...sture with a dry cloth DO NOT leave the Eee PC on your lap or any part of the body to prevent discomfort or injury from heat exposure DO NOT expose to dirty or dusty environments DO NOT operate during a gas leak DO NOT expose to strong magnetic or electrical fields DO NOT expose to or use near liquids rain or moisture DO NOT use the modem during electrical storms DO NOT press or touch the display ...

Страница 6: ...es that the battery should not be placed in municipal waste Transportation Precautions To prepare your Eee PC for transport you should turn it OFF and disconnect all external peripherals to prevent damage to the connectors The hard disk drive s head retracts when the power is turned OFF to prevent scratching of the hard disk surface during transport Therefore you should not transport your Eee PC w...

Страница 7: ...ew full charging and discharging cycles Airplane Precautions Contact your airline if you want to use the Eee PC on the airplane Most airlines have restrictions for using electronic devices Most airlines allow electronic use only between and not during takeoffs and landings There are three main types of airport security devices X ray machines used on items placed on conveyor belts magnetic detector...

Страница 8: ...viii Table of Contents ...

Страница 9: ...Top Side Bottom Side Front Side Right Side Left Side Keyboard Usage Touchpad Usage 1 Chapter 1 Knowing the Parts ...

Страница 10: ...ng the Parts 1 2 2 4 7 3 5 6 1 Top Side Refer to the diagram below to identify the components on this side of the Eee PC The top side may vary in appearance depending on models The keyboard differs for each territory ...

Страница 11: ...both hands The keyboard differs depending on models Touchpad and Buttons The touchpad and its buttons comprises a pointing device that provides the same functions as a desktop mouse Status Indicators Power Indicator The power indicator lights when the Eee PC is turned ON and blinks slowly when the Eee PC is in the Save to RAM Suspend mode This indicator is OFF when the Eee PC is turned OFF Battery...

Страница 12: ...g Off Hard Disk Drive HDD Indicator The hard disk drive indicator blinks when data is written to or read from the disk drive Wireless Bluetooth Indicator This is only applicable on models with built in wireless LAN Bluetooth on selected models When the built in wireless LAN Bluetooth is enabled this indicator lights Capital Lock Indicator Indicates that capital lock Caps Lock is activated when lig...

Страница 13: ...UT THE Eee PC ON YOUR LAP OR OTHER PARTS OF THE BODY TO AVOID INJURY FROM THE HEAT Battery Lock Manual The manual battery lock is used to keep the battery pack secured Move the manual lock to the unlocked position to insert or remove the battery pack Move the manual lock to the locked position after inserting the battery pack 1 Bottom Side Refer to the diagram below to identify the components on t...

Страница 14: ...y pack secure When the battery pack is inserted it will automatically lock When removing the battery pack this spring lock must be retained in the unlocked position Memory Compartment The memory module is secured in a dedicated compartment 2 4 Front Side Refer to the diagram below to identify the components on this side of the Eee PC 1 1 Audio Speaker System The built in stereo speaker system allo...

Страница 15: ...g this jack automatically disables the built in speakers Microphone Jack The microphone jack is designed to connect the microphone used for Skype voice narrations or simple audio recordings USB Port 2 0 1 1 The USB Universal Serial Bus port is compatible with USB 2 0 or USB 1 1 devices such as keyboards pointing devices cameras and storage devices connected in a series up to 12Mbits sec USB 1 1 an...

Страница 16: ...a local network The built in connector allows convenient use without additional adapters Kensington Lock port The Kensington lock port allows the Eee PC to be secured using Kensington compatible security products These security products usually include a metal cable and lock that prevent the Eee PC to be removed from a fixed object 5 6 ...

Страница 17: ...side of the Eee PC Display Monitor Output The 15 pin D sub monitor port supports a standard VGA compatible device such as a monitor or projector to allow viewing on a larger external display 1 2 3 4 HDMI 1 2 4 3 5 1 4 2 3 5 4 6 1 2 4 3 HDMI 1 2 4 3 5 1 4 2 3 5 4 6 1 2 4 3 1201HA 1201N 1201T ...

Страница 18: ...cool air to enter and warm air to exit the Eee PC Ensure that paper books clothing cables or other objects do not block any of the air vents or else overheating may occur HDMI HDMI Port HDMI High Definition Multimedia Interface is an uncompressed all digital audio video interface between any audio video source such as a set top box DVD player and A V receiver and an audio and or video monitor such...

Страница 19: ...Icon F1 Places the Eee PC in suspend mode Save to RAM Radio Tower F2 Wireless Models Only Toggles the internal wireless LAN or Bluetooth on selected models ON or OFF with an on screen display When enabled the corresponding wireless indicator will light The default setting is WLAN ON Bluetooth OFF Sun Down Icon F5 Decreases the display brightness Sun Up Icon F6 Increases the display brightness Cros...

Страница 20: ...on of the keyboard for cell navigation CD Play Pause During CD stop begins CD play During CD play pauses CD play CD Stop During CD play Stops CD play CD Skip to Previous Track Rewind During CD play skips to the previous audio track movie chapter CD Skip to Next Track Fast Forward During CD play skips to the next audio track movie chapter V Toggles the camera applicaiotn ON C Toggles the screensave...

Страница 21: ...Word MS Excel Three finger page up down Adobe reader MS Word MS Excel Zoom in Zoom out Two finger zooming in out Moving two fingertips apart or together on the touchpad to zoom in or zoom out This is convenient when viewing photos or reading documents Two finger rotating Fix one fingertip on the touchpad and make an arc with the other to rotate the photo or the document you are viewing You can mak...

Страница 22: ...left to the right to view the next page or right to the left to return to the previous pages Two finger scrolling up down or left right Use two fingertips to slide up down or left right on the touchpad to scroll a window up down or left right If your display window includes several sub windows move the pointer on that pane before scrolling ...

Страница 23: ...Powering on your Eee PC First time Startup Desktop Network Connection 2 Chapter 2 Getting Started ...

Страница 24: ...ecifically approved by the manufacturer or retailer for use with this model or else damage may occur to the Eee PC The output voltage of this adapter is 19Vdc 2 1A Never attempt to remove the battery pack while the Eee PC is turned ON as this may result in the loss of working data Remember to fully charge the battery before first use and whenever it is depleted to prolong battery life 3 Turn ON th...

Страница 25: ...ontinue 4 Set a password for your user account if you want Click Next to continue 3 Type your user account name and your computer s name then click Next to continue First time Startup For the first time you start your Eee PC the Windows wizard will launch automatically and lead you through setting up your preferences and some basic information Follow the wizard instructions to finish the initializ...

Страница 26: ...continue 6 Click Use recommended settings to get the latest important updates 5 Read the end user license agreement and check the two boxs before I accept the license terms Click Next to continue 8 Connect to a wireless network and click Next to continue or click Skip to set up the wireless connection later ...

Страница 27: ...unch the corresponding applications and enter the specified folders Some applications would form minimized icons in the Notification area The actual Desktop screen may vary according to different models 9 Select the network s location Click Next to continue 10 The initialization is finished ...

Страница 28: ... icon in the Notification area 2 Select the wireless access point you want to connect to from the list and click Connect to build the connection If you cannot find the desired access point click the Refresh icon on the upper right corner to refresh and search in the list again If the wireless connection icon does not show in the Notification area activate the wireless LAN function by pressing Fn F...

Страница 29: ...low Using a dynamic IP PPPoE network connection 1 Click the network icon with a yellow warning triangle in the Windows Notification area and select Open Network and Sharing Center 2 Click Change adapter settings in the left blue pane 3 Right click Local Area Connection and select Properties ...

Страница 30: ...net Protocol Version 4 TCP IPv4 and click Properties 5 Click Obtain an IP address automatically and click OK 6 Return to the Network and Sharing Center and then click Set up a new connection or network Continue the following steps if using PPPoE ...

Страница 31: ... and click Next 9 Enter your User name and Password and Connection name Click Connect 10 Click Close to finish the configuration 11 Click the network icon in the taskbar and click the connection you just created 12 Enter your user name and password Click Connect to connect to the Internet ...

Страница 32: ...ice of your Eee PC Using a static IP 1 Repeat the step 1 4 of Using a dynamic IP to start the static IP network configuration 2 Click Use the following IP address 3 Enter the IP address Subnet mask and Gateway from your service provider 4 If needed enter the preferred DNS Server address and alternative address 5 After entering all the related values click OK to build the network connection Contact...

Страница 33: ...ASUS Update Bluetooth Connection Super Hybrid Engine Eee Docking Microsoft Office Trial Digital Zoom Control 3 Chapter 3 Using the Eee PC ...

Страница 34: ... BIOS version information This utility is pre loaded in your Eee PC and is also available in the support DVD that comes with the Eee PC package ASUS Update requires an Internet connection either through a network or an Internet Service Provider ISP Updating the BIOS through the Internet To update the BIOS through the Internet 1 Launch the ASUS Update utility from the Windows desktop by clicking St...

Страница 35: ...ess 5 Follow the screen instructions to complete the update process The ASUS Update utility is capable of updating itself through the Internet Always update the utility to avail all its features Updating the BIOS through a BIOS file To update the BIOS through a BIOS file 1 Launch the ASUS Update utility from the Windows desktop by clicking Start Programs ASUS ASUSUpdate for EeePC ASUSUpdate The AS...

Страница 36: ... be Notebook PCs Desktop PCs mobile phones and PDAs To connect to a Bluetooth enabled device 1 Press Fn F2 repeatedly until Bluetooth ON or WLAN Bluetooth ON is shown 2 From Control Panel go to Network and Internet Network and Sharing Center and then click Change adapter settings in the left blue pane 3 Right click Bluetooth Network Connection and select View Bluetooth Network Devices ...

Страница 37: ...o look for new devices 5 Select a Bluetooth enabled device from the list and click Next 6 Enter the Bluetooth security code into your device and start pairing 7 The paired relationship is successfully built Click Close to finish the setting ...

Страница 38: ...battery time The selected mode is shown on the display To change the power mode Click Start All Programs ASUS EeePC SuperHybridEngine SuperHybridEngine Right click the Super Hybrid Engine icon in the Notification area and select a preferred power mode Press Fn Space Bar If your external monitor functions abnormally in Power Saving mode at a resolution of 1024 x 768 pixels or higher press Fn F5 rep...

Страница 39: ...ncluding Radio Live TV and Games etc The ASUS Vibe service contents differ for each territory Game Park Game Park includes multiple interesting games ASUS AP Bank ASUS AP Bank offers various software applications and multimedia enjoyment online Eee Amuse Eee Sharing Eee Xperience Eee Tools The applications in Eee Docking may vary depending on models The names of the applications in Eee Docking are...

Страница 40: ...ove your Eee PC display in terms of the contrast brightness skin tone and color saturation for red green and blue independently SRS Premium Sound on selected models SRS Premium offers the rich and immerse audio experience in any listening environment Voice Command Dr Eee on selected models Dr Eee is a voice command tool which allows you to launch a commonly used function wtih your voice YouCam E C...

Страница 41: ...er allows you to adjust the font text size on your Eee PC screen LocaleMe LocaleMe is a web mapping service application offering easy search for streets or companies sorted by multiple categories all over the world System Setting System Setting offers you quick access to the configuration of the desktop background and the Ad hoc mode ...

Страница 42: ...e click Microsoft Office 60 Day Trial Online on the desktop 2 Click TRY NOW 3 Enter your E mail address and click SUBMIT 4 Copy your product key and click the link 5 Enter your product key and follow the onscreen instructions to finish the activation process before starting the free trial If you want to use other applications in the Microsoft Office Suite click start and point to All Programs Micr...

Страница 43: ...t is in use You can zoom pan or tilt the camera with Digital Zoom Control Function keys Press Fn 1 to zoom in and Fn 2 to zoom out Zoom in or out Pan or tilt The following is the example when using E Cam You can use Digital Zoom Control when making a video call or having a video chat Press Fn S to pan left and Fn F to pan right ...

Страница 44: ...Chapter 3 Using the Eee PC 3 12 Press Fn E to tilt up Press Fn D to tilt down Panning and tilting is only available when you have zoomed in the camera ...

Страница 45: ...Support DVD information System Recovery Boot Booster 4 Chapter 4 Support DVD System Recovery ...

Страница 46: ...rnal optical drive The DVD automatically displays the Drivers menu if Autorun is enabled in your computer If Autorun is NOT enabled in your computer browse the contents of the support DVD to locate the file ASSETUP EXE from the BIN folder Double click the ASSETUP EXE file to run the DVD The drivers and utilities bundled in the support DVD may vary by models and are subject to change without notice...

Страница 47: ...e Utilities menu shows the applications that the Eee PC supports Contact Click the Contact tab to display the ASUS contact information Other information The icons on the top right corner of the screen provide additional information on the Eee PC and the contents of the support DVD Click an icon to display the specified information File list Technical support DVD content System information ...

Страница 48: ...uctions to complete the recovery process Disable Boot Booster in BIOS setup before you perform system recovery from USB flash disk external optical drive or hidden partition Refer to the end of this chapter for details Ensure to press F9 only once during bootup Using the Support DVD The Support DVD includes the pure operating system The Support DVD provides a comprehensive recovery solution that q...

Страница 49: ...m your hard disk drive and restore the pure OS Select and click Yes If you select Recover system to entire HD the entire hard disk drive will be a partition with the pure OS and the F9 recovery function will no longer exist Therefore we highly recommend that you use the F9 recovery to restore the system 4 Follow the onscreen instructions to complete the recovery process You will lose all your data...

Страница 50: ...05 American Megatrends Inc BIOS SETUP UTILITY Main Advanced Security Boot Exit Boot Device Priority Boot Settings Configuration OnBoard LAN Boot ROM Enabled Boot Booster Disabled Select Screen Select Item Enter Go to Sub Screen F1 General Help F10 Save and Exit ESC Exit Specifies the Boot Device Priority sequence A virtual floppy disk drive Floppy Drive B may appear when you set the CD ROM drive a...

Страница 51: ...Declarations and Safety Statements Copyright Information Limitation of Liability Service and Support A Appendix ...

Страница 52: ...is no guarantee that interference will not occur in a particular installation If this equipment does cause harmful interference to radio or television reception which can be determined by turning the equipment off and on the user is encouraged to try to correct the interference by one or more of the following measures Reorient or relocate the receiving antenna Increase the separation between the e...

Страница 53: ...e could void the user s authority to operate this equipment The manufacture declares that this device is limited to Channels 1 through 11 in the 2 4GHz frequency by specified firmware controlled in the USA This equipment complies with FCC radiation exposure limits set forth for an uncontrolled environment To maintain compliance with FCC RF exposure compliance requirements please avoid direct conta...

Страница 54: ... 301 489 1 EN 301 489 17 Effective use of the radio spectrum as in Article 3 2 Radio test suites according to EN 300 328 2 CE Marking CE marking for devices without wireless LAN Bluetooth The shipped version of this device complies with the requirements of the EEC directives 2004 108 EC Electromagnetic compatibility and 2006 95 EC Low voltage directive CE marking for devices with wireless LAN Blue...

Страница 55: ...ept any interference including interference that may cause undesired operation of the device To prevent radio interference to the licensed service i e co channel Mobile Satellite systems this device is intended to be operated indoors and away from windows to provide maximum shielding Equipment or its transmit antenna that is installed outdoors is subject to licensing This device and its antenna s ...

Страница 56: ...e property of public persons use is subject to a preliminary authorization procedure by the Ministry of Defense with maximum authorized power of 100mW in the 2446 5 2483 5 MHz band Use outdoors on public property is not permitted In the departments listed below for the entire 2 4 GHz band Maximum authorized power indoors is 100mW Maximum authorized power outdoors is 10mW Departments in which the u...

Страница 57: ...nded to be electrically connected to a telecommunication network that has an operating voltage to ground that does not exceed 200V peak 300V peak to peak and 105V rms and installed or used in accordance with the National Electrical Code NFPA 70 When using the Eee PC modem basic safety precautions should always be followed to reduce the risk of fire electric shock and injury to persons including th...

Страница 58: ...isposal instructions to reduce the risk of injury to persons due to fire or explosion Do not use power adapters or batteries from other devices to reduce the risk of injury to persons due to fire or explosion Use only UL certified power adapters or batteries supplied by the manufacturer or authorized retailers Power Safety Requirement Products with electrical current ratings up to 6A and weighing ...

Страница 59: ...stausch der Batterie Ersatz nur durch denselben oder einem vom Hersteller empfohlenem ähnlichen Typ Entsorgung gebrauchter Batterien nach Angaben des Herstellers German ADVARSELI Lithiumbatteri Eksplosionsfare ved fejlagtig håndtering Udskiftning må kun ske med batteri af samme fabrikat og type Levér det brugte batteri tilbage til leverandøren Danish VARNING Explosionsfara vid felaktigt batteribyt...

Страница 60: ...gées conformément aux instructions du fabricant French ADVARSEL Eksplosjonsfare ved feilaktig skifte av batteri Benytt samme batteritype eller en tilsvarende type anbefalt av apparatfabrikanten Brukte batterier kasseres i henhold til fabrikantens instruksjoner Norwegian Japanese ВНИМАНИЕ При замене аккумулятора на аккумулятор иного типа возможно его возгорание Утилизируйте аккумулятор в соответств...

Страница 61: ...NTIAL DAMAGES INCLUDING DAMAGES FOR LOSS OF PROFITS LOSS OF BUSINESS LOSS OF USE OR DATA INTERRUPTION OF BUSINESS AND THE LIKE EVEN IF ASUS HAS BEEN ADVISED OF THE POSSIBILITY OF SUCH DAMAGES ARISING FROM ANY DEFECT OR ERROR IN THIS MANUAL OR PRODUCT Products and corporate names appearing in this manual may or may not be registered trademarks or copyrights of their respective companies and are use...

Страница 62: ...n contract tort or infringement under this Warranty Statement This limit also applies to ASUS suppliers and its reseller It is the maximum for which ASUS its suppliers and your reseller are collectively responsible UNDER NO CIRCUMSTANCES IS ASUS LIABLE FOR ANY OF THE FOLLOWING 1 THIRD PARTY CLAIMS AGAINST YOU FOR DAMAGES 2 LOSS OF OR DAMAGE TO YOUR RECORDS OR DATA OR 3 SPECIAL INCIDENTAL OR INDIRE...

Отзывы: