Asus CP220 Series Скачать руководство пользователя страница 19

3-5

ASUS LCD Monitor CP220/CP240 Series

3.2 

Client setting

1.  Turn on power and press

to select [Client] as your input source.

MENU:Exit

Client

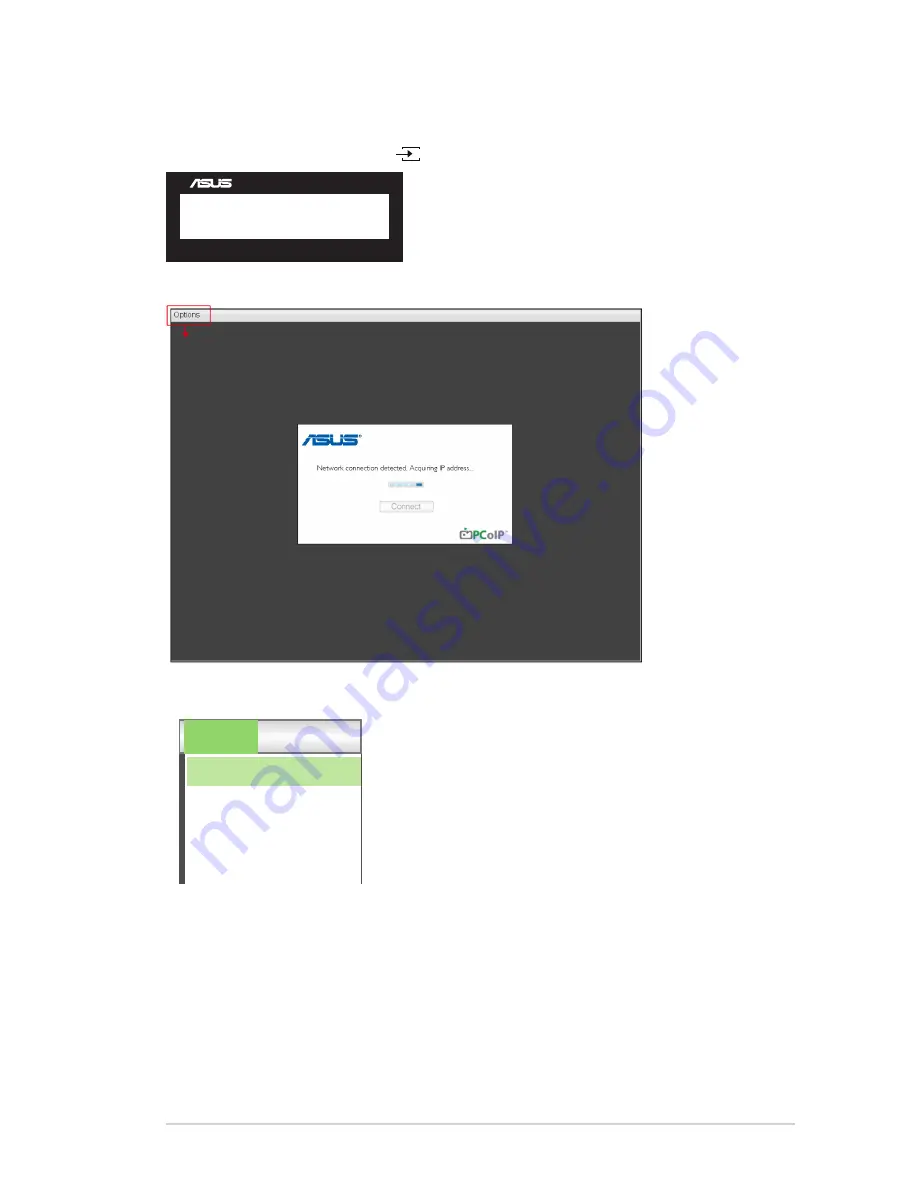
2.  Login Client widget, click “[Options]“ on top left corner.

Options

3. 

Select “[Options]” --> “[Configuration]”.

Options

Configuration
Diagnostics
Information
User Settings

Содержание CP220 Series

Страница 1: ...CP220 CP240 Series Zero client display User Guide ...

Страница 2: ...e display 1 3 1 4 2 Rear of the display 1 4 1 4 3 Get start with client system 1 5 1 4 4 Client Indicator Behavior 1 5 2 1 Detaching the arm stand for wall mounting 2 1 2 2 Adjusting the display 2 2 3 1 OSD On Screen Display menu 3 1 3 1 1 How to reconfigure 3 1 3 1 2 OSD Function Introduction 3 1 3 2 Client setting 3 5 3 3 Specifications 3 11 3 4 Trouble shooting FAQ 3 12 3 5 Supported Timing Lis...

Страница 3: ... FITNESS FOR A PARTICULAR PURPOSE IN NO EVENT SHALL ASUS ITS DIRECTORS OFFICERS EMPLOYEES OR AGENTS BE LIABLE FOR ANY INDIRECT SPECIAL INCIDENTAL OR CONSEQUENTIAL DAMAGES INCLUDING DAMAGES FOR LOSS OF PROFITS LOSS OF BUSINESS LOSS OF USE OR DATA INTERRUPTION OF BUSINESS AND THE LIKE EVEN IF ASUS HAS BEEN ADVISED OF THE POSSIBILITY OF SUCH DAMAGES ARISING FROM ANY DEFECT OR ERROR IN THIS MANUAL OR ...

Страница 4: ...tallation If this equipment does cause harmful interference to radio or television reception which can be determined by turning the equipment off and on the user is encouraged to try to correct the interference by one or more of the following measures Reorient or relocate the receiving antenna Increase the separation between the equipment and receiver Connect the equipment to an outlet on a circui...

Страница 5: ...erated only from the type of power source indicated on the label If you are not sure of the type of power supply to your home consult your dealer or local power company Use the appropriate power plug which complies with your local power standard Do not overload power strips and extension cords Overloading can result in fire or electric shock Avoid dust humidity and temperature extremes Do not plac...

Страница 6: ...he screen may flicker during the initial use due to the nature of the fluorescent light Turn off the power switch and turn it on again to make sure that the flicker disappears You may find slightly uneven brightness on the screen depending on the desktop pattern you use When the same image is displayed for hours an afterimage of the previous screen may remain after switching the image The screen w...

Страница 7: ...e updates 1 ASUS websites The ASUS websites worldwide provide updated information on ASUS hardware and software products Refer to http www asus com 2 Optional documentation Your product package may include optional documentation that may have been added by your dealer These documents are not part of the standard package ...

Страница 8: ... enhance your viewing experience With these features you can enjoy the convenience and delightful visual experience that the display brings you 1 2 Package contents Check your package for the following items Display set Display base and screw Quick start guide Warranty card Power cord Adapter DVI Cable VGA Cable If any of the above items is damaged or missing contact your retailer immediately ...

Страница 9: ...ttach the base to the arm and fix with the screw to join them tightly You can easily tighten the screw by fingers 2 Adjust the monitor to the angle that is most comfortable for you 2 1 We recommend that you cover the table surface with soft cloth to prevent from damaging the display ...

Страница 10: ...he display LED1 LED2 1 Client LED Indicator The color of client LED Indicator is as below 2 Power Indicator The color of power indicator is as below Status description LED1 White client power on LED1 Amber Power Off and Wake On Lan Wake On USB LED2 White link to virtual desktop ...

Страница 11: ... the display 2 3 4 1 9 11 USB 5 7 8 12 6 10 1 RJ45 2 DVI connector 3 VGA connector 4 Microphone input 5 audio in jack 6 earphone out 7 USB connector 8 Power in jack 9 Screw holes of mounting interface 10 USB connector 11 Kensington lock 12 Control keypad ...

Страница 12: ...e Function Description Auto Adjust Return VGA Auto Adjustment in VGA source 2 seconds Splendid mode switch in VGA source for short press 2 seconds Client Instant connection Press shortly under login UI 2 seconds Exit OSD press shortly to select disconnection turn off workstation or cancel Press shortly under host session 2 seconds Disconnect and return to log in UI Press shortly under server sessi...

Страница 13: ...e that covers the stand neck Use a screwdriver to remove the four screws that secure the stand to the monitor 3 Detach the stand from the monitor We recommend that you cover the table surface with soft cloth to prevent from damaging the display Hold the stand while removing the screws 3 2 1 The 100 x 100 mm wall mount kit is not included in the product purchased Use only the UL listed wall mount b...

Страница 14: ...g we recommend that you look at the full face of the display and then adjust the display to the angle that is the most comfortable to you Hold the stand to prevent the display from falling while changing its angle You may adjust the display s angle from 5 to 23 5 23 ...

Страница 15: ...desired sub menu function 3 Press and button to change the settings of the selected function 4 To exit from the OSD menu press the MENU button Repeat step 2 and step 3 to adjust any other function 3 1 2 OSD Function Introduction 1 Splendid This function contains six sub functions that you can select for your preference Each mode has the Reset selection allowing you to maintain your setting or retu...

Страница 16: ...lor Brightness Contrast Saturation Color Temp 100 80 User Mode 50 18 Brightness The adjusting range is from 0 to 100 The button is also a hot key to activate this function Contrast The adjusting range is from 0 to 100 ASCR To adjust the horizontal H Position and the vertical position V Position of the image from the VGA input The adjustable range is from 0 to 100 Saturation The adjusting range is ...

Страница 17: ...rpness Adjust the picture sharpness The adjusting range is from 0 to 100 Trace free speed up the response time by Over Drive technology The adjusting range is from lower 0 to faster 100 Only for CP240 Aspect Control Adjust the aspect ratio to Full 4 3 Position Adjust the horizontal position H Position and the vertical position V Position of the image The adjusting range is from 0 to 100 only avail...

Страница 18: ...age English OSD Setup Picture All Reset Splendid OSD Setup To adjust the OSD Timeout DDC CI Transparency and Power indicator Information To show the information of the display Language To select OSD language The selections are English French German Spanish Italian Dutch Russian Traditional Chinese Simplified Chinese Japanese Persian Thai Indonesian Poland Turkey Portugal Czech Croatia Hungary Roma...

Страница 19: ...ient setting 1 Turn on power and press to select Client as your input source MENU Exit Client 2 Login Client widget click Options on top left corner Options 3 Select Options Configuration Options Configuration Diagnostics Information User Settings ...

Страница 20: ...ernet Mode Enable 802 1X Security Identity Client Certificate Network IPv6 SCEP Label Discovery Session Language Power Display Access Audio Reset OK Cancel Apply 5 Select Session sheet and enter DNS Name or IP Address then click Apply to execute Configuration Configure the connection to a peer device Connection Type DNS Name or IP Address View Connection Server 192 168 100 252 vmware Horizon View ...

Страница 21: ...language for the user interface Language Keyboard Layout English US Network IPv6 SCEP Label Discovery Session Language Power Display Access Audio Reset OK Cancel Apply 7 Select OK to finish Configuration 8 Return to main manual select Options on top left corner and go to User settings Options Configuration Diagnostics Information User Settings ...

Страница 22: ...e Horizon View TM Client Certificate Mouse Keyboard Image Display Topology Touch Screen OK Cancel Apply This mode determines how the client proceeds when it cannot verify that your connection to the server is secure It is not recommended that you change this setting unless instructed to do so by your system administrator 10 Link to server IP and enter connection interface Click Connect Enter the a...

Страница 23: ...nter User name and password then click Login Enter your user name and password https 192 168 100 252 Server User name Password 192 168 100 252 Cancel Login 12 Click Connect Log on to desktop win7 Cancel Reser VM Connect 13 Enter client interface ...

Страница 24: ...3 10 Chapter 3 General Instruction 14 Select desktop Start choice Logout to exit client ...

Страница 25: ...ar 6 0 standard Based on Energy Star 6 0 standard Speaker Yes Yes Mic phone Yes Yes Earphone Yes Yes Power saving mode 6 W 6 W Power off mode 0 5 W 0 5 W Tilt 5 to 23 5 to 23 Mounting Interface 100mm x 100mm 100mm x 100mm Phys Dimension WxHxD 523 2 x 497 0 x 224 8 mm 567 60 x 517 15 x 244 81 mm Box Dimension WxHxD 654 x 397 x 176 mm 685 x 421 x 179 mm Net Weight Esti 5 3 kg 6 0 kg Gross Weight Est...

Страница 26: ...ess the A button for two seconds to automatically adjust the image Adjust the H Position or V Position settings via OSD Screen image bounces or a wave pattern is present in the image Make sure the signal cable is properly connected to the monitor and the computer Move electrical devices that may cause electrical interference Screen image has color defects white does not look white Inspect the sign...

Страница 27: ... 875KHz 848 x 480 60Hz 31 02KHz 1024 x 768 60Hz 48 363KHz 1024 x 768 70Hz 56 476KHz 1024 x 768 75Hz 60 023KHz 1152 x 864 75Hz 67 5KHz 1280 x 720 60Hz 44 772KHz 1280 x 800 60Hz 49 702KHz 1280 x 960 60Hz 60KHz 1280 x 1024 60Hz 63 981KHz 1280 x 1024 75Hz 79 976KHz 1366 x 768 60Hz 47 712KHz 1440 x 900 60Hz 55 935KHz 1680 x 1050 60Hz 65 29KHz 1680 x 1050 60Hz 64 674KHz 1920 x 1080 60Hz 67 5KHz 1920 x 1...

Отзывы: