background image

1-3

ASUS BM5365

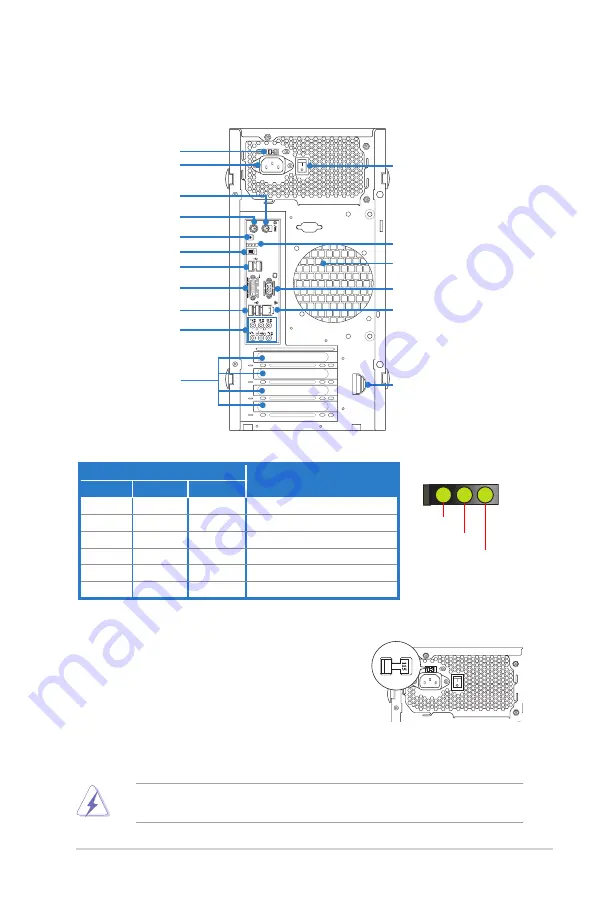
Voltage selector

The PSU has a 115 V/230 V voltage selector switch 

located beside the power connector. Use this switch 

to select the appropriate system input voltage 

according to the voltage supply in your area.

If the voltage supply in your area is 100–127 V, set 

this switch to 115 V.

If the voltage supply in your area is 200–240 V, set this switch to 230 V.

1.3 

Rear panel

The system rear panel includes the power connector and several I/O ports that 

allow convenient connection of devices.

Setting the switch to 115V in a 230V environment or 230V in a 115V 

environment will seriously damage the system!

PS/2 Mouse Port

PS/2 Keyboard Port

Debug LED

Voltage selector

Expansion Slot Cover

Power Connector

DVI Port

USB 2.0 Ports

Audio I/O Ports

Power Supply Switch

Chassis Fan Vent

LAN (RJ-45) Port

ME Switch

Expansion Slots

VGA Port

Clear CMOS button

USB 2.0 Ports

Debug LED

Description

Left

Middle

Right

ON

OFF

OFF

Detecting system memory

OFF

ON

OFF

Initializing VGA

ON

ON

OFF

Initializing CPU

OFF

OFF

ON

Detecting Hard Disk Drive

ON

OFF

ON

BIOS error message

OFF

ON

ON

Initializing ROM

Debug LED indications

Left

Middle

Right

Содержание BM5365

Страница 1: ...BM5365 ASUS PC User s Manual ...

Страница 2: ...TICULAR PURPOSE IN NO EVENT SHALL ASUS ITS DIRECTORS OFFICERS EMPLOYEES OR AGENTS BE LIABLE FOR ANY INDIRECT SPECIAL INCIDENTAL OR CONSEQUENTIAL DAMAGES INCLUDING DAMAGES FOR LOSS OF PROFITS LOSS OF BUSINESS LOSS OF USE OR DATA INTERRUPTION OF BUSINESS AND THE LIKE EVEN IF ASUS HAS BEEN ADVISED OF THE POSSIBILITY OF SUCH DAMAGES ARISING FROM ANY DEFECT OR ERROR IN THIS MANUAL OR PRODUCT SPECIFICAT...

Страница 3: ...VD information 2 3 2 3 1 Running the support DVD 2 3 2 3 2 Drivers menu 2 4 2 3 3 Utilities menu 2 5 2 3 4 Make Disk menu 2 6 2 3 5 Manual menu 2 7 2 3 6 ASUS contact information 2 7 2 3 6 Other information 2 8 2 4 ASUS AI Manager 2 10 2 4 1 Installing AI Manager 2 10 2 4 2 Launching AI Manager 2 10 2 4 3 AI Manager Quick Bar 2 10 2 4 4 Main 2 11 2 4 5 Support 2 14 2 4 6 Information 2 14 2 5 Loadi...

Страница 4: ...ation If this equipment does cause harmful interference to radio or television reception which can be determined by turning the equipment off and on the user is encouraged to try to correct the interference by one or more of the following measures Reorient or relocate the receiving antenna Increase the separation between the equipment and receiver Connect the equipment to an outlet on a circuit di...

Страница 5: ...m ensure that the power cables for the devices are unplugged before the signal cables are connected If the power supply is broken do not try to fix it by yourself Contact a qualified service technician or your retailer Operation safety Before installing devices into the system carefully read all the documentation that came with the package Before using the product make sure all cables are correctl...

Страница 6: ... on the front and rear panel and internal components 2 Chapter 2 Starting up This chapter helps you power up the system and install drivers and utilities from the support CD Lithium Ion Battery Warning CAUTION Danger of explosion if battery is incorrectly replaced Replace only with the same or equivalent type recommended by the manufacturer Dispose of used batteries according to the manufacturer s...

Страница 7: ...ch as warranty flyers that may have been added by your dealer These documents are not part of the standard package Conventions used in this guide To make sure that you perform certain tasks properly take note of the following symbols used throughout this manual DANGER WARNING Information to prevent injury to yourself when trying to complete a task CAUTION Information to prevent damage to the compo...

Страница 8: ... the following items If any of the items is damaged or missing contact your retailer immediately 1 ASUS BM5365 barebone system with ASUS motherboard Power supply unit ASUS chassis 2 Cable AC power cable 3 CD Support CD Recovery CD 4 Documents User guide Warranty card ...

Страница 9: ...Chapter 1 System introduction This chapter gives a general description of the ASUS BM5365 The chapter lists the system features including introduction on the front and rear panel and internal components ...

Страница 10: ...the 775 land package The system supports up to 16 GB of system memory using DDR2 1066 800 667 MHz DIMMs High resolution graphics via integrated graphics controller or PCI Express x16 slot Serial ATA USB 2 0 and 8 channel audio feature the system and take you ahead in the world of power computing 1 2 Front panel The front panel includes the optical drive bays floppy disk drive bay power button and ...

Страница 11: ...low convenient connection of devices Setting the switch to 115V in a 230V environment or 230V in a 115V environment will seriously damage the system PS 2 Mouse Port PS 2 Keyboard Port Debug LED Voltage selector Expansion Slot Cover Power Connector DVI Port USB 2 0 Ports Audio I O Ports Power Supply Switch Chassis Fan Vent LAN RJ 45 Port ME Switch Expansion Slots VGA Port Clear CMOS button USB 2 0 ...

Страница 12: ...pherals refer to the respective manuals for details Microphone USB VGA PS 2 Mouse Expansion slots RJ 45 Power connector Line In Line Out DVI Side Speaker Out Center Subwoofer Rear Speaker Out USB P S2 Keyboard Due to the chipset limitation we recommend that you install the graphics card onto PCIEX16_1 slot when using one graphics card When two graphics cards are installed the PCIEX16_2 slot runs a...

Страница 13: ...Chapter 2 Starting up This chapter helps you power up the system and install drivers and utilities from the support DVD ...

Страница 14: ...ardware Motherboard settings and hardware options vary Use the setup procedures presented in this chapter for reference only Refer to your OS documentation for detailed information 2 2 Powering up Press the system power button to enter the OS Press to turn ON the system DO NOT install the drivers from the Windows operating system at the first time bootup Install the drivers bundled in the support ...

Страница 15: ...ains the drivers software applications and utilities that you can install to avail all motherboard features 2 3 1 Running the support DVD Place the support DVD to the optical drive The DVD automatically displays the Drivers menu if Autorun is enabled in your computer The contents of the support DVD are subject to change at any time without notice Visit the ASUS website www asus com for updates Cli...

Страница 16: ...talls the ASUS InstAll installation wizard Intel Chipset Inf Update Program Installs the Intel chipset inf update program Realtek Audio Driver Installs the Realtek Audio driver Intel Graphics Accelerator Driver Instals the Intel Graphics Accelerator Driver Intel R LAN Driver Installs the Intel LAN driver Management Engine Inerface Installs the Management Engine Interface Intel TPM Driver Installs ...

Страница 17: ...equires an Internet connection either through a network or an Internet Service Provider ISP Intel IT Director Intel IT Director is a software that monitors security data protection and network concerns It includes a centrally monitored dashboard for overseeing a network of wired or wireless clients within a Local Area Network LAN Intel System Defense Utility Intel System Defense Utility enables yo...

Страница 18: ...ectX improves the multimedia features of your computer so you can enjoy watching TV and movies capturing videos or playing games in your computer Visit the Microsoft website www microsoft com for updates ASUS Screen Saver Installs ASUS screen saver 2 3 4 Make Disk menu The Make Disk menu allows you to make a RAID driver disk Intel ICH10R 32 bit RAID AHCI Driver Allows you to create an Intel ICH10R...

Страница 19: ...ontact information 2 3 5 Manual menu The Manual menu contains a list of supplementary user manuals Click an item to open the folder of the user manual Most user manual files are in Portable Document Format PDF Install the Adobe Reader from the Utilities menu before opening a user manual file ...

Страница 20: ... the screen give additional information on the motherboard and the contents of the support DVD Click an icon to display the specified information Motherboard Info Displays the general specifications of the motherboard Browse this DVD Displays the support DVD contents in graphical format ...

Страница 21: ...ist Displays the contents of the support DVD and a brief description of each in text format Technical support form Displays the ASUS Technical Support Request Form that you have to fill out when requesting technical support ...

Страница 22: ...e DVD 2 Click the Utilities tab then click ASUS AI Manager 3 Follow the onscreen instructions to complete the installation 2 4 2 Launching AI Manager You can launch AI Manager right after installation or anytime from the Windows desktop To launch AI Manager from the Windows desktop click Start All Programs ASUS AI Manager AI Manager v1 xx xx The AI Manager Quick Bar appears After launching the app...

Страница 23: ...4 Main Launch AI Disk AI Security AI Gear and AI Probe from the Main menu Click the small triangle to open or close the Main menu Click to open close the Main menu AI Disk AI Disk allows you to easily clear the temporary IE files IE URLs IE cookies IE history list Recycle Bin and recently opened files list Select the item that you want to clear then click Apply ...

Страница 24: ...storage devices such as a USB flash disk and a CD DVD disk which ensures more security for your data To lock a device 1 If you are using AI Security for the first time key in a password consisting of up to 20 alphanumeric characters 2 Confirm your password 3 Key in your password hint optional 4 Click OK ...

Страница 25: ...annot be accessed without the password To unlock a device 1 Deselect the device you locked then click Apply 2 Key in your password then click OK To change your password click Change Password and follow the onscreen instructions 5 Select the device you want to lock then click Apply ...

Страница 26: ... to the ASUS international website online technical support website online download support website and contact information website 2 4 6 Information The Information menu displays the general information of your system motherboard CPU BIOS memory and other devices installed ...

Страница 27: ...tem and press F8 when the ASUS logo appears Select the optical drive as the boot device 3 Select where to install a new system Options are Recover system to a partition This option deletes only the partition you selected allows you to keep other partitions and creates a new system partition as drive C Recovery system to entire HD This option deletes all partitions from your hard disk and creates a...

Страница 28: ...tem partition as drive C Recover Windows to entire HD This option deletes all partitions from your hard disk and creates a new system partition as drive C Recover Windows to entire HD with 2 partitions This option deletes all partitions from your hard disk and creates two new system partitions The first partition takes up 60 of the whole hard disk size and the second partition takes up 40 The new ...

Отзывы: