background image

Chapter 2:  Hardware setup

2-22

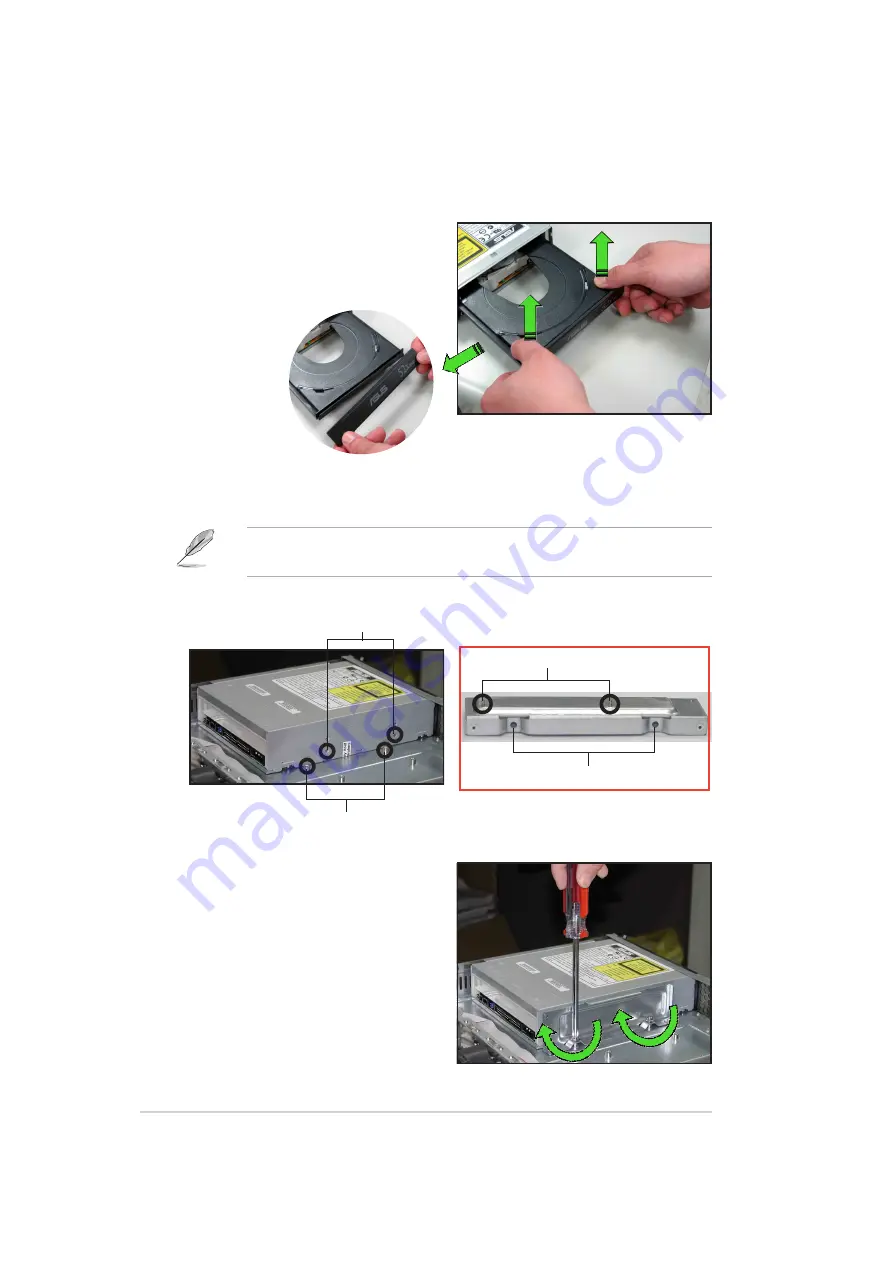
To install an optical drive:

1. Please follow previous Step 1

instructions to tray-out and to
remove the ODD bezel.

2. Then put the ODD inside the server and insert ODD into the ODD bay.

3. Secure the bracket with two screws

and re-connect the power and
signal cables in place. Put back the
tray bezel to finish ODD installation.

Drive holes to match the
pegs on the metal bracket

Standoffs to match the
holes on the metal bracket

Holes to match the standoffs

Bracket pegs

Drive metal bracket

The purpose of the metal bracket is to secure the ODD us securely in
place.

Содержание AP140R-E1

Страница 1: ...Intel Pentium 4 1U Rackmount Server 800 533MHz Front Side Bus AP140R E1 User Guide ...

Страница 2: ...terruption of business and the like even if ASUS has been advised of the possibility of such damages arising from any defect or error in this manual or product Specifications and information contained in this manual ae furnished for informational use only and are subject to change at any time without notice and should not be construed as a commitment by ASUS ASUS assumes no responsibility or liabi...

Страница 3: ... CPU 2 4 2 2 1 Removing the CPU heatsink 2 4 2 2 2 Installing a CPU 2 4 2 2 3 Installing the CPU heatsink 2 6 2 3 System memory 2 7 2 3 1 Memory configurations 2 7 2 3 2 Installing a DIMM 2 9 2 3 3 Removing a DIMM 2 9 2 4 Hard disk drives 2 10 2 4 1 Installing an IDE hard disk drive 2 10 2 4 2 Installing a Serial ATA hard disk drive 2 12 2 4 3 Installing a Hot Swap SATA HDD AA2 model 2 13 2 5 Expa...

Страница 4: ...up 5 1 5 1 Managing and updating your BIOS 5 2 5 1 1 Creating a bootable floppy disk 5 2 5 1 2 Updating the BIOS 5 3 5 2 BIOS Setup program 5 4 5 2 1 BIOS menu screen 5 5 5 2 2 Menu bar 5 5 5 2 3 Navigation keys 5 6 5 2 4 General help 5 6 5 2 5 Sub menu 5 6 5 2 6 Scroll bar 5 6 5 2 7 Pop up window 5 6 5 3 Main menu 5 7 5 3 1 Primary IDE Master 5 8 5 3 2 Primary IDE Slave 5 11 5 3 3 Secondary IDE M...

Страница 5: ... 1 RAID configurations 6 2 6 1 2 Installing hard disk drives 6 2 6 1 3 Setting the RAID item in BIOS 6 3 6 1 4 RAID configuration utility 6 3 6 1 5 Creating a RAID driver disk 6 21 6 1 6 Installing the Intel 6300ESB RAID controller driver 6 22 6 2 LAN 6 29 6 2 1 Windows 2000 Server 6 29 6 2 2 Windows 2003 Server 6 31 6 2 3 Red Hat Linux 9 0 6 33 6 3 VGA Driver Installation 6 34 6 3 1 Windows 2000 ...

Страница 6: ... harmful interference to radio or television reception which can be determined by turning the equipment off and on the user is encouraged to try to correct the interference by one or more of the following measures Reorient or relocate the receiving antenna Increase the separation between the equipment and receiver Connect the equipment to an outlet on a circuit different from that to which the rec...

Страница 7: ...fied or experienced engineers Before operating the server carefully read all the manuals included with the server package Before using the server make sure all cables are correctly connected and the power cables are not damaged If any damage is detected contact your dealer as soon as possible To avoid short circuits keep paper clips screws and staples away from connectors slots sockets and circuit...

Страница 8: ...yout and brief descriptions of the jumpers and internal connectors 5 Chapter 5 BIOS setup This chapter tells how to change the system settings through the BIOS Setup menus 6 Chapter 6 Driver Installation This chapter provides instructions for creating and configuring RAID and installing the necessary drivers for different system components 7 Appendix References This appendix includes additional in...

Страница 9: ...1 1 ASUS AP140R E1 1U barebone server This chapter describes the general features of the barebone server It includes sections on front panel and rear panel specifications Chapter 1 Product introduction ...

Страница 10: ...ackmount chassis with ASUS PSCH LR motherboard 300W power supply SATA backplane 52X Optical drive Chassis fan HDD fan Hot swap SATA HDD bays x 2 IDE cables power cables SATA cables x 2 2 CPU heatsink 3 Front Input Output panel 4 SMBUs Cable 5 ASUS AR 13 rackmonut rail kit 6 AC power cable 7 SATA Power cable 8 System screws and cables 9 Bundled CDs AP140R E1 drivers and utilities CD Include ASUS AS...

Страница 11: ... DDR DIMMs LAN Intel 82547GI Gigabit LAN controller CSA I F for LAN2 port Intel 82541GI Gigabit LAN controller 32 bit for LAN1 port VGA ATI RAGE XL PCI based VGA controller Expansion slots 2 x 64 bit 66MHz 3V PCI X slots Drive bays 1 x 5 25 inch bay with installed ASUS 52X CD ROM 2 x 3 5 inch internal HDD bays Front I O 2 x USB 2 0 ports Power switch Reset switch Location switch Power LED HDD Acce...

Страница 12: ...s are located on the front panel Refer to section 1 6 1 Front panel LEDs for the LED descriptions Refer to section 1 6 2 Rear panel LEDs for the LED descriptions HDD bays USB 2 0 ports CD ROM drive Power button Power LED Location switch Reset button Location LED Message LED LAN2 LED HDD Access LED Rack screw Rack screw LAN1 LED Power supply fan PS 2 keyboard port PS 2 mouse port VGA port Gigabit L...

Страница 13: ...The barebone system does not include a floppy disk drive Connect an external floppy disk drive USB interface to any of the USB 2 0 ports on the front or rear panel if you need to use a floppy disk 5 7 1 4 6 8 9 10 2 3 1 Power supply 2 Rear fan 3 PSCH LR motherboard 4 PCI X riser card PCIX2 Not include PCI X card 5 PCI X riser card PCIX1 Not include PCI X card 6 CPU heatsink 7 System fans 8 Device ...

Страница 14: ...ocation LED OFF Normal status ON Location switch is pressed Press the location switch again to turn off LAN LED OFF No LAN connection Blinking LAN is transmitting or receiving data ON LAN connection is present 1 6 2 Rear panel LEDs Message LED LAN2 LED HDD Access LED LAN1 LED Power LED Location LED SPEED ACT LNK RJ 45 Location LED ACT LINK LED SPEED LED Status Description Status Description OFF No...

Страница 15: ...ASUS AP140R E1 1U barebone server 2 1 This chapter lists the hardware setup procedures that you have to perform when installing or removing system components Chapter 2 Hardware setup ...

Страница 16: ...e cover 1 Use a Phillips screwdriver to remove the screw on each front end of the top cover 2 Firmly hold the cover and slide it toward the rear panel for about half an inch until it is disengaged from the chassis 3 Lift the cover from the chassis 2 Loosen the two thumbscrews on the rear panel to release the top cover from the chassis Thumbscrews 1 2 inch distance ...

Страница 17: ...he rear and leaving a gap of about half an inch from the front panel Side lock groove Thumbscrews 3 Slide the cover toward the front until it snaps in place 4 Tighten the thumbscrews on the rear to secure the cover 2 Make sure that the side markings on the cover two on each side are aligned to the grooves on the chassis Side markings ...

Страница 18: ...CPU 1 Locate the CPU socket on the motherboard and take note of the Pin 1 on the socket 2 2 1 Removing the CPU heatsink To remove the CPU heatsink 1 Use a Phillips cross screwdriver to loosen the four screws that secure the heatsink until it is released 2 Carefully lift the heatsink from the motherboard You don t need to detach the screws from the heatsink If your barebone system comes with the CP...

Страница 19: ...lace Socket Lever 90 100 Gold Mark The CPU fits only in one correct orientation DO NOT force the CPU into the socket to prevent bending the pins and damaging the CPU 5 Carefully push down the socket lever to secure the CPU The lever clicks on the side tab to indicate that it is locked 6 Apply the thermal interface material thermal grease to the top of the CPU This thermal grease should come with t...

Страница 20: ...th a Philips cross screwdriver just enough to attach the heatsink to the motherboard 3 When the four screws are attached tighten them one by one to completely secure the heatsink 2 2 3 Installing the CPU heatsink To install the CPU heatsink 1 Carefully place the heatsink on top of the installed CPU ...

Страница 21: ...ded configurations may cause memory sizing error or system boot failure Use any of the recommended configurations in Table 1 2 In dual channel configurations install only identical the same type and size DDR DIMM pairs for each channel 3 Always install DIMMs with the same CAS latency For optimum compatibility it is recommended that you obtain memory modules from the same vendor 4 Make sure that th...

Страница 22: ...Mode DIMM_A1 DIMM_A2 DIMM_B1 DIMM_B2 blue black blue black Single channel 1 Populated 2 Populated 3 Populated 4 Populated Dual channel 1 Populated Populated 2 Populated Populated 3 Populated Populated Populated Populated Table 2 Memory frequency CPU FSB synchronization Table 1 Recommended memory configurations CPU FSB DDR DIMM Type Memory Frequency 800 MHz PC3200 PC2700 PC2100 400 333 266 MHz 533 ...

Страница 23: ...reak on the socket 3 Firmly insert the DIMM into the socket until the retaining clips snap back in place and the DIMM is properly seated 1 While supporting the DIMM with your fingers press the retaining clips outward simultaneously to release the DIMM from the socket 2 Remove the DIMM from the socket 2 3 3 Removing a DIMM Follow these steps to remove a DIMM Follow these steps to install a DIMM To ...

Страница 24: ...d disk tray to the chassis Slide the tray backward until the two tray lock tabs are disengaged Lift the tray from the bay Lock tab 2 Place a hard disk drive into the drive tray and secure it with four screws 3 Carefully place the tray with installed hard disk drive into the drive bay Slide it forward until the front end aligns with the front panel and the screw hole matches the standoff ...

Страница 25: ... is pre connected to the primary IDE connector on the motherboard 6 Repeat steps 1 to 5 to install a second IDE drive 7 When finished installing devices join the power and signal cables together with the cable clamp to prevent interference to the rotating fan blades Cable clamp Ensure that all cables are held together with the cable clamp specially those near the system fans Loose cables may get c...

Страница 26: ...ck of the drive as shown above For Serial ATA HDDs without a 4 pin power connector use an SATA power cable with a 4 pin 15 pin plugs Connect a 4 pin female device plug from the power supply to the 4 pin male plug of the SATA power cable Connect the 15 pin SATA power plug to the power connector on the back of the drive 7 pin SATA cable 4 pin device power cable SATA connector 4 pin male 15 pin SATA ...

Страница 27: ...Each side has three holes to fit different types of hard disk drives Use two screws on each side to secure the hard disk drive 4 Place a SATA hard disk drive on the tray then secure it with four screws To install a hot swap SATA HDD 1 Release a drive tray by pushing the spring lock to the right then pulling the tray lever outward The drive tray ejects slightly after you pull out the lever ...

Страница 28: ...h the bay edge 7 Repeat steps 1 to 6 if you wish to install a second SATA drive When installed the SATA connector on the drive connects to the SATA interface on the backplane 8 Connect the bundled SATA cables to the connectors on the SATA backplane Refer to section 2 7 SATA backplane cabling for information on the SATA backplane cable connections SATA interface SATA interface SATA interface SATA i...

Страница 29: ...d to the left bracket as shown then secure the card with a screw The riser card brackets have different orientation For illustration purposes the riser card brackets will be referred to as right bracket and left bracket The PCI X slots on the riser cards support 3V universal type 32 bit 64 bit PCI cards 2 5 1 Installing a PCI card To install a PCI card 1 Firmly hold a riser card bracket then pull ...

Страница 30: ...t on the motherboard Make sure that the golden connectors completely fit the slot and the bracket aligns with the rear panel When properly installed the riser card brackets with PCI cards appear as shown 7 Connect the cable s to the cards if applicable 4 Install the left bracket with the card into the PCI X slot on the motherboard Make sure that the golden connectors completely fit the slot and th...

Страница 31: ...stable and the card inoperable Standard interrupt assignments IRQ assignments for this motherboard IRQ Priority Standard Function 0 1 System Timer 1 2 Keyboard Controller 2 N A Programmable Interrupt 3 11 Communications Port COM2 4 12 Communications Port COM1 5 13 Sound Card sometimes LPT2 6 14 Floppy Disk Controller 7 15 Printer Port LPT1 8 3 System CMOS Real Time Clock 9 4 ACPI Mode when used 10...

Страница 32: ...s Pre connected system cables 1 Rear fan connector FAN5 2 4 pin 12V power connector from power supply to motherboard 3 20 pin ATX power connector from power supply to motherboard 4 System fan connector FAN6 5 System fan connectors FAN2 FAN3 FAN4 6 Device fan connector FAN1 7 Panel connector for front panel LEDs 8 Front panel USB 2 0 2 ports 9 Primary IDE from motherboard to HDDs 10 Secondary IDE f...

Страница 33: ...s from the connectors labeled FAN2 FAN3 FAN4 and FAN6 on the motherboard 2 Remove the four screws that secure a 40mm x 56mm system fan 3 Repeat step 2 to uninstall the other 40mm x 56mm system fan FAN6 FAN4 FAN3 FAN2 FAN6 FAN2 FAN3 FAN4 FAN5 2 7 3 Rear fan To uninstall the rear fan 1 Disconnect the system fan cable from the connector labeled FAN5 on the motherboard 2 From the rear panel remove the...

Страница 34: ...ected to the motherboard and system devices 4 Slide the power supply forward for about half an inch then carefully lift it out from the chassis 3 From the rear panel remove the two screws the secure the rear end of the power supply 2 Use a Phillips cross screwdriver to remove the screw the secures the front end of the power supply ...

Страница 35: ...Use a Philips cross screwdriver to remove the two screws that secure the metal bracket on the side of the ODD 5 Remove the bracket to release the drive 3 Disconnect the power and signal cabled connected to the rear of the ODD When changing ODD the black ODD front plastic housing is already removed User can uninstall install ODD after remove the tray bezel 2 Then remove the tray bezel demonstrated ...

Страница 36: ... into the ODD bay 3 Secure the bracket with two screws and re connect the power and signal cables in place Put back the tray bezel to finish ODD installation Drive holes to match the pegs on the metal bracket Standoffs to match the holes on the metal bracket Holes to match the standoffs Bracket pegs Drive metal bracket The purpose of the metal bracket is to secure the ODD us securely in place ...

Страница 37: ...s Refer to the corresponding sections for instructions on removing these components 3 Use a Phillips cross screwdriver to remove the ten 10 screws that secure the motherboard to the base of the chassis The locations of the screw holes are indicated in the following figure 4 Carefully lift the motherboard out of the chassis To install a motherboard position the I O connectors toward the rear panel ...

Страница 38: ...Chapter 2 Hardware setup 2 24 ...

Страница 39: ...ASUS AP140R E1 1U barebone server 2 1 This chapter describes the optional installation procedures for the barebone server Chapter 3 Installation options ...

Страница 40: ...d bolt type screws 3 2 Rack rails assembly To assemble the rack rails 1 Determine the depth of the rack where you wish to install the system 2 Match one long and one short rail to your desired length and fix them together using four 4 pairs of nuts and bolts 3 Repeat step 2 to assemble the other rail pair Nuts Bolts Left pair Right pair Front ends Rear ends Nuts on outer side Bolts on inner side ...

Страница 41: ...ront 1U space where you attached the rail 6 Remove the screws from the rear 1U space and align the rear end holes 7 Drive in two screws on the outer holes to secure the rear end 8 From the rack front find the corresponding 1U space for the second rail pair 9 Repeat steps 2 to 7 to attach the second rail pair When properly installed the rack rails appear as shown 3 Align the front end holes of a ra...

Страница 42: ... both sides and insert the rear panel side to the front end of the rack rail 2 Carefully push the server all the way to the back until the front panel fits the front end of the rack and the rack screws on the server match the middle hole on the rack 3 Tighten the two rack screws to secure the server to the rack Rack screw ...

Страница 43: ...ASUS AP140R E1 1U barebone server 2 1 This chapter includes the motherboard layout and brief descriptions of the jumpers and internal connectors Chapter 4 Motherboard info ...

Страница 44: ...ES MCH FLOPPY1 PRI_IDE1 SEC_IDE1 Super I O Socket 478 ATX Power Connector CR2032 3V Lithium Cell CMOS Power 4Mbit Firmware Hub SATA2 COM1 SATA1 FAN6 FAN2 FAN1 FAN3 FAN4 VGA_EN1 RECOVERY1 KBPWR1 PS2_KB1 PS2_MS1 LAN_EN2 LAN_EN1 PCIX1 PCIX2 LAN1 LAN2 USB1 USB2 SW1 LOCLED1 CHASSIS1 J3 BPSMB1 Intel 82547GI Intel Hance Rapid ICH ATX12V1 MLED1 ATI RAGE XL VGA Controller PCI1 USB34 PANEL1 Intel 82541GI Th...

Страница 45: ... blue SEC_IDE black 4 9 4 Serial ATA connectors 7 pin SATA1 SATA2 4 10 5 ATX power connectors 20 pin 4 pin 4 11 6 LED connector 2 pin J3 4 11 7 Fan connectors 3 pin FAN1 2 3 4 5 6 4 12 8 Chassis intrusion connector 4 1 pin CHASSIS1 4 12 9 USB header 10 1 pin USB34 4 13 10 System panel connector 20 1 pin PANEL1 4 13 LAN connection indicators 2 pin LAN1_LED LAN2_LED 4 14 Hard disk activity LED 2 pin...

Страница 46: ...on the keyboard the default is the Space Bar This feature requires an ATX power supply that can supply at least 1A on the 5VSB lead and a corresponding setting in the BIOS see section 4 5 1 Power Up Control PSCH LR PSCH LR LAN_EN1 Setting Enable Default Disable LAN_EN1 2 3 1 2 2 Gigabit LAN1 controller setting 3 pin LAN_EN1 This jumper allows you to enable or disable the Intel 82541GI Gigabit LAN ...

Страница 47: ...rd VGA Set this jumper to disabled pins 2 3 if you wish to install a VGA card PSCH LR PSCH LR LAN_EN2 Setting Enable Default Disable LAN_EN2 2 3 1 2 3 Gigabit LAN2 controller setting 3 pin LAN_EN2 This jumper allows you to enable or disable the Intel 82547GI Gigabit LAN controller Setting this jumper to pins 2 3 disables the Gigabit LAN port RJ 45 on the rear panel that corresponds to this control...

Страница 48: ...er allows you to update recover the BIOS quickly To update the BIOS 1 Prepare a floppy disk that contains the latest BIOS for the motherboard xxxx xxx BIN and the AWDFLASH EXE utility 2 Set the jumper to pins 2 3 3 Insert the floppy disk then turn on the system to update the BIOS 4 Shut down the system 5 Set the jumper back to pins 1 2 6 Turn on the system ...

Страница 49: ...ords is powered by the onboard button cell battery To erase the RTC RAM 1 Turn OFF the computer and unplug the power cord 2 Remove the onboard battery 3 Move the jumper cap from pins 1 2 default to pins 2 3 Keep the cap on pins 2 3 for about 5 10 seconds then move the cap back to pins 1 2 4 Re install the onboard battery 5 Plug the power cord and turn ON the computer 6 Hold down the Del key during...

Страница 50: ... disk drive connector 34 1 pin FLOPPY1 This connector supports the provided floppy drive ribbon cable After connecting one end to the motherboard connect the other end to the floppy drive Pin 5 is removed to prevent incorrect insertion when using ribbon cables with pin 5 plug PSCH LR PSCH LR SMB Connector BPSMB1 1 SMBCLK Ground SMBDATA 3V FLOATING 2 SMBus connector 6 1 pin BPSMB1 This connector al...

Страница 51: ...drive as a slave device by setting its jumper accordingly Refer to the hard disk documentation for the jumper settings BIOS supports specific device bootup You may configure two hard disks to be both master devices with two ribbon cables one for the primary IDE connector and another for the secondary IDE connector 1 Pin 20 on each IDE connector is removed to match the covered hole on the UltraDMA ...

Страница 52: ... interface allows up to 150 MB s data transfer rate faster than the standard parallel ATA with 133 MB s Ultra ATA 133 If you installed Serial ATA hard disks you may create a RAID 0 RAID 1 configuration using the RAID feature of the Intel 6300ESB ICH Important notes on Serial ATA and RAID feature 1 You must enable the RAID function on the BIOS if you wish to create a RAID disk Refer to Chapter 5 BI...

Страница 53: ...t forget to connect the 4 pin ATX 12V power plug Otherwise the system does not boot up 2 Make sure that your ATX 12V power supply can provide 8A on the 12V lead and at least 1A on the 5 volt standby lead 5VSB The minimum recommended wattage is 300W The system may become unstable or may not boot up if the power is inadequate 6 LED connector 2 pin J3 For some storage cards such as SCSI cards with ac...

Страница 54: ...the ground pin of the connector 8 Chassis intrusion connector 4 1 pin CHASSIS1 This lead is for a chassis designed with intrusion detection feature This requires an external detection mechanism such as a chassis intrusion sensor or microswitch When you remove any chassis component the sensor triggers and sends a high level signal to this lead to record a chassis intrusion event By default the pins...

Страница 55: ...el functions 9 USB header 10 1 pin USB34 This USB header is connects to the two USB ports on the front panel The header complies with USB 2 0 specification that supports up to 480 Mbps connection speed This speed advantage over the conventional 12 Mbps on USB 1 1 allows faster Internet connection interactive gaming and simultaneous running of high speed peripherals PSCH LR PSCH LR USB Connector 5V...

Страница 56: ...ET These leads connect to the reset switch on the front panel using a cable for rebooting the system without turning off the system power ATX power button Soft off switch 2 pin PWRBTN This lead connects a switch that controls the system power Pressing the power switch turns the system between ON and SLEEP or ON and SOFT OFF depending on the BIOS or OS settings Pressing the power switch while in th...

Страница 57: ...ASUS AP140R E1 1U barebone server 5 1 1 1 This chapter tells how to change the system settings through the BIOS Setup menus Chapter 5 BIOS setup ...

Страница 58: ...s XP environment a Insert a new 1 44 MB floppy disk in the floppy disk drive b From the Windows desktop click Start My Computer c In the My Computer window click the 3 1 2 Floppy icon d From the Menu bar click File Format e Select Create an MS DOS Startup Disk in the Format Options field then click Start 2 Copy the original or the latest motherboard BIOS to the bootable floppy disk The barebone sy...

Страница 59: ...o a floppy disk 2 Insert the disk that contains the new BIOS file into the floppy drive 5 AWDFLASH checks the new BIOS file from the floppy disk 6 After verification AWDFLASH flashes the new BIOS file Do not shut down the computer during the flash process 7 After the new BIOS file is copied the computer returns to POST Save only the updated BIOS file in the floppy disk to avoid loading the wrong B...

Страница 60: ... the CMOS RAM of the Flash ROM The Flash ROM on the motherboard stores the Setup utility When you start up the computer the system provides you with the opportunity to run this program Press Delete during the Power On Self Test POST to enter the Setup utility otherwise POST continues with its test routines If you wish to enter Setup after POST restart the system by pressing Ctrl Alt Delete or by p...

Страница 61: ...d loading default settings To select the menu bar items press the right or left arrow key on the keyboard until the desired item is highlighted 5 2 1 BIOS menu screen Item Specific Help Change the day month year and century Time hh mm ss 11 10 30 Date mm dd yy Wed Mar 24 2004 Legacy Diskette A 1 44M 3 5 in Floppy 3 Mode Support Disabled Primary IDE Master None Primary IDE Slave None Secondary IDE ...

Страница 62: ... right side of a menu screen when there are items that do not fit on the screen Press Up Down arrow keys or PageUp PageDown keys to display the other items on the screen 5 2 7 Pop up window Select an item in the menu then press Enter to display a pop up window with the configuration options for that item The navigation keys differ from one screen to another 5 2 3 Navigation keys At the bottom of a...

Страница 63: ...specify usually the current date The format is month day year Valid values for month day and year are Month 1 to 12 Day 1 to 31 Year 1999 to 2099 Use the Tab key to move between the month day and year fields Legacy Diskette A 1 44M 3 5 in Sets the type of floppy drive installed Configuration options None 360K 5 25 in 1 2M 5 25 in 720K 3 5 in 1 44M 3 5 in 2 88M 3 5 in Base Extended Total Memory xxx...

Страница 64: ...ct the presence of a IDE drive Primary IDE Master Auto Select Auto to automatically detect an IDE drive If automatic detection is successful the setup BIOS automatically fills in the correct values for the remaining fields on this sub menu If automatic detection fails this may be because the IDE drive is too old or too new If the drive was already formatted on a previous system the BIOS may detect...

Страница 65: ...you can manually enter the drive values Configuration options CHS LBA Large Auto PIO Mode Auto Sets the PIO mode for the IDE drive The settings Mode 0 to 4 allow successive increase in performance Configuration options Auto Mode 0 Mode 1 Mode 2 Mode 3 Mode 4 UDMA Mode Auto When this item is set to Auto the UDMA capability allows improved transfer speeds and data integrity for supported IDE drives ...

Страница 66: ...er to the drive documentation or the drive label for this information To enter a value you may also highlight the item then press Enter to display a pop up menu Type in the value from the drive documentation then press Enter Capacity xxxxx MB Displays the auto detected hard disk capacity The value is not user configurable Cylinder Shows the number of the hard disk cylinders Head Shows the number o...

Страница 67: ... format new IDE drives This is necessary so that you can write or read data from the hard disk Make sure to set the partition of the Primary IDE hard disk drive to Active Precomp Displays the precompressed volumes on the hard disk if any on the motherboard Landing Zone Displays the drive s maximum usable capacity as calculated by the BIOS based on the drive information you entered Sector Shows the...

Страница 68: ...the console redirection settings Select an item then press Enter to display a pop up menu with the configuration options Advanced BIOS Features CPU Configuration Memory Configuration Chipset Onboard Device PCIPnP USB Configuration Item Specific Help Virus Protection Boot Sequence Select Menu Console Redirection Enabled Baud Rate 19200 Agent After Boot Disabled Advanced BIOS Features Item Specific ...

Страница 69: ...tions 9600 19200 38400 57600 115200 Agent After Boot Disabled When set to enable the server management agent running after a system boot Configuration options Disabled Enabled CPU L1 L2 Cache Enabled Allows you to enable or disable the CPU L1 and L2 cache Configuration options Disabled Enabled Hyper Threading Function Disabled Allows you to enable or disable the CPU Hyper Threading Technology feat...

Страница 70: ...uration This menu shows the memory configuration settings Select an item then press Enter to display a pop up menu with the configuration options DRAM Frequency Auto Memory Timing Selectable By SPD Cache Latency Time 2 5 Active to Precharge Delay 7 DRAM RAS to CAS Delay 3 DRAM RAS Precharge 3 Memory Parity Check Enabled Memory Configuration Item Specific Help Set DRAM Frequency Select Menu ...

Страница 71: ...succeeding memory items to optimal timings Configuration options Manual By SPD CAS Latency Time 2 5 This item sets the latency in clocks between the DRAM read command and the time the data actually becomes available Configuration options 2 2 5 3 Active to Precharge Delay 7 This item controls the number of DRAM clocks used for DRAM parameters Configuration options 8 7 6 5 DRAM RAS to CAS Delay 3 Co...

Страница 72: ...aphics controller to use as primary boot device Configuration options PCI VGA Card Onboard VGA Auto Detect PCI Clk Enabled Allows you to select the maximum PCI bus speed to be porgrammed Configuration options Enabled Disabled Frequency Voltage Control Init Display First PCI VGA Slot Auto Detect PCI Clk Enabled Chipset Item Specific Help Change CPU s clock and voltage Select Menu The item Frequency...

Страница 73: ...CPU Clock Ratio 15 X Allows you to set the ratio between the CPU core clock and the FSB frequency Configuration options 15 X CPU Clock Ratio 15 X Frequency Voltage Control Item Specific Help Sets the ratio between the CPU core clock and the FSB frequency Select Menu ...

Страница 74: ...ed H W Jumper of CSA LAN Enabled Onboard CSA LAN Boot ROM Disabled H W Jumper of ONB LAN Enabled Onboard LAN Boot ROM Disabled SuperIO Device SATA Configuration Onboard Device Item Specific Help Enable Disable Onboard CSA LAN device boot ROM support Select Menu The item Onboard CSA LAN Boot ROM appears only when the jumper LAN_EN2 is set to pins 1 2 H W Jumper of ONB LAN Enabled This item shows En...

Страница 75: ... Disabled SATA Mode IDE Serial ATA Port0 Mode Primary Master Serial ATA Port1 Mode Primary Slave SATA Configuration Item Specific Help Disabled Disable SATA Controller Auto Auto arrange the BIOS Combined Mode PATA and SATA are combined Max of 2 IDE drives on each channel Enhanced Mode Enable both SATA and PATA Max of 6 IDE drives are supported SATA Only SATA is opeating in legacy mode Select Menu ...

Страница 76: ...install SATA devices on the Serial ATA channels only e Setting to Disabled disables the onboard SATA controller The RAID feature is also disabled The configuration options for the items Serial ATA Port0 Mode and Serial ATA Port1 Mode vary depending on the On chip Serial ATA and SATA Mode settings For more information refer to the Parallel and Serial ATA hard disk configurations on the next page SA...

Страница 77: ...rimary Slave Combined Mode x x Serial ATA Port0 Mode Secondary Master Serial ATA Port1 Mode Secondary Slave SATA Only x x x x Parallel and Serial ATA hard disk configurations On Primary IDE connector A Hard disk 1 B Hard disk 2 On Secondary IDE connector C Hard disk 3 D Hard disk 4 On SATA connectors E SATA hard disk 1 F SATA hard disk 2 Supported x Disabled ...

Страница 78: ...f the Extended System Configuration Data ESCD when you exit the Setup The ESCD includes information on non PnP devices Set this item to Enabled if you installed an expansion card that conflicts with other devices and cause system boot failure Configuration options Disabled Enabled Resources Controlled By Auto When set to Auto allows BIOS to automatically configure of all boot and Plug and Play dev...

Страница 79: ...Item Specific Help Legacy ISA for devices compliant with the original PC AT bus specification PCI ISA PnP for devices compliant with the Plug and Play standard whether designed for PCI or ISa bus architecture Select Menu IRQ xx assigned to PCI device The IRQ Resources sub menu is activated when the Resources Controlled by parameter is set to Manual Select PCI Device to assign an IRQ address to a P...

Страница 80: ...oller Select Menu USB Controller Enabled Allows you enable or disable the USB controller Configuration options Disabled Enabled USB 2 0 Support Enabled Allows you to enable or disable the EHCI controller Setting this item to Enabled allows the built in high speed USB support in the BIOS to turn on automatically when you install high speed USB devices Configuration options Disabled Enabled USB Lega...

Страница 81: ...m then press Enter to display the configuration options ACPI APIC Support Enabled Allows you to enable or disable the ACPI feature on the operating system Configuration options Disabled Enabled ACPI APIC Support Enabled APM Configuration Hardware Configuration Item Specific Help Enable Disable ACPI support for Operating System Select Menu ...

Страница 82: ...d Date of Month Alarm 0 Time hh mm ss Alarm 0 0 0 APM Configuration Item Specific Help This field allows you to set the automatic power saving features Select Menu Power Management User Define Allows you to set the automatic power saving features Configuration options User Define Min Saving Max Saving HDD Power Down Disabled Shuts down any IDE hard disk drives in the system after a period of inact...

Страница 83: ... options Blank Screen V H SYNC Blank DPMS Video Off In Suspend Yes This item determines when to activate the video off feature for monitor power management Configuration options Yes No MODEM Use IRQ 3 Allows you to select the IRQ assignment for the modem Configuration options NA 3 4 5 7 9 10 11 Soft Off by PWR BTTN Instant Off When set to Instant Off the system goes to soft off when you press the ...

Страница 84: ...me by Alarm Disabled Allows you to enable or disable RTC to generate a wake event When this item is enabled you can set the date and time of alarm using the two following items Configuration options Disabled Enabled Date of Month Alarm 0 To set the date of alarm highlight this item and press Enter to display a pop up menu Key in a value within the specified range then press Enter Configuration opt...

Страница 85: ...TAGE 3 15 V Voltage Monitor Item Specific Help Select Menu Voltage Monitor CPU VCORE Voltage 3 3V Voltage 12V Voltage MCH VCORE 1 5V Voltage DDR 2 5V Voltage 5VCC Voltage 5VSB Voltage VBAT Voltage Auto detected voltages through the onboard voltage regulators Voltage Monitor M B Temperature 49o C 109o F CPU Temperature 48o C 118o F Current FAN1 Speed 0 RPM Current FAN2 Speed 0 RPM Current FAN3 Spee...

Страница 86: ...ity Hard Disk Boot Priority Removable Device Priority Boot Settings Configuration Security Item Specific Help Select Menu 1st Boot Device Removable 2nd Boot Device CDROM 3rd Boot Device Hard Disk Boot Device Priority Item Specific Help Select your Boot Device Priority Select Menu 1st Boot Device Removable 2nd Boot Device CDROM 3rd Boot Device Hard Disk These items allow you to select your boot dev...

Страница 87: ...ress to move it up or to move it down the list Press ESC to exit this menu Select Menu 1 Floppy Disks Removable Device Priority Item Specific Help Use up or down arrow to select a device then press to move it up or to move it down the list Press ESC to exit this menu Select Menu 1st Master 1st Slave 2nd Master Bootable Add in Cards These items allow you to set the priority of hard disk drives if y...

Страница 88: ...k Power On Self Test Enabled This field speeds up the Power On Self Test POST routine by skipping retesting a second third and fourth time Configuration options Disabled Enabled Halt On All But diskette Sets the system to halt on errors according to the system functions specified in each option Configuration options All Errors No Errors All But Keyboard All But Diskette All But Disk Key Case Open ...

Страница 89: ... items Typematic Rate Chars Sec and Typematic Delay become configurable only when the item Typematic Setting is enabled Typematic Rate Chars Sec 6 Allows you to select the rate at which character repeats when you hold a key Configuration options 6 8 10 12 15 20 24 30 Typematic Delay Msec 250 Allows you to set the delay before key strokes begin to repeat Configuration options 250 500 750 1000 5 6 5...

Страница 90: ... menu A note about passwords The Supervisor password is required to enter the BIOS Setup program preventing unauthorized access The User password is required to boot the system preventing unauthorized use Forgot the password If you forget your password you can clear it by erasing the CMOS Real Time Clock RTC RAM The RAM data containing the password information is powered by the onboard button cell...

Страница 91: ...n press Enter or simply press F10 to save your changes to CMOS before exiting the Setup utility When a confirmation window appears with a blinking Y press Enter to save and exit type N then press Enter or simply press Esc to cancel the command and return to the Exit menu Exit Discard Changes Select this option then press Enter if you wish to exit the Setup utility without saving your changes When ...

Страница 92: ... default values type N then press Enter or simply press Esc to cancel the command and return to the Exit menu Discard Changes Select this option to discard the changes that you made and restore the previously saved values When a confirmation window appears with a blinking Y press Enter to discard any changes and load the previously saved values type N then press Enter or simply press Esc to cancel...

Страница 93: ...ASUS AP1600R E2 AA2 AI2 2 1 This chapter provides instructions for creating and configuring RAID and installing the necessary drivers for different system components Chapter 6 Driver installation ...

Страница 94: ...must be of the same size or larger than the existing drive JBOD Spanning stands for Just a Bunch of Disks and refers to hard disk drives that are not yet configured as a RAID set This configuration stores the same data redundantly on multiple disks that appear as a single disk on the operating system Spanning does not deliver any advantage over using separate disks independently and does not provi...

Страница 95: ...n utility You can create a RAID set using the utility embedded in the RAID controller For example you can use the Adaptec RAID Configuration Utility if you installed SATA hard disk drives on the SATA connectors supported by the Intel 6300ESB Southbridge The Adaptec RAID Configuration Utility allows you to create RAID 0 and RAID 1 set using the SATAhard disk drives connected to the SATAconnectors s...

Страница 96: ...or execute commands The keys on the legend box vary according to the menu level 6 1 4 1 6 1 4 1 6 1 4 1 6 1 4 1 6 1 4 1 Creating a RAID 0 set Striped Creating a RAID 0 set Striped Creating a RAID 0 set Striped Creating a RAID 0 set Striped Creating a RAID 0 set Striped To create a RAID 0 set 1 From the Adaptec RAID Configuration Utility initial menu highlight Array Configuration Utility then press...

Страница 97: ... you want to add to the array then press Insert The selected drive appears in the Selected Drives section A RAID 0 set requires two identical hard disk drives 4 When all the drives required for a RAID 0 set appear in the Selected Drives field press Enter ...

Страница 98: ...arning users that initialization will erase all array information on the drives Press Y to proceed or press N to abort creating the RAID 0 set 6 After disk initialization the utility displays the Array Properties menu Select Array Type RAID 0 Stripe then press Enter ...

Страница 99: ...nter when done 8 Move the cursor to the Stripe Size option select 64KB from the menu then press Enter to select For server systems we recommend that you use a lower array block size For multimedia computer systems used mainly for audio and video editing we recommend a higher array block size for optimum performance ...

Страница 100: ...n 6 8 9 Move the cursor to the Create RAID via option select No Init from the menu then press Enter to select 10 When you have finished setting the array properties move the cursor to Done then press Enter to create the RAID 0 set ...

Страница 101: ...r you have created the RAID 0 set the utility main menu appears Select Manage Arrays to display the array then press Enter to view the array properties 12 The screen displays the array properties Press Esc to return to the previous menu ...

Страница 102: ...et Mirrored Creating a RAID 1 set Mirrored Creating a RAID 1 set Mirrored To create a RAID 1 set 1 Follow instructions 1 to 5 of the section Creating a RAID 0 set Stripe 2 From the Array Properties menu select Array Type RAID 1 Mirror then press Enter 3 Move the cursor to the Array Label option then type a name for the RAID 1 set Press Enter when finished ...

Страница 103: ...ess Enter to select 5 When you have finished setting the array properties move the cursor to Done then press Enter to create the RAID 1 set 6 A message appears on screen informing you that a RAID 1 array created with Quick Init requires you to run a Verify W FIX on the drives for consistency Press any key to continue ...

Страница 104: ...1 set the utility main menu appears Select Manage Array to display the created set Press Enter to view the array properties 8 The screen displays the array properties Press Esc to return to the previous menu 9 To exit the utility press Esc highlight Yes then press Enter ...

Страница 105: ... bootable RAID set Creating a bootable RAID set Creating a bootable RAID set To create a bootable RAID set 1 From the main menu select Manage Arrays then select the RAID set you want to make as bootable 2 Press Ctrl B A message appears on screen informing you that all other arrays if available will become non bootable Press Y to continue ...

Страница 106: ...ay for easy identification 3 Press Esc to return to the previous menu 4 Exit the utility then reboot the system 5 During POST press Esc to select the boot device 6 Use the up or down arrow to highlight the bootable RAID set HostRAID 0 0 6300ESB then press Enter to select The system boots from the RAID set ...

Страница 107: ...ID 0 set Deleting a RAID 0 set Deleting a RAID 0 set To delete a RAID 0 set 1 From the array list select the RAID set you want to delete then press Del The Array Properties dialog box appears 2 Move the cursor to Delete then press Enter to delete the selected RAID set otherwise move the cursor to Cancel to close the dialog box ...

Страница 108: ...on 3 When prompted press Y to delete the RAID set or press N to abort the operation 4 To verify if the array was deleted select Manage Arrays from the main menu A No Arrays Present message pops up on the screen if no array is detected ...

Страница 109: ...ID 1 set Deleting a RAID 1 set Deleting a RAID 1 set To delete a RAID 1 set 1 From the array list select the RAID set you want to delete then press Del The Array Properties dialog box appears 2 Move the cursor to Delete then press Enter to delete the selected RAID set otherwise move the cursor to Cancel to close the dialog box ...

Страница 110: ...on 4 When prompted use the arrow keys to select either Member 0 or Member 1 to delete a RAID 1 set member Select None or Both if you want to delete the entire array 5 To verify if the array was deleted select Manage Arrays from the main menu A No Arrays Present message pops up on the screen if no array is detected ...

Страница 111: ...ec RAID Configuration Utility following the instructions in the section Creating a RAID 0 Stripe 2 Select Array Configuration Utility from the initial menu then press Enter Check the physical connections of the SATA hard disk drives before you rebuild a degraded RAID set Check the system and motherboard user guide for additional information 3 From the main menu highlight Manage Arrays then press E...

Страница 112: ...e RAID set The Array Status shows the rebuilding progress To rebuild the RAID set using the RAID management application in the operating system press Esc while the RAID set is being rebuilt to exit the application A message pops up for confirmation Press Y to exit ...

Страница 113: ...The Intel 6300ESB RAID Driver Disk is located in Drivers 6300ESB Windows 3 Insert a formatted high density floppy disk to the floppy disk drive 4 Follow screen instructions to complete the process 5 After creating a RAID driver disk eject the floppy disk then write protect it to prevent computer virus infection 6 1 5 2 6 1 5 2 6 1 5 2 6 1 5 2 6 1 5 2 Red Hat Red Hat Red Hat Red Hat Red Hat Linux 9...

Страница 114: ...nstall the Intel 6300ESB RAID controller driver when installing Windows 2000 2003 Server OS 1 Boot the computer using the Windows 2000 2003 Server installation CD The Windows 2000 2003 Setup starts 2 Press F6 when the message Press F6 if you need to install a third party SCSI or RAID driver appears at the bottom of the screen 3 When prompted press S to specify an additional device ...

Страница 115: ... 5 Select the Adaptec Embedded Serial ATA HostRAID Driver for Windows 2000 XP 2003 then press Enter to select 6 The Windows 2000 2003 Setup loads the RAID controller drivers from the RAID driver disk When prompted press Enter to continue installation 7 Setup then proceeds with the OS installation Follow screen instructions to continue ...

Страница 116: ...arches the RAID controller drivers When found click Next to install the drivers To an existing Windows 2000 2003 Server OS To install the Intel 6300ESB RAID controller driver on an existing Windows 2000 2003 Server OS 1 Restart the computer then log in with Administrator privileges 2 Windows automatically detects the RAID controller and displays a New Hardware Found window Click Cancel 3 Right cli...

Страница 117: ...erties from the menu 2 Click the Hardware tab then click the Device Manager button 3 Click the sign before the item SCSI and RAID controllers The Adaptec Embedded Serial ATA HostRAID item should appear 4 Right click the Adaptec Embedded Serial ATA HostRAID item then select Properties from the menu 5 Click the Driver tab then click the Driver Details button to display the RAID controller drivers 6 ...

Страница 118: ...Linux 9 0 Linux 9 0 Linux 9 0 Linux 9 0 Linux 9 0 To install the Intel 6300ESB RAID controller driver when installing Red Hat Linux 9 0 OS 1 Boot the system from the Red Hat Installation CD 2 At the boot type linux dd then press Enter 3 Select Yes using the Tab key when asked if you have the driver disk Press Enter ...

Страница 119: ...ect the driver disk source Press Tab to move the cursor to OK then press Enter 5 When prompted insert the Intel 6300ESB Red Hat Linux 9 0 driver disk to the floppy disk drive select OK then press Enter The drivers for the Intel 6300ESB RAID controller are installed to the system ...

Страница 120: ...on 6 When asked if you will load additional RAID controller drivers select No then press Enter otherwise select Yes if you need to install additional RAID controller drivers 7 Follow screen instructions to continue the OS installation ...

Страница 121: ...oppy disk drive 3 Windows automatically detects the LAN controller and displays a New Hardware Found window Click Cancel 4 Right click the My Computer icon on the Windows desktop then select Properties from the menu 5 Click the Hardware tab then click the Device Manager button to display the list of devices installed in the system 6 Right click the LAN Controller item then select Properties 7 Clic...

Страница 122: ... Click the Hardware tab then click the Device Manager button 3 Click the sign before the item Network adapters The Intel R PRO 1000 CT Network Connection item should appear 4 Right click the Intel R PRO 1000 CT Network Connection item then select Properties from the menu 5 Click the Driver tab then click the Driver Details button to display the RAID controller drivers 6 Click OK when finished ...

Страница 123: ...4 Right click the My Computer icon on the Windows desktop then select Properties from the menu 5 Click the Hardware tab then click the Device Manager button to display the list of devices installed in the system 6 Right click the LAN Controller item then select Properties 7 Click the Driver tab then click the Update Driver button 8 The Hardware Update Device Driver Wizard window appears Select the...

Страница 124: ... Click the Hardware tab then click the Device Manager button 3 Click the sign before the item Network adapters The Intel R PRO 1000 CT Network Connection item should appear 4 Right click the Intel R PRO 1000 CT Network Connection item then select Properties from the menu 5 Click the Driver tab then click the Driver Details button to display the RAID controller drivers 6 Click OK when finished ...

Страница 125: ...istributions 1 Move the base driver tar file to the directory of your choice For example use home username e1000 or usr local src e1000 2 Untar or unzip the archive tar zxf e1000 x x x tar gz 3 Change to the driver src directory cd e1000 x x x src 4 Compile the driver module makenstall The binary is installed as lib modules KERNEL_VERSION kernel drivers net e1000 o The locations listed above are d...

Страница 126: ... click the My Computer icon on the Windows deaktop then select Properties from the menu 2 Click the Hardware tab then click the Device Manager button 3 Click the sign before the item Display adapters The ATI Technologies Inc RAGE XL PCI item sholud appear 4 Right click the ATI Technologies Inc RAGE XL PCI item then select Properties from the menu 5 Click the Driver tab then click the Device Detail...

Страница 127: ...ASUS AP140R E1 1U barebone server 2 1 This appendix includes additional information that you may refer to when configuring your barebone server Appendix References ...

Страница 128: ...t includes PFC and ATX compliant output cables and connectors Take note of the devices to which you should connect the plugs P1 Motherboard 20 pin ATX power connector P2 Motherboard 4 pin 12V AUX power connector P3 8 pin connector for 2 additional device connectors P4 4 pin floppy disk drive connector P5 4 pin devcie connector P1 P2 P3 P4 P5 Connect to P3 ...

Страница 129: ...V 3 9 4 5 5V 5 7 6 5 12V 13 3 15 0 12V 13 3 15 0 5VSB 5 7 6 5 Output Voltage Min V Nom V Max V Ripple Noise 3 3V 3 14 3 30 3 46 50mVp p 5V 4 75 5 00 5 25 50mVp p 12V 11 40 12 00 12 60 120mVp p 12V 10 80 12 20 13 20 120mVp p 5VSB 4 75 5 00 5 25 50mVp p Output Voltage Min A Max A Peak A 3 3V 0 3 20 0 5V 0 8 28 0 12V 0 3 18 0 25 0 12V 0 0 0 8 5VSB 0 0 2 0 3 0 ...

Страница 130: ...R333 184 pin non ECC DDR400 CPU Vendor Model L2 cache L3 cache Clock Bus speed Intel Pentium4 2 8GHz 512KB 21 533 Intel Pentium4 3 0GHz 512KB 15 800 Intel Pentium4 3 2GHz 512KB 16 800 Intel Pentium4 3 4GHz 512KB 17 800 IDE HDD Vendor Model Interface Speed Capacity FW Rev Seagate ST3160021A IDE 7200rpm 160GB 3 06 Maxtor 6Y160L0 IDE 7200RPM 160GB YAR41BW0 SATA HDD Vendor Model Interface Speed Capaci...

Страница 131: ...tem rear panel 2 Make sure that the power cables are connected to a grounded power outlet 3 Press the power button to make sure that the system is turned on The keyboard does not work Check if the keyboard cable is properly connected to the PS 2 keyboard port The mouse does not work Check if the mouse cable is properly connected to the mouse port The system does not perform power on self tests POS...

Страница 132: ...ure that the DIMMs are properly installed on the sockets The message Non system disk or disk error appears 1 Check if a bootable HDD is active 2 Check if the HDDs are properly installed Network connection not available 1 Make sure that the network cable is connected to the LAN port on the rear panel 2 Make sure that you have installed the LAN drivers from the support CD ...

Отзывы: