100
Notebook PC E-Manual
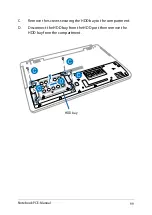
E.
Turn the HDD bay upside down then remove the screws.
F.
Remove the old HDD from the HDD bay.
HDD
G.
Place the new HDD with its PCB (printed circuit board) facing the
HDD bay. Ensure that the port connectors of your HDD are not
obstructed by any part of the HDD bay.
H.
Reattach and secure the HDD with the screws you removed
earlier.
Содержание A450CF
Страница 1: ...Notebook PC E Manual ...
Страница 12: ...12 Notebook PC E Manual ...
Страница 13: ...Notebook PC E Manual 13 Chapter 1 Hardware Setup ...
Страница 26: ...26 Notebook PC E Manual ...
Страница 27: ...Notebook PC E Manual 27 Chapter 2 Using your Notebook PC ...
Страница 31: ...Notebook PC E Manual 31 Lift to open the display panel Press the power button ...
Страница 45: ...Notebook PC E Manual 45 Chapter 3 Working with Windows 8 ...
Страница 70: ...70 Notebook PC E Manual ...
Страница 71: ...Notebook PC E Manual 71 Chapter 4 ASUS apps ...
Страница 77: ...Notebook PC E Manual 77 Chapter 5 Power on Self Test POST ...
Страница 93: ...Notebook PC E Manual 93 Chapter 6 Upgrading your Notebook PC ...
Страница 106: ...106 Notebook PC E Manual ...
Страница 107: ...Notebook PC E Manual 107 Appendices ...
Страница 124: ...124 Notebook PC E Manual CTR 21 Approval for Notebook PC with built in Modem Danish Dutch English Finnish French ...
Страница 125: ...Notebook PC E Manual 125 German Greek Italian Portuguese Spanish Swedish ...
Страница 128: ...128 Notebook PC E Manual ...

