background image

ASUS V7700 Series User’s Manual

92

4. Software Reference

4

. S/W Reference

ASUS Digital VCR

Capture Frames F6

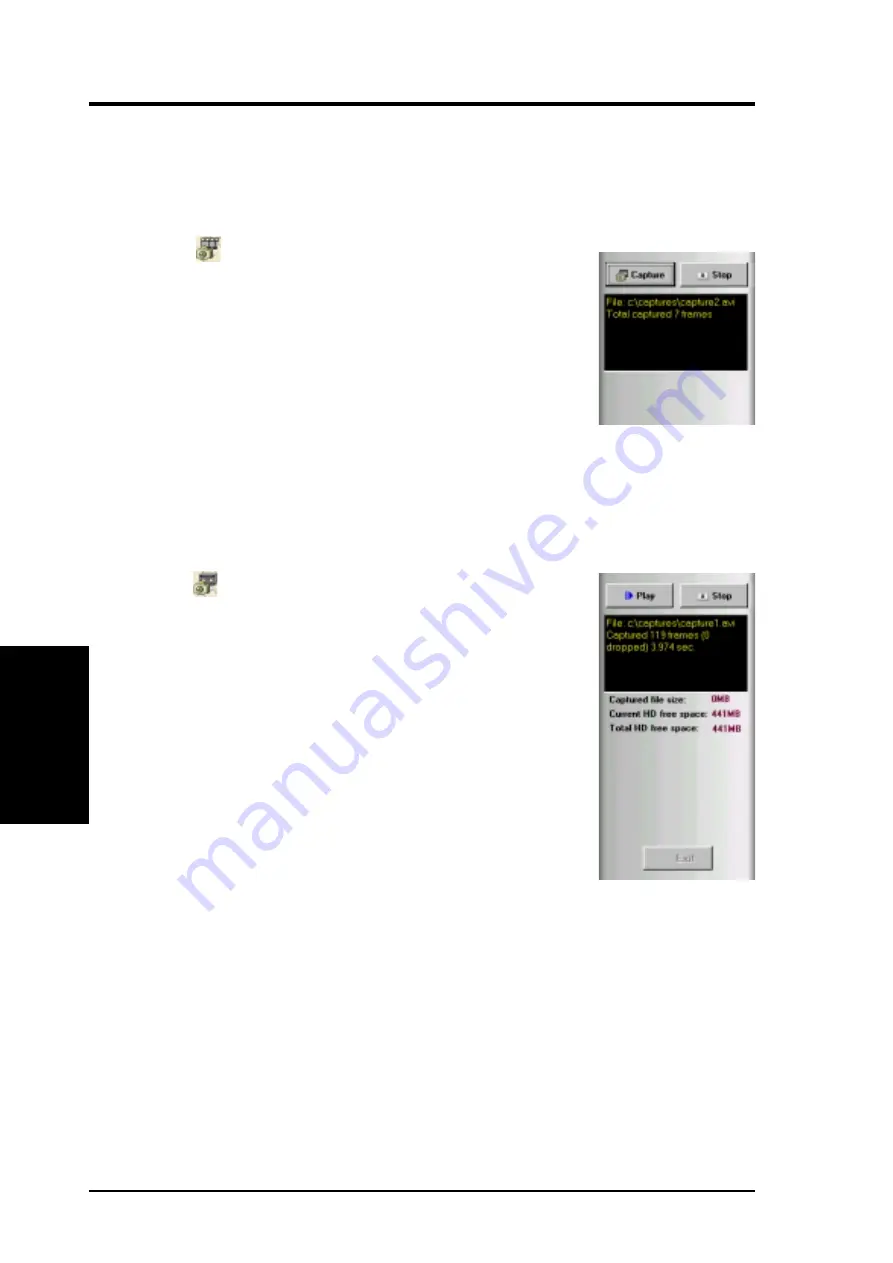
Capture Frames (hotkey: F6) lets you capture video stream data as consecutive
images and then show these images on your desktop through your default movie
player. Capture Frames is useful in animation.

To begin capturing, do the following:

1. Click 

 on the ASUS Digital VCR toolbar or press the 

F6

key to open the Capture Frames box.

2. Click  Capture to begin capturing the desired frame or

frames on ASUS Digital VCR monitor and then click Stop
when the desired end frame is reached. The initial frame of
the captured video (saved as an 

AVI

 file) will immediately

be displayed on your movie player.

NOTE

1. With the new TimeShifting™ technology from ASUS,

you can start playing back the captured video anytime
(see TimeShifting™ later in this section), even while
recording!

Capture Video F7

Capture Video (hotkey: F7) lets you capture video stream data continuously and
then show these images on your desktop through your default movie player.

To begin capturing, do the following:

1. Click 

 on the ASUS Digital VCR toolbar or press the 

F7

 key.

2. The Video Capture Setup dialog box opens. Set the different

options as desired and then click Start. Click Stop when the
desired end frame is reached. The initial frame of the captured
video (saved as an 

AVI

 file) will immediately be played back.

Содержание 7700 Deluxe 32mb

Страница 1: ...d USER S MANUAL Hardware Video Drivers V7700 32MB V7700 64MB V7700 T 32MB V7700 T 64MB V7700 Deluxe 32MB V7700 Deluxe TV 32MB V7700 Pro 64MB V7700 Pro T 64MB V7700 Pro Deluxe 64MB V7700 TI 64MB 32MB V7700 TI T 64MB 32MB V7700 TI Deluxe 64MB 32MB ...

Страница 2: ...ng by ASUS or 2 the serial number of the product is defaced or missing Products and corporate names appearing in this manual may or may not be registered trade marks or copyrights of their respective companies and are used only for identification or explanation and to the owners benefit without intent to infringe NVIDIA GeForce 256 GTS andcombinationsthereof aretrademarksofNVIDIACorporation Window...

Страница 3: ... tw pub ASUS ASUS COMPUTER INTERNATIONAL America Marketing Address 6737 Mowry Avenue Mowry Business Center Building 2 Newark CA 94560 USA Fax 1 510 608 4555 Email tmd1 asus com Technical Support Fax 1 510 608 4555 Email tsd asus com WWW www asus com FTP ftp asus com Pub ASUS ASUS COMPUTER GmbH Europe Marketing Address Harkortstr 25 40880 Ratingen BRD Germany Fax 49 2102 442066 Email sales asuscom ...

Страница 4: ...V Out Module Layout 18 ASUS TV77 TV Out Module Connection 18 ASUS VR 100 Optional Upgrade Kit 19 Installation Procedures 20 New Systems 20 Systems with Existing VGA Card 20 III Software Setup 21 Operating System Requirements 21 Windows 98 21 Display Driver Installation 22 Windows 98 22 Method 1 ASUS Quick Setup Program 22 Method 2 Display Property Page 23 Method 3 Plug and Play 24 Windows 2000 25 ...

Страница 5: ... 39 Install VideoSecurity 40 Install ASUS Live Utility 41 Install ASUS Digital VCR 42 IV Software Reference 43 ASUS Control Panel 43 Refresh Rate 43 More Resolution 44 Information 44 Color 44 Display 48 Direct3D 55 OpenGL VR 58 On Screen Display 59 OpenGL 60 Other 62 Using the ASUS Utilities 63 ASUS Tweak Utility 63 ASUS VideoSecurity 65 ASUS Live Video 69 ASUS SmartDoctor 78 ASUS Digital VCR 81 U...

Страница 6: ...e separation between the equipment and receiver Connect the equipment to an outlet on a circuit different from that to which the receiver is connected Consult the dealer or an experienced radio TV technician for help WARNING The use of shielded cables for connection of the monitor to the graphics card is required to assure compliance with FCC regulations Changes or modifications to this unit not e...

Страница 7: ...s processing unit GPU and featuring DDR Double Data Rate memory the ASUS V7700 delivers cutting edge graphics performance and superb image fidelity irrespective of the Central Processing Unit CPU used by the PC TheASUS V7700 gives you the experience of dynamic realistic 3D worlds and characters V7700 Deluxe 32MB DDR Frame Buffer VGA Video In TV Out 3D Glasses ASUS VR 100G Bundled Free V7700 T 32 6...

Страница 8: ...uffering double triple quad buffering for smooth animation and video playback Multiple video windows with hardware color space conversion and filtering YUV 4 2 2 and 4 2 0 Integrated 350MHz RAMDAC supporting from 640x480 up to 2048x1536 in true color BRDF Bidirectional Reflectance Distribution Function support Video acceleration for Direct Show and MPEG 1 MPEG 2 and Indeo Highlights Powered by the...

Страница 9: ...SC PAL JP1 JP1 Use the same TV standard for all devices For example if your TV uses the NTSC standard then you should set JP1 to NTSC Digital PC to TV Encoder NVIDIA T M GeForce2 GTS T M GPU Graphics Processing Unit Chip with Fan J1 Fan Power The VIP Video Interface Port Connector are used for third party add on modules such as video capture cards or television tuners VGA BIOS 32 64MB Frame Buffer...

Страница 10: ...e output connector VGA Output S Video Output Composite RCA Output VGA Monitor output 15pin standard composite TV output RCA SVHS TV output 7pin Projector 1 2 3 1 2 3 NTSC PAL JP1 JP1 Use the same TV standard for all devices For example if your TV uses the NTSC standard then you should set JP1 to NTSC Digital PC to TV Encoder NVIDIA TM GeForce2 GTS TM GPU Graphics Processing Unit Chip with Fan J1 F...

Страница 11: ...in standard Projector VGA BIOS TV Out Module Connector FAN_PWR 32 64MB Frame Buffer DDR DDR Double Data Rate NVIDIA T M GeForce2 GTS T M GPU Graphics Processing Unit Chip with Fan 1 Item Checklist ASUS V7700 Graphics Card ASUS TV77 TV Out Module optional see installation procedures later in this section This User s Manual ASUS V7700 Series Driver Utility CD Disc ...

Страница 12: ...100G 1 2 3 1 2 3 NTSC PAL JP1 JP1 Use the same TV standard for all devices For example if your TV uses the NTSC standard then you should set JP1 to NTSC Digital PC to TV Encoder NVIDIA T M GeForce2 Pro GPU Graphics Processing Unit Chip with Fan J1 Fan Power The VIP Video Interface Port Connector are used for third party add on modules such as video capture cards or television tuners VGA BIOS 64MB ...

Страница 13: ...r VGA Output VGA Monitor output 15pin standard Projector SVHS TV output 7pin FAN_PWR 64MB Frame Buffer DDR DDR Double Data Rate NVIDIA TM GeForce2 Pro GPU Graphics Processing Unit Chip with Fan Item Checklist ASUS V7700 Pro T Graphics Card ASUS TV77 TV Out Module This User s Manual ASUS V7700 Series Driver Utility CD Disc ...

Страница 14: ... 15pin standard Projector VGA BIOS TV Out Module Connector FAN_PWR 64MB Frame Buffer DDR DDR Double Data Rate NVIDIA TM GeForce2 Pro GPU Graphics Processing Unit Chip with Fan 1 Item Checklist ASUS V7700 Pro Graphics Card ASUS TV77 TV Out Module optional see installation procedures later in this section This User s Manual ASUS V7700 Series Driver Utility CD Disc ...

Страница 15: ...osite output connector VGA Output S Video Output Composite RCA Output VGA Monitor output 15pin standard composite TV output RCA SVHS TV output 7pin Projector 1 2 3 1 2 3 NTSC PAL JP1 JP1 Use the same TV standard for all devices For example if your TV uses the NTSC standard then you should set JP1 to NTSC Digital PC to TV Encoder NVIDIA TM GeForce2 T2 TM GPU Graphics Processing Unit Chip with Fan J...

Страница 16: ...tional see installation procedures later in this section This User s Manual ASUS V7700 Series Driver Utility CD Disc VGA Output VGA Monitor output 15pin standard Projector VGA BIOS TV Out Module Connector FAN_PWR 32 64MB Frame Buffer DDR DDR Double Data Rate NVIDIA T M GeForce2 TI T M GPU Graphics Processing Unit Chip with Fan 1 II H W Setup V7700 TI Pure ...

Страница 17: ...e same TV standard for all devices For example if your TV uses the NTSC standard then you should set JP1 to NTSC Digital PC to TV Encoder NVIDIA T M GeForce2 TI T M GPU Graphics Processing Unit Chip with Fan J1 Fan Power The VIP Video Interface Port Connector are used for third party add on modules such as video capture cards or television tuners VGA BIOS 64 32MB Frame Buffer DDR DDR Double Data R...

Страница 18: ... the TV77 TV Out Module When installed the TV Out Module s components face the graphics card s compo nents as shown below To install Position the TV77 TV Out Module s S Video TV Output toward the hole on the V7700 ASUS V7700 Pro card s bracket and then Position the TV77 s TV Out Connector directly over the V7700 ASUS V7700 Pro sTV Out Module Connector making sure the pins are aligned with theV7700...

Страница 19: ...lasses ASUS VR 100G Stereo Glasses Output VGA Monitor output 15pin standard VGA Input Reserved VR Glasses Output To VGA Card s Monitor Output VGA Input Projector ASUS VR 100 You must anchor the ASUS VR 100 s mounting bracket with a screw to a free ex pansion slot in your computer chassis VGA Output 3D Glasses ASUS VR 100G Stereo Glasses Output VGA Monitor output 15pin standard VGA Input Reserved V...

Страница 20: ...ready to install the software drivers and utilities Systems with Existing VGA Card 1 Change your display driver to Standard VGA 2 Shut down your computer and unplug all electrical cords 3 Replace the existing VGA card with your graphics card 4 Restart your computer 5 Install the ASUS V7700 series display driver NOTE This graphics card series can only be installed in motherboards with an AGP slot W...

Страница 21: ...r chipsets but it is recommended that you install VGARTD from the ASUS V7700 Series CD to make sure that you have the latest version of VGARTD see III Software Setup Install GART Driver NOTES VGARTD stands forVirtual GraphicsAddress RemappingTable Driver which is necessary to use the DIME feature of AGP DIME means Direct Memory Execute which is accessed directly by most AGP chips when VGARTD is in...

Страница 22: ...ll also the DirectX runtime libraries DirectX must be installed so that your video player can take advantage of hardware acceleration See III Software Setup Install GARTDriver and III Software Setup Install DirectX later in this manual for the setup steps Method 1 ASUS Quick Setup Program NOTE SeeIII SoftwareSetup Drivers InstallDisplayDriverformoreinformation 1 Start Windows 2 Switch display to W...

Страница 23: ...therwise proceed to the next step 7 Click Browse to search the CD ROM drive In the Drives box of the Open dialog box select your CD ROM drive and then click OK 8 In the Folders box double click the WIN9x folder and then select ASUSNV9X INF in the File name box 9 ClickOK Alistofvideocardsappears SelectyourVGAcardtype for your operating system and then click OK 10 The Update Driver Warning box appea...

Страница 24: ...ries graphics card the New Hardware Found dialog box appears 3 Click Driver from disk provided by hardware manufacturer 4 When Setup prompts you for the locationofthedriver typeD WIN9x to direct Setup to the INF file and then click Finish to install the driver 5 When Setup has finished installing all the necessary files on your computer it will prompt you to restart your computer Click Yes to rest...

Страница 25: ...ll Display Driver on the Driver dialog box 6 Follow the onscreen instructions to complete the setup 7 When Setup has finished installing all the necessary files on your computer it will prompt you to restart your computer Click Yes to restart your computer and to complete Setup Windows 2000 Method 1 ASUS Quick Setup Program 1 Start Windows 2 When Windows detects your ASUS graphicscard theFoundNewH...

Страница 26: ... installation disc into your CD ROM drive to bring up the Locate Driver Files item of the FoundNewHardwareWizarddia log box 4 When the next Found New Hard ware Wizard dialog box appears select Search for a suitable driver for my device recommended and then click Next Method 2 Plug and Play 1 Start Windows 2 When Windows detects your ASUS graphics card the Found New Hardware Wizard dialog box ap pe...

Страница 27: ...Files Search Results item of the Found New Hardware Wizard dialog box 9 Follow the onscreen instructions to complete the setup 10 When Setup has finished installing all the necessary files on your computer it will prompt you to restart your computer Click OK to restart your computer and to complete Setup 8 When prompted to select the display driver to install in your system se lect the one that is...

Страница 28: ...ange 2 After your computer restarts right click the desktop and click Properties 3 Click the Settings tab 4 Select Change Display Type 5 Select Adapter Type and click Change 6 Click Have Disk 7 Insert the CD installation disc 8 Type D NT40 or click Browse to select the path of the display driver for Win dows NT Click OK 9 Select ASUS V7700 and then click OK 10 Windows NT will once again prompt for...

Страница 29: ...creen or run Setup exe in the root directory of your CD ROM drive Click Drivers If you prefer to install the drivers indi vidually follow the steps on the follow ing pages Windows 2000 Setup will only copy the display drivers Windows NT 4 0 SETUPNT TXTwill appear Follow the instructions to install the display driver You may refer to the installation procedures earlier in III Software Setup Win dow...

Страница 30: ...our CD ROM drive Click Drivers Install DirectX Windows 98 Only Microsoft DirectX allows 3D hardware acceleration support in Windows 98 For Software MPEG support in Windows 98 you must first install Microsoft DirectX and then an MPEG compliant video player 2 The Drivers box appears Click In stall DirectX to select the DirectX version you want to install WARNING Some games written for older DirectX ...

Страница 31: ...Follow the on screen instructions to finish the GART driver installation The succeeding steps as sume that you are installing for an Intel chipset 1 Insert the CD installation disc into your CD ROM drive or double click the CD drive icon in My Computer to bring up the autorun screen or run Setup exe in the root directory of your CD ROM drive Click Drivers 2 The Drivers box appears Click In stall G...

Страница 32: ... If you selected No on the previ ous screen before clicking OK you will be presented with a selection of other drivers Make your driver se lection and click Install 5 When the Welcome screen appears click Next to continue 6 Once the driver installation is fin ished click Finish ...

Страница 33: ... card TVR model Windows 98 only 1 Insert the CD installation disc into your CD ROM drive or double click the CD drive icon in My Computer to bring up the autorun screen or run Setup exe in the root directory of your CD ROM drive Click Drivers 2 The Drivers box appears Click In stall ASUS TWAIN Driver 3 When the Welcome box appears click Next to start copying the files Setup automatically starts co...

Страница 34: ...t the CD installation disc into your CD ROM drive or double click the CD drive icon in My Computer to bring up the autorun screen or run Setup exe in the root directory of your CD ROM drive Click Drivers 2 Click Uninstall Display Driver and follow the on screen directions Method 2 Using Control Panel 1 Click Start and then point to Set tings 2 Click Control Panel 3 Double click the Add Remove Pro ...

Страница 35: ... 7 The system will prompt you to restart your computer Click Yes to restart Windows 2000 Method1 Using the Autorun Screen See Windows 98 Method 1 Using the Autorun Screen earlier in this section for the procedures Method 2 Using Control Panel 1 Click Start and then point to Set tings 2 Click Control Panel 3 Double click the Add Remove Programs icon 4 Click the Change Remove Pro grams icon 5 Click ...

Страница 36: ...drop down list box and then click Next Update BIOS Driver from the Internet lets you update the BIOS or driver from the Internet The updating running the flash utility or the installation program will be done automatically Download BIOS Driver from the Internet lets you download the BIOS or driver to a folder in your computer 3 After you have selected your pre ferred update method you will need to...

Страница 37: ... for Windows standard 1 Insert the CD installation disc into your CD ROM drive or double click the CD drive icon in My Computer to bring up the autorun screen or run Setup exe in the root directory of your CD ROM drive Click Drivers and when the Driv ers box appears click Install Video for Windows Capture Driver To complete the installation simply follow the on screen instructions or prompts NOTE ...

Страница 38: ...appropriately may dam age your card and cause your system to be unstable 1 Insert the CD installation disc into your CD ROM drive or double click the CD drive icon in My Computer to bring up the autorun screen or run Setup exe in the root directory of your CD ROM drive Click Utilities 2 The Utilities box appears Click In stall ASUS Tweak Utility 3 When the Welcome box appears click Next To complet...

Страница 39: ...installation disc into your CD ROM drive or double click the CD drive icon in My Computer to bring up the autorun screen or run Setup exe in the root directory of your CD ROM drive Click Utilities 2 The Utilities box appears Click In stall SmartDoctor NOTE If your graphics card is not equipped with a monitor IC an error message warns you that monitor IC was not detected The installation will abort...

Страница 40: ... by using a video capture device such as a digital camera 1 Insert the CD installation disc into your CD ROM drive or double click the CD drive icon in My Computer to bring up the autorun screen or run Setup exe in the root directory of your CD ROM drive Click Utilities 2 The Utilities box appears Click In stall VideoSecurity 3 When the Welcome box appears click Next to start the installation To c...

Страница 41: ...tallation disc into your CD ROM drive or double click the CD drive icon in My Computer to bring up the autorun screen or run Setup exe in the root directory of your CD ROM drive Click Utilities To complete the installation simply follow the on screen instructions or prompts Install ASUS Live Utility TheASUS Live utility lets you view and capture video images from the card s video input port NOTE M...

Страница 42: ...he CD drive icon in My Computer to bring up the autorun screen or run Setup exe in the root directory of your CD ROM drive Click Utilities To complete the installation simply follow the on screen instructions or prompts Install ASUS Digital VCR ASUS DigitalVCR like the ASUS Live utility lets you view and capture video images from the card s video input port DigitalVCR however provides extra func t...

Страница 43: ...98 2000 click Advanced after clicking Set tings Click the appropriate tab to change your display settings Refresh Rate Refresh Rate lets you change the refresh rate of your current screen resolution WARNING Be sure that the refresh rate that you select is supported by your monitor Selecting a refresh rate that is beyond your monitor s specification may damage it Press ESC to restore your original ...

Страница 44: ...600 HiColor to 800x600 TrueColor Click OK to restart your computer to make the change 1 Click right click the ASUS Control Panel icon point to More Resolu tion andthenclickthedesiredscreen resolution The system will automati cally set the resolution selected with out restarting your computer Information Information lists the relevant informa tion about your card Aside from this it has links to the...

Страница 45: ...an be made for Desk top D3D Game Video and OpenGL The color settings of Desktop D3D Game and OpenGL are not adjustable under 8 bit colr depth Desktop Desktop lets you adjust the color of your Windows desktop D3D Game D3D Game lets you make your favorite color settings for D3D games Video Video lets you make your favorite color settings for videos OpenGL OpenGL lets you make your favorite color set...

Страница 46: ... saturation out put of your display card Video Changes to your settings can be viewed on the displayed picture shown as race horses Scheme Scheme lists schemes that you can use to change the appearance of many screen elements simultaneously You can use existing schemes or create and save your own scheme by saving your current settings or delete unwanted schemes You may want to save a scheme that y...

Страница 47: ...n you click Video first and then run your favorite video player you can only see the adjustments you made to the settings in the preview window because the video player cannot use the hardware acceleration function overlay On the other hand if you run your video player first before opening Video the preview window will show a warning message The message may also appear when you click Video and the...

Страница 48: ...Displays the Change current refresh rate box to let you customize a new refresh rate To change the current refresh rate 1 Click Change current refresh rate 2 In the Refresh rate list under Change current refresh rate click the nearest default refresh rate and then adjust the Edit refresh rate slider to the rate you want click Test and then click YES when prompted to add the new refresh rate into t...

Страница 49: ...Refresh Rate list under the GDI tab select the refresh rate you want to use ATest button appears to let you test the selected refresh rate and resolution combination Click YESwhenpromptedwhethertokeep the new refresh rate Otherwise the original refresh rate will be restored DirectDraw DirectDraw lets you change the refresh rate of DirectDraw It is most useful when you are play ing a full screen ga...

Страница 50: ...t aTVOut connector Position Sets the screen position Standard Sets the TV signal format for example PAL or NTSC Output type Displays the connection status of composite and S Video Scan type Sets the scan type of the TV display Black Level Sets the brightness of the TV display Contrast Sets the contrast of the TV display Flicker Filter Sets the anti flicker effect ...

Страница 51: ...en Foreground Foreground is set in conjunction with Background to extend or stretch the histogram chart on the D3D OSD box to scale the depth of 3D objects Some games require only a little range of Z to make bad stereoscopic effect On the D3D OSD box move the Foreground slider to the left to adjust Foreground to the Z value of objects stretched toward 0 0 On the Advanced dialog box see above sever...

Страница 52: ...ver may not be able to support a high refresh rate Make sure that your monitor supports a selected refresh rate otherwise your monitor may become unstable for example a blank screen may occur Scheme Scheme lists schemes that you can use to change the appearance of many screen elements simultaneously You can use existing schemes or create and save your own scheme by saving your current settings or ...

Страница 53: ...atest information D3DVR TXT in the WIN9X folder The OSD settings include Depth Embossment Direction Background Foreground Blind Brightness Contrast and Gamma See IV Software Reference Advanced for a description of the 3D glasses settings and IV Software Reference Color for a description of the display settings When selected this lets you to adjust onscreen the settings of your 3D glasses and displ...

Страница 54: ...ASUS V7700 Series User s Manual 54 IV Software Reference IV S W Reference This page was intentionally left blank ...

Страница 55: ...ill run properly Adjust Z buffer depth to rendering depth if unequal This option forces the hardware to automatically adjust the depth of its Z buffer to the depth that the applica tion requests Normally you will want to keep this option enabled unless your work absolutely requires a specific Z buffer depth Enable alternate depth buffering technique This option lets the hardware use a different me...

Страница 56: ... Location Command Buffer Location lets you choose the location of the command buffer Default setting is Strict AGP Strict AGP This option forces all the command buffer into the AGP memory Choose for best performance PCI This option forces the command buffer to be created into the PCI memory If you are experiencing stability problems with your system especially with some Socket 7 motherboards choos...

Страница 57: ...lows for frame rates higher than the refresh rate of your monitor This may however produce visual artifacts and tearing re sulting in reduced image quality More Options Pre Rendering Maximum pre render frames allows you to limit the number of frames the CPU can prepare before they are processed by the graphics chip when ver tical sync is turned off Reduce this value if you ex perience while playin...

Страница 58: ... objects being pulled or popping out of the screen See On Screen Display later in this section for details When set to a too high value eye discomfort fatigue may occur To achieve a better stereoscopic visual quality set Embossment in conjunction with View Angle VR Effect Enable Stereoscopic Mode When selected this enables you to use the stereo scopic mode when running OpenGL 3D applica tions and ...

Страница 59: ...nation For example to define the hot key combination CTRL ALT D press D NOTE The hot keys will be available only if you selected the Enable OSD check box OSD Settings When selected this lets you to adjust onscreen the settings of your 3D glasses and display card when playing games or watching 3D videos These settings include Eyes View Angle Embossment Brightness Con trast and Gamma See IV Software...

Страница 60: ...n the GL_KTX_buffer_region extension is enabled Use fast linear mipmap linear filtering This option allows increased application performance at the expense of some image quality loss In many cases the loss of image quality may not be noticeable Enable anisotropic filtering This option allows OpenGL to use anisotropic filtering for improved image quality Enable alternate depth buffering technique T...

Страница 61: ...pth should be used by default in OpenGL applications Options are Use desktop color depth default Always use 16 bpp and Always use 32 bpp Buffer flipping mode Buffer flipping mode determines the buffer flipping mode for full screen OpenGL applications Options are Auto select default Use block transfer and Use page flip Vertical sync Vertical sync lets you specify how vertical sync is handled in Ope...

Страница 62: ... determine the proper mode This option allows Windows to receive the proper timing information directly from the monitor itself This is the default setting NOTE Some older monitors may not support this feature General Timing Formula GTF GTF is a standard used by most new hardware Discrete Monitor Timings DMT DMT is an older standard still in use on some hardware Select this option if your hardware...

Страница 63: ...S Tweak Utility click Start and point to Programs Asus Tweak ing Utilities and then click Tweak Timing Adjustment Timing Adjustment lets you adjust the working frequency of the graphic engine and video memory Use tweak settings on next startup Selecting this allows you to use your settings when Windows starts Graphics Speed Engine Lets you adjust the working frequency of the graphic engine Memory ...

Страница 64: ...in safe mode hold the F8 key until the Windows Startup Menu appears For some machines and Windows 98 you can use CTRL to bring up the Startup Menu Enter the number for Safe mode and then press ENTER 2 In Windows click Start and point to Programs Asus Tweak Utility and then click Tweak Safe Mode Recovery 3 The ASUSTweak Safe Mode Prop erties box appears Click the appro priate settings Using Tweak S...

Страница 65: ...or editing software can then be used to view modify or distribute them Limitations Because of differences in hardware sensitivity VideoSecurity may not completely detect all possible errors Before you execute VideoSecurity there are some limita tions you have to understand so that you can appropriately use it Due to changing temperatures the captured image of some CCDs will be twisted which may gi...

Страница 66: ... in the lower right corner of your screen Whenever VideoSecurity detects a problem it will run You may also run VideoSecurity by clicking the icon VideoSecurity Working Directory The VideoSecurity Working Directory is the folder where the utility stores its temporary working and log files Default is C VIDEOSEC The directory is user configurable When VideoSecurity is ran a sub directory will automa...

Страница 67: ...ure Currently only one option is available to set the image format This is an important parameter when setting up VideoSecurity Your environment may change often but VideoSecurity is concerned only when there is a change in the environment Make sure that you select a suitable sensitivity for your environment Use this to stop tracing or to choose the error processing method to use while tracing Thi...

Страница 68: ...ain Control Panel Click to start detecting Click to open the VideoSecurity Setting dialog box Starts the Setup Wizard Lets you define a region with which VideoSecurity will monitor for errors or intrusion Lets you adjust the video source parameters such as Color Video Connector and Video Standard Opens online help Minimizes VideoSecurity to the status tray Click ASUS VideoSecurity icon on the stat...

Страница 69: ... digital cameras and laser disc players through the onboard RCA or SVHS VIDEO IN connectors 2 Capture live motion video up to 30 frames second minimum system require ment Pentium II 266 NOTE You should already have installed DirectX 7 or later to use ASUS Live see 3 Software Setup Install DirectX Running ASUS Live Video To run the utility click Start and point to Programs and then ASUS Live and th...

Страница 70: ... and or ASV2 Settings Quality Level 0 Best Compression 1 2 3 default 4 5 Normal Quality 6 7 8 9 Best Quality Click an image to view it with the associated image viewer or application a pop up window opens to show the path and filename of the selected image Right click an image to View Save As and Delete that image Shows hides the Video Source Option F9 see next page Opens the About ASUS Live ASUS ...

Страница 71: ...e Option When first using ASUS Live you must set up the video source By clicking the Video Source Option F9 button hotkey F9 on the ASUS Live Control Panel you can show or hide the video source setup screen Use your mouse pointing device or the Up or Down Buttons on the ASUS Live Control Panel or the UP and DOWN arrow keys on your keyboard to select Video Connector and then the Left and Right Butt...

Страница 72: ...et live video as wallpaper to display it To change video source settings click the Setup button on the ASUS Live Control Panel NOTES 1 Currently Live Mode does not work under Windows NT 4 0 Live Mode requires at least Direct Draw 6 which Windows NT 4 0 does not support 2 Before using the Wall Paper option make sure that the View as Web Page option of the Active Desktop setting is not selected see ...

Страница 73: ...4 x 480 30 frames second during the video capture process Otherwise your system may become unstable Windows 2000 NT 4 0 The video capture driver for Windows 2000 NT 4 0 is not automatically installed when you install the display drivers of your ASUS graphics card To install insert the CD installation disc into your CD ROM drive click Drivers and then click Install Video for Windows Capture Driver ...

Страница 74: ...g to ad just the basic video capture settings such as Capture Image Dimension and Format Capture CODEC se lection and CaptureAudio Format and Attribute Video Capture Setting Under Capture Image Dimension and Format select the Image Dimensions Image Format and ASV2 Settings of your choice NOTE Windows 2000 NT4 0 sup ports only the UYVY image format Under Capture CODEC selection select the video com...

Страница 75: ...lso lets you ad just the Brightness Contrast Satura tion and Hue of your images SnapShot Setting 1 Click Setup and point to and then click Video SnapShot to select your Capture Picture Format default 24 bit Image Setting and other set tings Under Image Setting you may set the desired Image File name and path default C CAPTURE BMP and for the filename to be consecu tively numbered Store image use c...

Страница 76: ...y screen The screen will freeze momentarily and the captured image saved as a BMP file using consecutive numbers will be previewed in the Preview Files window You may click an image to view that captured image 2 Repeat Step 1 as necessary These settings include the Start Time Year Month Day Hour Minute Second Stop Time Year Month Day Hour Minute Second Channel Number Capture Frame Rate and options...

Страница 77: ... on your desktop through your default movie player Frame Recording is useful in animation To begin capturing do the following 1 Click Frame Recording on the ASUS Live Control Panel or press the F6 key to open the Capture Frames box 2 Click Capture to begin capturing the desired frame or frames on ASUS Live Video s display screen and then click Done when the desired end frame is reached The initial...

Страница 78: ...eat fan malfunction and out of safe range voltage Forcibly cools down the graphic chip when the graphic chip s temperature is over an acceptable temperature to protect the graphic chip from overheat damage Cools down the graphic chip s temperature when it is idle and restores it to its maxi mum capability once needed thus smartly extending the graphic chip s lifetime Cools down the CPU s temperatu...

Страница 79: ...t CPU is idle The CPU s temperature will then drop NOTE If you have already installed any CPU cooling software in your system you should just choose only one Running more than one CPU cooling software at the same time is redundant After CPU cooling is enabled and when you run System Monitor in Programs Accessories System Tools to monitor CPU usage you will find that CPU usage has reached its maxim...

Страница 80: ...omething is wrong with your card s graphic chip the message display region will display a detailed description of the error or trouble The component in question will also have a flashing red value If you enabled overheat protection in Advanced Setup dialog SmartDoctor will cool down the graphic chip in time to protect it from possible overheat damage 4 S W Reference SmartDoctor ...

Страница 81: ...em require ment Pentium II 266 For TimeShifting recording at MPEG II format 704x480 30 frames second minimum system requirement is Pentium III 600 recommended Pentium III 700 or higher NOTE You should already have installed DirectX 7 or later to useASUS Digital VCR see 3 Software Setup Install DirectX Running ASUS Digital VCR To run the utility click Start and point to Programs and then ASUS Digit...

Страница 82: ...2x240 To resize the monitor drag a window corner pointer becomes a double headed arrow when it is ready to the desired size The video size status will also change accordingly NOTES Users of PAL D K models of the graphics card should select PAL BGHI for the Video Standard Monitor Toolbox Exit Click to quit ASUS Digital VCR OSD Setup Click to set up the video source and adjust Brightness Contrast an...

Страница 83: ...lect the Always on Top Off command from the Window W menu OSD Setup When first using ASUS Digital VCR you must set up the video source Use the OSD Setup button on the ASUS Digital VCR Control Panel to show or hide the video source setup screen on the monitor Use your mouse pointing device or the UP and DOWN arrow keys on your keyboard to select options Brightness Contrast Saturation Hue Connector ...

Страница 84: ...ick the display and then click You may also use CTRL S or ESC to disable full screen display The display will then revert to its previous size Enable wallpaper display NOTE Before using the Enable wallpaper display option make sure that the View as Web Page option of theActive Desktop setting is not selected see Start Settings Active Desktop View as Web Page To Enable wallpaper display click or us...

Страница 85: ...esults from fast moving objects when rendering to video Normal uses both fields to render the video output For PAL output use Skip Odd Field and for NTSC output use Skip Even Field Video Standard Video Standard lets you select the video srandard to use for display NTSC M default NTSC N NTSC 4 43 PAL BGHI PAL M PAL N PAL 4 43 or SECAM NOTE Users of the PAL D K models should select PAL BGHI for the ...

Страница 86: ...de from Live Mode click or press F3 Captured images are shown on the Preview Library Double click an image to play it back or view it with the associated image viewer or application the path and file name of the selected image is shown below the image You may also right click an image or select an image and then click the appropriate button to Playback or view Save As a new file or Delete that ima...

Страница 87: ...y models with the VIDEO IN connector the video capture driver will automatically be installed on your system This video capture driver follows Microsoft Video for Windows standard and can open up to a capture window size of 704 x 480 It can be used withsomeapplicationsthatusevideocaptureasanoption suchasvideoconferencing net meeting or digital video authoring applications IMPORTANT You must enable...

Страница 88: ...Video Capture Store Video file use consecutive numbered filename Select preferred file naming convention default selected Capture Audio Select if you prefer to include audio when capturing video default not selected When selected the Set Audio option becomes available SnapShot Store image use consecutive numbered filename Select preferred file naming convention default selected Snapshot color bits...

Страница 89: ...z 16 Bit Stereo 172 KB s can make the sound quality of your video file better but your video file size will be larger Frame rate lets you select the preferred video data rate for the images to be cap tured default 30 frame sec which is full motion Maximum AVI split file size lets you set the maximum size for each video capture default 2000 M Bytes Enable capture time limit lets you limit the captu...

Страница 90: ...cording includes the Current time Hour Minute Second StartTime Year Month Day Hour Minute Second End Time Year Month Day Hour Minute Second Frame Rate Channel and options to Capture Audio to the recording View Log of auto recorded events and to Delete one or Delete All the pre recording settings Add lets you add while Clear lets you clear your pre recording setting s The video recording will start...

Страница 91: ... images and then show these images on your desktop almost simultaneously through the default image viewer It supports any plug in picture viewer image processing pro gram to view the captured images To begin capturing do the following 1 Click on the ASUS Digital VCR toolbar or press the F5 key to capture the desired image from the ASUS Digital VCR monitor The screen will freeze momentarily and the...

Страница 92: ...reached The initial frame of the captured video saved as an AVI file will immediately be displayed on your movie player NOTE 1 With the newTimeShifting technology fromASUS you can start playing back the captured video anytime see TimeShifting later in this section even while recording Capture Video F7 Capture Video hotkey F7 lets you capture video stream data continuously and then show these image...

Страница 93: ...u re watching your favorite TV show on your computer and you had to leave but you don t want to miss the rest of the show all you need is to record it with ASUS TimeShifting When you come back you don t have to wait unlike traditional recorders for the recording to finish to be able to watch what s been recorded Just click Play and playback will start imme diately this while recording still contin...

Страница 94: ...ox opens Double click the video file you want to open You may need to locate the drive or folder that contains the file 3 Playback immediately begins A progress indicator will show the elapsed time NOTES During playback 1 You may apply some filters to create effects on your video Simply click Filtersto apply a filter to the video file 2 You may apply Fast Motion Slow Motion and other effects Simpl...

Страница 95: ...he First Time NOTE You do not need to repeat this step for subsequent uses of theASUS TWAIN module If more than one TWAIN device is installed in your system and you want to switch devices use Select TWAIN_32 Source command Importing an Image Using the ASUS TWAIN Interface ASUS TWAIN Interface Windows 98 Only TWAIN is a cross platform interface for acquiring images captured by scanners digital came...

Страница 96: ...click the capture button or click the Capture menu and then Single Frame Other Options Preferences Menu Click to adjust the background color of your image and other options Toggle preview video Click button or click the Options menu and then Preview to toggle between the preview video options A pressed button or a checked Preview command indicates that the preview is on and vice versa Toggle overl...

Страница 97: ... 3D glasses ASUS VR 100G and test your 3D glasses func tionality 1 Click the VR Effect menu and then click VR On to enable stereoscopic display Opening or Displaying a Stereoscopic or 3D File To run ASUS VR PictureViewer click or right click the ASUS Control Panel icon see 4 Software Reference ASUS Control Panel on the taskbar s status area to display the ASUS Control Panel point to VR PictureView...

Страница 98: ...en dialog box or select another folder and then click Open The 3D image appears on the VrViewer main window see preced ingpageforanopened3Dimagefile Note that the 3D effect is not shown in this picture Changing the View 1 Click the Zoom menu and then click the desired zoom percentage Testing the 3D Glasses 1 Click the Test 3D glasses and then follow the onscreen instructions ...

Страница 99: ...ereoTV see 3 Software Setup Install DirectX To run StereoTV right click the ASUS Control Panel icon on the taskbar s status area to display the ASUS Control Panel point to StereoTV and then click it ASUS Control Panel icon ASUS VR MoviePlayer Exit Minimize Channel Buttons Stereo Setting Volume Buttons Window Size Buttons Channel Setting Video Setting Image Setting Buttons and Functions Channel But...

Страница 100: ...system IMPORTANT Be sure that the system and standard of the country where you will be installing your card is set appropriately For example you should have the NTSC model if you plan to use your card in countries with NTSC systems PAL BGHI model in countries with PAL BGHI systems or PAL 4 43 model in countries with PAL 4 43 systems Video Setting Use this button to select the video format Options ...

Страница 101: ... 94 0 170Hz 112 7 200Hz 135 1 240Hz 166 2 1024 x 768 60Hz 48 4 70Hz 56 4 72Hz 57 5 75Hz 60 0 85Hz 68 7 100Hz 81 7 120Hz 98 8 140Hz 116 6 144Hz 120 2 150Hz 125 7 170Hz 144 1 200Hz 172 8 240Hz 212 1 1152 x 864 60Hz 53 7 70Hz 62 9 72Hz 64 9 75Hz 67 5 85Hz 77 1 100Hz 91 3 120Hz 111 2 140Hz 131 3 144Hz 135 2 150Hz 141 4 170Hz 162 9 200Hz 194 9 1280 x 960 60Hz 60 0 70Hz 69 9 72Hz 72 1 75Hz 75 2 85Hz 86 ...

Страница 102: ... 4 100Hz 95 3 120Hz 115 4 140Hz 136 8 144Hz 140 4 150Hz 146 8 1600 x 1200 60Hz 75 0 70Hz 87 5 72Hz 90 1 75Hz 94 0 85Hz 106 1 100Hz 127 5 120Hz 154 5 1920 x 1080 60Hz 67 1 70Hz 78 7 72Hz 81 1 75Hz 84 6 85Hz 96 4 100Hz 113 9 1920 x 1200 60Hz 74 6 70Hz 87 4 72Hz 90 0 75Hz 94 0 85Hz 106 7 100Hz 126 7 1920 x 1440 60Hz 89 4 70Hz 104 9 72Hz 108 5 75Hz 112 5 85Hz 129 4 2048 x 1536 60Hz 95 5 70Hz 111 9 72H...

Страница 103: ...PBus Master mode instead ofAGP execute mode for motherboards using this AGPset You must install DirectX 6 or later so that your player can take advantage of the hardware acceleration mode DirectDraw Try to switch to a lower resolution color depth or refresh rate Switching to a lower mode allows your player to use hardware acceleration mode Switch dual view mode to VGA or TV mode VideoSecurity curr...

Страница 104: ... The only way to remove password protection is to recall the original password that you assigned The password protection is still active even when you uninstallVideoSecurity and install a new copy Make sure that the password that you assigned can be eas ily remembered You may write down your password and store it in a safe place VI Troubleshooting VI Troubleshooting ...

Отзывы: