background image

16

ASUS AGP-V3000 User’s Manual

III.  W

indows 95

V

ideo Player

III.  Windows 95

1. Start Windows 95.

2. Insert the ASUS AGP-V3000 V1.00 Installation CD into your CD-ROM disc

drive. The ASUS Windows 95 Install Shell should appear.  If it does not appear,
run D:\setup.exe.

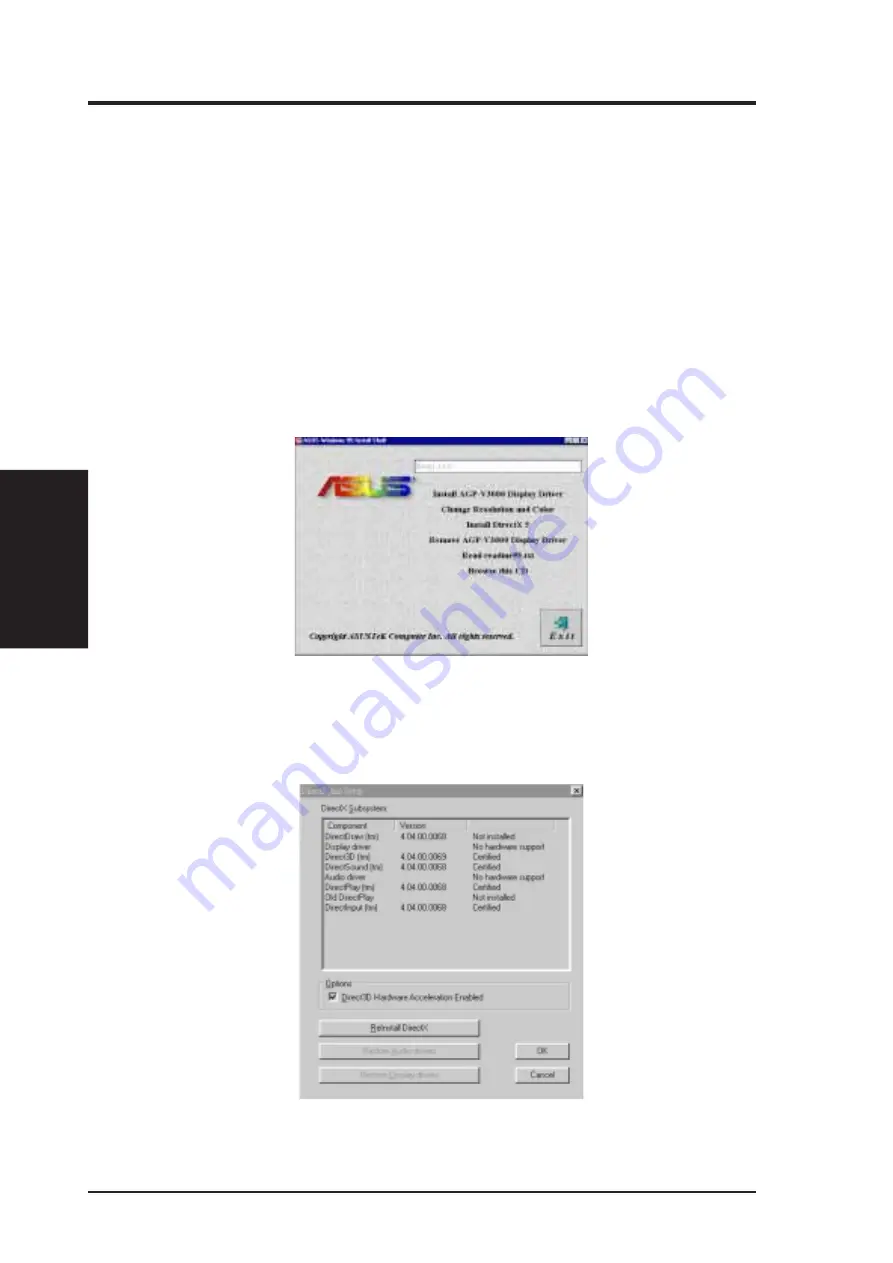
3. Select Install DirectX 5 in the ASUS Windows 95 Install Shell.  The following

screen will appear.  Check “Direct 3D Hardware Acceleration Enabled” option
and then click the “ReInstall DirectX” button.

4.  DirectX 5 Installation

For Software MPEG support in Windows 95, you must first install the Microsoft
DirectX 5 
libraries, then you may install your own MPEG Video Player.

NOTE: ASUS does not provide an MPEG Video Player.

Содержание 3DexPlorer 3000

Страница 1: ...R 3DexPlorer 3000 AGP V3000 Graphics Card USER S MANUAL Hardware Video Drivers ...

Страница 2: ...sed only for identification or explanation and to the owners benefit without intent to infringe Intel LANDesk and Pentium are registered trademarks of Intel Corporation IBM and OS 2 are registered trademarks of International Business Machines Symbios is a registered trademark of Symbios Logic Corporation Windows and MS DOS are registered trademarks of Microsoft Corporation Sound Blaster AWE32 and ...

Страница 3: ...asus com tw FTP ftp asus com tw pub ASUS ASUS COMPUTER INTERNATIONAL Marketing Info Address 721 Charcot Avenue San Jose CA 95131 USA Telephone 1 408 474 0567 Fax 1 408 474 0568 Email info usa asus com tw Technical Support BBS 1 408 474 0569 Email tsd usa asus com tw WWW www asus com ASUS COMPUTER GmbH Marketing Info Address Harkort Str 25 40880 Ratingen BRD Germany Telephone 49 2102 445011 Fax 49 ...

Страница 4: ... Systems with Existing VGA Card 10 III Windows 95 11 Operating System Requirements 11 Windows 95 and Windows 95 OSR2 0 2 1 11 Installation in Windows Memphis Beta1 Beta2 11 1 Installing for an Installed ASUS AGP V3000 12 1 1 Windows 95 12 1 2 Win95 OSR 2 0 2 1 12 2 Replacing an Existing VGA Card 14 3 Video Driver Uninstallation 15 3 1 Using the Autorun Screen 15 3 2 Using the Windows 95 Control Pa...

Страница 5: ...tion Procedures in DOS 18 1 2 Installation Procedures in Windows 3 x 19 1 3 Installation of Video for Windows 20 VI Display Information 21 Resolution Table 21 4MB Video Memory 21 VIP Connectors 22 VIP Module Mechanical Specification 22 VII Hardware Information 22 VIII Troubleshooting 24 Description 24 Recommended Action 24 ...

Страница 6: ...cular installation If this equipment does cause harmful interference to radio or television reception which can be determined by turning the equipment off and on the user is encouraged to try to correct the inter ference by one or more of the following measures Reorient or relocate the receiving antenna Increase the separation between the equipment and receiver Connect the equipment to an outlet o...

Страница 7: ...ye strain Powerful 3D rendering Crisp realistic images Striking cinema quality video Features Built in SGS THOMSON RIVA 128 128 bit 3D Multimedia Accelerator User friendly Installation for Windows 95 and Windows 3 x Built inVIPBus Connectors forTVTuner Video Capture MPEG 1 and MPEG II Acceleration forWindows 95APIs including Direct3D and DirectDraw VPE Acceleration for Windows NT APIs including Di...

Страница 8: ...lation II Installation Layout ASUS AGP V3000 Layout 4MB SGRAM Memory Video Output Connector VIP Connector A VIP Connector B VGA BIOS SGS THOMSON RIVA 128 3D Chipset ASUS AGP V3000 with VIP Module Example VIP Module Solder Side AGP V3000 Component Side ...

Страница 9: ...nplug your power supply when adding or removing expansion cards or other system components Failure to do so may cause severe damage to both your motherboard and expansion cards 2 Keep all components such as the host adapter in its antistatic bag until you are ready to install it 3 Use a grounded wrist strap before handling computer components If you do not have one touch both of your hands to a sa...

Страница 10: ...metal contacts on the bottom of the host adapter are securely seated in the slot 8 Anchor the board s mounting bracket to the computer chassis using the screw from the slot cover that you set aside previously 9 Replace the cover on the system unit 10 Connect your analog monitor s 15 pin VGAconnector to the card and fasten the retaining screws if any 11 Connect other cables and devices if available...

Страница 11: ... found in OSR2 while the USB upgrade is found in OSR2 USBUPP To determine the installed version of the operating system look in the registry at HKEY_LOCAL_MACHINE SOFTWARE Microsoft Windows CurrentVersion Version HKEY_LOCAL_MACHINE SOFTWARE Microsoft Windows CurrentVersion VersionNumber OSR2 1 hasVersion Windows 95 andVersionNumber 4 03 1212 or 4 03 1214 Installation in Windows Memphis Beta1 Beta2...

Страница 12: ...order to complete the VGAdriver instal lation If you do not have your CD handy direct the installation path to your Windows Systemdirectory Windowswill promptyoutorestartyourwindows Choose No and follow the steps on the next page WARNING Only click Next The system will hang if you click Cancel 1 1 Windows 95 When installing Windows 95 a New Hardware Found window will appear Select Do not install a...

Страница 13: ...dated DirectX Runtime Components and updating as necessary TheCheckSetupInformationwindowwillappear Click Next to begin the file transfer The Installing Microsoft DirectX 5 dialog box will automatically appear because the AGP V3000 display driver requries DirectX 5 to have access to the advanced 3D features ClickNext tocontinuewiththeSetupprogram The Setup program window appears The Features windo...

Страница 14: ...om ponents and updating as necessary After all drivers are installed power off your sys tem and replace your VGA card with the ASUS TheCheckSetupInformationwindowwillappear Click Next to begin the file transfer The Installing Microsoft DirectX 5 dialog box will automatically appear because the AGP V3000 display driver requries DirectX 5 to have access to the advanced 3D features ClickNext tocontin...

Страница 15: ... a Remove Shared File dialog box will display asking you to remove some shared files Click the Yes or Yes ToAll button to remove the shared files that are no longer used 3 2 Using the Windows 95 Control Panel 1 Insert the ASUS AGP V3000 V1 00 In stallation CD 2 Select Remove AGP V3000 Display Driver in theASUS Windows 95 Install Shell and follow the uninstallation steps 1 Click Start and then poin...

Страница 16: ...t appear run D setup exe 3 Select Install DirectX 5 in theASUS Windows 95 Install Shell The following screen will appear Check Direct 3D Hardware Acceleration Enabled option and then click the ReInstall DirectX button 4 DirectX 5 Installation For Software MPEG support in Windows 95 you must first install the Microsoft DirectX 5 libraries then you may install your own MPEG Video Player NOTE ASUS do...

Страница 17: ...our computer restarts right click the desktop and click Properties 3 Click the Settings tab 4 Select Change Display Type 5 Select Adapter Type and click Change 6 Click Have Disk 7 Insert the ASUS AGP V3000 Installation CD 8 Type D NT40 assuming your CD ROM disc drive is in drive D or click Browse to select the path of the display driver for Windows NT Click OK 9 You will see a list ofASUSAGP V3000...

Страница 18: ...x can be installed under DOS mode or Windows 3 x 1 1 Installation Procedures in DOS 1 Start your computer and enter DOS mode 2 Type D and change to the WIN31 directory 3 Type install and the install screen will appear 4 Type c windows or the path to your Windows 3 x directory 5 TheinstallationprogramwillinstalltheappropriatelanguagesupportintoWindows 6 When completed keep your ASUS driver CD in yo...

Страница 19: ...section and then select VGA Switch to the standard VGA mode 16 colors 640 x 480 pixels then start Windows by typing WIN 5 Insert the ASUS AGP V3000 V1 00 Installation CD and run D setup exe A list of install options will appear 6 Click Install Windows 3 x Display Driver and follow the installation steps 7 Enter your Windows 3 x directory path Click the Ok button to complete the driver installation...

Страница 20: ...un D setup exe A list of install options will appear 4 Click Install Win32s Runtime Library NOTE Part of the driver s code is written with 32bit API which will need the Win32s Runtime Library to be executable It is recommended that you install Win32s Runtime Library once you have installed the Windows 3 x driver 5 Click Install Video for Windows if you have not installed Video for Windows NOTE You...

Страница 21: ... 1KHz ü ü ü 75Hz 47 1KHz ü ü ü 85Hz 53 5KHz ü ü ü 100Hz 63 6KHz ü ü ü 120Hz 77 3KHz ü ü ü 1024 x 768 60Hz 48 4KHz ü ü ü 72Hz 57 6KHz ü ü ü 75Hz 60 2KHz ü ü ü 85Hz 68 7KHz ü ü ü 100Hz 81 9KHz ü ü ü 1152 x 864 60Hz 53 6KHz ü ü ü 72Hz 64 9KHz ü ü ü 75Hz 67 7KHz ü ü ü 85Hz 77 2KHz ü ü ü 100Hz 91 4KHz ü ü ü 1280 x 1024 60Hz 64 0KHz ü ü ü 72Hz 77 0KHz ü ü ü 75Hz 80 4KHz ü ü ü 85Hz 91 2KHz ü ü ü 1600 x 1...

Страница 22: ...odules will have the opposite mating connectors Connector B on the slave side must be shrouded to prevent the danger of wrong insertion Connector A can be configured as a standard Feature Connector VIP or Connector A video of VMI 1 4 On power up the graphics chip master is configured in the standard feature connector mode All VIP slaves must be disabled and tri stated on power up VIP Module Mechan...

Страница 23: ...EO HAD 1 8 P3 VID 3 9 ESYNC HAD 0 10 P4 VID 4 11 EDCLK HCTL 12 P5 VID 5 13 N C SCL 14 P6 VID 6 15 Ground Ground 16 P7 VID 7 17 Ground Ground 18 DCLK PIXCLK 19 Ground Ground 20 BLANK VIPCLK 21 Ground Ground 22 HSYNC N C 23 N C VIRQ 24 VSYNC N C 25 N C SDA 26 Ground Ground VIP CONNECTOR B 14 Pin Dual Row Header 0 100 in centers Standard Feature VIP Standard Feature VIP Connector Mode Connector Mode ...

Страница 24: ... proper ties box of your card Select the Driver tab 10 ClickChangeDriver andfollowtheinstallationsteps After installation and re starting Windows 95 in forms me that the display setting is still incorrect There may be a conflict between a previous and the current display drivers This is caused by the incom plete removal of the previous display driver Try the following steps to remove it 1 Right cl...

Отзывы: