3
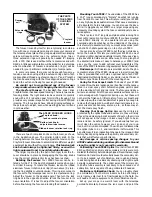
Viewing aperture
in center of
Cheshire eyepiece
Reflective surface
of Cheshire
eyepiece
Secondary mirror
spider vane
Secondary
mirror in its
holder
Reflection of the
interior of central
baffle tube; the
glare stop baffles
are visible as light
concentric rings
Figure 1:
View through a
Cheshire eyepiece
(not to scale)
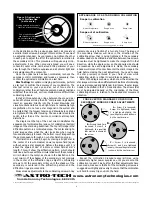
Viewing aperture is
off center in reflective
surface of Cheshire
Figure 2:
Secondary mirror
out of collimation
(not to scale)
Secondary mirror is
centered when viewed
through Cheshire
End of focuser
drawtube (optical axis)
Surface of
room wall
Front end of
optical tube
Front end of
optical tube
End of focuser
drawtube (optical axis)
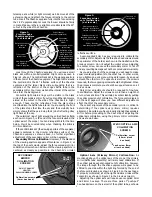
SECONDARY
MIRROR
COLLIMATION
SCREWS
Collimation screws
(4mm hex head)
DO NOT ADJUST
CENTER
PHILLIPS-HEAD SCREW
DO NOT
ADJUST
Matte black interior
of optical tube
telescope at a white (or light colored) wall. Remove all of the
extension rings and attach the focuser directly to the optical
tube. Insert the Cheshire eyepiece fully into the focuser using
the 1.25” eyepiece adapter. Lock the focuser drawtube firmly
in place. Make sure there is a light source directed at the 45°
cutout in the side of the Cheshire.
Look through the Cheshire eyepiece. You will see a small
black dot within a centrally-located bright circle as seen in
Figure 1, above. The central black dot is the viewing aperture
in the center of the Cheshire eyepiece. The bright circle around
the central dot is the 45° reflective surface of the Cheshire
eyepiece and the larger black circle surrounding that is a
reflection of the interior of the scope’s baffle tube in the
secondary mirror. Your room wall and the interior of the optical
tube form the background.
Concentric light-colored rings will be visible in the black
circle of the secondary mirror if your room and the light source
aimed at the cutout in the side of the Cheshire are bright
enough. These are the reflections from the glare stops
machined into the baffle tube interior. You are seeing the front
of the glare stops that face the sky and their visibility here
simply shows that they are doing their job of reflecting stray
light back at the sky.
The outermost ring of light around the entire Cheshire field,
as shown in Figure 1, is the end of the focuser drawtube (the
optical axis of the scope). You can disregard this for the time
being. It will be covered later, when checking the primary
mirror collimation.
If the central black dot (the viewing aperture of the eyepiece)
appears centered in the circular reflective surface of the
Cheshire eyepiece as shown above, no further significant
adjustment of the secondary mirror will be necessary.
Secondary Mirror Collimation:
However, if the black dot
of the viewing aperture appears off-center as in Figure 2, at
the top of the next column, adjust the three secondary mirror
collimation screws shown below until the viewing aperture is
centered as closely as possible in the Cheshire’s circular
reflective surface.
A user-supplied 4mm hex key is required to collimate the
secondary mirror. Adjust only the three hex head screws around
the perimeter of the holder, as shown in the illustration in the
previous column.
Do not adjust the center screw. Adjusting
the center screw can cause the secondary mirror to fall off
and any resulting damage will not be covered under warranty.
As you adjust each of these screws you will need to make
equal counter-adjustments to the other two. In other words,
as you tighten one screw you will need to loosen, by an equal
amount, the other two. The opposite is also true. If a screw is
loosened, the two opposing screws should be tightened. When
the process is complete you should have equal tension on all
three screws.
Only minor adjustments should be required to fine-tune
the collimation. Adjust the screws no more than an eighth of
a turn or less at a time. This will help prevent accidently putting
the optics grossly out of collimation. The force vector diagram
on the next page will show you how different adjustments
affect the tilt of the secondary mirror.
The correct alignment of the secondary mirror is critical in
determining if the optical axis (primary mirror) requires
alignment. Be certain you have properly aligned the secondary
mirror before proceeding to the next step of adjusting the
optical axis collimation, using the primary mirror collimation
screws shown below.
Optical Axis (Primary Mirror) Collimation:
As
mentioned above, the optical axis of the scope
(the primary
mirror/baffle tube assembly) will rarely need collimation. If
the optical axis does get knocked out of collimation, however,
the image through the Cheshire eyepiece will appear to be
shifted to one side within the light ring formed by the end of
the focuser drawtube, as shown in Figure 3 on the next page.
If properly collimated, all of the light and dark circles will be
concentric, as shown in Figure 1 in the previous column.
Adjusting the optical axis will require user-supplied 3mm
and 2.5mm hex keys. There are three pairs of “push-pull”
hex-head screws on the rear cell of the optical tube, as shown
AT8RC OPTICAL AXIS
COLLIMATION
SCREWS
Collimation screw
(2.5mm black
hex head)
Lock screw (3mm
silver hex head)
Rear cell


