


ABOT4001 REV1
BATTERY POWERED CRIMP TOOL
DATASHEET
________________________________________________________________________________________________
ABOT4001 rev1-DS
©2014 Astro Tool Corp., All Rights Reserved Page 6 of 8
REV. A
3/3/2016
Astro Tool Corp.
21615 SW Tualatin-Valley Hwy. Beaverton, OR 97003
Phone: 503-642-9853 Fax: 503-591-7766 Email: [email protected]
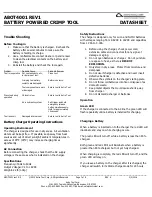
4.
Attempt to insert the NO-GO gage (Red) under the
locator and into the conductor cavity of the die (Red
or Blue) you are trying to gage (See Figure 3).
5.
The NO-GO gage (Red) member may
enter slightly into the die cavity, but should not pass
fully through the cavity. If the NO-GO gage (Red)
member does enter the cavity fully, the die is worn
and should be replaced.
Figure 3
Insulation Cavity
1.
With the Insulation Adjustment Indicator on setting
#1, depress the trigger on the tool until the dies
touch. Release the trigger.
2.
Insert the appropriately sized GO gage (Green) into
the insulation cavity of the die (Red or Blue) you are
trying to gage (See Figure 4).
3.
The GO gage (Green) member should freely enter
the die.
4.
Repeat steps 2 & 3 on the other insulation cavity.
5.
Keeping the tool closed. Adjust the Insulation
Adjustment to setting #4.
6.
Attempt to insert the NO-GO gage (Red) into the
insulation cavity of the die (Red or Blue) you are
trying to gage (See Figure 4). The NO-GO gage
(Red) member may enter slightly into the die cavity,
but should not pass fully through the cavity. If the
NO-GO gage (Red) member does enter the cavity
fully, the die is worn and should be replaced.
7.
Repeat step 6 on the other insulation cavity.
Figure 4
Maintenance
Each Operating Day
Before Use:
1.
Inspect the dies for wear or damage such as cracks,
gouges, or chips.
2.
Inspect the tool for damage or leaks. If damage is
detected, return the tool to the Astro Tool repair
center for inspection.
After Use:
1.
Wipe all tool surfaces clean with a damp cloth and
mild detergent.
2.
Charge the battery.
3.
Fully retract the push rod.
4.
Place the tool in the carrying case.
5.
Store in a cool dry place.
Monthly
1.
Thoroughly clean all surfaces.
2.
Oil the push rod’s outer surface.
Annually or after 10,000 Crimps
1.
Return the tool to the Astro Tool repair center for
inspection & calibration.
GAGE PIN
UPPER DIE
LOCATOR
LOWER DIE
GAGE PIN
INSULATION
INSERT
INSULATION
ADJUSTMENT
INDICATOR


