background image

Miscellaneous


57

User Guide

Disclai- 

mers

The manufacturer, importer, and distributor shall not be liable 
for damages including accidental and personal injury due to 
the improper use or operation of this product. The information 
in this user manual was written based on current product 
specifications. The manufacturer, IRIVER Limited, regularly 
adds new features via OTA updates and will continue to apply 
new technologies in the future. Product specifications may 
be changed without prior notice. There is no warranty against 
data loss due to the use of this product.

CAUTION

RISK OF EXPLOSION IF BATTERY IS REPLACED

BY AN INCORRECT TYPE.

DISPOSE OF USED BATTERIES ACCORDING

TO THE INSTRUCTIONS

The device must be used a minimum of 5mm away from the human 
(body) in normal use conditions.

The excessive sound pressure from earphones and headphones can 
cause hearing loss.

Содержание SP1000M

Страница 1: ...INSTRUCTION BOOK SP1000M User Guide ...

Страница 2: ...Services AK CONNECT Listening to Music Playlist Management USB DAC Installation How to Use USB Audio CD Ripping Settings Connecting to Wi Fi Using Bluetooth Equalizer Setup 13 17 19 22 23 24 30 33 36 37 38 40 45 46 48 Using the Device _02 Safety Pre Cautions Troubleshooting Copyright Certifications Registered Trademarks Disclaimers Specifications 51 53 54 55 56 57 58 Miscellaneous _03 CONTENTS ...

Страница 3: ...talled in the product by default USB Type C Cable For charging and data transfer Quick Start Guide Basic overview of device functionality Warranty Card Provides warranty details for your device Maintain a copy of this card since it may be required for future technical support requests User Guide The User Guide can be downloaded from the Astell Kern website http www astellnkern com Support Download...

Страница 4: ...roSD card to access its files USB Type C Port DC Power symbol For charging and data transfer Power Power symbol Press Turns the screen on or off Press and Hold Turns the device on or off Getting Started 03 User Guide The appearance of the product as well as the printed and engraved information may vary depending on the model Product Overview Previous Rewind Next Fast Forward Play Pause 3 5mm Unbal...

Страница 5: ...with touch control features Previous Rewind Short press Play the previous song or restart the current song Press and hold Rewind the current song Play Pause Play or pause the current song Next Fast Forward Short press Play the next song Press and hold Fast forward the current song Home Button Press to return to the Home Screen ...

Страница 6: ... 7 seconds to force a shutdown The device can then be restarted after the shutdown is complete Turning the Screen On Off 1 While the screen is on press the Power button to turn off the screen 2 Press Power button again to turn it on This device has an automatic shutdown feature to save battery power The device will turn off if there is no user input during the period defined in Menu Settings Timer...

Страница 7: ...apter Normal charging About 5 hours 30 minutes Fully discharged Power off 5V 2A adapter A fast charger of 9V 1 67A may be used Using a 12V adapter will not charge the device and may cause malfunctions Charging via USB Wall Adapter 1 Commercially available 9V 1 67A output adapters may be used for charging Charging ...

Страница 8: ...hones to the 3 5mm unbalanced port 2 5mm Balanced Port 1 Connect earphones or headphones to the 2 5mm balanced port OR OR Connecting to Balanced Audio Device 1 Connect to an external audio device by using the 3 5mm unbalanced port and 2 5mm balanced port Unbalanced Port Ground Balanced Port LR ...

Страница 9: ...omputer through the device See Page 37 Mac users need to download and install Android File Transfer from the Astell Kern website http www astellnkern com Support Download For an optimal connection quit any unnecessary programs before connecting the device to the computer Do not use cables other than the USB Type C cable provided with the device Doing so may cause malfunctions For both Windows and ...

Страница 10: ...files folders and drag drop them into the device folder Ensure the USB Type C cable is properly connected Turning off the device computer or disconnecting the USB Type C cable while copying or moving files folders may corrupt files or device memory File transfer speeds may be affected by the computer and or the OS environment ...

Страница 11: ...en select Delete 2 Select Yes in the Confirm File Folder Deletion window to delete the selected files folders Disconnecting from the Computer 1 Disconnect the USB Type C cable after the transfer between the device and computer is complete Disconnecting the device from the computer during a file transfer may corrupt data on the device ...

Страница 12: ...e proper procedure may corrupt data and cause serious damage to the both the card and device Do not remove the microSD card during use Doing so may cause malfunction delete data and damage the microSD card Getting Started 11 User Guide Recommended microSD Cards SanDisk Transcend Insert Remove a microSD Card 1 Refer to the diagram and gently insert a microSD card into the microSD card slot 2 To saf...

Страница 13: ...vel of 20 is required Do not disconnect from the wireless network while downloading the update file Doing so may cause data corruption and or damage to the system If an error occurs or the notice in the Notification Bar disappears during an update download the firmware update again through Menu Settings Update System Moving to another screen during a file download will cancel the download Wi Fi Up...

Страница 14: ...n LCD touchscreen that allows you to perform operations by touch Use the touchscreen to access various features on the device To prevent damage to the screen do not use a sharp object or excessive force Return to the Home Screen Home Screen 1 Press at any time to return to the Home Screen ...

Страница 15: ...Home Screen swipe your finger to the left right up or down from any edge of the touchscreen to access display menus Each side of the Home Screen will activate a different display menu Music files extracted using the AK CD Ripper accessory that are stored in the Ripping folder of the internal memory will be displayed in the CD library menu ...

Страница 16: ...e Notification Bar 1 From the top edge of the touchscreen swipe your finger down to display the Notification Bar View Current Playlist 1 From the right edge of the touchscreen swipe your finger left to display the Now Playing menu ...

Страница 17: ...ice 16 User Guide View Play History 1 From the bottom edge of the touchscreen swipe your finger up to display the Play History menu Moving Up Down on a List 1 Scroll through a list by dragging your finger up or down ...

Страница 18: ...o to the last displayed menu list Add the current song to a playlist Song title information File name is displayed when the title is unavailable Displays the artist and album info Menu Details Song Progress Recent Menu List Add to Playlist Title Artist Album 1 2 3 4 5 6 7 Home Screen 9 1 4 6 7 8 3 11 15 14 5 2 16 13 12 10 ...

Страница 19: ...the desired track time Indicates the song s total duration Press to switch from elapsed time to remaining time Press to set track sequence for playback Shuffle mode on Shuffle mode off Press to set the Repeat mode Repeat entire playlist Repeat current track Repeat mode off Play or pause the current song Short press Play the next song Press and hold Fast forward the current song The Floating Back b...

Страница 20: ...Using the Device 19 User Guide Notifi cation Bar 11 12 1 2 3 4 5 6 7 8 9 10 13 ...

Страница 21: ...Default Enables transfer of media files After connecting the device to a portable USB DAC press to connect or disconnect the device Turn CD ripping function on off Press to turn AK Connect on off Press to turn line out on off Press to turn Gapless Playback on off Press to turn Wheel lock on off The volume wheel is disabled when the screen is locked Wi Fi Bluetooth EQ Computer Connection Mode USB A...

Страница 22: ...reen Using the Device 21 User Guide Press to display the full settings menu Use the adjustment bar to control the display brightness Device notifications are displayed in this area Clear notifications Settings Brightness Notifications Display Clear Notifications 10 11 12 13 ...

Страница 23: ...for detailed information Select Menu User Guide within the Groovers Services for detailed instructions Listen to streaming services or purchase music from the Services when connected to a wireless network Streaming services and ability to purchase music vary by country Not all services are available in all countries Music Services For Wi Fi connections see Page 45 Currently supported services are ...

Страница 24: ...ing Open APP Service The source of the app you are trying to install is unknown Be aware that if the app is installed the device may be damaged and personal data compromised If you install an app from an unknown source despite this warning the company is not responsible for any damages to the device and data resulting from the app s installation and downloading and installing such apps may limit t...

Страница 25: ...ored on a computer on the same network as well as output sound through compatible speakers with AK Connect AK CONNECT Please refer to the following computer minimum system requirements Minimum Computer Requirements OS Windows 7 8 10 32 64 bit Mac Requirements OS X 10 7 Lion or later Using AK Connect to Link Music Libraries Speakers 1 Turn on the music library device and or speaker and AK player Ru...

Страница 26: ...s see Page 45 5 A list of libraries speakers that are on the same network with AK player will be displayed 6 Select a library speaker to connect 7 After selecting a library speaker select a category from the menu to display the corresponding music list ...

Страница 27: ...and press to initiate the download A message on the Notification Bar will indicate when the download is complete Depending on network conditions song loading may be slow and streaming may stutter Performing other operations on the linked computer may cause slower response time If you stream and download at the same time it may slow the device s response time depending on the speed of the Wi Fi net...

Страница 28: ...Using the Device 27 User Guide AK Connect Usage Examples Case 1 LIBRARY SPEAKER AK T1 SP1000M Case 2 AK500N LIBRARY REMOTE SPEAKER AK T1 SP1000M ...

Страница 29: ...Using the Device 28 User Guide Case 3 REMOTE LIBRARY SP1000M SPEAKER AK500N Case 4 LIBRARY SPEAKER AK T1 SP1000M AK500N REMOTE ...

Страница 30: ...Using the Device 29 User Guide Case 5 SPEAKER AK T1 LIBRARY SP1000M or REMOTE AK Connect APP AK500N LIBRARY ...

Страница 31: ...SD files MQS PCM 8 384kHz 24 32bit DSD DSD 2 8 5 6 11 2MHz Select the Folder category to check the internal external memory capacity and number of files folders and copy move music Press on the music list to add all music to the current playlist Listening to Music Selecting Music 1 Select a category from the menu to display the corresponding music list 2 Select a song from the list to begin playba...

Страница 32: ... during playback to pause and to resume playback Press during playback for the previous next track Press and hold to rewind fast forward the track Drag the indicator on the Playback Progress Bar to a desired location of a track during playback Press the album art on the Home Screen to display the song lyrics Press the to go to Home Screen Press at the top of the menu list to hide the menu list Aft...

Страница 33: ...User Guide Playlist Screen 1 3 2 4 Return to the previous screen Displays the current playlist Display the editing options for the music list Play all songs in the current list Previous Playlist Edit mode Play All 1 2 3 4 ...

Страница 34: ...the upper right corner of the screen 3 Enter a name for the playlist and then press Add to create a new playlist Adding a Song to a Playlist 1 Press Playlists to display the list of playlists 2 Select a playlist and press Add Song to display a list of songs by album 3 Select a song and press Add to add the song to the selected playlist ...

Страница 35: ...e song from the selected playlist Playing a Playlist 1 Select the desired playlist for playback 2 Press at the top right of the screen to play the entire playlist 3 To playback part of the playlist or add it to a current Now Playing playlist press at the top of the playlist select the music you want to play and press to add the selected list to the top bottom after the current song of Now Playing ...

Страница 36: ...e playlist to be deleted 3 Press at the top of the screen 4 Press DELETE to delete the selected playlist 1 Press Playlists to view the playlists and press 2 Select a playlist to be renamed 3 Press RENAME at the top of the screen to display the RENAME window 4 Enter a name for the playlist and then press RENAME to confirm the change ...

Страница 37: ...m must be used to adjust the volume Install a dedicated driver to use the AK device as a USB DAC The driver file is located in SP1000M Internal_Storage SP1000M_ Contents Driver Before installing the driver set device to USB DAC mode and connect to the computer USB DAC Installation The USB DAC function allows the device to be recognized as a sound card on a computer Music from the computer is playe...

Страница 38: ...erted into DoP before being outputted through the USB audio out The USB Type C cable that comes packaged with the device is only to be used for computer data transfer or to charge the device The type of dedicated cable needed to connect to the portable DAC varies please refer to USB DAC manufacturer instructions for correct cable type A USB DAC cable is not included with the device and must be pur...

Страница 39: ... ripping function 2 Connect the AK CD RIPPER to the device and insert a CD 3 Metadata ID3 tags for the inserted CD will be retrieved via Gracenote if Wi Fi is turned on 4 CD ripping will begin automatically after the metadata has been downloaded 5 When finished press OK when prompted to complete the automatic CD ripping process The USB Type C cable provided with the device is to be used to connect...

Страница 40: ...rogress The AK Connect service will be disabled during CD ripping The service will automatically restart when CD ripping is completed Music playback is disabled during ripping You can set the desired file format and ripping speed from the Menu Settings CD Ripping menu Several attempts at correction will be made for data with errors when the feature is enabled under Menu Settings CD Ripping Error C...

Страница 41: ...ings or select from the Notification Bar menu 2 Select the feature to view setting options Wi Fi Change wireless network settings and turn Wi Fi on off Bluetooth Connect a Bluetooth device to listen to music wirelessly See page 45 for more information on connecting to Wi Fi See page 46 for more information on using Bluetooth AK CONNECT Turn AK Connect on off and set AK Connect options ...

Страница 42: ...led Doing so may cause permanent hearing loss Supported Formats for EQ PCM 8 192kHz 8 16 24bit Using the equalizer may negatively affect device performance See pages 48 50 for more information on using the equalizer Equalizer Set the equalizer according to the user s preferences USER EQ Adjust the frequencies according to the user s preferences Left Right Balance Adjust the left right balance for ...

Страница 43: ...tion as well as the file format and ripping speed Screen Brightness Adjust screen brightness settings Date Time Set the current date and time USB mode Media Device USB Drive When connected to a computer device appears as a removable drive DAC Input Output sound from a connected computer to the device Device Name Set the name of the device The maximum name length is 50 characters ...

Страница 44: ... the device will turn off after the selected amount of time Input method Back button The Floating Back button will be displayed on the screen Move the Back button to the desired position by dragging and dropping the icon with your finger Move the button to the center of the screen to deactivate it To reactivate the button use the Input Method menu in the Settings Keyboard Select a language for the...

Страница 45: ...ns the internal database Database initialization time may vary depending on the number of files stored on the device Settings Reset Resets all user settings back to the default settings Factory Data Reset Deletes all user data and resets all user settings back to the default setting Update System Update Update the device when a new firmware version is available Application Update Update the defaul...

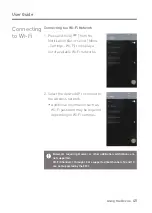
Страница 46: ...be required depending on Wi Fi settings Connecting to a Wi Fi Network 1 Press and hold from the Notification Bar or select Menu Settings Wi Fi to display a list of available Wi Fi networks Networks requiring browser or other additional certifications are not supported Wi Fi Channels 1 through 13 are supported but channels 12 and 13 are not supported by the FCC ...

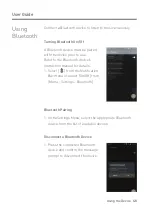
Страница 47: ...e Refer to the Bluetooth device s instruction manual for details 1 Select from the Notification Bar menu or select On Off from Menu Settings Bluetooth Bluetooth Pairing 1 In the Settings Menu select the appropriate Bluetooth device from the list of available devices Disconnect a Bluetooth Device 1 Press the connected Bluetooth device and confirm the message prompt to disconnect the device ...

Страница 48: ...the necessary connections prior to use Car audio Bluetooth connections may not be fully compatible Some features may not be supported and quality of playback may vary Malfunction noise and other undesirable effects may occur due to the device s battery level and the environment If signal interference affects data transmission e g holding the device while wearing a Bluetooth device holding the devi...

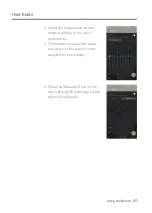
Страница 49: ...r a name for the custom EQ settings and select SAVE User Guide Equalizer Setup 1 Press and hold on the Notification Bar or turn on Menu Settings Equalizer 2 Press PRO EQ to activate the drop down menu and select Equalizer Setup ...

Страница 50: ...ncies up and down according to the user s preferences 5 The number values at the lower left corner of the screen can be adjusted for fine tuning User Guide 6 Press the Advanced tab on the top to display PEQ settings screen Adjust Freq Gain Q ...

Страница 51: ...d EQ settings 2 Press next to the EQ name to be deleted 3 Press OK to delete the selected EQ setting Renaming a Custom Equalizer Setting 1 Press on the drop down menu at the upper left corner of the screen to display the list of the saved EQ settings 2 Press next to the EQ setting name you wish to change and enter a new name for the selected EQ 3 Press CHANGE to save ...

Страница 52: ...atures 10 50 14 122 such as the inside of a car during the summer Do not store or use in hot and humid places such as saunas Avoid places with excessive dust or smoke Do not use for extended periods on blankets electric blankets or carpet Do not place near a fire or in a microwave Never disassemble repair or alter the product Do not store for extended periods in a confined space with the power on ...

Страница 53: ...sing the device Do not listen to music at excessive volumes for extended periods Do not use earphones headphones at excessive volumes Make sure that the headphone earphone does not get stuck in another object or get caught between other objects Do not sleep with earphones in your ears or leave them in for extended periods Connecting the cable to a defective or damaged USB port on a computer may da...

Страница 54: ...he back of the computer Check if the USB Type C cable is connected correctly For Mac check to ensure the MTP program is installed properly Check if the device connects properly on a different computer 4 The screen turns off repeatedly The screen turns off automatically after a defined period to reduce battery consumption Set the time at Menu Settings Timer Settings Screen Off 5 The screen does not...

Страница 55: ... or reproduced in any format or by any means without the prior approval of IRIVER Using or reproducing in whole or part the contents of this document is subject to penalties Software audio video and any other copyrighted contents are protected in accordance with relevant copyright laws The user accepts all legal responsibility for the unauthorized reproduction or distribution of the copyrighted co...

Страница 56: ...n the text of the manual NOTE This equipment has been tested and found to comply with the limits for a Class B digital device pursuant to part 15 of the FCC Rules These limits are designed to provide reasonable protection against harmful interference in a residential installation This equipment generates uses and can radiate radio frequency energy and if not installed and used in accordance with t...

Страница 57: ...stance requirements Users must be fully informed of the operating requirements and restrictions to the extent that the typical user can easily understand the information to acquire the required body worn accessories to maintain compliance Instructions on how to place and orient a device in body worn accessories in accordance with the test results should also be included in the user instructions Al...

Страница 58: ... regularly adds new features via OTA updates and will continue to apply new technologies in the future Product specifications may be changed without prior notice There is no warranty against data loss due to the use of this product CAUTION RISK OF EXPLOSION IF BATTERY IS REPLACED BY AN INCORRECT TYPE DISPOSE OF USED BATTERIES ACCORDING TO THE INSTRUCTIONS The device must be used a minimum of 5mm a...

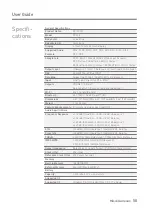
Страница 59: ...ndition 20Hz 20kHz Balance 0 68dB Condition 10Hz 70kHz Unbalance 0 67dB Condition 10Hz 70kHz Balance 120dB 1kHz Unbalance 123dB 1kHz Balance 138dB 1kHz Unbalance 144dB 1kHz Balance 0 0007 1kHz Unbalance 0 0006 1kHz Balance 0 0004 800Hz 10kHz 4 1 Unbalance 0 0004 800Hz 10kHz 4 1 Balance Balanced out 2 5mm 1ohm PHONES 3 5mm 2ohm 25ps Typ 200 Femto Seconds 128GB NAND MicroSD Max 400GB x 1 3 300mAh 3 ...

Отзывы: