


20
:: Tuning Tips (cont.)
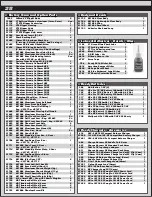
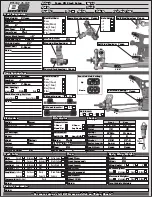
Motor Gearing:
Proper motor gearing will result in maximum performance and run time while reducing the chance of overheating and
premature motor failure. The gear ratio chart lists recommended
starting gear ratios
for the most widely used
motor types. Gear ratios will vary depending upon motor brand, wind, and electronic speed control. Consult your
motor and electronic speed control manufacturers for more information.
Team Associated is not responsible for motor damage due to improper gearing.
Set The Gear Mesh:
You should be able to rock the spur gear back and forth in the teeth of the pinion gear without making the pinion gear
move. If the spur gear mesh is tight, then loosen the #31532 screws and move the motor away, then try again.
A gear mesh that is too tight or too loose will reduce power and damage the gear teeth.
31
30
24
23
22
21
20
21
21
19
18
Pinion
69
75
78
78
78
78
78
81
81
81
81
Spur
5.79:1
6.50:1
8.45:1
8.82:1
9.22:1
9.65:1
10.14:1
10.03:1
10.03:1
11.08:1
11.70:1
Final Drive Ratio
17.5 Reedy Sonic Brushless
13.5 Reedy Sonic Brushless
10.5 Reedy Sonic Brushless
9.5 Reedy Sonic Brushless
8.5 Reedy Sonic Brushless
7.5 Reedy Sonic Brushless
6.5 Reedy Sonic Brushless
3300kV Brushless
3900kV Brushless
4900kV Brushless
6100kV Brushless
Motor
B6 Gear Ratio Chart (Internal Gear Ratio 2.60:1)
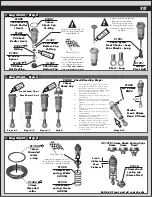
Rear Camber:
Camber describes the angle at which the tire and wheel rides when looked at from the back. Negative camber means
that the tire leans inward at the top. A good starting camber setting is -1°. Adding a small amount of positive camber,
where the top of the tire is leaning out, will tend to improve straight-line acceleration on loose tracks.
Optional #1719 camber gauge can be used to more accurately set camber.
Slipper Clutch:
The assembly instructions give you a base setting for your clutch. Turn the nut on the shaft so that the end of the top
shaft is even with the outside of the nut. At the track, tighten or loosen the nut in 1/8 turn increments until you hear
a faint slipping sound for 1-2 feet on takeoffs. Another popular way to set the clutch is to hold both rear tires firmly in
place and apply short bursts of throttle. If the clutch is properly set, the front tires should lift slightly up off the surface.
Front Camber:
Camber describes the angle at which the tire and wheel rides when
looked at from the front. Negative camber means that the tire leans
inward at the top. A good starting camber setting is -1°. Positive camber,
where the top of the tire is leaning out, is not recommended.
Optional #1719 camber gauge can be used to more accurately set camber.
*Testing camber
with camber gauge
!
Front Camber Links:
Changing the length of the camber link is considered a bigger step than
adjusting the ball end height on the tower. Shortening the camber link
(or lowering the ball end) will give the front end less roll and quicken steering
response. Lengthening the camber link (or raising the ball end) will give the
front more roll and slower steering response. Longer camber links are
typically used on high grip tracks and shorter links tend to work better on
medium-grip loose tracks.
*Raise or lower the
ball end by adding
or removing
washers here
!
Caster:
Caster describes the angle of the caster block as it leans toward the rear of the vehicle. Positive caster means the
kingpin leans rearward at the top. The B6 includes three inserts to adjust caster angle at the caster block, 0
°
,
2.5
°
,
and +5
°
. The total caster angle is the sum of the kick-up angle and the caster block angle. Standard total caster angle
for the B6 is 30
°
, with 25
°
kick-up and +5
°
caster block angle.
For less entry steering and more exit steering, try 0
°
caster block angle.
Содержание RC10B6D Team Kit
Страница 1: ... 90012 RC10B6D Team Kit ...