background image

CALMER CANINE USER MANUAL

4

INTR

ODUCING THE 

S

Y

S

TEM

INTRODUCING YOUR DOG TO THE SYSTEM

For the best treatment experience, it’s important for your dog to feel comfortable 

wearing the vest and have a positive association with the Calmer Canine system. 

Make sure you give your dog plenty of praise and treats as they get used to the vest! 

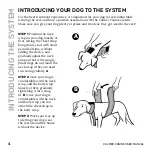
STEP 1

 Position the neck 

wrap on your dog loosely at 

first, letting the chest strap 

hang down, start with short 

periods of time, without 

adding the device, and 

gradually adjust the neck 

strap so that it fits snugly.  

(Most dogs do not mind the 

neck wrap if they are used 

to wearing collars). 

A

STEP 2

 Once your dog is 

comfortable with the neck 

wrap, add the body wrap 

loosely at first, gradually 

tightening it for a snug 

fit. 

B  

Once your dog is 

comfortable with the neck 

and body wrap you can 

attach the chest strap to  

the body wrap. 

STEP 3

 Work your way up 

to letting your dog wear 

the vest around the house 

without the device. 

A

B

Содержание CALMER CANINE

Страница 1: ...ECN XXXXXXXX 1 CALMER CANINE USER MANUAL DEVELOPED BY ...

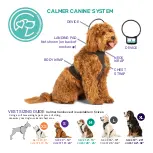
Страница 2: ...NECK 19 23 CHEST 32 39 S M L XL XS Using a soft measuring tape or piece of string measure your dog s neck and chest area CALMER CANINE SYSTEM LANDING PAD Not shown on back of neck wrap DEVICE NECK WRAP BODY WRAP CHEST STRAP DEVICE VEST SIZING GUIDE Calmer Canine vest is available in 5 sizes ...

Страница 3: ...ATTERY DOOR POWER BUTTON INDICATOR LIGHT HOOK FABRIC FASTENER PAD TOP VIEW BOTTOM VIEW SERIAL NUMBER POD ENCLOSURE TOP VIEW BOTTOM VIEW Hookfabric fastenerpad Power button Pod loop enclosure Applicator Serial number Batterydoor Indicatorlight TABLE OF CONTENTS Convenience Vest 2 Safety Warnings 3 Introducing Your Dog to the System 4 Fitting the Vest 5 Attaching the Device 6 Vest Free Use 7 Beginni...

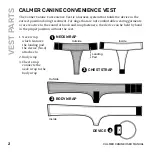
Страница 4: ...e body wrap The Calmer Canine Convenience Vest is a harness system that holds the device in the correct position during treatment For dogs that are not comfortable wearing garments or are reactive to the sound of hook and loop fasteners the device can be held by hand in the proper position without the vest Outside Outside Inside Landing Pad Inside NECK WRAP CHEST STRAP BODY WRAP DEVICE 1 3 2 4 ...

Страница 5: ...e rain DO NOT leave your dog unsupervised with the Calmer Canine device DO NOT let your dog wear a metal collar such as a prong collar or sit on or near a large metal surface such as a wire crate during treatments Metal can reduce the effectiveness of the treatment A metal ID tag will not affect the device Remove any electronic devices from your dog e g electronic training collars activity monitor...

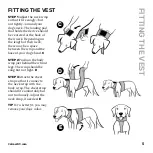
Страница 6: ...loosely at first letting the chest strap hang down start with short periods of time without adding the device and gradually adjust the neck strap so that it fits snugly Most dogs do not mind the neck wrap if they are used to wearing collars A STEP 2 Once your dog is comfortable with the neck wrap add the body wrap loosely at first gradually tightening it for a snug fit B Once your dog is comfortab...

Страница 7: ...on the length of their neck there may be a space between the wrap and the base of your dog s head C STEP 2 Position the body wrap just behind their front legs The wrap should be snug but not tight D STEP 3 Attach the chest strap so that it connects the neck wrap with the body wrap The chest strap should fit comfortably but not too loosely Adjust the neck strap if needed E TIP For a better fit you ...

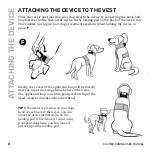
Страница 8: ...treatment session without holding the device in place F F Ideally the center of the applicator loop will be directly over the top of your dog s head between their ears The applicator loop can either gently rest on top of the head or up to 4 inches above their head TIP If the device is pressing on your dog s head or resting over their eyes you can move the device farther down on the landing pad If ...

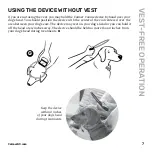
Страница 9: ...s head You should position the device with the center of the coil centered over the area between your dog s ears The device may rest on your dog s head or you can hold it off the head a few inches away The device should be held no more than 4 inches from your dog s head during treatments G Keep the device within 4 inches of your dog s head during treatments ...

Страница 10: ...y should be avoided because it could dislodge the device NOTE If you need to turn off the device before the 15 minute treatment cycle has ended press the power button The blue light should stop flashing indicating the device is off TREATMENT TIPS Only initiate a treatment session when your dog is calm To help them relax try taking them for a short walk Give your dog plenty of praise and treats dur...

Страница 11: ...me alone Every dog is an individual and each shows different signs of anxiety We recommend that you use the online anxiety progress tracker to assess your dog s signs of anxiety before beginning treatment with Calmer Canine and to track weekly progress during the course of treatment Visit CalmerK9 com anxiety tracker for tools to help you assess how well your dog is doing HOW LONG DO THE EFFECTS L...

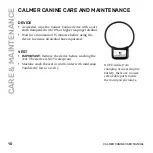
Страница 12: ...l alcohol Wait for a minimum of 15 minutes before using the device to ensure all alcohol has evaporated VEST IMPORTANT Remove the device before washing the vest The device is NOT waterproof Machine wash the vest in warm water with mild soap Tumble dry low or air dry NOTE Aside from changing or accessing the battery there are no user serviceable parts inside the main pod enclosure ...

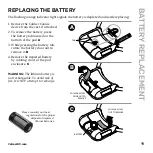
Страница 13: ...ted on the bottom of the pod A 3 While pressing the battery tab rotate the battery door out to remove it B 4 Remove the depleted battery by rotating it out of the pod enclosure C WARNING The lithium battery is not rechargeable To avoid risk of fire DO NOT attempt to recharge TAB PRESS TAB ROTATE BATTERY DOOR OUT TO REMOVE ROTATE BATTERY OUT TO REMOVE BATTERY A B C Please consult your local regulat...

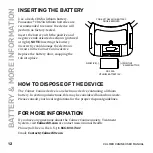
Страница 14: ...e ends oriented as shown pictured at right NOTE Inserting the battery incorrectly could damage the electronic circuits in the Calmer Canine device Replace the battery door snapping the tab into place The Calmer Canine device is an electronic device containing a lithium battery In certain jurisdictions this may be considered hazardous waste Please consult your local regulations for the proper dispo...

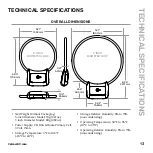
Страница 15: ...8 to 75 noncondensing Operating Temperature 50 F to 95 F 10 C to 35 C Operating Relative Humidity 8 to 75 noncondensing TECHNICAL SPECIFICATIONS 3 02 76 8mm 6 83 173 5mm 5 27 133 9mm 0 27 6 9mm 1 04 26 5mm 2 38 60 4mm 8 96 227 7mm 7 27 184 7mm 7 INCH DIAMETER LOOP 5 INCH DIAMETER LOOP OVERALL DIMENSIONS 5 27 133 9mm 7 27 184 7mm 8 96 227 7mm 3 02 76 8mm 1 04 26 5mm 0 27 6 9mm 2 38 60 4mm 6 83 173 ...

Страница 16: ...6 830 7342 Contact CalmerK9 com CalmerK9 com V01 0919 2019 Assisi Animal Health and its affiliates Calmer Canine and tPEMF are trademarks of Assisi Animal Health LLC ALL RIGHTS RESERVED Manufactured in the U S A U S PATENT 7 744 524 and patents pending ...

Отзывы: