background image


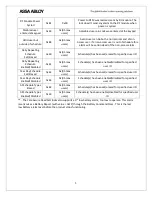
RF Module Power 

Cycled 

0x82 

0x00 

Power to RFM was restored, sent by RF module. The 

lock doesn’t send any alarm to the RF module when 

power is cycled. 

Disabled user 

entered at keypad 

0x83 

0x(01-max 

users) 

A disabled user pin code was entered at the keypad 

Valid user but 

outside of schedule 

0x84 

0x(01-max 

users) 

A valid user can be both a normal user and a Non-

Access user. If a non-access user is out of schedule this 

alarm will be sent instead of the non-access alarm. 

Daily Repeating 

Schedule 

Set/Erased 

0x60 

0x(01-max 

users) 

Schedule(s) has been set/erased for specified user ID 

Daily Repeating 

Schedule 

Enabled/Disabled 

0x61 

0x(01-max 

users) 

Schedule(s) has been enabled/disabled for specified 

user ID 

Year Day Schedule 

Set/Erased 

0x62 

0x(01-max 

users) 

Schedule(s) has been set/erased for specified user ID 

Year Day Schedule 

Enabled/Disabled 

0x63 

0x(01-max 

users) 

Schedule(s) has been enabled/disabled for specified 

user ID 

All Schedule Types 

Erased 

0x64 

0x(01-max 

users) 

Schedule(s) has been set/erased for specified user ID 

All Schedule Types 

Enabled/Disabled 

0x65 

0x(01-max 

users) 

Schedule(s) has been enable/disabled for specified user 

ID 

** - The Yale Assure Deadbolt locks also supports a 3

rd

 low battery alarm, too low to operate. This alarm 

is sent out as a Battery Report (with value = 0xFF) through the Battery Command Class.  This is the last 
low battery alarm level before the product stops functioning.   


Содержание Yale Assure Lock YRC226

Страница 1: ...pliance with all codes and ratings Yale Assure Lock Installation and Programming Instructions YRC226 YRC426 YRC620 Electronic Interconnected Touchscreen Network Module Optional Not available on YRC620 Before you begin for step by step installation instructions to register your product DOWNLOAD THE BILT APP 4 Touchscreen Shown 5 5 Available Inside of Door Outside of Door ...

Страница 2: ...2 P N Rev G YRL EMICL TSINSTL FUL Before You Begin 1 3 8 35mm Min to 1 3 4 44 5mm Max 4 1 2 114 Min x1 x2 x8 Network Module Optional Not available on YRC620 3 32 1 8 Template x2 x2 x2 2 1 8 2 1 8 1 1 ...

Страница 3: ...3 P N Rev G YRL EMICL TSINSTL FUL Mark Door Reference Lines C L REMOVE Template EXISTING 2 3 8 or 2 3 4 Backset ...

Страница 4: ...4 P N Rev G YRL EMICL TSINSTL FUL 1 Preparing Door if necessary Drill holes 1 2 way thru door then complete from other side to prevent splitting Ø2 1 8 2 3 8 or 2 3 4 Ø1 Template 4 or 5 5 ...

Страница 5: ...5 P N Rev G YRL EMICL TSINSTL FUL 2 Installing Strike Plates Door Frame Inside of Door Frame 1 Dia x 1 Deep 1 Dia x 1 2 Deep Frame 7 16 8 32 x 1 UNCWS x4 ...

Страница 6: ...rd Right Hand Hinges Right RH Open Inward Right Hand Reverse Hinges Right RHR Open Outward The hand of a door is determined from the secure side of the door The term secure means the side from which you initially unlock and enter Determining Handing 6 P N Rev G YRL EMICL TSINSTL FUL ...

Страница 7: ... G YRL EMICL TSINSTL FUL 3 Changing Handing if necessary 4 24 x 1 4 PPHMS 4 Left Hand to 4 Right Hand Shown x2 3 DO NOT TAMPER WITH OR LOOSEN E CLIP AND ITS ASSEMBLY DO NOT LOOSEN THESE 6 SCREWS OR REMOVE COVER ...

Страница 8: ...Changing Handing if necessary continued 3 8 P N Rev G YRL EMICL TSINSTL FUL ...

Страница 9: ... Rev G YRL EMICL TSINSTL FUL Lockset Handing Configurations 4 Left Hand For 5 5 For 4 4 Right Hand For 5 5 For 4 After handing is changed check that lever and thumbturn rotate freely Test Lever and Thumbturn ...

Страница 10: ...10 P N Rev G YRL EMICL TSINSTL FUL 4 Installing Fire Cups Inside of Door Both Fire Cups and a marked UL Latchbolt must be used to qualify for listing UL ...

Страница 11: ...11 P N Rev G YRL EMICL TSINSTL FUL 5 Adjusting Deadbolt Latch If adjustable deadbolt latch provided O optional default UP 2 3 8 position UP 2 3 4 position Press Pull ...

Страница 12: ...Latch Latchbolt x4 7 16 8 32 x 1 UNCWS Curved edge of latchbolt faces direction door closes Choose latchbolt based on backset 2 3 8 or 2 3 4 Inside of Door Bolt must be in retracted unlocked position before installing Ensure arrow stamped on deadbolt is UP UP ...

Страница 13: ...13 P N Rev G YRL EMICL TSINSTL FUL M6x55 PPHMS UP Inside of Door x2 7 Installing Exterior Deadbolt UP Bolt must be in retracted unlocked position ...

Страница 14: ...14 P N Rev G YRL EMICL TSINSTL FUL 8 Installing Lock Chassis 10 32 x 1 1 2 PPHMS Inside of Door x2 UP ...

Страница 15: ...5 P N Rev G YRL EMICL TSINSTL FUL 9 Securing Back Plate to Door x2 6 32 x 1 2 POHMS 6 32 x 1 2 POHMS screws must be used to qualify for listing UL Drill two pilot holes Ø1 8 x 1 2 deep Inside of Door UP ...

Страница 16: ...16 P N Rev G YRL EMICL TSINSTL FUL Testing Deadbolt Latchbolt Operation Outside of Door ...

Страница 17: ...17 P N Rev G YRL EMICL TSINSTL FUL 10 Remove Battery Cover Loosen screw to remove cover ...

Страница 18: ...aching the Cable Assembly Cable must be routed as shown to avoid interference with movement of lock UP Inside of Door Align wire connectors so that tabs slide into slots Tug gently on cables to test that connectors are secure Tab Slot Tab Slot ...

Страница 19: ...19 P N Rev G YRL EMICL TSINSTL FUL 12 Installing Interior Lock Turn thumbturn to adjust slot orientation UP Orientation must match Do not fasten lock to back plate until properly fitted Inside of Door ...

Страница 20: ...20 P N Rev G YRL EMICL TSINSTL FUL 12 Installing Interior Lock continued 10 32 x 5 8 POHMS x1 6 32 x 1 PPHMS x2 Inside of Door DO NOT LOOSEN THIS SCREW ...

Страница 21: ...21 P N Rev G YRL EMICL TSINSTL FUL Pull lever to ensure it is secure 13 SNAP Installing Interior Lever Inside of Door Inside of Door ...

Страница 22: ...22 P N Rev G YRL EMICL TSINSTL FUL Testing Final Latchbolt Operation Outside of Door Inside of Door ...

Страница 23: ...Testing Final Deadbolt Operation If testing fails go back to beginning of Step 12 and check installation 23 P N Rev G YRL EMICL TSINSTL FUL ...

Страница 24: ...k module with batteries in unit Damage may occur Bolt must be in retracted unlocked position before installing batteries Tighten screw to replace cover Welcome to 15 Installing Batteries Cover Optional Not available on YRC620 24 P N Rev G YRL EMICL TSINSTL FUL ...

Страница 25: ...ing Instructions After entering the Master code PIN Press Advanced Lock Settings Press to Select Press Handing the Lock Press to Select Press to complete Lock will cycle motor to complete handing Congratulations you ve installed the Yale Assure Lock Electronic Interconnected Touchscreen Continue with the Programming Instructions to customize your product ...

Страница 26: ...rify proper door preparation and re bore holes that are too small or misaligned d Verify touchscreen wire harness is routed properly see Step 10 e Verify bolt is installed with correct side up see Step 6 Keypad numerics are scrolling Remove interior escutcheon a Check that wire terminals are securely connected b Check that wire harness lies flat against mounting plate and is routed through wire ho...

Страница 27: ...tton hole See image at right 3 Re insert 3 batteries and insert a small screwdriver into the hole holding the reset button for 3 seconds 4 While still holding the reset button insert the 4th battery and hold the reset button for an additional 3 seconds 5 Release the reset button 6 Re install the interior lock onto the door Upon reset Master Code creation is the only option PIN available and must b...

Страница 28: ...n Speaker P Key Return to Previous Low Battery Indicator Lockout Mode Touchscreen OR Master Code must be created before any further programming PIN Max User Codes 250 with Z Wave Plus or ZigBee network module Max User Codes 25 without network module or with iM1 network module Max User Codes 12 with Bluetooth ...

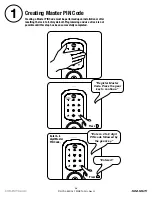
Страница 29: ...llation or after PIN resetting the lock to factory default Programming and use of lock is not possible until this step has been successfully completed Press Press Register Master Code Press the gear key to continue Enter a 4 to 8 digit code followed by PIN the gear key Entered 29 P N Rev G YRL EMICL TSINSTL FUL ...

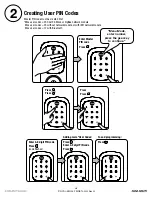
Страница 30: ...ve or ZigBee network module Max user codes 25 without network module or with iM1 network module Max user codes 12 with Bluetooth Enter 4 8 digit code PIN Press Press code flashes Press Enter 4 8 digit code PIN Press Adding more User Codes To end programming Menu Mode enter number press the gear key to continue 30 P N Rev G YRL EMICL TSINSTL FUL ...

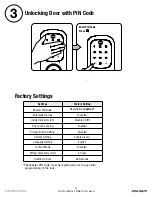
Страница 31: ...ny other PIN programming of the lock Factory Setting Registration required Disabled Disabled Off Enabled Enabled Low 5 Times 60 Seconds Settings Master Code PIN Automatic Re lock Inside Indicator Light One Touch Locking Volume Setting Wrong Code Entry Limit Shutdown Time Disabled Privacy Button Setting Disabled Lockout Mode English Language Setting ...

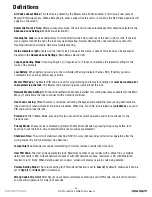
Страница 32: ...le Setting With the optional Network Module installed this setting becomes available thru the Main Menu 7 and allows the lock to connect with a network controller One Touch Locking When the latch is retracted activating the keypad will extend the latch during Automatic Re lock duration or when Automatic Re lock is disabled When One Touch Re lock is in use any valid not disabled PIN code will re lo...

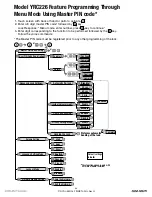
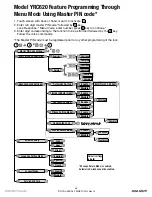
Страница 33: ...f the lock PIN M U This function appears only with network module installed Default settings in bold Master Code Setting PIN User Code Registration PIN Continue Complete Register Delete Continue Complete M 2 3 1 Join the Network Enable Disable English Spanish French Silent Low High Complete Exit the Network Volume Setting Language Setting Mode Lockout Mode Network Module Setting Privacy Setting Mo...

Страница 34: ...N M U Default settings in bold Master Code Setting PIN User Code Registration PIN Continue Complete Register Delete Continue Complete M 2 3 1 Enable Disable English Spanish French Silent Low High Complete Volume Setting Language Setting Mode Lockout Mode Set Up Card SEOS Privacy Setting Mode Enable Disable Handing the Lock Preforms automatic handing of the lock Advanced Lock Settings Automatic Re ...

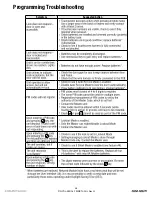
Страница 35: ...35 P N Rev G YRL EMICL TSINSTL FUL Programming Troubleshooting Symptom Suggested Action ...

Страница 36: ...se the separation between the equipment and receiver Connect the equipment into an outlet on a circuit different from that to which the receiver is connected Consult the dealer or an experienced radio technician for help TV Industry Canada This Class A digital apparatus meets all requirements of the Canadian Interference Causing Equipment Regulations Cet appareillage numérique de la classe A répon...

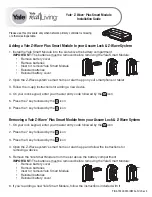
Страница 37: ... If you re adding a new Yale Smart Module follow the instructions included with it P N AYR202 ZW INSTAL FUL Rev E Removing a Yale Z Wave Plus Smart Module from your Assure Lock Z Wave System 1 Install the Yale Smart Module into the slot above the battery compartment IMPORTANT The batteries must be removed before removing the Yale Smart Module Remove battery cover Remove batteries Insert or remove ...

Страница 38: ...on is subject to the following two conditions 1 this device may not cause interference and 2 this device must accept any interference including interference that may cause undesired operation of the device Industry Canada Ÿ Consult the dealer or an experienced radio TV technician for help THIS DEVICE COMPLIES WITH PART 15 OF THE FCC RULES OPERATION IS SUBJECT TO THE FOLLOWING TWO CONDITIONS En ver...

Страница 39: ...1 Yale Locks YRC226 246 256 Z Wave Plus System Integrators Guide Yale Assure Deadbolt Lock January 2 2019 ...

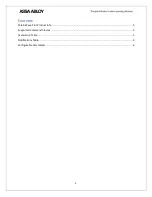
Страница 40: ...2 Contents Yale Z Wave Plus Product Info 3 Supported Command Classes 3 Association Table 3 Notifications Table 4 Configurable Parameters 6 ...

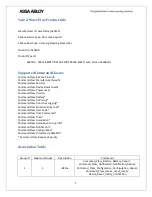
Страница 41: ...Command Class Battery Command Class Door Lock Command Class Door Lock Logging Command Class Schedule Entry Lock Command Class User Code Command Class Time Parameters Command Class Time Command Class Association Command Class Association Group Info Command Class Notification Command Class Configuration Command Class Firmware Update Md Command Class Requires Security Association Table Group ID Maxim...

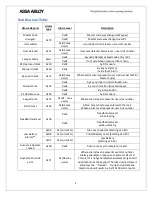
Страница 42: ... inside button RF Operate Lock 0x18 0x01 by RF module Keypad Lock 0x12 0x 01 max users Where Alarm level represents user slot number Non Access 0x26 0x 01 max users A Non Access Code was entered at the lock Where alarm level represents user slot number Deadbolt Jammed 0x09 0x01 Deadbolt jammed while locking 0x02 Deadbolt jammed while unlocking Low Battery Alarms 0xA9 0x Current Too Low to operate ...

Страница 43: ...hedule Enabled Disabled 0x61 0x 01 max users Schedule s has been enabled disabled for specified user ID Year Day Schedule Set Erased 0x62 0x 01 max users Schedule s has been set erased for specified user ID Year Day Schedule Enabled Disabled 0x63 0x 01 max users Schedule s has been enabled disabled for specified user ID All Schedule Types Erased 0x64 0x 01 max users Schedule s has been set erased ...

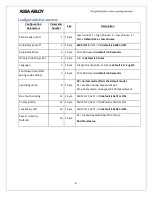
Страница 44: ...anguage 5 1 byte 1 English 2 Spanish 3 French default is 1 English Shut down time after wrong code entries 7 1 byte 10 to 180 seconds default is 60 seconds operating mode 8 1 byte 00 normal mode this is the default mode 01 vacation mode keypad lockout 02 privacy mode no keypad RF Unlock will work One Touch Locking 11 1 byte 0x00 OFF 0xFF ON default is 0xFF or ON Privacy Button 12 1 byte 0x00 OFF 0...

Отзывы: