


7
BHL Trim
Installation Instructions
8200 Series
A8131F 08/19
Copyright © 2019, SARGENT Manufacturing Company. All rights reserved. Reproduction in whole or
in part without the express written permission of SARGENT Manufacturing Company is prohibited.
1-800-727-5477 • www.sargentlock.com
6
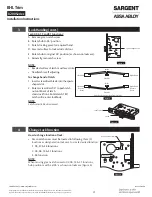
Door Preparation
Important:
Be sure to hand the lockbody before installing.
1. Insert mortise lock into door and fully
tighten 1” lock mounting
with two (2) wood screws and two (2) machine screws. (Figure 9)
2. Turn-piece functions only:
• Insert turn-piece door marker spindle into
lockbody on inside of door.
NOTE:
Use blade side of door marker spindle.
3. Turn-piece functions only:
• Slide turn-piece door marker over spindle.
Figure 9
Blade Side
Figure 10
4. Turn-piece functions only:
• Mark three holes for turn-piece. (Figure 11)
5. Coin-turn functions only:
• Insert turn-piece marker spindle into lockbody
on outside of door.
NOTE:
Use blade side of door marker spindle.
6. Coin-turn functions only:
• Slide turn-piece door marker template over spindle.
7. Coin-turn functions only:
• Mark two holes for coin-turn. (Figure 12)
8. Remove lockbody from door.
9. Turn-piece functions only:
• Drill one middle hole (.290”) And two outer holes (3/8”) halfway
through door. (Figure 13)
10. Coin-turn functions only: drill two holes (1/8”) halfway through door. (Figure 14)
Turn-Piece Door
Marker Template
Inside of Door
Figure 11
Turn-Piece Door
Marker Template
Outside of Door
Figure 12
Ø.290"
Ø3/8"
Ø3/8"
Figure 13
Ø1/8"
Figure 14


