background image

Installation instructions

:

1.

2.

3.

4.

5.

4

Fix the screen 

case over the

bracket

Insert and fix

screw

DOOR

FIG

. 1

FIG. 2

FIG. 4

FIG

. 3

8

7

up

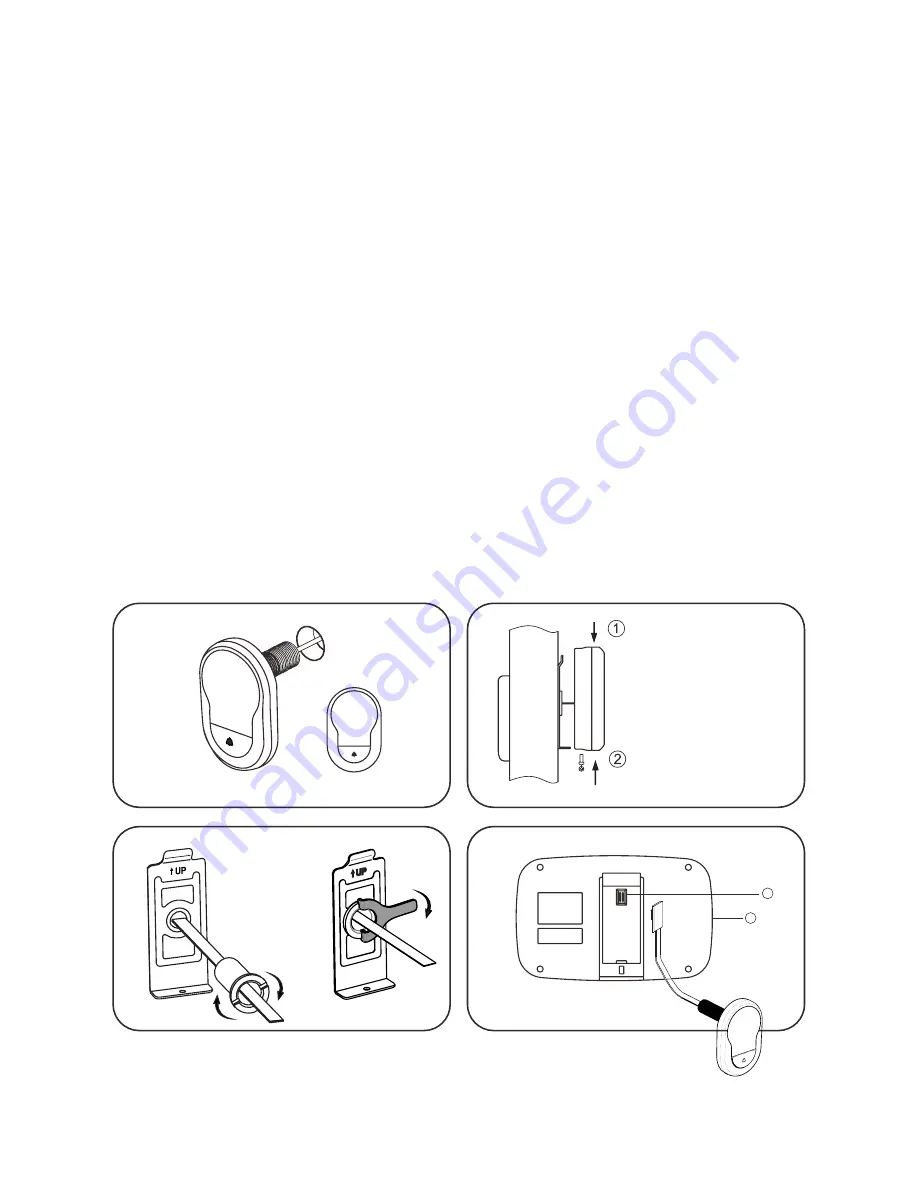
If there is an existing door viewer, remove and replace with the camera 

front facing. If a door viewer does not exist, drill a 14mm hole in the 

door at the required height and then insert the camera. The washer 

should be fitted between the camera and the door. The doorbell should 

be positioned at the bottom, while the camera should be adjusted so 

that it is horizontal. (FIG. 1)
Peel the backing off the 3M stickers on the holding plate and fit it over 

the end of the lens. Then screw the locking barrel on to the threaded 

sleeve of the camera and tighten. This will hold the plate to the door.


Make sure that the arrow on the plate points upwards. (FIG. 2)
Securely plug the data wire into the back of the screen. Any excess 

wire should be gently placed into the groove at the back of the screen.
Fix the screen over the bracket at the top of the plate. Then secure it by 

inserting the screw at the bottom of the screen case. (FIG. 3)
Connect the camera to the back of the screen case. (FIG. 4)

Содержание Mul-T-Lock

Страница 1: ...ations Mul T Lock reserves the right to invalidate the product s warranty if without prior consent the product s functionality or appearance has been altered or if the product is used in an environmen...

Страница 2: ...2...

Страница 3: ...To avoid injury and maintain the product s warranty never attempt to repair or modify the device or its accessories on your own Incorrect usage and extreme environmental conditions may cause memory l...

Страница 4: ...should be adjusted so that it is horizontal FIG 1 Peel the backing off the 3M stickers on the holding plate and t it over the end of the lens Then screw the locking barrel on to the threaded sleeve o...

Страница 5: ...n replace batteries promptly to avoid any damage from battery leaks To avoid damage 5 Full power No power AA AA AA AA The battery icon shows the power status As the batteries are depleted the number o...

Страница 6: ...shift 3 Menu 4 Left shift only in menu setting Selection key for replay mode 5 Right shift only in menu setting Begin video key in normal use 6 Power button Screen operating instructions Part specific...

Страница 7: ...Camera front view 1 Camera 2 Doorbell button 3 Data wire Camera operating instructions Part speci cations Menu interface instructions 2011 01 01 00000 1 2 3 4 5 6 2 1 3 Camera side view 7 TF...

Страница 8: ...ystem This icon shows the normal doorbell mode 8 Memory Card Installation Please insert the memory card before installing the batteries Before inserting the memory card make sure the marked side is fa...

Страница 9: ...ntil manually turned off if not turned off the batteries will quickly run out of power Auto power OFF setting Press the power button and an image of the exterior will appear on the screen The screen w...

Страница 10: ...of will stop the video function Users can select the doorbell chime and volume Choose the doorbell setting and press enter Press the up button to select the doorbell chime Choose the OFF mode to acti...

Страница 11: ...reened in black and white All photos are saved in the JPEG format Videos are taken and saved in MP4 format Users can scan and edit these photos and videos using Windows Camera Video ON OFF If you choo...

Страница 12: ...NOT mount the doorbell camera without first using the 3M sticker to adhere it to the door Fig1 Fig 2 Use care when installing the doorbell camera DO NOT disassemble the camera or pull on its wires Pul...

Отзывы: