background image

19

Getting Started    

3

IMPORTANT!  Never attempt to remove the battery pack while the Notebook PC is 

turned ON, as this may result in the loss of working data.

IMPORTANT!  Only use battery packs and power adapters supplied with this Notebook 

PC or specifically approved by the manufacturer or retailer for use with this model or 

else damage may occur to the Notebook PC.

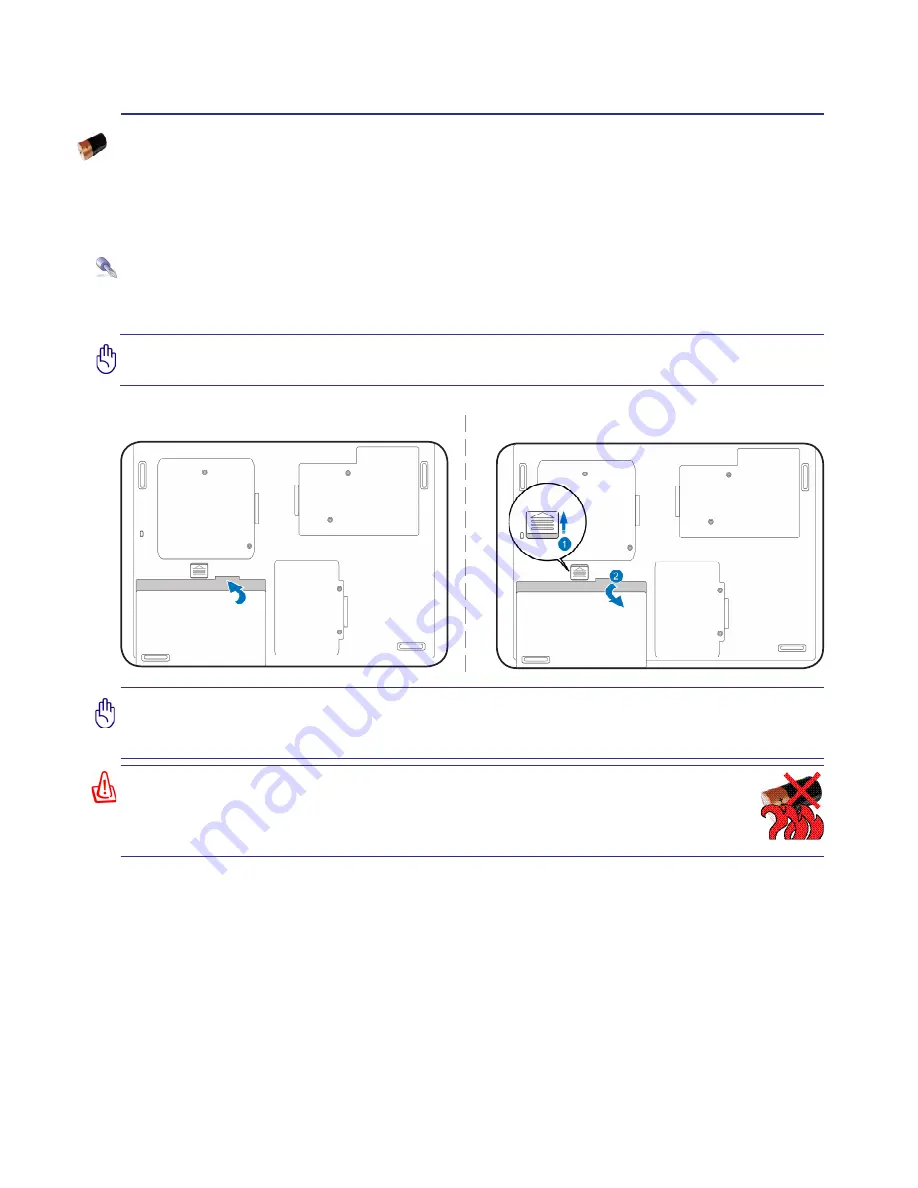
To install the battery pack:

To remove the battery pack:

WARNING! For safety reasons, DO NOT throw the battery in fire, DO NOT 

short circuit the contacts, and DO NOT disassemble the battery. If there is 

any abnormal operation or damage to the battery pack caused by impact, 

turn OFF the Notebook PC and contact an authorized service center.

Using Battery Power

The Notebook PC is designed to work with a removable battery pack. The battery pack consists of a set 

of battery cells housed together. A fully charged pack will provide several hours of battery life, which 

can be further extended by using power management features through the BIOS setup. Additional battery 

packs are optional and can be purchased separately through a Notebook PC retailer.

Installing and Removing the Battery Pack

Your Notebook PC may or may not have its battery pack installed. If your Notebook PC does not have 

its battery pack installed, use the following procedures to install the battery pack.

Содержание M15 BLACK/W7HP

Страница 1: ...Multi Book M15 User Manual...

Страница 2: ...sing Battery Power 19 Powering ON the Notebook PC 20 Checking Battery Power 21 Charging the Battery Pack 21 Power Options 22 Power Management Modes 23 Sleep and Hibernate 23 Thermal Power Control 23 S...

Страница 3: ...2 Flash Memory Card Reader 33 Optical Drive 34 Hard Disk Drive 36 Memory RAM 37 Connections 38 Network Connection 38 Modem Connection 39 Wireless LAN Connection on selected models 40 Windows Wireless...

Страница 4: ...4 Contents...

Страница 5: ...oduction About This User s Manual Notes For This Manual Safety Precautions NOTE Photos and icons in this manual are used for artistic purposes only and do not show what is actually used in the product...

Страница 6: ...mation on using the Notebook PC s components 5 Appendix Introduces you to optional accessories and gives additional information Notes For This Manual A few notes and warnings in bold are used througho...

Страница 7: ...ok PC should only be used in environments with ambient temperatures between 5 C 41 F and 35 C 95 F Battery safety warning DO NOT throw the battery in fire DO NOT short circuit the contacts DO NOT disa...

Страница 8: ...8 1 Introducing the Notebook PC...

Страница 9: ...9 2 Knowing the Parts Basic sides of the Notebook PC NOTE Photos and icons in this manual are used for artistic purposes only and do not show what is actually used in the product itself...

Страница 10: ...10 2 Knowing the Parts Top Side Refer to the diagram below to identify the components on this side of the Notebook PC NOTE The keyboard will be different for each territory...

Страница 11: ...ails later in this document Display Panel Touchpad and Buttons Camera Keyboard Microphone Built in Wireless Switch Power Indicator details later in this document Battery Charge Indicator details later...

Страница 12: ...e Refer to the diagram below to identify the components on this side of the Notebook PC Audio Speakers Left and Right Modem Port on selected models IMPORTANT The built in modem does not support the vo...

Страница 13: ...DC Input CAUTION MAYBECOMEWARMTOHOTWHENINUSE BESURENOTTOCOVER THE ADAPTER AND KEEP IT AWAY FROM YOUR BODY USB Port 2 0 1 1 on selected models Display Monitor Output HDMI High Definition Multimedia In...

Страница 14: ...s Right Side Refer to the diagram below to identify the components on this side of the Notebook PC Microphone Input Jack USB Port 2 0 1 1 on selected models Headphone Output Jack Flash Memory Reader S...

Страница 15: ...15 Knowing the Parts 2 Left Side Refer to the diagram below to identify the components on this side of the Notebook PC Optical Drive...

Страница 16: ...16 2 Knowing the Parts...

Страница 17: ...he Notebook PC Checking Battery Power Powering Options Power Management Modes Special Keyboard Functions Switches and Status Indicators NOTE Photos and icons in this manual are used for artistic purpo...

Страница 18: ...R THE ADAPTER AND KEEP IT AWAY FROM YOUR BODY Power System Using AC Power The Notebook PC power is comprised of two parts the power adapter and the battery power system The power adapter convertsAC po...

Страница 19: ...abnormal operation or damage to the battery pack caused by impact turn OFF the Notebook PC and contact an authorized service center Using Battery Power The Notebook PC is designed to work with a remov...

Страница 20: ...not a problem with the display WARNING DO NOT carry or cover a Notebook PC that is powered ON with any materi als that will reduce air circulation such as a carrying bag Powering ON the Notebook PC Th...

Страница 21: ...the CPU system memory size and the size of the display panel Left click the battery icon Cursor over the battery icon without power adapter Cursor over the battery icon with power adapter Right click...

Страница 22: ...Windows Control Panel Power Options For other options such as Switch User Restart Sleep or Shut Down click the arrowhead next to the lock icon Restarting or Rebooting After making changes to your oper...

Страница 23: ...t data and status on the hard disk drive By doing this RAM does not have to be periodically refreshed and power consumption is greatly reduced but not completely eliminated because certain wake up com...

Страница 24: ...creen display When enabled the corresponding wireless indicator will light Windows software settings are necessary to use the wireless LAN or Bluetooth LCD MonitorIcons F8 TogglesbetweentheNotebookPC...

Страница 25: ...eaker volume only in Windows OS Speaker Icons F10 Toggles the speakers ON and OFF only in Windows OS Scr Lk Del Toggles the Scroll Lock ON and OFF Allows you to use a larger portion of the keyboard fo...

Страница 26: ...located at the upper right hand corner of each key as shown in the figure When the numeric keypad is engaged by pressing Fn Ins Num LK the number lock LED lights up If an external keyboard is connecte...

Страница 27: ...ection keys in order to allow easier navigation when only a part of the keyboard is required such as for playing games Number Lock Indicator Indicates that number lock Num Lk is activated when lighted...

Страница 28: ...s OFF when the Notebook PC is turned OFF or in the Suspend to Disk Hibernation mode Battery Charge Indicator The battery charge indicator is an LED that shows the status of the battery s power as foll...

Страница 29: ...ctually used in the product itself 4 Using the Notebook PC Pointing Device Storage Devices Flash memory card reader Optical disc drive Hard disk drive Memory RAM Connections Network connection Modem c...

Страница 30: ...n software Using the Touchpad Light pressure with the tip of your finger is all that is required to operate the touchpad Be cause the touchpad is electrostatic sensitive objects cannot be used in plac...

Страница 31: ...and then slide your finger CW or CCW for rotating an item such as a photo Two Fingers Flick Slide two fingers up down left or right for enhanced navigation such as browsing back on the web Two Fingers...

Страница 32: ...ids or grease Do not touch the touchpad if your fingers are dirty or wet Do not rest heavy objects on the touchpad or the touchpad buttons Do not scratch the touchpad with your finger nails or any har...

Страница 33: ...reader that can use many flash memory cards as shown in the example below The built in memory card reader is not only convenient but also faster than most other forms of memory card readers because i...

Страница 34: ...o obstructions that may get jammed under the drive s tray 3 Hold the disc by the edge and face the disc s printed side up Push down on both sides of the disc s center until the disc snaps onto the hub...

Страница 35: ...the opti cal drive tray in case the electronic eject does not work Do not use the emergency eject in place of the electronic eject Actual location will vary by model Optical Drive Cont Emergency eject...

Страница 36: ...to detect hard disk errors or failures before they happen When replacing or upgrading the hard drive always visit an authorized service center or retailer for this Notebook PC IMPORTANT Poor handling...

Страница 37: ...ional memory will increase application performance by decreasing hard disk access The BIOS automatically detects the amount of memory in the system and configures CMOS accordingly during the POST Powe...

Страница 38: ...y 3 with twisted pair wiring If you plan on running the interface at 100 1000Mbps it must be connected to a 100 BASE TX 1000 BASE T hub not a BASE T4 hub For 10Base T use category 3 4 or 5 twisted pai...

Страница 39: ...d The telephone wire used to connect the Notebook PC s internal modem should have either two or four wires only two wires telephone line 1 is used by the modem and should have an RJ 11 connector on bo...

Страница 40: ...ent adapter that supports Infrastructure and Ad hoc modes giving you flexibility on your existing or future wireless network configurations for distances up to 40 meters between the client and the acc...

Страница 41: ...should see the Not Connected network icon 4 Select Show Wireless if you have many networks in your area 5 Select the wireless network you want to con nect to 6 When connecting you may have to enter a...

Страница 42: ...e phones and PDAs Note If your Notebook PC did not come with built in Bluetooth you need to connect a USB or ExpressCard Bluetooth module in order to use Bluetooth Turning ON and Launching Bluetooth U...

Отзывы: