

如何安裝硬碟
/ So installieren Sie die Festplatte / Comment installer le disque dur / Come installare l’unità HDD / Cómo instalar la unidad de disco duro / Установка жесткого диска /
Como Instalar o Disco Rígido /
하드 드라이브를 설치하는 방법
/
ハードドライブの取り付け方法
iBOX 1100
系列擺放
/ Positionen der iBOX 1100 Series / Positions de la série iBOX 1100 Series / Posizioni della iBOX 1100 Series / Posiciones de la iBOX 1100 Series /
Положения серии iBOX 1100 Series / Posições de iBOX 1100 Series / iBOX 1100 Series
시리즈의 위치
/ iBOX 1100 Series
シリーズの位置
如何安裝記憶體模組
/ So installieren Sie die Speichermodule / Comment installer les modules de mémoire / Come installare i moduli di memoria / Cómo instalar los módulos de memoria /
Установка модулей памяти / Como Instalar os Módulos de Memória /
메모리 모듈
/
メモリモジュール
如何安裝
VESA
支架
/ So installieren Sie die VESA-Halterung / Comment installer le support VESA / Come installare il supporto VESA / Cómo instalar el soporte VESA /
Установка кронштейна VESA / Como Instalar a Braçadeira VESA / VESA
브래킷을 설치하는 방법
/ VESA
ブラケットの取り付け方法
2.5-inch Hard Drive:
How to Install the Hard Drive
C
SO-DIMM Slots:
How to Install the Memory Modules
(DDR4 Low Voltage (1.2V))
D
How to Install the VESA Bracket
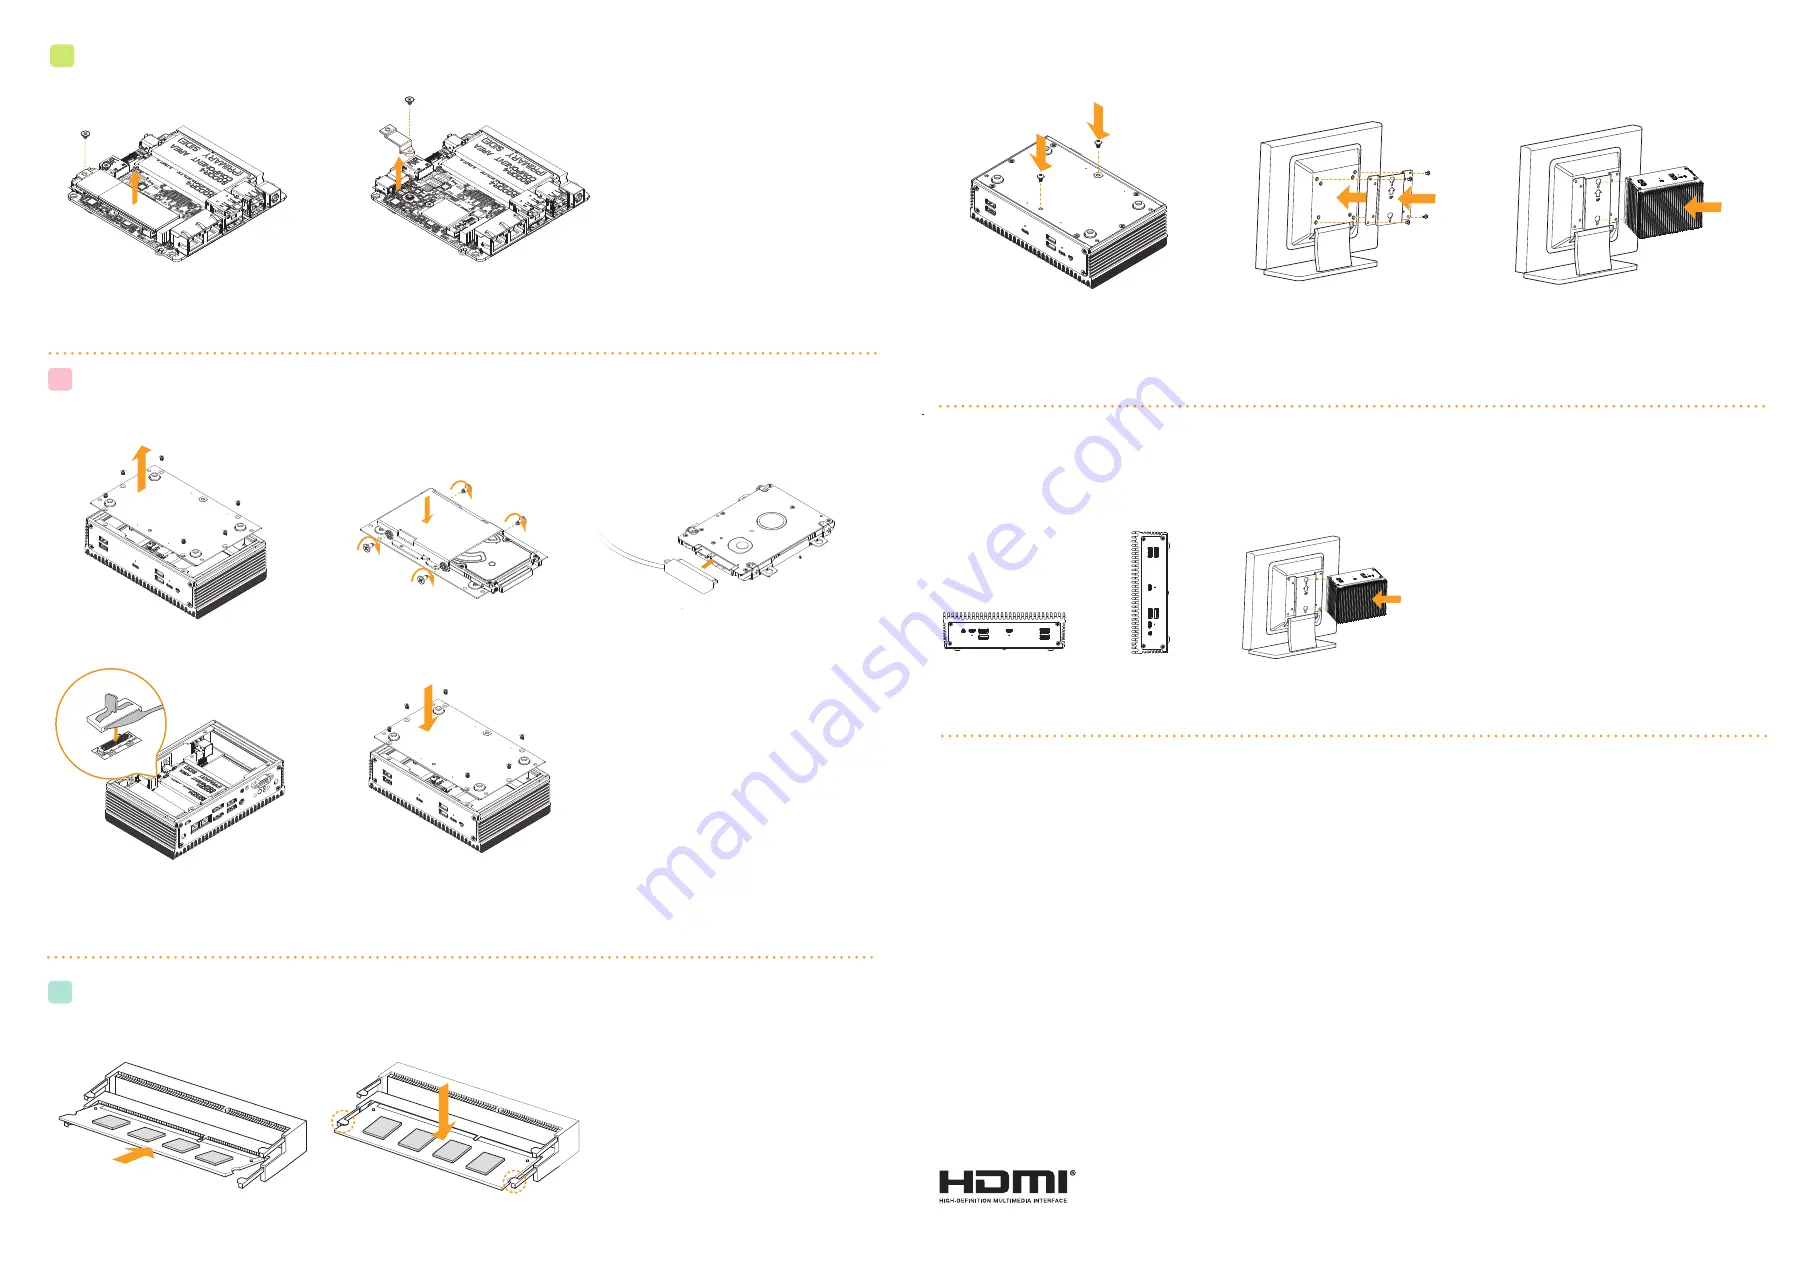
1. Remove the four screws on the bottom case.
Then lift up and remove the bottom panel.
2. Attach the HDD cage to the bottom panel
and secure it using the four screws. Then
connect the SATA cable to the HDD.
5. Then reinstall the bottom panel.
1. Carefully insert the SO-DIMM memory modules
into the slot at a 30-degree angle.
2. Push down until the modules snap into place.
1. Attach the two screws to the base of the
iBOX 1100 Series.
2. Attach the VESA Bracket to the rear of
a compatible display using the four screws.
*Choose mounting holes depending on the
mounting hole pattern of your LCD screen
(75 mm × 75 mm or 100 mm × 100 mm).
3. Mount the iBOX 1100 Series by sliding it
into place.
Vertical Position
VESA-mounted
Horizontal Position
Positions of the iBOX 1100 Series
Note:
- The iBOX 1100 Series requires DDR4
SO-DIMM (1.2V).
- For dual channel configuration, you always need to
install identical (the same brand, speed, size and
chip-type) DDR4 SO-DIMM pairs.
*Please note that keeping the iBOX 1100 Series in a vertical position will ensure better cooling performance.
*For iBOX 1100 Series, it is not recommended to install 2.5” HDD. If you install the 2.5” HDD, please keep the iBOX 1100 Series
in a vertical position to ensure better cooling performance.
The iBOX 1100 Series can be placed in vertical or horizontal position.
3. Connect the SATA Data and Power Cable to
the HDD.
4. Connect the SATA Cable to the connector.
The terms HDMI® and HDMI High-Definition Multimedia Interface, and the HDMI logo are trademarks
or registered trademarks of HDMI Licensing LLC in the United States and other countries.
1. Release the screw and carefully remove the M.2
SSD (Type 2280).
2. Release the screw and remove the bracket
from the motherboard.
如何移除2280 M.2 SSD及其托架
w to Install the Bracket for a M.2 SSD (Type 2280) /
How to Install the Bracket for a M.2 SSD (Type 2280) / How to Install the Bracket for a M.2 SSD (Type 2280) / How to Install the Bracket for a M.2 SSD (Type 2280) /
How to Install the Bracket
for a M.2 SSD (Type 2280)
Bracket:
How to Remove the M.2 SSD (Type 2280) and the Bracket
B1


