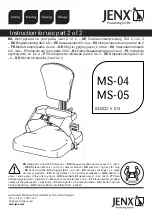
background image

10

11

Step 2a

Slide the backrest downwards onto 

mounting points until the clicks in 

place.

Step 4

Slide the edge of the commode bowl 

along the rails and make sure it is in a 

stable position and clicks into place. 

Repeat this step in reverse to remove 

the bowl for easy cleaning.

Step 3a

Under the seat frame 

1

 there are 

6 x clips. Place the clips in the right 

positions highlighted in red 

2


until they click into place.  

Make sure all 6 x clips keep the seat 

firmly in position. 

Step 3b

On the seat is a removable seat 

cover. When using the chair as a 

shower chair, slide the insert into 

the open seat.

Step 2b

Tighten with hand wheels and ensure 

the backrest is properly positioned 

and firmly secured.

Step 5

Insert legrests into receivers on front 

of commode 

1

 and lock into place 

by swinging towards centre. Lift the 

pivot pin 

2

 to unlock and remove 

the footrests by swinging outwards.

1

2

1

2

Содержание Community Commode

Страница 1: ...USER MANUAL ATTENDANT PROPELLED SELF PROPELLED Community Commodes...

Страница 2: ...tion 5 Assembly Instructions 6 Operation 7 Troubleshooting 8 Cleaning 9 Service Maintenance 10 Specifications 11 Warranty 4 5 7 8 9 12 14 15 16 17 18 Thank you for choosing this commode from our Aspir...

Страница 3: ...ng the commode The manual is designed to ensure that users are equipped with the information required to competently and responsibly operate this commode It is recommended that the User Manual be kept...

Страница 4: ...ALWAYS check with your healthcare professional prior to using this commode ALWAYS apply the brakes when the commode is stationary ALWAYS ensure brakes remain locked when transferring into or out of t...

Страница 5: ...ng castors 2x Bowl lid 5 ASSEMBLY INSTRUCTIONS Step 1a Insert the castor tube into the frame and secure in place with hand wheels Repeat 4 x times for attendant propelled version 2 x locking on back a...

Страница 6: ...in the right positions highlighted in red 2 until they click into place Make sure all 6 x clips keep the seat firmly in position Step 3b On the seat is a removable seat cover When using the chair as...

Страница 7: ...k on the hand levers Adjusting the Legrests Lift the pivot pin to lock or unlock the footrests If the user wishes to vacate the chair swing the footrests outwards for clearance They can be completely...

Страница 8: ...trongly recommended that protective clothing be used when cleaning Frame and metal components Always keep the commode clean for greater comfort and long lasting performance Clean metal components with...

Страница 9: ...HEIGHT BACKREST HEIGHT ARMREST HEIGHT UNIT WEIGHT ANTERIOR SEAT HEIGHT POSTERIOR SEAT HEIGHT SEAT WIDTH OVERALL WIDTH OVERALL HEIGHT BACKREST HEIGHT ARMREST HEIGHT UNIT WEIGHT ANTERIOR SEAT HEIGHT POS...

Страница 10: ...nd tear The warranty on this product is a back to base warranty and does not cover any freight costs pertaining to the return of any items under warranty Aidacare acknowledges and conforms to all ACCC...

Страница 11: ...AIDACARE PTY LTD 4 Noonan Road Ingleburn NSW 2565 1300 133 120 www aidacare com au MADE IN PR CHINA ASUM20 5 290817...

Отзывы: