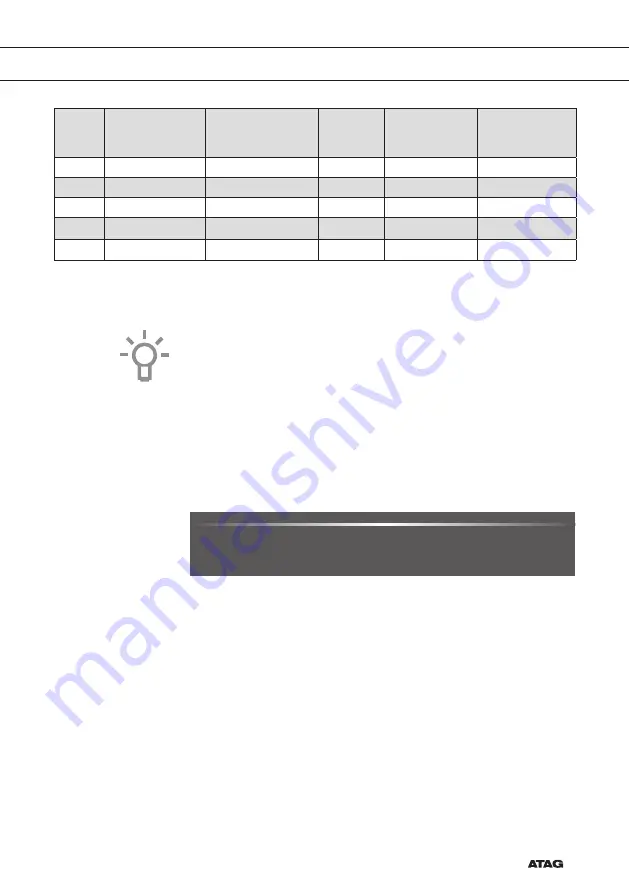
Asko CS46 D Series Скачать руководство пользователя страница 15

EN 15

Display

Test strip 

number/colour 

of the bars

Type

PPM

French 

hardness (°df)

German 

hardness (°dH)

1

4 green bars

Very soft water

0 - 90

0 - 9

0 - 5

2

1 red bar

Soft water

90 -178

9 - 18

5 - 10

3

2 red bars

Rather hard water

178 - 267

18 - 26

10 - 15

4

3 red bars

Hard water

267 - 356

26 - 35

15 - 20

5

4 red bars

Very hard water

> 356

> 35

> 20

All the start-up settings are now set and the display will show the 
standby screen. The appliance is now ready for use.

The language, time, date and water hardness can be adjusted in the 
settings menu (see ‘Settings menu’ chapter). The settings menu can be 
opened from the start display via the ‘Plus’ menu.

Standby display

The standby display will show the time, date, cavity temperature (if 
this is higher than 80 °C) and the timer (if set). The appliance goes to 
standby mode after:
•  Turning the function knob to 0 (‘off’ position).
•  Pressing the stop key multiple times (deeper in the menu).

12 : 00

03  


05  

  2015

Off mode

•  Default the appliance will shut down after no action for a set time of  

30 minutes. 

•  Press and hold the stop key to shut down the appliance manually.

Switching on the appliance

•  Press and hold the stop key to switch on the appliance.
•  The appliance can also be switched on by turning the function knob 

to a function.

INITIAL USE

Содержание CS46 D Series

Страница 1: ...instructions for use Combi steam oven CS46xxD CS66xxD...

Страница 2: ...EN Manual EN 3 EN 45 Pictograms used Important information Tip...

Страница 3: ...Steam function 25 Culisensor 28 Settings menu 29 Plus menu 30 Cooking information 31 Fast preheat 32 Delayed start 32 Gratin 33 Stage cooking 33 Go to manual cooking 34 Programs and Favourites 34 Egg...

Страница 4: ...thod every time This manual shows how you can best use this oven In addition to information about operating the oven you will also find background information that may be useful when using the applian...

Страница 5: ...clean 10 Display 11 Selection knob 12 On off key and stop key cancel 13 Light key 14 Timer key 15 Navigation key left 16 Navigation key right 17 Plus key 18 Water reservoir key 19 Confirm key pressin...

Страница 6: ...y used for the grill function Place the oven rack baking tray or steam dish in the gap between the guide rail sliders A number of shelf levels can have fully retractable telescopic guide rails dependi...

Страница 7: ...used for grilling A steam dish or pan with food can also be placed on the oven rack The oven rack is equipped with a safety peg Lift the rack slightly at the front to slide it out of the oven Do not u...

Страница 8: ...n only be used together on a level with telescopic guide rails Culisensor can be used to measure the core temperature of the dish When the desired temperature is reached the cooking process will be st...

Страница 9: ...t Bottom heat fan Pro roasting Eco hot air Fast preheat Programs and favourites Favourites Programs Defrost Manual defrost Steam Steam Low temperature Sous vide Combi steam Hot air steam density 1 Hot...

Страница 10: ...function The longest possible timer setting is 23 59 Navigation key left To move the active area to the left Navigation key right To move the active area to the right Plus key To open or exit the set...

Страница 11: ...ve grey background In this activated area you can select your settings using the selection knob 180 C OVEN l HOT AIR 14 30 Within every menu the navigation is as follows Use the navigation keys or pre...

Страница 12: ...op of the display is a feedback bar This bar shows where you are in the menu and what setting you are changing Functions settings are separated with a vertical line SETTINGS l GENERAL l SOUND l KEY SO...

Страница 13: ...e not comfortable with the language on the display you can select another language The default setting is English 1 Turn the selection knob and select your preferred language from the displayed list 2...

Страница 14: ...measure water hardness using the paper test strip supplied with your appliance For information about water hardness in your region please contact your local water board Using the paper test strip Dip...

Страница 15: ...ee Settings menu chapter The settings menu can be opened from the start display via the Plus menu Standby display The standby display will show the time date cavity temperature if this is higher than...

Страница 16: ...Oven Hot air bottom heat 40 minutes 1 Choose a main function by turning the function knob The first sub function setting becomes active 180 C OVEN l HOT AIR 14 30 Now the settings can be changed as de...

Страница 17: ...ting is displayed instead of the timer icon 6 Turn the selection knob and change the setting 210 C OVEN l COOKING TIME 14 30 0 39 0 40 H M 0 41 H M notation 7 If preferred select any additional settin...

Страница 18: ...how the preheating display preheating in the feedback bar and the preheating icon All settings are displayed only the colours are switched The cavity temperature is white and the chosen settings are g...

Страница 19: ...screen will show 10 positions where the program can be positioned 2 Select a position for your recipe by rotating the selection knob and press the confirm key to save it 3 Give the recipe a name Rotat...

Страница 20: ...Preheating is recommended 2 Hot Air Bottom Heat Heating by means of hot air from the back of the oven and the bottom heating element This mode can be used to bake pizza moist pastry fruitcakes leavene...

Страница 21: ...ode can be used for grilling a smaller amount of open sandwiches beer sausages and for toasting bread Place the oven rack in the upper part of the oven and the baking tray in the middle of the oven Ma...

Страница 22: ...er part of the oven Use just before the end of the baking or roasting time Suggested temperature 160 C Bottom Heat Fan Heating by means of the lower heating element The heat is distributed by the fan...

Страница 23: ...g by means of steam See chapter Steam function for more information Steam of 100 C is sprayed into the oven cavity at regular intervals This mode can be used to steam vegetables eggs fruit and rice fo...

Страница 24: ...fish fillets and vegetables au gratin LOW cooking large chuncks of meat roast whole chicken baking risen dough bread and rolls cooking lasagna etc Extra functions Warming Plate warming this function i...

Страница 25: ...tion in the oven will increase when opening the door Note Let the oven cool down after every steam function and dry the inside of the oven with a soft cloth Note The water system empties each time the...

Страница 26: ...and cooking times Most dishes can be kept at serving temperature around 60 C for a few hours which makes mise en place very easy you simply remove the dish from the oven when you need it Filling the...

Страница 27: ...water remaining in the steam system after cooking will be pumped back into the water reservoir Empty clean and dry the water reservoir after using the steam function Only fill the reservoir just prio...

Страница 28: ...re between 30 100 C 4 Start the progress by pressing the confirm key During cooking the rising temperature of the core will be displayed the desired core temperature may be adjusted during the cooking...

Страница 29: ...y mode Cooking Default program intensity Steam Preheat settings System Appliance information Factory settings Oven light General You can set the following from this menu Language language of the displ...

Страница 30: ...s Water hardness Descaling Preheat settings set preheat default on or off System You can set the following from this menu Appliance information request appliance information Factory settings back to f...

Страница 31: ...ogress gratin time will be added at the end of the progress Add to favourites To add the settings for the cooked dish to your favourites see chapter Finish display Stage cooking Combine up to three fu...

Страница 32: ...d start will be greyed out because these functions do not work together When delayed start is activated preheat will be greyed out To cancel the preheat press the confirm key again Starting with fast...

Страница 33: ...y A small grill icon will appear next to the current time To cancel gratin select cancel gratin in the plus menu Stage cooking This function allows you to combine up to three functions in one cooking...

Страница 34: ...cooking mode a standard program from the Programs and favorites function can be chosen and edited as in Stage cooking mode By selecting the manual function in the plus menu a popup will appear Switch...

Страница 35: ...ress the stop key to switch off the signal and close the pop up menu The sound will stop automatically after approximately 2 minutes Child lock The oven s control panel can be locked by means of the C...

Страница 36: ...ter for longer For this function you can set the warming up temperature and duration Keep warm Use this function to keep already cooked food at temperature For this function you can set the food warmi...

Страница 37: ...ever use abrasive cleaning materials or chemical solvents Always make sure that the seal of the door is clean This prevents accumulation of dirt and allows you to close the door properly Steam clean W...

Страница 38: ...no longer be available Use this function only when the oven has cooled down fully The descaling process comprises descaling and rinsing Notifications with information and requests for actions will be...

Страница 39: ...Water is used for the steaming process Water contains calcium and magnesium Heat causes the water to condense leaving a mineral deposit not harmful to humans If the descaling cycle is interrupted pri...

Страница 40: ...ct the appliance from the power supply by removing the plug from the socket or by switching off the circuit breaker in the fuse box Please note the light bulb can be very hot Use protection to remove...

Страница 41: ...door until it reaches a 45 angle 4 Remove the door by lifting and tilting it towards the oven C The hinges need to come out of the slots in the oven B A C Install the oven door 1 Hold the door at an a...

Страница 42: ...nd right of the door to release the glass A 2 Grab the glass A at the bottom and gently lift 3 and shift 4 it to remove it from the upper support 3 The inner glass B depending on the model can be remo...

Страница 43: ...y for a few minutes remove the mains plug from the socket or switch the circuit breaker to off then reconnect the appliance and switch it on Power failure can cause the display to reset Disconnect the...

Страница 44: ...d set the current time Consult a service technician if the error persists Storing and repairing the oven Repairs should only be performed by a qualified service technician If maintenance is required t...

Страница 45: ...it This indicates that household appliances must be disposed of separately This means that the appliance may not be processed via the regular waste flow at the end of its useful life You should take i...

Страница 46: ...EN 46...

Страница 47: ...EN 47...

Страница 48: ...ntification card is located on the inside of the appliance When contacting the service department have the complete type number to hand You will find the addresses and phone numbers of the service org...

Отзывы: