background image

2-24

Installing Asanté MacCon Cards

9

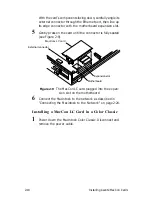
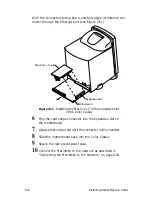
Place the motherboard (with the controller card 
riding piggyback on it) back into the guides on the left 
side of the chassis.

10

Reconnect the power supply and the disk drive cable on 
the component side of the motherboard.

11

Plug the ribbon cable into the controller card’s receptacle.

Make sure the white dot on the ribbon cable aligns with 
the white dot on the connector. (The blue wire is pin 1 on 
both ends of the cable.)

12

Close the Macintosh SE:

— Place the Macintosh SE face down. 

— Fit the aluminum shield over the external device con-

nectors and around the bottom and sides of the moth-
erboard. 

— Fit the plastic case over the chassis and snap the case in-

to place. Screw the case shut.

Connecting the Macintosh to the Network

To connect the Macintosh to the Ethernet cable, perform the follow-
ing steps:

With 10BaseT cabling

1

Plug the RJ-45 connector on one end of the 10BaseT cable 
into the RJ-45 jack on the card. The RJ-45 connector’s plastic 
tab snaps locked into the jack.

2

Plug the other end of the cable directly into a hub or plug 
it into a 10BaseT wall jack. A green LED (link integrity) 
light indicates a good connection to the hub.

Note: Asanté offers a full range of intelligent and non-in-
telligent 10BaseT-compliant hubs.

With thin Ethernet cabling

Caution

Check with your network administrator before you discon-
nect the Ethernet cable. Network users must be warned if 
you are bringing down the network.

!

Содержание ASANTE MacCon Family Ethernet Network Cards for the Macintosh

Страница 1: ...MacCon Family Ethernet Network Cards for the Macintosh Installation Guide ASANTÉ ...

Страница 2: ...Asanté MacCon Adapter Family Installation Guide Asanté Technologies Inc 821 Fox Lane San Jose CA 95131 October 1994 Part Number 06 00141 00 Rev B Printed in USA ...

Страница 3: ...interference in this electronic environment This equipment has been tested and found to comply with the limits for a Class A computing device pursuant to Subpart J of Part 15 of FCC Rules which are designed to provide reasonable protection against radio frequency interference when operated in a commercial environment Operation of this equipment in a residential area is likely to cause interference...

Страница 4: ...RFORMANCE OF THE APPLE SOFTWARE IS ASSUMED BY YOU THE EXCLUSION OF WARRANTIES IS NOT PERMITTED BY SOME STATES THE ABOVE EXCLUSION MAY NOT APPLY TO YOU IN NO EVENT WILL APPLE ITS DIRECTORS OFFICERS EMPLOYEES OR AGENTS BE LIABLE TO YOU FOR ANY CONSEQUENTIAL INCIDENTAL OR INDIRECT DAMAGES INCLUDING DAMAGES FOR LOSS OF BUSINESS PROFITS BUSINESS INTERRUPTION LOSS OF BUSINESS INFORMATION AND THE LIKE AR...

Страница 5: ...est part of this manual What is the most needed improvement you would make to this manual Fax your comments and suggestions to Asanté Technical Publications at 408 894 0363 or E mail them through Internet techpubs asante com a Please request catalog of contents b Download INDEX TXT file for catalog of contents c When sending email please include your full name US mailing address phone number produ...

Страница 6: ...s 2 13 Setting the Cable Type on the Daughter Card 2 13 Video Options 2 14 Setting the Slot Address for Two Cards 2 14 Installing the Math Co processor 2 15 Installing in a Macintosh IIsi 2 16 Installing a MacCon3 IIsi and a Radius Pivot IIsi 2 18 Installing a MacCon Card in a Macintosh SE 30 2 19 Installing a MacCon SE Card in a Macintosh SE 2 21 Setting the Cable Type on the Daughter Card 2 21 C...

Страница 7: ...roubleShooter Diagnostics 4 2 Running other TroubleShooter tests 4 3 Running the Loopback test 4 4 Running the Bandwidth Utilization test 4 4 If a test fails 4 6 Quitting TroubleShooter and restarting network services 4 7 Running ADLS 4 7 Troubleshooting 5 1 Checking the Basics 5 1 Do You Have the Current Asanté Driver Software 5 1 Running TroubleShooter 5 2 Other Tips 5 2 Installing the Math Co p...

Страница 8: ...on the motherboard 2 10 Figure 2 10 The rear panel removed on the Color Classic 2 11 Figure 2 11 Installing the MacCon LC in the expansion slot in the Color Classic 2 12 Figure 2 12 The MacCon3 IIsi controller card and daughter card installed in a Macintosh IIsi 2 15 Figure 2 13 Removing the MacCon3 IIsi daughter card 2 17 Figure 2 14 Installing a MacCon3 IIsi card with a Radius card 2 17 Figure 2...

Страница 9: ...hick 10BaseT Thin and Thick NuBus Macs MacCon i NB 10T 99 00198 01 MacCon IIET64 99 00102 10 MacCon i NB TN 99 00197 01 MacCon IIET64 99 00101 02 MacCon3 NB 99 00301 02 MacCon i NB 3 99 00196 01 Centris 610 PDS Quadra 610 and Centris 660 AV MacCon 610ET 99 00162 01 MacCon 610E 99 00161 01 MacCon3 610 99 00160 01 Mac IIsi and Mac SE 30 MacCon 30iET64 99 00203 03 MacCon 30iE64 99 00204 02 MacCon3 II...

Страница 10: ... with tuned drivers for optimal performance Diagnostic software for help in identifying problems A PDS pass through slot and a removable AUI port on the MacCon3 IIsi cards allowing you to install more than one PDS card in a Macintosh IIsi A socket for an additional Motorola 68882 math co processor on the MacCon3 IIsi 30i and LC cards The Math Co processor Option An optional socket for a math co pr...

Страница 11: ...he EtherTalk software Preparing for the Installation Before you open the anti static bag containing the card you must prepare for the installation as described below Make sure you meet all the requirements and are aware of the safety rules Checking the Requirements Before you open the anti static bag containing the Asanté MacCon card make sure you have the following The required software Apple sys...

Страница 12: ...tion Consult your network administrator about the card installa tion before connecting to the network Turn off the Macintosh and all peripherals connected to it If you need to lay a Macintosh flat on its face use an anti static mat When installing the MacCon SE or SE 30 card be extremely careful not to touch any part of the exposed circuitry Some circuit components retain a high voltage charge lon...

Страница 13: ... expansion cards you can use the MacCon NuBus network interface card to connect the Macintosh to an Ethernet network You install a MacCon NuBus card into an unused Nubus expansion slot on the motherboard Refer to your computer s User Guide for illustrated instructions on how to open your Macintosh computer MacCon NuBus Card Note If you are using Thick Ethernet 10Base5 cabling and your network does...

Страница 14: ...ard 1 Power down the Macintosh Disconnect and remove the power cable 2 Open the Macintosh 3 Remove the access port cover Make sure you are ground ed check that your anti static wrist strap is properly at tached to your wrist and to the Macintosh chassis 4 Plug the MacCon card into the NuBus expansion slot on the motherboard With the card s Ethernet connectors facing the expan sion slot access port...

Страница 15: ...ris 610 you need to use the Apple Centris 610 NuBus Adapter which is not included with the MacCon NuBus card The Apple Centris NuBus Adapter part number is M1402LL A Slide the MacCon NuBus card into the Centris 610 Nu Bus Adapter Plug the adapter into the NuBus expansion slot as shown in Figure 2 4 on page 2 6 5 Close the case 6 Connect the Macintosh to the network as described in Connecting the M...

Страница 16: ...card which plugs into the expansion slot in the Macintosh The smaller daughter card which is mounted on the rear access port to enable a connection to the Ethernet cable You connect the two cards before installing them To install the MacCon3 610 MacCon 610E or MacCon 610ET card in a Macintosh Centris 610 perform the following steps 1 Set jumpers if needed see the next two Notes and Figures 2 5 and...

Страница 17: ...bling link integrity MacCon 610 card 2 Attach the daughter card to the controller card Remove the two screws from the bracket on the smaller daughter card Hold the daughter card in your right hand so that its components face down and the interface ports are on the right Hold the larger controller card in your left hand so that you re looking at the components Connect the daughter card to the contr...

Страница 18: ...th daughter card attached in to the expansion slot on the motherboard see Figure 2 7 Figure 2 7 The MacCon 610 card plugged into the expan sion slot on the motherboard 7 Align the chassis bracket with the access port on the back cover 8 Secure the daughter card to the chassis using the two screws 9 Close the case 10Connect the Macintosh to the network as described in Connecting the Macintosh to th...

Страница 19: ...puter Note LCIII card You can disable link integrity on the Mac Con LCIII card by setting the JP2 jumper as indicated in Figure 2 8 For example hubs made before the 10BaseT specifica tions were published do not support link integrity Figure 2 8 Disabling link integrity LCIII card To install the MacCon LC card into the expansion slot on the moth erboard perform the following steps 1 Power down the ...

Страница 20: ...card until the connector is fully seated see Figure 2 9 Figure 2 9 The MacCon LC card plugged into the expan sion slot on the motherboard 6 Connect the Macintosh to the network as described in Connecting the Macintosh to the Network on page 2 24 Installing a MacCon LC Card in a Color Classic 1 Power down the Macintosh Color Classic Disconnect and remove the power cable MacCon LC card Motherboard E...

Страница 21: ...igure 2 10 The rear panel removed on the Color Classic 3 Make sure you are grounded check that your anti static wrist strap is properly attached to your wrist and to the Macintosh chassis 4 Slide out the motherboard 5 Insert the card into the expansion slot I O Tabs Access panel Thumbscrews ...

Страница 22: ... slot in the Color Classic 6 Plug the card s edge connector into the expansion slot on the motherboard 7 Gently press on the card until the connector is fully inserted 8 Slide the motherboard back into the Color Classic 9 Secure the rear access panel case 10Connect the Macintosh to the network as described in Connecting the Macintosh to the Network on page 2 24 Motherboard Expansion slot MacCon LC...

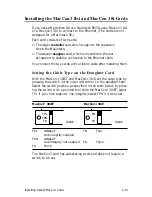
Страница 23: ...ou connect the two cards with a ribbon cable after installing them Setting the Cable Type on the Daughter Card With the MacCon 30iET and MacCon 30iE set the cable type by pressing the switch in the lower left corner on the daughter card Select the switch position as specified in the table below by press ing the switch with a pointed tool With the MacCon 30iET select TPL if your hub supports link i...

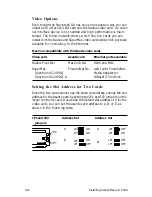
Страница 24: ...ards cannot use the same slot address change the slot address for the Asanté card by setting the JP1 and JP2 jumpers on the larger controller card If you keep the default slot address of 9 for the video card you can set the Asanté card address to A B or E as shown in the following table MacCon compatibility with third party video cards Video card Asanté card Ethernet ports available Radius Pivot I...

Страница 25: ...30 Instructions for installing a MacCon card together with a video card are also included Figure 2 12 The MacCon3 IIsi controller card and daugh ter card installed in a Macintosh IIsi Note In some cases with thick Ethernet 10Base5 cabling you may need to set the JP1 jumper ON as shown below to force the daughter card to select the AUI port This may be necessary when your network does not have a 10...

Страница 26: ...nded check that your anti static wrist strap is properly attached to your wrist and to the Macintosh chassis 4 Plug the controller card into the expansion slot on the motherboard 5 Install the daughter card Remove the screws on the daughter card bracket Align the bracket so that the daughter card extends down from the access port and the external cable con nectors protrude through the port Secure ...

Страница 27: ...i daughter card Figure 2 14 Installing a MacCon3 IIsi card with a Radius card MacCon3 IIsi daughter card AUI part removed force AUI ON Motherboard Expansion slot MacCon3 IIsi controller card MacCon3 IIsi daughter card Radius video card Radius video cable MacCon3 IIsi cable ...

Страница 28: ...nnector Connecting a thick cable to this port renders the video card unusable 3 Plug the assembled Asanté daughter card into the rear of the chassis 4 Since the two cards cannot use the same slot address you need to change the slot address for the Asanté card by set ting the JP1 and JP2 jumpers on the Asanté controller card Refer to the instructions on page 2 14 5 Plug the Radius video card into t...

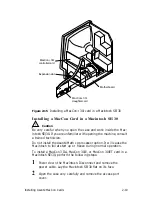
Страница 29: ...hnician Do not install the Asanté Math co processor option It will cause the Macintosh to fail at start up or freeze during normal operation To install a MacCon3 IIsi MacCon 30iE or MacCon 30iET card in a Macintosh SE 30 perform the following steps 1 Power down the Macintosh Disconnect and remove the power cable Lay the Macintosh SE 30 flat on its face 2 Open the case very carefully and remove the...

Страница 30: ...the bracket Align the bracket so the daughter card extends down from the access port and the external cable connector sticks through the access port Attach the card to the chassis bracket that lines up with the access port on the back cover Secure the daughter card with printed circuit side facing up using the two screws 7 Connect the ribbon cable to the controller card keeping it as flat as possi...

Страница 31: ...The MacCon3 IIsi or the MacCon 30i cards are not designed for the Macintosh SE Setting the Cable Type on the Daughter Card With the MacCon SEET and MacCon SEE set the cable type by pressing the switch on the daughter card lower left corner Select the switch position as specified in the table below by pressing the switch with a pointed tool With the MacCon SEE only select TPL if your hub supports l...

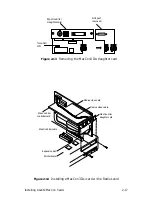
Страница 32: ...osh Disconnect and remove the power cable 2 Lay the Macintosh SE flat on its face 3 Open the case very carefully and remove the access port cover 4 Make sure you are grounded check that your anti static wrist strap is properly attached to your wrist and to the Macintosh chassis Motherboard Expansion slot MacCon SE controller card Hard drive connector 50 pin MacCon SE daughter card Floppy drive con...

Страница 33: ...e controller card in to the expansion slot so that the card lies on top parallel to the motherboard see Figure 2 16 Gently press on the card until the connector is fully seated Snap the standoffs on the side of the card into place to keep the card from touching the motherboard 7 Attach the smaller MacCon daughter card to the back of the Macintosh SE Remove the two screws from the bracket on the da...

Страница 34: ...moth erboard Fit the plastic case over the chassis and snap the case in to place Screw the case shut Connecting the Macintosh to the Network To connect the Macintosh to the Ethernet cable perform the follow ing steps With 10BaseT cabling 1 Plug the RJ 45 connector on one end of the 10BaseT cable into the RJ 45 jack on the card The RJ 45 connector s plastic tab snaps locked into the jack 2 Plug the...

Страница 35: ...e thick Ethernet transceiver Installing the EtherTalk Software An EtherTalk Installer diskette is included with each Asanté MacCon Ethernet adapter This diskette contains Asanté s EtherTalk driver AppleTalk and other Apple system extensions Asanté s EtherTalk device driver allows AppleTalk to communicate with the MacCon adapter Two Types of Software Installations Asanté provides two types of insta...

Страница 36: ...therTalk software read the Read Me First file which contains information about your installation and helps you determine if you need to do a customized in stallation The installation instructions assumethatyounormallyboot from your hard disk Choose When Easy Install You want to install the AppleTalk version on the diskette and the Asanté Ethernet driver Your network does not present any potential ...

Страница 37: ...ox 4 To perform an Easy Install click Install The Installer pro gram examines your Macintosh and installs the appropri ate EtherTalk driver and the current AppleTalk To perform a Customize install only experienced Macin tosh users should perform a customized installation Click Customize A dialog box appears with a list of soft ware options Select the appropriate software options Use Shift click to...

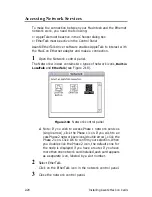
Страница 38: ...two types of network icons Built in LocalTalk and EtherTalk see Figure 2 18 Figure 2 18 Network control panel Note If you wish to access Phase 1 network services single arrow click the Phase 1 icon If you wish to ac cess Phase 2 network services double arrow click the Phase 2 icon Click OK to confirm your selection When you double click the Phase 2 icon the default zone for the node is displayed i...

Страница 39: ... the Asanté interface card 4 Select Chooser from the Apple menu The Chooser dialog box displays the icons for all available device options and theAppleTalk zones you set up see the example in Figure 2 19 Figure 2 19 An example of a user s Chooser dialog box 5 Make sure AppleTalk is active Click the Active button if AppleTalk is not active ...

Страница 40: ...te MacTCP is Apple Computer sTCP IP software It pro vides the transport mechanism for accessing the information provided by the Asanté SNMP MacAgent TCP IP Protocol Stack TCP IP refers to a collection of network protocols that support host to host communication TheTCP IP protocol family is an industry stan dard developed by the United States Department of Defense IP Addressing To connect to an IP ...

Страница 41: ...ble to manage the SNMP MacAgent You must obtain Asanté s SNMP MacAgent MIB a text file available on Asanté s FTP server via the Internet The file can be obtained from the snmp directory using anonymous as the log in to ftp asante com The SNMP MacAgent MIB text file is also available via our Bulletin Board Service at 408 432 1416 Asanté SNMP MacAgent and the TCP IP Protocol The Asanté SNMP MacAgent...

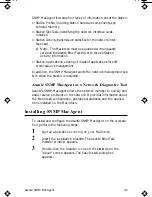
Страница 42: ... the SNMP MacAgent alerts the network management sys tem when the station is restarted Asanté SNMP MacAgent as a Network Diagnostic Tool Asanté s SNMP MacAgent allows the network manager to quickly and easily resolve problems on the network It provides information about the Macintosh configuration operational statistics and the applica tions installed on the Macintosh Installing SNMP MacAgent To i...

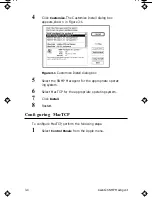
Страница 43: ...e 3 1 Figure 3 1 Customize Install dialog box 5 Select the SNMP MacAgent for the appropriate operat ing system 6 Select MacTCP for the appropriate operating system 7 Click Install 8 Restart Configuring MacTCP To configure MacTCP perform the following steps 1 Select Control Panels from the Apple menu ...

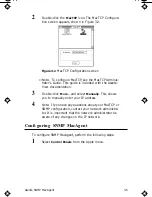
Страница 44: ...th the Asanté View documentation 3 Double click More and select Manually This allows you to manually enter your IP address 4 Note If you have any questions about your MacTCP or SNMP configuration contact your network administra tor It is important that the network administrator be aware of any changes on the IP network Configuring SNMP MacAgent To configure SNMP MacAgent perform the following step...

Страница 45: ...t Asanté SNMP Configuration Parameters System Contact The person who should be contacted regarding this workstation System Location The physical location of the workstation System Name A local alias describing this station Read community Enter public default allowing theAsanté network management sta tion to query SNMP MacAgent and get information about the station Write community Enter private def...

Страница 46: ...ss The IP address to which the workstation sends traps This is usually the Asanté management station IP address Authentication Trap On Off This is ON by default This station sends a trap to theAsanté manage ment station if accessed by an SNMP management console with the wrong read or write community string SNMP Agent On Off This is also ON by default If SNMP Agent is OFF the agent does not send in...

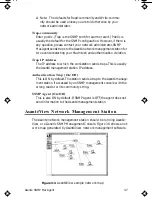
Страница 47: ...3 5 Sample SNMP MacAgent Station Information Other Network Management Software If you are using network management software other than Asanté View for example HP OpenView or SunNet Manager use the Asanté MacAgent MIB and follow the directions for loading and browsing a MIB file in your network management software docu mentation Note You can obtain the SNMP MacAgent MIB text file in the pub directo...

Страница 48: ...roubleShooter diagnostic program reinitializes and reconfigures your Ethernet connection and sends out data through the Ethernet port Therefore before you run TroubleShooter you must Save all open files and close all active applications Log out of any active network services Change from EtherTalk to LocalTalk Turn off virtual memory with System 7 Restart your Macintosh with virus software extensio...

Страница 49: ...o do so by displaying the message shown in Figure 4 1 Figure 4 1 TroubleShooter warning message Click Exit make the change then restart the Macintosh with the Shift key down Run TroubleShooter again Note If you re using MacTCP it can activate the EtherTalk driver regardless of whether you re in EtherTalk or Local Talk You ll get the TroubleShooter warning message even though you ve switched to Loc...

Страница 50: ...its and receives special packets to verify com munication with other systems on the network If the Ping Pong test fails check your connectors and cables Note The Ping Pong Test requires at least one other Mac intosh in EtherTalk Phase 1 or Phase 2 on the network 5 TroubleShooter opens the TroubleShooter window and displays results from the following tests Figure 4 2 TroubleShooter window Running o...

Страница 51: ...teps 1 Click the Loopback test checkbox to select the test 2 Click TEST to start the loopback test 3 If the first test fails click REPEAT If the tests are passed successfully everything is operating properly If the Loopback test fails repeatedly please call Technical Support Running the Bandwidth Utilization test 1 Reconnect the Ethernet cable 2 Click the Bandwidth Utilization checkbox to select t...

Страница 52: ... the window The criteria are described briefly below Good packets received Total number of good packets error free received from the network by the adapter This allows you to evaluate activity on the network Activity level can be used as a benchmark to determine changes in network performance Total bytes received Total number of bytes received from the network by the adapter Good Packets received ...

Страница 53: ...FO First In First Out is disabled causing an overflow during reception The reception of the packet is aborted Frame Lost Error This error represents the number of lost frames received from the network by the adapter Receive Buffer Overwrite Error This error occurs when the receive buffer is full due to heavy network traffic Sample Time The time in seconds from test start to test completion Bandwid...

Страница 54: ...therTalk in the Network control panel 3 Restart the Macintosh 4 Select the Chooser from the Apple menu then select a network resource such as AppleShare or another net work service Running ADLS The Asanté Driver Local Statistic ADLS program provides configura tion information about your Macintosh and MacCon adapter and dis plays statistics about Ethernet traffic through the MacCon adapter Make sur...

Страница 55: ...anté EtherTalk driver TheTransmit Status and Receive Status areas display information about Ethernet traffic through the MacCon adapter The upper panes of the Transmit Status and Receive Status areas show Simple Network Man agement Protocol SNMP information the lower panes show infor mation specific to the Asanté EtherTalk driver The File menu contains these commands Start Begin statistical tracki...

Страница 56: ...please check that you have the lat est Asanté Ethernet driver in use If you do not have the latest ver sion we ask that you obtain it and load it Asanté Technical Support has found driver and operating system issues to be the 1 cause of most network problems AppleTalk is active in the Chooser EtherTalk is selected in the Network Control Panel Make sure the same EtherTalk version Phase 1 or Phase 2...

Страница 57: ... Co processor Option Caution If your Macintosh already has a math co processor do not install the Asanté math co processor option with the MacCon3 IIsi MacCon 30iE 30iET or LC cards It will cause the Macintosh to fail at start up Math Co processor Socket The MacCon3 IIsi MacCon 30i FriendlyNet IIsi MacCon LCII and LCIII cards offer a socket for a math co processor The Motorola MC68882 Co processor...

Страница 58: ...Asanté Ethernet card is terminated with a 50 ohm terminating resistor Q Why is the EtherTalk icon not in the Network control panel I can t connect to the network A The Asanté EtherTalk driver may not be installed or is not seen by the system Run the Asanté EtherTalk Installer again Make sure the Asanté network interface card is firmly seated With a Macintosh IIsi or SE 30 model make sure the cable...

Страница 59: ...acintosh We recommend you have Apple operating system 6 0 7 or later AppleTalk 57 04 or later Asanté EtherTalk 5 1 or later Mac TCP version 1 1 1 if using Mac TCP Upgrade your software if necessary Remove old driver software by run ning the Installer selecting the Customize option and holding down the Option key Install changes to Remove Then install new software Try a known good location to conne...

Страница 60: ...Phase 2 EtherTalk Register level compatible with Apple Computer s Ethernet cards Software supported AppleShare Novell NetWare for Macintosh 3Com 3 Open 3Com 3 Share Sitka TOPS DEC Path works A UX and other popular network software Protocols supported AFP TCP IP DecNet and LAT Math co processor Motorola 68882 PLCC math co processor available for MacCon IIsi 30i and LC cards Address selection IIsi o...

Страница 61: ...the Ethernet address using the Get Adapter Infor mation option from the TroubleShooter File menu see Obtaining System Configuration Information on page 4 5 TheTroubleShooter application is available on the Installer diskette Figure A 1 Location of Ethernet addresses on MacCon cards MacCon IIsi 30iE series MacCon Nubus series MacCon LCIII series ID 000094 40xxxx MacCon Centris 610 series MacCon i L...

Страница 62: ...cabling used OFF No network activity Link Integrity enabled Twisted pair cabling used no link detected Link Integrity enabled thin or thick cabling used Blinking Network traffic N A Parameter 10Base2 10Base5 10BaseT Cable Thin Thick UTP Impedance 50 ohms 50 ohms 100 ohms Connector on cable BNC DB 15 RJ 45 Data transfer rate 10 Mbps 10 Mbps 10 Mbps Topology Bus Bus Star Segment length maximum 185 m...

Страница 63: ...quality to support 100 meters between a device and the hub When subdividing cable segments do not randomly pick any length of cable The IEEE recommends that Ethernet coaxial cable be subdivided at lengths of 23 4 meters 76 8 feet or multiples of that length in order to minimize internal signal reflections These reflections reduce the signal strength for large networks On small networks such as tho...

Страница 64: ...bes the AUI connector pinouts GND Circuit Signal name 09 TX Transmit 10 TX Transmit 02 RX Receive 03 RX Receive 05 CD Collision Detect 06 CD Collision Detect 07 5 V 04 GND Pin Circuit Signal name 03 10 11 DO DO DO S Data Out transmit pair Data Out Data Out Shield 05 12 04 DI DI DI S Data In transmit pair Data In Data In Shield 07 15 08 CO CO COS Control Out optional Control Out Control Out Shield ...

Страница 65: ...d down Pin 1 is the left most pin and Pin 8 is the right most pin Figure B 2 RJ 45 connector and biscuit block pin outs Pin Circuit Signal name Color code 1 TD Data Transmit white blue 2 TD Data Transmit blue white 3 RD Data Receive white orange 4 Not used 5 Not used 6 RD Data Receive orange white 7 Not used 8 Not used 8 15 7 6 5 4 3 2 1 14 13 12 11 10 9 4 5 7 8 1 2 3 4 5 6 7 8 RJ 45 2 1 6 3 orang...

Отзывы: