Artusi ACH600X Скачать руководство пользователя страница 18

Please complete and send to ARTUSI at:   REPLY PAID 83617 

LEICHHARDT NSW 2040

Last Name:

First Name:

Address:

State:

Postcode:

Email:

Home Phone:

Mobile:

Purchase Date:        /         /                                                                   

(Please attach proof of purchase to validate warranty)

MODEL NUMBER

SERIAL NUMBER  

(if you cannot locate the serial number please call ARTUSI on 1300 694 583)

1

2

3

4

WARRANTY REGISTRATION CARD
01052013

01032014

5. Proof of Purchase
Customers must retain proof of purchase in order 

to be eligible to make a warranty claim in respect 

of an artusi product.

6. Claiming under the Warranty
Customers will bear the cost of claiming under 

this Warranty unless Worldwide Appliances 

determines the expenses are reasonable, in which 

case the customer must claim those expenses 

by providing written evidence of each expense 

to Worldwide Appliances at the address on the 

Warranty Registration Card.

7. Statutory Rights

(a) These terms and conditions do not affect your 

statutory rights.
(b) The limitations on the Warranty set out in this 

document do not exclude or limit the application 

of the consumer guarantees set out in the Act or 

any other equivalent or corresponding legislation 

in the relevant jurisdiction where to do so would:
(i) contravene the law of the relevant jurisdiction; 

or 
(ii) cause any part of the Warranty to be void.

(c) Worldwide Appliances excludes indirect or 

consequential loss of any kind (including, without 

limitation, loss of use of the artusi product) and 

(other than expressly provided for in these terms 

and conditions) subject to all terms,
conditions and warranties implied by custom, 

the general law, the Act or other statute.
(d) The liability of Worldwide Appliances to you 

for a breach of any express or non-excludable 

implied term, condition or warranty is limited at 

the option of Worldwide Appliances to:

(i) replacing or repairing the defective part of the 

artusi product;
(ii) paying the cost of replacing or repairing the 

defective part of the artusi product;
(iii) replacing the artusi product; or
(iv) paying the cost of replacing the artusi 

product.
(e) Our goods come with guarantees that cannot 

be excluded under the Australian Consumer 

Law. You are entitled to a replacement or refund 

for a major failure and for compensation for any 

other reasonably foreseeable loss or damage. 

You are also entitled to have the goods repaired 

or replaced if the goods fail to be of acceptable 

quality and the failure does not amount to a 

Warranty Card tear off

major failure.

8. Defects
Any part of an artusi product deemed to be 

defective and replaced by Worldwide Appliances 

is the property of Worldwide Appliances. 

Worldwide Appliances reserves the right to 

inspect and test artusi products in order to 

determine the extent of any defect and the 

validity of a claim under the Warranty.
*To locate your closest artusi authorised service 

agent please contact us on 1300 652 100 or visit 

www.artusi.com.au

ALL SERVICE CALLS MUST BE BOOKED THROUGH AN 

AUTHORISED DEALER OR WARRANTY DEPARTMENT 

ON 1300 652 100 OR stokesaps.com.au/artusi-

service


  01032014

Содержание ACH600X

Страница 1: ...ACH600X ACH900X OPERATION MANUAL APPLIANCES FOR LIVING...

Страница 2: ...will allow you to get the best results from using your appliance KEEP THE DOCUMENTATION OF THIS PRODUCT FOR FUTURE REFERENCE TO REGISTER YOUR PRODUCT WITH ARTUSI PLEASE FILL OUT THE WARRANTY CARD AT...

Страница 3: ...rmine the required clearance between the cooktop and the range hood always consult the installation manual for both the range hood and cooktop The required clearance is the greater of the distance spe...

Страница 4: ...lters and are a fire hazard F Never leave frying food unattended as the oil may catch on fire G Disconnect the hood from the power supply before any maintenance H Never allow persons with reduced phys...

Страница 5: ...lap 5 Bottom outer chimney flue 6 Top inner chimney flue 1 2 3 4 5 6 Also included Damper flap Chimney fixed bolster Drill hole stencil User instruction manual Congratulations on the purchase of our c...

Страница 6: ...and frequency on the rating plate located inside the hood Ensure the hood is installed so that the bottom of the hood is no less than 600mm and no more than 750mm above the cooking elements or burners...

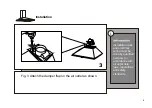
Страница 7: ...tion 3 Fig 3 Attach the damper flap on the air outlet as shown Installation work and electrical wiring must be done by qualified person s in accordance with all applicable laws regulations and safety...

Страница 8: ...the drill hole stencil mark the screw positions on the wall Drill four 8mm holes into the wall Put one expansion plug and one 10mm screw into each of the holes Screw the screws into place but not all...

Страница 9: ...Installation 6 6 7 Hang the hood body onto the screws First screw in the top 2 screws then the bottom 2 screws Adjust the level of the hood on the wall to be straight horizontally...

Страница 10: ...nning the installation 7 Attach the ducting hose to the air duct Vertical discharge of air Run the ducting through a cupboard and or into a space in the ceiling cavity to a roof cap Horizontal dischar...

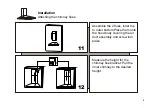
Страница 11: ...imney flues Assemble the 2 flues inner top to outer bottom Place them onto the hood body covering the air duct assembly and screw into place Measure the height for the chimney flue bracket Pull the in...

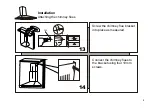
Страница 12: ...14 Screw the chimney flue bracket into place as measured Connect the chimney flues to the bracket using four 10mm screws Installation Attaching the chimney flues 9 13...

Страница 13: ...tton for the lights to turn ON Press again to turn OFF Push button 1 for low speed Push button 2 for medium speed Push button 3 for high speed Push button 0 to turn off the motor Hood Operation Cautio...

Страница 14: ...using the hood Open the filter and remove the old light bulb Replace with a new lightbulb no more than 40W Fig 17 Keep all lids oven cloths etc at least 450mm away from the lamps as they may cause the...

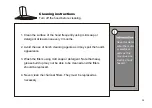
Страница 15: ...f harsh cleaning agents as it may spoil the hood s appearance 3 Wash the filters using mild soap or detergent Note that heavy grease build up may not be able to be cleaned and the filters should be re...

Страница 16: ...The manufacturer shall decline all responsibility when the recommendations and instructions regarding installation maintenance and use are not observed 13...

Страница 17: ...nchtop Models and Portable Gas Models 2 What is not Covered by the Warranty The Warranty does not apply if an artusi product is defective by a factor other than a defect arising in the manufacture of...

Страница 18: ...artusi product and other than expressly provided for in these terms and conditions subject to all terms conditions and warranties implied by custom the general law the Act or other statute d The liabi...

Страница 19: ......

Страница 20: ...e design specifications aesthetics and production techniques of its products As a result alterations to our products and designs take place continually Whilst every effort is made to produce informati...

Отзывы: