


5.4. Using the MiniFuse 2 as a MIDI device with your DAW
The MiniFuse 2 features standard 5-pin MIDI input and output ports on the rear panel that
can be used to connect MIDI-compatible devices to your computer.
While most MIDI controllers nowadays come with direct MIDI-over-USB connectivity, there are
devices like synthesizers and drum machines that only feature standard 5-pin MIDI input and output
ports. These devices can be connected to your computer and integrated into your workflow through the
MiniFuse.
IMPORTANT:
Note that MIDI input and output will only work once the MiniFuse Control
Center is installed on the computer. You can access the MiniFuse Control Center installation
by clicking the MiniFuse in your Finder / Explorer and visiting the link contained inside.
You may need to enable these MIDI ports in your DAW to be able to use them. Here we will
show you how to do this in several audio applications. The process will be similar in other
audio applications.
5.4.1. Configuring MIDI in Ableton Live
In Ableton Live, go to the Live menu and click
Preferences
.
In the Preferences window, click the
Link MIDI
tab to access the MIDI device settings.
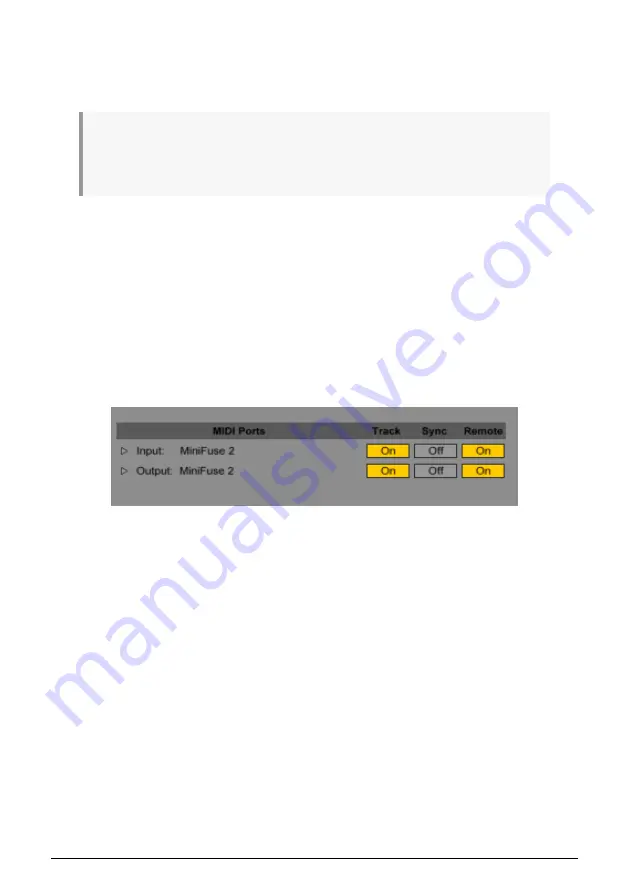
The MiniFuse 2 should be listed in the MIDI ports section.
• To receive MIDI notes from the MIDI IN port on the MiniFuse 2, enable the Track
input.
• To transmit MIDI notes to the MIDI OUT port on the MiniFuse 2, enable the Track
output.
• To receive continuous control (CC) data from the MIDI IN port on the MiniFuse 2,
enable Remote input.
• To transmit continuous control (CC) data to the MIDI OUT port on the MiniFuse 2,
enable Remote output.
16
Arturia - User Manual MiniFuse 2 - SETUP
Содержание MINIFUSE 2
Страница 1: ...USER MANUAL _MINIFUSE 2...


