


OPERATION OF GRINDER MIXER
21
OPERATION OF GRINDER MIXER
T
RACTOR
PTO
E
NGAGEMENT
The mixer may be operated by engaging the PTO.
Always engage the tractor PTO with the tractor
engine at idle speed. After the PTO is engaged,
increase the engine speed gradually until the
desired operating speed is obtained. Reverse the
PTO engagement steps to disengage the PTO.
For smooth PTO operation and to help increase the
life of the PTO driveline, make sure the tractor is
aligned straight with the frame of the grinder mixer
whenever possible.
IMPORTANT:
If mixing while in transport, avoid
sharp and unnecessary turns which may damage
the PTO driveline.
H
AMMERMILL
C
LUTCH
P
IN
CAUTION: BEFORE ENGAGING OR
DISENAGING THE CLUTCH PIN, MAKE
SURE THE HAMMERMILL HAS COME
TO A COMPLETE STOP AND SHUT OFF
THE TRACTOR BEFORE PROCEEDING
WITH THE NEXT STEP. PLACE THE KEY
IN YOUR POCKET.
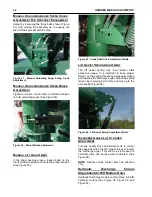
The hammermill clutch pin is located on the front of
the fly-wheel. (See Figure 16)
Make sure the
grinder mixer has come to a complete stop and
shut off the tractor before proceeding with the
next step.
To engage the hammermill, turn the fly-
wheel by hand to align one of the six slots in the fly-
wheel with the pin. Push in the pin and turn 1/4 turn
in either direction to lock it in place. To disengage
the hammermill, push in the pin, turn 1/4 turn, and
release.
CAUTION: ALWAYS OPERATE PTO AT
THE SAME SPEED FOR WHICH THE
GRINDER MIXER IS EQUIPPED; 540
RPM. NOTE THE SPEED DECAL ON THE
FRONT SHIELD OF GRINDER MIXER.
Figure 16 - Hammermill Clutch Pin (Pin Disengaged
In Photo And Shields Removed For Clarity).
F
EED
G
ATE
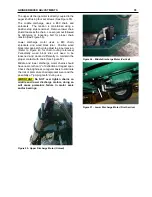
A feed gate is provided in the mill throat with a
rubber baffle (removed for roll feed installation)
behind it. (See Figure 17) The feed gate should be
set to the lowest possible position to allow material
to flow into the hammermill evenly.
Figure 17 - Feed Gate At Throat Of The Hammermill.
H
AY
R
ETARD
B
OLTS
The hay retard bolts will help maintain uniform
feeding while grinding hay. (See Figure 18) The
degree of the retard is adjusted by loosening the
lock nuts on each of the retard bolts and turning the
bolts in (increase) or out (decrease) to the desired
position. Secure the bolts by tightening the lock
nuts.
Содержание CATTLEMAXX 6105
Страница 7: ...TABLE OF CONTENTS 5 ...
Страница 14: ...12 INTRODUCTION Figure 5a Safety Decals ...
Страница 22: ...20 PREPAIRING THE GINDER MIXER FOR OPERATION Figure 15 PTO Support ...
Страница 27: ...OPERATION OF GRINDER MIXER 25 cleaned out Keep all bystanders away from the machine ...
Страница 42: ...40 LUBRICATION Figure 70 Hammermill engaging pin shields removed for clarity ...
Страница 49: ...SERVICE 47 Figure 96 Belt Removal Shields Removed For Clarity B C ...
Страница 78: ...76 OPERATION OF CATTLEMAXX Figure 143 Hopper Inspection Window ...


